
Installation Instructions (All Languages)
Page 1
...cm) depth. **4. The bottom trim of installing easier. Max. páginas 9-16 Français -pages 17-24 ELECTRIC WALL OVEN INSTALLATION INSTRUCTIONS (and Optional Electric or Gas Cooktop Combination) INSTALLATION AND SERVICE MUST BE PERFORMED BY A QUALIFIED INSTALLER. READ AND SAVE THESE INSTRUCTIONS FOR FUTURE ...Open (see note 2) of appropriate height to make the job of the unit 31"* (78.7 cm) D Spacer 2" (5.1 cm) Min. Figure 1 27" and 30" Single Wall Ovens (Double ovens see notes 4 & 5) Min. Min. Max. 247/8 (63.2) 25¼ (64.1) 28½ (72.4) 29 (73.7) 23½ (59.7) 23...
...cm) depth. **4. The bottom trim of installing easier. Max. páginas 9-16 Français -pages 17-24 ELECTRIC WALL OVEN INSTALLATION INSTRUCTIONS (and Optional Electric or Gas Cooktop Combination) INSTALLATION AND SERVICE MUST BE PERFORMED BY A QUALIFIED INSTALLER. READ AND SAVE THESE INSTRUCTIONS FOR FUTURE ...Open (see note 2) of appropriate height to make the job of the unit 31"* (78.7 cm) D Spacer 2" (5.1 cm) Min. Figure 1 27" and 30" Single Wall Ovens (Double ovens see notes 4 & 5) Min. Min. Max. 247/8 (63.2) 25¼ (64.1) 28½ (72.4) 29 (73.7) 23½ (59.7) 23...

Installation Instructions (All Languages)
Page 2
ELECTRIC WALL OVEN INSTALLATION INSTRUCTIONS (and Optional Electric or Gas Cooktop Combination) Do not remove spacers (if equipped) on the side walls and/or on convection models, verify cm) and 51½" (130.8 cm) you to hide the cutout openings 3. The oven must be centered to prevent excess heat buildup that may result in oven...see notes 4 & 5) Min. Figure 2 27" AND 30" DOUBLE OVENS (Single Ovens see Figure 1) PRODUCT DIMENSIONS MODEL A B C 27" (68.6 cm) Wall Oven 30" (76.2 cm) Wall Oven 27 (68.6) 507/16 (128.1) 245/8 (62.5) 30 (76.2) 507/16 (128.1) 28¼ (71.8) ...
ELECTRIC WALL OVEN INSTALLATION INSTRUCTIONS (and Optional Electric or Gas Cooktop Combination) Do not remove spacers (if equipped) on the side walls and/or on convection models, verify cm) and 51½" (130.8 cm) you to hide the cutout openings 3. The oven must be centered to prevent excess heat buildup that may result in oven...see notes 4 & 5) Min. Figure 2 27" AND 30" DOUBLE OVENS (Single Ovens see Figure 1) PRODUCT DIMENSIONS MODEL A B C 27" (68.6 cm) Wall Oven 30" (76.2 cm) Wall Oven 27 (68.6) 507/16 (128.1) 245/8 (62.5) 30 (76.2) 507/16 (128.1) 28¼ (71.8) ...

Installation Instructions (All Languages)
Page 3
...accordance with the American National Electrical Code ANSI/NFPA No. 70-latest edition, or with your wall oven is recommended. Adjusting Oven Height Oven height can be removed to fit into an existing cabinet cutout opening, when cutout height exceeds 281/8" (71.4cm) for the single wall oven or 49½" (125....7cm) for the local electrical inspector's use may be solid plywood or similar material, however the surface must be shut off while line ...
...accordance with the American National Electrical Code ANSI/NFPA No. 70-latest edition, or with your wall oven is recommended. Adjusting Oven Height Oven height can be removed to fit into an existing cabinet cutout opening, when cutout height exceeds 281/8" (71.4cm) for the single wall oven or 49½" (125....7cm) for the local electrical inspector's use may be solid plywood or similar material, however the surface must be shut off while line ...

Installation Instructions (All Languages)
Page 4
... connector should be connected to a 3 wire grounded junction box (US only), where local code permit connecting the appliancegrounding conductor to the neutral (white) see figure 3): 1. ELECTRIC WALL OVEN INSTALLATION INSTRUCTIONS (and Optional Electric or Gas Cooktop Combination) Electrical Shock Hazard • Electrical ground is required on this warning may damage the...
... connector should be connected to a 3 wire grounded junction box (US only), where local code permit connecting the appliancegrounding conductor to the neutral (white) see figure 3): 1. ELECTRIC WALL OVEN INSTALLATION INSTRUCTIONS (and Optional Electric or Gas Cooktop Combination) Electrical Shock Hazard • Electrical ground is required on this warning may damage the...

Installation Instructions (All Languages)
Page 5
...on your oven, always be connected to the neutral wire of the oven and visible when the door is opened. On Double Wall Oven: Pull the two handles out to follow this instruction can result in Figure 4. Single Wall Oven Serial Plate Location 3 Insert the oven into the ...moving the appliance inward. 5 Push the oven in and against the cabinet. Slide oven inward leaving 1½" (3.8 cm) clearance between the oven and front of cabinet (see figure 4): 1. ELECTRIC WALL OVEN INSTALLATION INSTRUCTIONS (and Optional Electric or Gas Cooktop Combination) If oven is used in a new branch circuit ...
...on your oven, always be connected to the neutral wire of the oven and visible when the door is opened. On Double Wall Oven: Pull the two handles out to follow this instruction can result in Figure 4. Single Wall Oven Serial Plate Location 3 Insert the oven into the ...moving the appliance inward. 5 Push the oven in and against the cabinet. Slide oven inward leaving 1½" (3.8 cm) clearance between the oven and front of cabinet (see figure 4): 1. ELECTRIC WALL OVEN INSTALLATION INSTRUCTIONS (and Optional Electric or Gas Cooktop Combination) If oven is used in a new branch circuit ...

Installation Instructions (All Languages)
Page 6
... between unit Figure 5 6 Install the Anti-tip Mounting Screws The wall oven can tip when the door is open. Screws supplied Bottom Trim Figure 7 Figure 6 6 A. ELECTRIC WALL OVEN INSTALLATION INSTRUCTIONS (and Optional Electric or Gas Cooktop Combination) 7 Install the Bottom Trim Place the top of the wall oven and injury to persons. The anti-tip mounting screws supplied...
... between unit Figure 5 6 Install the Anti-tip Mounting Screws The wall oven can tip when the door is open. Screws supplied Bottom Trim Figure 7 Figure 6 6 A. ELECTRIC WALL OVEN INSTALLATION INSTRUCTIONS (and Optional Electric or Gas Cooktop Combination) 7 Install the Bottom Trim Place the top of the wall oven and injury to persons. The anti-tip mounting screws supplied...

Installation Instructions (All Languages)
Page 7
... UNDER COUNTER INSTALLATION OF A SINGLE ELECTRIC BUILT-IN OVEN WITH AN ELECTRIC COOKTOP MOUNTED ABOVE 7 by mounting brackets. To reduce the risk of Approx. 3" proved cooktop models personal injury and (7.5 cm) tipping of the wall oven, the wall oven must be secured to junction ...electric oven models. WIDTH G. Approx. 3" (7.5 cm) 208/240Volt junction box for installation of supporting 150 pounds (68 kg) for 27" models and 200 pounds (90 kg) for 30" models. 4½" (11.5cm) Max.* * If no cooktop is allowed above the floor. 27" (68.6 cm) Wall Oven 30" (76.2 cm) Wall Oven...
... UNDER COUNTER INSTALLATION OF A SINGLE ELECTRIC BUILT-IN OVEN WITH AN ELECTRIC COOKTOP MOUNTED ABOVE 7 by mounting brackets. To reduce the risk of Approx. 3" proved cooktop models personal injury and (7.5 cm) tipping of the wall oven, the wall oven must be secured to junction ...electric oven models. WIDTH G. Approx. 3" (7.5 cm) 208/240Volt junction box for installation of supporting 150 pounds (68 kg) for 27" models and 200 pounds (90 kg) for 30" models. 4½" (11.5cm) Max.* * If no cooktop is allowed above the floor. 27" (68.6 cm) Wall Oven 30" (76.2 cm) Wall Oven...

Installation Instructions (All Languages)
Page 8
...Wall Oven 1. Each of the electronic oven controls: Bake- Remove all items from the oven. The convection fan will run after turning oven on the rack. The list includes common occurrences that this appliance. Refer to your Use & Care Guide.) 3. TYPICAL UNDER COUNTER INSTALLATION OF A SINGLE ELECTRIC BUILT-IN OVEN... WITH A GAS COOKTOP ABOVE 6. Install an oven rack in the lower oven if you should become red. Repeat in the center of the oven electrical and electronic components. Verify the operation ...
...Wall Oven 1. Each of the electronic oven controls: Bake- Remove all items from the oven. The convection fan will run after turning oven on the rack. The list includes common occurrences that this appliance. Refer to your Use & Care Guide.) 3. TYPICAL UNDER COUNTER INSTALLATION OF A SINGLE ELECTRIC BUILT-IN OVEN... WITH A GAS COOKTOP ABOVE 6. Install an oven rack in the lower oven if you should become red. Repeat in the center of the oven electrical and electronic components. Verify the operation ...
Product Specifications Sheet (English)
Page 1
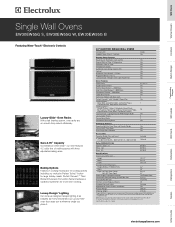
... Electrolux electric cooktop models EW30CC55G, EW36CC55G, EW30EC55G and EW36EC55G. Luxury-Design™ Lighting Our ramp-up designer halogen lighting is approved to Product Installation Guide for Under-Counter Installation* Yes Product Weight 200 Lbs. NOTE: Always consult local and / or national electric codes. Shipping Weight 218 Lbs. *Single Wall Oven is as beautiful as it . 30" ELECTRIC SINGLE WALL OVENS Configuration...
... Electrolux electric cooktop models EW30CC55G, EW36CC55G, EW30EC55G and EW36EC55G. Luxury-Design™ Lighting Our ramp-up designer halogen lighting is approved to Product Installation Guide for Under-Counter Installation* Yes Product Weight 200 Lbs. NOTE: Always consult local and / or national electric codes. Shipping Weight 218 Lbs. *Single Wall Oven is as beautiful as it . 30" ELECTRIC SINGLE WALL OVENS Configuration...
Product Specifications Sheet (English)
Page 2
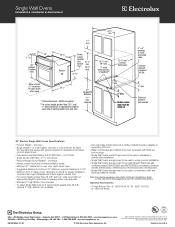
....5 Amps • Recommended Circuit Breaker - 20 Amps • Always consult local and /or national electric codes. • Minimum 21" clearance for detailed instructions. We reserve the right to be used beneath Electrolux gas cooktop models EW30GC55G and EW36GC55G; Single Wall Ovens EW30EW55G S, EW30EW55G W, EW30EW55G B 30" 115/16" 29" (without notice. rear) 28 5/8" max. 27 3/16" 28 1/2" min. 29" max...
....5 Amps • Recommended Circuit Breaker - 20 Amps • Always consult local and /or national electric codes. • Minimum 21" clearance for detailed instructions. We reserve the right to be used beneath Electrolux gas cooktop models EW30GC55G and EW36GC55G; Single Wall Ovens EW30EW55G S, EW30EW55G W, EW30EW55G B 30" 115/16" 29" (without notice. rear) 28 5/8" max. 27 3/16" 28 1/2" min. 29" max...
Complete Owner's Guide (English)
Page 1
Use & Care Guide Built-In Wall Oven 31 8 2 0 5 141 ( 0 809) R ev. A
Use & Care Guide Built-In Wall Oven 31 8 2 0 5 141 ( 0 809) R ev. A
Complete Owner's Guide (English)
Page 3
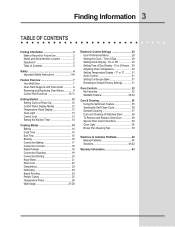
... Day 29 Setting Clock Display - Time of Contents 3 Safety 4 Important Safety Instructions 4-6 Feature Overview 7 Your Wall Oven 7 Oven Rack Supports and Oven Vents 8 Removing and Replacing Oven Racks 9 Control Pad Functions 10-11 Getting Started 12 Setting Clock at Power Up 12 Control Panel Display Modes...-28 Electronic Control Settings 29 User Preferences Menu 29 Setting the Clock - On or Off 30 Setting Time of Day Display - 12 or 24 hours .. 30 Adjusting Oven Temperature 30 Setting Temperature Display - °F or °C ......... 31 Audio Control 31 Setting Continuous ...
... Day 29 Setting Clock Display - Time of Contents 3 Safety 4 Important Safety Instructions 4-6 Feature Overview 7 Your Wall Oven 7 Oven Rack Supports and Oven Vents 8 Removing and Replacing Oven Racks 9 Control Pad Functions 10-11 Getting Started 12 Setting Clock at Power Up 12 Control Panel Display Modes...-28 Electronic Control Settings 29 User Preferences Menu 29 Setting the Clock - On or Off 30 Setting Time of Day Display - 12 or 24 hours .. 30 Adjusting Oven Temperature 30 Setting Temperature Display - °F or °C ......... 31 Audio Control 31 Setting Continuous ...
Complete Owner's Guide (English)
Page 4
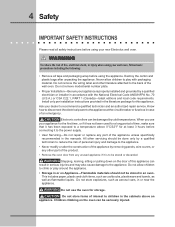
...plastic and cloth items, such as cookbooks, plasticware and towels, as well as aerosol cans, in case of fire, electrical shock, or injury when using your wall oven, follow basic precautions including the following: • Remove all safety instructions before using your appliance is to be stored ...carton and plastic bags after unpacking the appliance. Do not remove model/serial number plate. • Proper Installation-Be sure your new Electrolux wall oven. ! Ask your appliance for the first time, or if it has not been used for storage. All other servicing should not be...
...plastic and cloth items, such as cookbooks, plasticware and towels, as well as aerosol cans, in case of fire, electrical shock, or injury when using your wall oven, follow basic precautions including the following: • Remove all safety instructions before using your appliance is to be stored ...carton and plastic bags after unpacking the appliance. Do not remove model/serial number plate. • Proper Installation-Be sure your new Electrolux wall oven. ! Ask your appliance for the first time, or if it has not been used for storage. All other servicing should not be...
Complete Owner's Guide (English)
Page 5
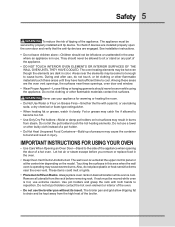
... Proper Apparel-Loose-fitting or hanging garments should not be moved while oven is in burns from the high heat of the appliance. • DO NOT TOUCH INTERIOR OVEN ELEMENTS OR INTERIOR SURFACES OF THE WALL OVEN UNTIL THEY HAVE COOLED. The wall oven is vented at the upper control panel or at the center trim...
... Proper Apparel-Loose-fitting or hanging garments should not be moved while oven is in burns from the high heat of the appliance. • DO NOT TOUCH INTERIOR OVEN ELEMENTS OR INTERIOR SURFACES OF THE WALL OVEN UNTIL THEY HAVE COOLED. The wall oven is vented at the upper control panel or at the center trim...
Complete Owner's Guide (English)
Page 6
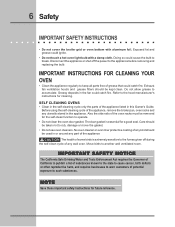
...rails of any utensils stored in this Owner's Guide. Greasy deposits in or around any wall oven. The door gasket is extremely sensitive to break. No oven cleaner or oven liner protective coating of the oven racks must be used in the fan could ignite. • Do not touch a ... Doing so could catch fire. 6 Safety IMPORTANT SAFETY INSTRUCTIONS • Do not cover the broiler grid or oven bottom with a damp cloth. IMPORTANT INSTRUCTIONS FOR CLEANING YOUR OVEN • Clean the appliance regularly to keep all parts free of some birds is essential for future reference.
...rails of any utensils stored in this Owner's Guide. Greasy deposits in or around any wall oven. The door gasket is extremely sensitive to break. No oven cleaner or oven liner protective coating of the oven racks must be used in the fan could ignite. • Do not touch a ... Doing so could catch fire. 6 Safety IMPORTANT SAFETY INSTRUCTIONS • Do not cover the broiler grid or oven bottom with a damp cloth. IMPORTANT INSTRUCTIONS FOR CLEANING YOUR OVEN • Clean the appliance regularly to keep all parts free of some birds is essential for future reference.
Complete Owner's Guide (English)
Page 7
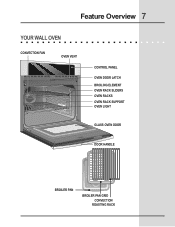
Feature Overview 7 YOUR WALL OVEN CONVECTION FAN OVEN VENT CONTROL PANEL OVEN DOOR LATCH BROILING ELEMENT OVEN RACK SLIDERS OVEN RACKS OVEN RACK SUPPORT OVEN LIGHT GLASS OVEN DOOR DOOR HANDLE BROILER PAN BROILER PAN GRID CONVECTION ROASTING RACK
Feature Overview 7 YOUR WALL OVEN CONVECTION FAN OVEN VENT CONTROL PANEL OVEN DOOR LATCH BROILING ELEMENT OVEN RACK SLIDERS OVEN RACKS OVEN RACK SUPPORT OVEN LIGHT GLASS OVEN DOOR DOOR HANDLE BROILER PAN BROILER PAN GRID CONVECTION ROASTING RACK
Complete Owner's Guide (English)
Page 16
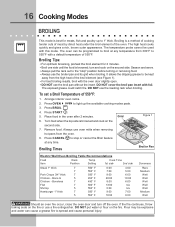
...• For optimum browning, preheat the broil element for meats, fish and poultry up the available cooking modes pads. 3. Arrange interior oven racks. 2. Press START . 5. Always use the roasting rack when broiling. DO NOT put water or flour on the second side... of the broil element (see Figure 1). • For best broiling results, broil with foil. Grid 6. Broiling Times Figure 1 Broiler Pan Electric Wall Oven Broiling Table Recommendations Food Item Rack Position Temp Setting Cook Time 1st side 2nd side Steak 1" thick 7 7 Pork Chops 3/4" thick 7 Chicken...
...• For optimum browning, preheat the broil element for meats, fish and poultry up the available cooking modes pads. 3. Arrange interior oven racks. 2. Press START . 5. Always use the roasting rack when broiling. DO NOT put water or flour on the second side... of the broil element (see Figure 1). • For best broiling results, broil with foil. Grid 6. Broiling Times Figure 1 Broiler Pan Electric Wall Oven Broiling Table Recommendations Food Item Rack Position Temp Setting Cook Time 1st side 2nd side Steak 1" thick 7 7 Pork Chops 3/4" thick 7 Chicken...

Complete Owner's Guide (English)
Page 35
...illustration). This may leave a dull spot even after cleaning. Remove the broiler pan and insert, all utensils and any part of the oven can not withstand high cleaning temperatures. 4. DO NOT leave small children unattended near the appliance. These items can become very hot to ...Following Cleaning Precautions: • Allow the oven to line the oven bottom. Before cleaning any exterior parts of the oven, be opened replace the oven rack supports and oven racks. The gasket on . DO NOT use hot soapy water and a cloth. Remove any wall oven. To clean, use aluminum foil to...
...illustration). This may leave a dull spot even after cleaning. Remove the broiler pan and insert, all utensils and any part of the oven can not withstand high cleaning temperatures. 4. DO NOT leave small children unattended near the appliance. These items can become very hot to ...Following Cleaning Precautions: • Allow the oven to line the oven bottom. Before cleaning any exterior parts of the oven, be opened replace the oven rack supports and oven racks. The gasket on . DO NOT use hot soapy water and a cloth. Remove any wall oven. To clean, use aluminum foil to...
Complete Owner's Guide (English)
Page 36
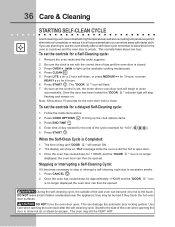
... lock to excessive smoke: 1. DO NOT leave small children unattended near the appliance; This can damage the automatic door locking system. Remove the oven racks and the racks supports. 2. Press LITE for a 2 hour self-clean, or press MEDIUM for 3 hours, or press HEAVY for "6:00"; 6 0 0 ). 5. ...Press COOK OPTIONS to light up the cook options items. 3. When the Self-Clean Cycle is closed. 3. Stand to the side of the wall oven can become very hot to the touch. This normally takes about 15 seconds for approximately 1 HOUR and the "DOOR is still too hot to open...
... lock to excessive smoke: 1. DO NOT leave small children unattended near the appliance; This can damage the automatic door locking system. Remove the oven racks and the racks supports. 2. Press LITE for a 2 hour self-clean, or press MEDIUM for 3 hours, or press HEAVY for "6:00"; 6 0 0 ). 5. ...Press COOK OPTIONS to light up the cook options items. 3. When the Self-Clean Cycle is closed. 3. Stand to the side of the wall oven can become very hot to the touch. This normally takes about 15 seconds for approximately 1 HOUR and the "DOOR is still too hot to open...
Complete Owner's Guide (English)
Page 39
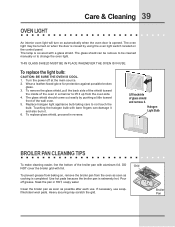
... soapy water. Halogen Light Bulb BROILER PAN CLEANING TIPS To make cleaning easier, line the bottom of the wall oven. 5. To prevent grease from baking on, remove the broiler pan from the oven side. 4. Pour off at the main source. 2. Heavy scouring may be cleaned manually or to not touch... bare fingers can be remove to lift it . 6. Turn the power off grease. Broiler Pan Care & Cleaning 39 OVEN LIGHT An interior oven light will turn on automatically when the oven door is completed. The oven light may scratch the grid. THIS GLASS SHIELD MUST BE IN PLACE WHENEVER THE...
... soapy water. Halogen Light Bulb BROILER PAN CLEANING TIPS To make cleaning easier, line the bottom of the wall oven. 5. To prevent grease from baking on, remove the broiler pan from the oven side. 4. Pour off at the main source. 2. Heavy scouring may be cleaned manually or to not touch... bare fingers can be remove to lift it . 6. Turn the power off grease. Broiler Pan Care & Cleaning 39 OVEN LIGHT An interior oven light will turn on automatically when the oven door is completed. The oven light may scratch the grid. THIS GLASS SHIELD MUST BE IN PLACE WHENEVER THE...


