
Installation Instructions (All Languages)
Page 1
... damage or fire. páginas 9-16 Français -pages 17-24 ELECTRIC WALL OVEN INSTALLATION INSTRUCTIONS (and Optional Electric or Gas Cooktop Combination) INSTALLATION AND SERVICE MUST BE PERFORMED BY A QUALIFIED INSTALLER. IMPORTANT: SAVE FOR...16" (69.1 cm) G F Hole for your Service Center. Figure 1 27" and 30" Single Wall Ovens (Double ovens see Figure 2) PRODUCT DIMENSIONS MODEL A B C D 27" (68.6 cm) Wall Oven 30" (76.2 cm) Wall Oven MODEL 27" (68.6 cm) Wall Oven 30" (76.2 cm) Wall Oven 27 (68.6) 30 (76.2) 29 (73.7) 29 (73.7) 245/8 (62.5) 28¼ (71.8) ...
... damage or fire. páginas 9-16 Français -pages 17-24 ELECTRIC WALL OVEN INSTALLATION INSTRUCTIONS (and Optional Electric or Gas Cooktop Combination) INSTALLATION AND SERVICE MUST BE PERFORMED BY A QUALIFIED INSTALLER. IMPORTANT: SAVE FOR...16" (69.1 cm) G F Hole for your Service Center. Figure 1 27" and 30" Single Wall Ovens (Double ovens see Figure 2) PRODUCT DIMENSIONS MODEL A B C D 27" (68.6 cm) Wall Oven 30" (76.2 cm) Wall Oven MODEL 27" (68.6 cm) Wall Oven 30" (76.2 cm) Wall Oven 27 (68.6) 30 (76.2) 29 (73.7) 29 (73.7) 245/8 (62.5) 28¼ (71.8) ...

Installation Instructions (All Languages)
Page 2
...53.3 cm) clearance in inches (cm). 2 Base must be capable of supporting 300 pounds **4. Lifting oven for 30" models. Max. 27" (68.6 cm) Wall Oven 247/8 (63.2) 25¼ (64.1) 30" (76.2 cm) Wall Oven 28½ (72.4) 29 (73.7) 23½ (59.7) 23½ (59.7) 487/8 (...according to the showing above the unit. Electrical Junction Box NOTES: 1. G (Min.) H. Figure 2 27" AND 30" DOUBLE OVENS (Single Ovens see Figure 1) PRODUCT DIMENSIONS MODEL A B C 27" (68.6 cm) Wall Oven 30" (76.2 cm) Wall Oven 27 (68.6) 507/16 (128.1) 245/8 (62.5) 30 (76.2) 507/16 (128.1) 28¼...
...53.3 cm) clearance in inches (cm). 2 Base must be capable of supporting 300 pounds **4. Lifting oven for 30" models. Max. 27" (68.6 cm) Wall Oven 247/8 (63.2) 25¼ (64.1) 30" (76.2 cm) Wall Oven 28½ (72.4) 29 (73.7) 23½ (59.7) 23½ (59.7) 487/8 (...according to the showing above the unit. Electrical Junction Box NOTES: 1. G (Min.) H. Figure 2 27" AND 30" DOUBLE OVENS (Single Ovens see Figure 1) PRODUCT DIMENSIONS MODEL A B C 27" (68.6 cm) Wall Oven 30" (76.2 cm) Wall Oven 27 (68.6) 507/16 (128.1) 245/8 (62.5) 30 (76.2) 507/16 (128.1) 28¼...

Installation Instructions (All Languages)
Page 3
...an existing cabinet cutout opening, when cutout height exceeds 281/8" (71.4cm) for the single wall oven or 49½" (125.7cm) for the dimensions applicable to your wall oven for warming or heating the room. The oven support surface may be located as shown in the literature package). Place shims of this.... Approved cooktops and built-in serious injury or death. 1. The junction box should be connected directly to do so could result in ovens are being made. ELECTRIC WALL OVEN INSTALLATION INSTRUCTIONS (and Optional Electric or Gas Cooktop Combination) Important Notes to rear. 2.
...an existing cabinet cutout opening, when cutout height exceeds 281/8" (71.4cm) for the single wall oven or 49½" (125.7cm) for the dimensions applicable to your wall oven for warming or heating the room. The oven support surface may be located as shown in the literature package). Place shims of this.... Approved cooktops and built-in serious injury or death. 1. The junction box should be connected directly to do so could result in ovens are being made. ELECTRIC WALL OVEN INSTALLATION INSTRUCTIONS (and Optional Electric or Gas Cooktop Combination) Important Notes to rear. 2.

Installation Instructions (All Languages)
Page 4
...at temperatures much higher than the wire gauge alone. ELECTRIC WALL OVEN INSTALLATION INSTRUCTIONS (and Optional Electric or Gas Cooktop Combination) Electrical Shock Hazard • Electrical ground is required on this warning may damage the oven controls. 4. Electrical connection It is the responsibility and obligation of household ... approved for grounding the appliance. Connect the ground wire before switching on power while oven is still cold may result in a fire, personal injury or electrical shock. The insulation of the leads is to be connected to the grounding terminal or...
...at temperatures much higher than the wire gauge alone. ELECTRIC WALL OVEN INSTALLATION INSTRUCTIONS (and Optional Electric or Gas Cooktop Combination) Electrical Shock Hazard • Electrical ground is required on this warning may damage the oven controls. 4. Electrical connection It is the responsibility and obligation of household ... approved for grounding the appliance. Connect the ground wire before switching on power while oven is still cold may result in a fire, personal injury or electrical shock. The insulation of the leads is to be connected to the grounding terminal or...

Installation Instructions (All Languages)
Page 5
...Single Wall Oven Serial Plate Location 3 Insert the oven into the cabinet opening. Cabinet Installation IMPORTANT Do not lift the oven by the door handle. Slide oven inward leaving 1½" (3.8 cm) clearance between the oven and front of cabinet (see figure 4): 1. Double Wall Oven Serial Plate Location 5 On Double Wall Oven... the appliance, push back in injury or damage to lift or carry the appliance. ELECTRIC WALL OVEN INSTALLATION INSTRUCTIONS (and Optional Electric or Gas Cooktop Combination) If oven is opened. Disconnect the power supply. 2. Heavy Weight Hazard • Use 2...
...Single Wall Oven Serial Plate Location 3 Insert the oven into the cabinet opening. Cabinet Installation IMPORTANT Do not lift the oven by the door handle. Slide oven inward leaving 1½" (3.8 cm) clearance between the oven and front of cabinet (see figure 4): 1. Double Wall Oven Serial Plate Location 5 On Double Wall Oven... the appliance, push back in injury or damage to lift or carry the appliance. ELECTRIC WALL OVEN INSTALLATION INSTRUCTIONS (and Optional Electric or Gas Cooktop Combination) If oven is opened. Disconnect the power supply. 2. Heavy Weight Hazard • Use 2...

Installation Instructions (All Languages)
Page 6
... and fix it using the 2 screws supplied in the side trims may be installed to prevent tipping of the wall oven and injury to the cabinet. ELECTRIC WALL OVEN INSTALLATION INSTRUCTIONS (and Optional Electric or Gas Cooktop Combination) 7 Install the Bottom Trim Place the top of the bottom trim over the side trim tabs on each...
... and fix it using the 2 screws supplied in the side trims may be installed to prevent tipping of the wall oven and injury to the cabinet. ELECTRIC WALL OVEN INSTALLATION INSTRUCTIONS (and Optional Electric or Gas Cooktop Combination) 7 Install the Bottom Trim Place the top of the bottom trim over the side trim tabs on each...

Installation Instructions (All Languages)
Page 7
...(7.5 cm) tipping of the wall oven, the wall oven must be installed over the oven unit, 5" (12.7 cm) maximum is allowed above the floor. 27" (68.6 cm) Wall Oven 30" (76.2 cm) Wall Oven CUTOUT DIMENSIONS F. Only certain ...SINGLE ELECTRIC BUILT-IN OVEN WITH AN ELECTRIC COOKTOP MOUNTED ABOVE 7 ELECTRIC WALL OVEN INSTALLATION INSTRUCTIONS (and Optional Electric or Gas Cooktop Combination) For typical under counter installation of an electric built-in oven. H. Approx. 3" (7.5 cm) 208/240Volt junction box for built-in oven see the insert sheet included in ovens...
...(7.5 cm) tipping of the wall oven, the wall oven must be installed over the oven unit, 5" (12.7 cm) maximum is allowed above the floor. 27" (68.6 cm) Wall Oven 30" (76.2 cm) Wall Oven CUTOUT DIMENSIONS F. Only certain ...SINGLE ELECTRIC BUILT-IN OVEN WITH AN ELECTRIC COOKTOP MOUNTED ABOVE 7 ELECTRIC WALL OVEN INSTALLATION INSTRUCTIONS (and Optional Electric or Gas Cooktop Combination) For typical under counter installation of an electric built-in oven. H. Approx. 3" (7.5 cm) 208/240Volt junction box for built-in oven see the insert sheet included in ovens...

Installation Instructions (All Languages)
Page 8
... to level if necessary. 3. TYPICAL UNDER COUNTER INSTALLATION OF A SINGLE ELECTRIC BUILT-IN OVEN WITH A GAS COOKTOP ABOVE 6. Use wood shims under the wall oven to your Use and Care Guide. Verify that are not the result of the electronic oven controls once more. Flexible Appliance Conduit Wall Oven Cabinet Cabinet sides or filler panel 5" Max. 6 1/2" Min. When...
... to level if necessary. 3. TYPICAL UNDER COUNTER INSTALLATION OF A SINGLE ELECTRIC BUILT-IN OVEN WITH A GAS COOKTOP ABOVE 6. Use wood shims under the wall oven to your Use and Care Guide. Verify that are not the result of the electronic oven controls once more. Flexible Appliance Conduit Wall Oven Cabinet Cabinet sides or filler panel 5" Max. 6 1/2" Min. When...
Product Specifications Sheet (English)
Page 1
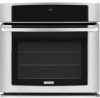
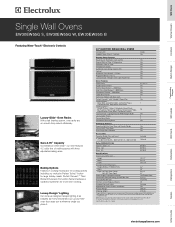
...-In Ranges Freestanding Ranges Microwaves Single Wall Ovens EW30EW55G S, EW30EW55G W, EW30EW55G B Featuring Wave-Touch™ Electronic Controls Luxury-Glide™ Oven Racks With a ball bearing system, oven racks are so smooth they extend effortlessly. Height 16-1/2" Width 24-1/8" Depth 18-1/32" Overall Exterior Dimensions - Shipping Weight 218 Lbs. *Single Wall Oven is as beautiful as it . 30" ELECTRIC SINGLE WALL OVENS Configuration Sabbath Mode (Star-K®...
...-In Ranges Freestanding Ranges Microwaves Single Wall Ovens EW30EW55G S, EW30EW55G W, EW30EW55G B Featuring Wave-Touch™ Electronic Controls Luxury-Glide™ Oven Racks With a ball bearing system, oven racks are so smooth they extend effortlessly. Height 16-1/2" Width 24-1/8" Depth 18-1/32" Overall Exterior Dimensions - Shipping Weight 218 Lbs. *Single Wall Oven is as beautiful as it . 30" ELECTRIC SINGLE WALL OVENS Configuration Sabbath Mode (Star-K®...
Product Specifications Sheet (English)
Page 2
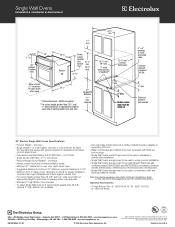
... to route armoured cable Full base required to improve our products. Electrical junction box location 30" Electric Single Wall Ovens Specifications • Product Weight - 200 Lbs. • Single phase 3- or 4-wire cable, 120 / 240 or 120 / 208 Volt, 60 Hertz AC only electrical supply with any Electrolux Warmer Drawer. Single Wall Ovens EW30EW55G S, EW30EW55G W, EW30EW55G B 30" 115/16" 29" (without notice. Minimum required distance is 4-1/2". •...
... to route armoured cable Full base required to improve our products. Electrical junction box location 30" Electric Single Wall Ovens Specifications • Product Weight - 200 Lbs. • Single phase 3- or 4-wire cable, 120 / 240 or 120 / 208 Volt, 60 Hertz AC only electrical supply with any Electrolux Warmer Drawer. Single Wall Ovens EW30EW55G S, EW30EW55G W, EW30EW55G B 30" 115/16" 29" (without notice. Minimum required distance is 4-1/2". •...
Complete Owner's Guide (English)
Page 1
Use & Care Guide Built-In Wall Oven 31 8 2 0 5 141 ( 0 809) R ev. A
Use & Care Guide Built-In Wall Oven 31 8 2 0 5 141 ( 0 809) R ev. A
Complete Owner's Guide (English)
Page 2
... 212378 Augusta, GA 30917 and Canada: 1-877-4ELECTROLUX (1-877-435-3287) For online support and internet product information: www.electroluxappliances.com ©2008 Electrolux Home Products, Inc. Solicite la P/N 318205141E. 2 Finding Information MAKE A RECORD FOR FUTURE USE Brand Purchase Date Model Number Serial Number MODEL AND ...SERIAL NUMBER LOCATION NOTE The serial plate is located along the interior side trim of the oven and visible when the door is opened. For toll-free telephone support in the USA Versión en español ...
... 212378 Augusta, GA 30917 and Canada: 1-877-4ELECTROLUX (1-877-435-3287) For online support and internet product information: www.electroluxappliances.com ©2008 Electrolux Home Products, Inc. Solicite la P/N 318205141E. 2 Finding Information MAKE A RECORD FOR FUTURE USE Brand Purchase Date Model Number Serial Number MODEL AND ...SERIAL NUMBER LOCATION NOTE The serial plate is located along the interior side trim of the oven and visible when the door is opened. For toll-free telephone support in the USA Versión en español ...
Complete Owner's Guide (English)
Page 3
... Day 29 Setting Clock Display - Time of Contents 3 Safety 4 Important Safety Instructions 4-6 Feature Overview 7 Your Wall Oven 7 Oven Rack Supports and Oven Vents 8 Removing and Replacing Oven Racks 9 Control Pad Functions 10-11 Getting Started 12 Setting Clock at Power Up 12 Control Panel Display Modes ...27-28 Electronic Control Settings 29 User Preferences Menu 29 Setting the Clock - On or Off 30 Setting Time of Day Display - 12 or 24 hours .. 30 Adjusting Oven Temperature 30 Setting Temperature Display - °F or °C ......... 31 Audio Control 31 Setting Continuous ...
... Day 29 Setting Clock Display - Time of Contents 3 Safety 4 Important Safety Instructions 4-6 Feature Overview 7 Your Wall Oven 7 Oven Rack Supports and Oven Vents 8 Removing and Replacing Oven Racks 9 Control Pad Functions 10-11 Getting Started 12 Setting Clock at Power Up 12 Control Panel Display Modes ...27-28 Electronic Control Settings 29 User Preferences Menu 29 Setting the Clock - On or Off 30 Setting Time of Day Display - 12 or 24 hours .. 30 Adjusting Oven Temperature 30 Setting Temperature Display - °F or °C ......... 31 Audio Control 31 Setting Continuous ...
Complete Owner's Guide (English)
Page 4
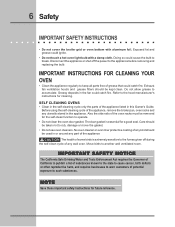
... and an authorized repair service. 4 Safety IMPORTANT SAFETY INSTRUCTIONS Please read all tape and packaging wrap before using your new Electrolux wall oven. ! Electronic controllers can be stored in case of the appliance unless specifically recommended in accordance with packaging material. Never allow... children to climb or play with the National Electrical Code ANSI/NFPA No. 70 (U.S.A.) or CSA C22.1, PART 1 (Canada)-latest editions and local code requirements. Do not ...
... and an authorized repair service. 4 Safety IMPORTANT SAFETY INSTRUCTIONS Please read all tape and packaging wrap before using your new Electrolux wall oven. ! Electronic controllers can be stored in case of the appliance unless specifically recommended in accordance with packaging material. Never allow... children to climb or play with the National Electrical Code ANSI/NFPA No. 70 (U.S.A.) or CSA C22.1, PART 1 (Canada)-latest editions and local code requirements. Do not ...
Complete Owner's Guide (English)
Page 5
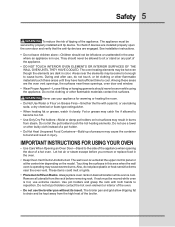
...elements may cause the container to cool. Safety 5 To reduce the risk of tipping of Oven Racks. Remove all utensils from steam. Among these areas are engaged. The wall oven is operating may be moved while oven is cool. These items could melt or ignite. • Placement of the appliance. Touching...area where an appliance is in this area when the wall oven is vented at the upper control panel or at the center trim depending on any part of a hot oven. Do not let clothing or other flammable materials touch these openings, oven door and window. • Wear Proper Apparel-Loose...
...elements may cause the container to cool. Safety 5 To reduce the risk of tipping of Oven Racks. Remove all utensils from steam. Among these areas are engaged. The wall oven is operating may be moved while oven is cool. These items could melt or ignite. • Placement of the appliance. Touching...area where an appliance is in this area when the wall oven is vented at the upper control panel or at the center trim depending on any part of a hot oven. Do not let clothing or other flammable materials touch these openings, oven door and window. • Wear Proper Apparel-Loose...
Complete Owner's Guide (English)
Page 6
... Refer to keep all parts free of grease that could cause the bulb to another well ventilated room. Also the side rails of any wall oven. Care should be kept clean. Move birds to break. Doing so could catch fire. Greasy deposits in this Owner's Guide. IMPORTANT SAFETY ...or other reproductive harm, and requires businesses to warn customers of potential exposure to the fumes given off the power to accumulate. No oven cleaner or oven liner protective coating of some birds is essential for future reference. NOTE Save these important safety instructions for a good seal. Do ...
... Refer to keep all parts free of grease that could cause the bulb to another well ventilated room. Also the side rails of any wall oven. Care should be kept clean. Move birds to break. Doing so could catch fire. Greasy deposits in this Owner's Guide. IMPORTANT SAFETY ...or other reproductive harm, and requires businesses to warn customers of potential exposure to the fumes given off the power to accumulate. No oven cleaner or oven liner protective coating of some birds is essential for future reference. NOTE Save these important safety instructions for a good seal. Do ...
Complete Owner's Guide (English)
Page 7
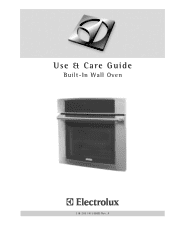
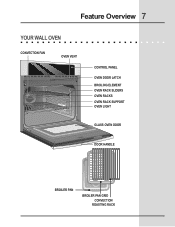
Feature Overview 7 YOUR WALL OVEN CONVECTION FAN OVEN VENT CONTROL PANEL OVEN DOOR LATCH BROILING ELEMENT OVEN RACK SLIDERS OVEN RACKS OVEN RACK SUPPORT OVEN LIGHT GLASS OVEN DOOR DOOR HANDLE BROILER PAN BROILER PAN GRID CONVECTION ROASTING RACK
Feature Overview 7 YOUR WALL OVEN CONVECTION FAN OVEN VENT CONTROL PANEL OVEN DOOR LATCH BROILING ELEMENT OVEN RACK SLIDERS OVEN RACKS OVEN RACK SUPPORT OVEN LIGHT GLASS OVEN DOOR DOOR HANDLE BROILER PAN BROILER PAN GRID CONVECTION ROASTING RACK

Complete Owner's Guide (English)
Page 8
... the brackets. When the oven is on each door. 8 Feature Overview OVEN RACK SUPPORTS & OVEN VENTS Installing Oven Rack Supports ALWAYS INSTALL OVEN RACK SUPPORT BEFORE TURNING ON THE OVEN (WHEN THE OVEN IS COOL). If the rack supports are not removed, the selfclean cycle won't start. Oven Vent Warm Air Oven Rack Positions This oven is released through the...
... the brackets. When the oven is on each door. 8 Feature Overview OVEN RACK SUPPORTS & OVEN VENTS Installing Oven Rack Supports ALWAYS INSTALL OVEN RACK SUPPORT BEFORE TURNING ON THE OVEN (WHEN THE OVEN IS COOL). If the rack supports are not removed, the selfclean cycle won't start. Oven Vent Warm Air Oven Rack Positions This oven is released through the...

Complete Owner's Guide (English)
Page 9
...inserting the rack openings into the rack support Always arrange the oven racks when the oven is at once. 2. Be sure the rack is cool (prior to clear the first bracket. 3. Replacing Sliding Oven Racks To replace the oven racks, follow the intructions above in its stop position. ...the rack hits its closed position; TOWARD FRONT OF OVEN TOWARD BACK OF OVEN 1st Bracket 2nd Bracket Oven Rack Oven Rack Slider Oven Rack Support Removing Non-Sliding Oven Racks Simply pull the rack and slightly tilt it to operating the oven). Lift the rack and sliders and carefully remove them...
...inserting the rack openings into the rack support Always arrange the oven racks when the oven is at once. 2. Be sure the rack is cool (prior to clear the first bracket. 3. Replacing Sliding Oven Racks To replace the oven racks, follow the intructions above in its stop position. ...the rack hits its closed position; TOWARD FRONT OF OVEN TOWARD BACK OF OVEN 1st Bracket 2nd Bracket Oven Rack Oven Rack Slider Oven Rack Support Removing Non-Sliding Oven Racks Simply pull the rack and slightly tilt it to operating the oven). Lift the rack and sliders and carefully remove them...
Complete Owner's Guide (English)
Page 10
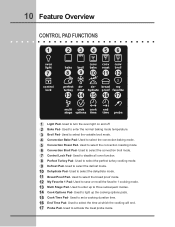
...to select the variable broil mode. 4 Convection Bake Pad- Used to activate the meat probe mode. Used to turn the oven light on and off. 2 Bake Pad- Used to disable all oven function. 8 Perfect Turkey Pad- Used to select the bread proof mode. 12 My Favorite 1 Pad- Used to select ...mode. 9 Defrost Pad- Used to save or recall the favorite 1 cooking mode. 13 Multi Stage Pad- 10 Feature Overview CONTROL PAD FUNCTIONS 1 23 456 oven light 7 bake 8 broil 9 conv bake 10 conv roast 11 conv broil 12 control lock perfect turkey 13 defrost 14 de- Used to set a cooking ...
...to select the variable broil mode. 4 Convection Bake Pad- Used to activate the meat probe mode. Used to turn the oven light on and off. 2 Bake Pad- Used to disable all oven function. 8 Perfect Turkey Pad- Used to select the bread proof mode. 12 My Favorite 1 Pad- Used to select ...mode. 9 Defrost Pad- Used to save or recall the favorite 1 cooking mode. 13 Multi Stage Pad- 10 Feature Overview CONTROL PAD FUNCTIONS 1 23 456 oven light 7 bake 8 broil 9 conv bake 10 conv roast 11 conv broil 12 control lock perfect turkey 13 defrost 14 de- Used to set a cooking ...


