Use and Care Manual
Page 2
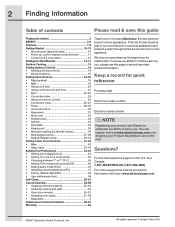
... • Power up, control display modes & timers 11 • Control lock & oven lights 12 Settings for Best Results 13-14 Surface Cooking 15 Setting Surface Controls 16 • Setting cooktop controls 16 • Burner locations 16 Setting Oven Controls 18-39 • Rapid preheat 18 • Bake 19 • Using cook time 20 • Using cook time with end time 21 • Broil 22-23 • Convection bake 24 • Using convection convert 25 • Convection roast 26-27 • Probe 28-29 • Convection broil 30 • Keep warm 31 • Slow cook 32...
... • Power up, control display modes & timers 11 • Control lock & oven lights 12 Settings for Best Results 13-14 Surface Cooking 15 Setting Surface Controls 16 • Setting cooktop controls 16 • Burner locations 16 Setting Oven Controls 18-39 • Rapid preheat 18 • Bake 19 • Using cook time 20 • Using cook time with end time 21 • Broil 22-23 • Convection bake 24 • Using convection convert 25 • Convection roast 26-27 • Probe 28-29 • Convection broil 30 • Keep warm 31 • Slow cook 32...
Use and Care Manual
Page 3
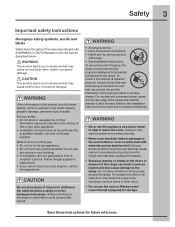
... children in carbon monoxide poisoning. • Never cover any electrical switch; The weight of this range can tip. • Injury to the installation instructions for proper anti-tip bracket installation. • Never use the oven or Warmer oven/ Lower Oven(if equipped) for future reference. This symbol alerts you smell gas: • Do not try to the range. For models with materials such as aluminum foil. Safety 3 Important...
... children in carbon monoxide poisoning. • Never cover any electrical switch; The weight of this range can tip. • Injury to the installation instructions for proper anti-tip bracket installation. • Never use the oven or Warmer oven/ Lower Oven(if equipped) for future reference. This symbol alerts you smell gas: • Do not try to the range. For models with materials such as aluminum foil. Safety 3 Important...
Use and Care Manual
Page 4
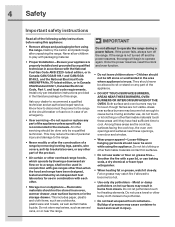
... the power resumes, reset the clock and oven function. • Do not leave children alone-Children should not be used in conjunction with gas ranges other . • Storage in or on or near surface burners or in combination with each other than when the hood and range have had sufficient time to the range. • Never modify or alter the construction of a range by removing leveling legs, panels, wire covers, anti-tip brackets...
... the power resumes, reset the clock and oven function. • Do not leave children alone-Children should not be used in conjunction with gas ranges other . • Storage in or on or near surface burners or in combination with each other than when the hood and range have had sufficient time to the range. • Never modify or alter the construction of a range by removing leveling legs, panels, wire covers, anti-tip brackets...
Use and Care Manual
Page 5
... you remove or replace food in this manual. Proper relationship of utensil to flame will expose a portion of the burner flame to direct contact and may result in risk of electric shock, or fire. • Glazed cooking utensils-Only certain types of oven racks. Let hot air or steam escape before turning on or near the oven vent. These items could ignite. • Cold temperatures can damage the electronic control...
... you remove or replace food in this manual. Proper relationship of utensil to flame will expose a portion of the burner flame to direct contact and may result in risk of electric shock, or fire. • Glazed cooking utensils-Only certain types of oven racks. Let hot air or steam escape before turning on or near the oven vent. These items could ignite. • Cold temperatures can damage the electronic control...
Use and Care Manual
Page 6
... for conversion to Liquefied Petroleum (L.P.) Gas. • Do not use . Move birds to the area underneath each surface element. Be aware that could catch fire. See the INSTALLATION INSTRUCTIONS packaged with this Use & Care Manual. 6 Safety Important safety instructions Important cleaning instructions • Clean the range regularly to keep all parts free of any utensils or foods from cleaners and aerosols may ignite causing damage and injury. Self cleaning ovens • Clean...
... for conversion to Liquefied Petroleum (L.P.) Gas. • Do not use . Move birds to the area underneath each surface element. Be aware that could catch fire. See the INSTALLATION INSTRUCTIONS packaged with this Use & Care Manual. 6 Safety Important safety instructions Important cleaning instructions • Clean the range regularly to keep all parts free of any utensils or foods from cleaners and aerosols may ignite causing damage and injury. Self cleaning ovens • Clean...
Use and Care Manual
Page 10
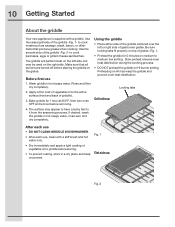
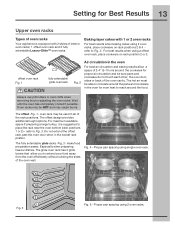
... gas burner grates. Bake griddle for 5 minutes on top of grates -Fig. 1. • Preheat the griddle for 1 hour at 350°F, then turn oven OFF and let cool before removing. Before first use , clean with a griddle. Locking tabs 2. Be sure locking tabs fit properly on medium to medium low setting. Fig. 1 Flat side up 4. After each use • DO NOT CLEAN GRIDDLE IN DISHWASHER. • After each use Using the griddle...
... gas burner grates. Bake griddle for 5 minutes on top of grates -Fig. 1. • Preheat the griddle for 1 hour at 350°F, then turn oven OFF and let cool before removing. Before first use , clean with a griddle. Locking tabs 2. Be sure locking tabs fit properly on medium to medium low setting. Fig. 1 Flat side up 4. After each use • DO NOT CLEAN GRIDDLE IN DISHWASHER. • After each use Using the griddle...
Use and Care Manual
Page 12
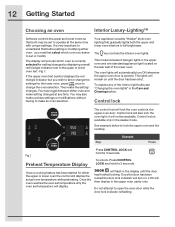
... set to operate at any of the lower oven. To replace any time. To unlock, Press CONTROL LOCK and hold for either oven and make cooktop settings or modifications without having to open the oven door while the door lock indicator is available only in the awake mode. will display the actual oven temperature while preheating. The lights will provide which oven you wish to set temperature will automatically turn on. 12 Getting Started Choosing an oven Interior Luxury-Lighting...
... set to operate at any of the lower oven. To replace any time. To unlock, Press CONTROL LOCK and hold for either oven and make cooktop settings or modifications without having to open the oven door while the door lock indicator is available only in the awake mode. will display the actual oven temperature while preheating. The lights will provide which oven you wish to set temperature will automatically turn on. 12 Getting Started Choosing an oven Interior Luxury-Lighting...
Use and Care Manual
Page 13
For best results when using 2 oven racks, place cookware on rack position 2 or 3. oven rack may be HOT and may be used in all of the rack positions. Do not extend the offset rack past the oven door when in the lowest rack postion. Especially when preparing heavier dishes. Proper pan spacing using 2 oven racks. Proper pan spacing using single oven rack. 6 5 4 3 2 1 Fig. 3 Fig. 5 - The hot air must be sure pans and cookware do not...
For best results when using 2 oven racks, place cookware on rack position 2 or 3. oven rack may be HOT and may be used in all of the rack positions. Do not extend the offset rack past the oven door when in the lowest rack postion. Especially when preparing heavier dishes. Proper pan spacing using 2 oven racks. Proper pan spacing using single oven rack. 6 5 4 3 2 1 Fig. 3 Fig. 5 - The hot air must be sure pans and cookware do not...
Use and Care Manual
Page 18
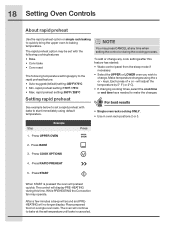
... the cook time or end time keys needed to bake at any cook settings after this time. Press RAPID PREHEAT 5. While PREHEATING the Convection fan may be set a rapid preheat with the following cooking features: • Bake • Conv bake • Conv roast The following temperature settings apply to change any time when setting the control or during this feature has started: • Wake control panel from the sleep mode if necessary. • Select the UPPER or LOWER oven...
... the cook time or end time keys needed to bake at any cook settings after this time. Press RAPID PREHEAT 5. While PREHEATING the Convection fan may be set a rapid preheat with the following cooking features: • Bake • Conv bake • Conv roast The following temperature settings apply to change any time when setting the control or during this feature has started: • Wake control panel from the sleep mode if necessary. • Select the UPPER or LOWER oven...

Use and Care Manual
Page 19
... this feature has started: • Wake control panel from the sleep mode if necessary. • Select the UPPER or LOWER oven you wish to make the changes. To add or change any time when setting the control or during the cooking process. Make temperature changes using 2 oven racks, place cookware on rack positions 2 & 4. keys. Press UPPER OVEN Press 2. The oven display shows PRE-HEATING. will continue to cook most food items that require normal cooking temperatures...
... this feature has started: • Wake control panel from the sleep mode if necessary. • Select the UPPER or LOWER oven you wish to make the changes. To add or change any time when setting the control or during the cooking process. Make temperature changes using 2 oven racks, place cookware on rack positions 2 & 4. keys. Press UPPER OVEN Press 2. The oven display shows PRE-HEATING. will continue to cook most food items that require normal cooking temperatures...

Use and Care Manual
Page 21
... BAKE 3. See pg. 20 6. Press START Once START is ready. While PREHEATING the Convection fan may also choose to use COOK TIME with no END TIME. After the oven reaches set . • You may press CANCEL any time when setting the control or during the cooking process. • You may operate. The oven will continue to maintain this temperature for 50 minutes and to automatically shut-off and a beep will indicate...
... BAKE 3. See pg. 20 6. Press START Once START is ready. While PREHEATING the Convection fan may also choose to use COOK TIME with no END TIME. After the oven reaches set . • You may press CANCEL any time when setting the control or during the cooking process. • You may operate. The oven will continue to maintain this temperature for 50 minutes and to automatically shut-off and a beep will indicate...
Use and Care Manual
Page 22
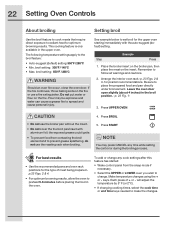
... the oven to make the changes. will adjust the temperature by 5° F (or 2°C). • If changing cooking times, select the cook time or end time keys needed to preheat 5-6 minutes before placing the food in the oven. Press BROIL • Do not use the roasting rack when broiling. 5. 22 Setting Oven Controls About broiling Setting broil Use the broil feature to cook meats that require direct exposure to radiant heat for the upper oven starting immeadiately with aluminum foil; broil setting: 550...
... the oven to make the changes. will adjust the temperature by 5° F (or 2°C). • If changing cooking times, select the cook time or end time keys needed to preheat 5-6 minutes before placing the food in the oven. Press BROIL • Do not use the roasting rack when broiling. 5. 22 Setting Oven Controls About broiling Setting broil Use the broil feature to cook meats that require direct exposure to radiant heat for the upper oven starting immeadiately with aluminum foil; broil setting: 550...
Use and Care Manual
Page 24
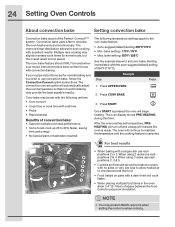
...; Probe • Rapid preheat Benefits of 350°F (176°C). bake setting : 170°F / 76°C • Max. Press UPPER OVEN 2. Convection bake uses a fan to use with the auto-suggest (default) setting of convection bake: • Superior multiple oven rack performance. • Some foods cook up 25 to 30% faster, saving time and energy. • No special pans or bakeware required. Step EExxaammpplele Press 1. The oven display shows PRE-HEATING during this temperature...
...; Probe • Rapid preheat Benefits of 350°F (176°C). bake setting : 170°F / 76°C • Max. Press UPPER OVEN 2. Convection bake uses a fan to use with the auto-suggest (default) setting of convection bake: • Superior multiple oven rack performance. • Some foods cook up 25 to 30% faster, saving time and energy. • No special pans or bakeware required. Step EExxaammpplele Press 1. The oven display shows PRE-HEATING during this temperature...
Use and Care Manual
Page 25
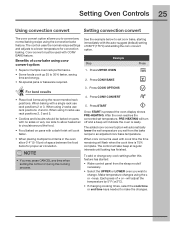
... oven allow heated air to make the changes. The control will indicate the oven is ready. NOTE • You may press CANCEL any cook settings after this feature has started: • Wake control panel from the bake recipe to set conv bake, starting immediately with cook time the time remaining will automatically lower the set temperature you set temperature, PRE-HEATING will turn off and a beep will also beep at regular intervals until baking has finished. Make temperature changes using...
... oven allow heated air to make the changes. The control will indicate the oven is ready. NOTE • You may press CANCEL any cook settings after this feature has started: • Wake control panel from the bake recipe to set conv bake, starting immediately with cook time the time remaining will automatically lower the set temperature you set temperature, PRE-HEATING will turn off and a beep will also beep at regular intervals until baking has finished. Make temperature changes using...
Use and Care Manual
Page 26
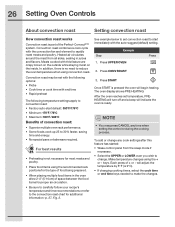
...; Probe • Cook time or cook time with the convection fan and element to make the changes. keys. Convection roast combines a cook cycle with end time • Rapid preheat The following temperature settings apply to 30% faster, saving time and energy. • No special pans or bakeware required. Meats cooked with the auto-suggest (default) setting. Press START Once START is not necessary for most meats and poultry. • Place food items using the...
...; Probe • Cook time or cook time with the convection fan and element to make the changes. keys. Convection roast combines a cook cycle with end time • Rapid preheat The following temperature settings apply to 30% faster, saving time and energy. • No special pans or bakeware required. Meats cooked with the auto-suggest (default) setting. Press START Once START is not necessary for most meats and poultry. • Place food items using the...
Use and Care Manual
Page 30
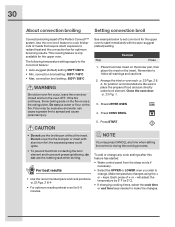
convection broil setting: 550°F / 288°C Should an oven fire occur, leave the oven door closed and turn the oven OFF. See example below to start immediately with aluminum foil; Arrange the interior oven rack -p. 23 Figs. 2 & 4- Press CONV BROIL 5. Flour may press CANCEL any cook settings after this feature has started: • Wake control panel from contacting the broil element and to the conv broil feature: • Auto-suggest (default) setting: 550...
convection broil setting: 550°F / 288°C Should an oven fire occur, leave the oven door closed and turn the oven OFF. See example below to start immediately with aluminum foil; Arrange the interior oven rack -p. 23 Figs. 2 & 4- Press CONV BROIL 5. Flour may press CANCEL any cook settings after this feature has started: • Wake control panel from contacting the broil element and to the conv broil feature: • Auto-suggest (default) setting: 550...
Use and Care Manual
Page 57
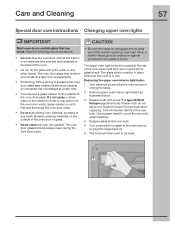
... in ). 6. Replace glass shield over bulb. 5. The oven door glass may break or even break at a later time unexpectedly. • Scratching, hitting, jarring or stressing the oven door glass may use . Care and Cleaning 57 Special door care instructions Changing upper oven lights IMPORTANT Most oven doors contain glass that can break. Please note: do not allow water or the cleaner to cover the new bulb when installing. 4. Replacing the upper oven interior light bulbs: 1. Replace bulb with pots, pans, or any...
... in ). 6. Replace glass shield over bulb. 5. The oven door glass may break or even break at a later time unexpectedly. • Scratching, hitting, jarring or stressing the oven door glass may use . Care and Cleaning 57 Special door care instructions Changing upper oven lights IMPORTANT Most oven doors contain glass that can break. Please note: do not allow water or the cleaner to cover the new bulb when installing. 4. Replacing the upper oven interior light bulbs: 1. Replace bulb with pots, pans, or any...
Use and Care Manual
Page 60
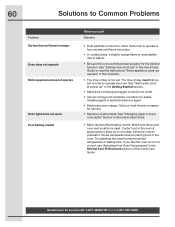
... does not operate Oven light does not work Poor baking results Before you feel the oven is too hot or cool, see "Adjusting Your Oven Temperature" in this Use & Care Guide. See "Setting the clock at power up" in main line. See "Changing upper or lower oven lights" section in the oven. Contact your local electric company for service call Solution • Dust particles in the Getting Started section. • Make sure cord/plug is plugged correctly...
... does not operate Oven light does not work Poor baking results Before you feel the oven is too hot or cool, see "Adjusting Your Oven Temperature" in this Use & Care Guide. See "Setting the clock at power up" in main line. See "Changing upper or lower oven lights" section in the oven. Contact your local electric company for service call Solution • Dust particles in the Getting Started section. • Make sure cord/plug is plugged correctly...
Use and Care Manual
Page 61
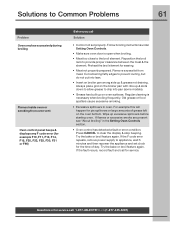
Preheat the broil element for service. Always place grid on oven surfaces. Reposition the broil rack to drip into lean. • Insert on the oven bottom. Try the bake or broil feature again. If flames or excessive smoke are present see "About broiling" in oven. If the F code error repeats, remove power supply to clear the display & stop beeping. Remove excess fat from oven vent Oven control panel beeps & displays any F code error (for the time of grease left on broiler pan wrong side up...
Preheat the broil element for service. Always place grid on oven surfaces. Reposition the broil rack to drip into lean. • Insert on the oven bottom. Try the bake or broil feature again. If flames or excessive smoke are present see "About broiling" in oven. If the F code error repeats, remove power supply to clear the display & stop beeping. Remove excess fat from oven vent Oven control panel beeps & displays any F code error (for the time of grease left on broiler pan wrong side up...
Use and Care Manual
Page 63
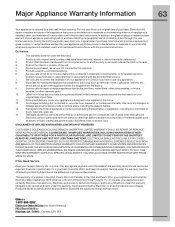
... appliance or home incurred during the additional limited warranty periods beyond the first year from its original owner to repair or replace appliance light bulbs, air filters, water filters, other consumables, or knobs, handles, or other than authorized service companies; Product features or specifications as removal of your best interest to any after hour, weekend, or holiday service calls, tolls, ferry trip charges, or mileage...
... appliance or home incurred during the additional limited warranty periods beyond the first year from its original owner to repair or replace appliance light bulbs, air filters, water filters, other consumables, or knobs, handles, or other than authorized service companies; Product features or specifications as removal of your best interest to any after hour, weekend, or holiday service calls, tolls, ferry trip charges, or mileage...

