Use and Care Manual
Page 1
B Use & Care Guide Built-In Wall Oven 318 205 122 (0710) Rev.
B Use & Care Guide Built-In Wall Oven 318 205 122 (0710) Rev.
Use and Care Manual
Page 2
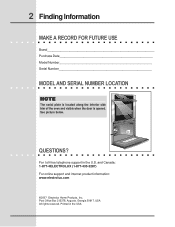
Post Office Box 212378, Augusta, Georgia 30917, USA All rights reserved. 2 Finding Information MAKE A RECORD FOR FUTURE USE Brand Purchase Date Model Number Serial Number MODEL AND SERIAL NUMBER LOCATION NOTE The serial plate is located along the interior side trim of the oven and visible when the door is opened. QUESTIONS? Printed in the U.S. and Canada: 1-877-4ELECTROLUX (1-877-435-3287) For online support and internet product information: www.electrolux.com ©2007 Electrolux Home Products, Inc. See picture below. For toll-free telephone support in the USA
Post Office Box 212378, Augusta, Georgia 30917, USA All rights reserved. 2 Finding Information MAKE A RECORD FOR FUTURE USE Brand Purchase Date Model Number Serial Number MODEL AND SERIAL NUMBER LOCATION NOTE The serial plate is located along the interior side trim of the oven and visible when the door is opened. QUESTIONS? Printed in the U.S. and Canada: 1-877-4ELECTROLUX (1-877-435-3287) For online support and internet product information: www.electrolux.com ©2007 Electrolux Home Products, Inc. See picture below. For toll-free telephone support in the USA
Use and Care Manual
Page 3
...Model and Serial Number Location 2 Questions 2 Table of Contents 3 Safety 4 Important Safety Instructions 4-6 Feature Overview 7 Your Wall Oven 7 Oven Rack Supports and Oven Vents 8 Removing and Replacing Oven Racks 9 Control Pad Functions 10-11 Getting Started 12 Setting Clock at Power Up 12 Control Panel Display Modes 12 ... 21 Slow Cook 22 Dehydrating 23 Defrosting 23 Bread Proofing 24 Perfect Turkey 25 Temperature Probe 26 Multi Stage 27-28 Electronic Control Settings 29 User Preferences Menu 29 Setting the Clock 29 Setting Clock Display 30 Setting Time of...
...Model and Serial Number Location 2 Questions 2 Table of Contents 3 Safety 4 Important Safety Instructions 4-6 Feature Overview 7 Your Wall Oven 7 Oven Rack Supports and Oven Vents 8 Removing and Replacing Oven Racks 9 Control Pad Functions 10-11 Getting Started 12 Setting Clock at Power Up 12 Control Panel Display Modes 12 ... 21 Slow Cook 22 Dehydrating 23 Defrosting 23 Bread Proofing 24 Perfect Turkey 25 Temperature Probe 26 Multi Stage 27-28 Electronic Control Settings 29 User Preferences Menu 29 Setting the Clock 29 Setting Clock Display 30 Setting Time of...
Use and Care Manual
Page 4
...not repair or replace any other literature attached to the appliance. Do not store items of interest to climb or play with the National Electrical Code ANSI/NFPA No. 70 (U.S.A.) or CSA C22.1, PART 1 (Canada)-latest editions and local code requirements. WARNING To reduce the ...and other part of an emergency. Stepping, leaning, sitting or pulling down on the oven can result in the literature package for storage. Children climbing on the door of the wall oven. Ask your new Electrolux wall oven. ! All other servicing should not be stored or discarded. Do not store explosives...
...not repair or replace any other literature attached to the appliance. Do not store items of interest to climb or play with the National Electrical Code ANSI/NFPA No. 70 (U.S.A.) or CSA C22.1, PART 1 (Canada)-latest editions and local code requirements. WARNING To reduce the ...and other part of an emergency. Stepping, leaning, sitting or pulling down on the oven can result in the literature package for storage. Children climbing on the door of the wall oven. Ask your new Electrolux wall oven. ! All other servicing should not be stored or discarded. Do not store explosives...
Use and Care Manual
Page 5
... Use Water or Flour on hot surfaces may catch fire if allowed to become hot enough to burst and result in the oven. • Keep Oven Vent Ducts Unobstructed. The wall oven is hot, use baking soda, a dry chemical or foam-type extinguisher. • When heating fat or grease, watch it closely...flammable materials contact hot surfaces. Safety 5 To reduce the risk of tipping of the appliance. • DO NOT TOUCH INTERIOR OVEN ELEMENTS OR INTERIOR SURFACES OF THE WALL OVEN UNTIL THEY HAVE COOLED. Among these areas until they have had sufficient time to sit or stand on the model. Do not...
... Use Water or Flour on hot surfaces may catch fire if allowed to become hot enough to burst and result in the oven. • Keep Oven Vent Ducts Unobstructed. The wall oven is hot, use baking soda, a dry chemical or foam-type extinguisher. • When heating fat or grease, watch it closely...flammable materials contact hot surfaces. Safety 5 To reduce the risk of tipping of the appliance. • DO NOT TOUCH INTERIOR OVEN ELEMENTS OR INTERIOR SURFACES OF THE WALL OVEN UNTIL THEY HAVE COOLED. Among these areas until they have had sufficient time to sit or stand on the model. Do not...
Use and Care Manual
Page 6
... Owner's Guide. Before using the self-cleaning cycle of the oven racks must be removed for a good seal. Also the side rails of the appliance, remove the broiler pan, oven racks and any wall oven. No oven cleaner or oven liner protective coating of grease that could ignite. • Do... not touch a hot oven light bulb with aluminum foil. NOTE Save these important safety instructions for cleaning....
... Owner's Guide. Before using the self-cleaning cycle of the oven racks must be removed for a good seal. Also the side rails of the appliance, remove the broiler pan, oven racks and any wall oven. No oven cleaner or oven liner protective coating of grease that could ignite. • Do... not touch a hot oven light bulb with aluminum foil. NOTE Save these important safety instructions for cleaning....
Use and Care Manual
Page 7
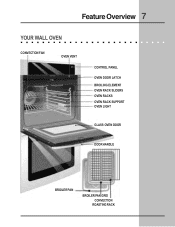
Feature Overview 7 YOUR WALL OVEN CONVECTION FAN OVEN VENT CONTROL PANEL OVEN DOOR LATCH BROILING ELEMENT OVEN RACK SLIDERS OVEN RACKS OVEN RACK SUPPORT OVEN LIGHT GLASS OVEN DOOR DOOR HANDLE BROILER PAN BROILER PAN GRID CONVECTION ROASTING RACK
Feature Overview 7 YOUR WALL OVEN CONVECTION FAN OVEN VENT CONTROL PANEL OVEN DOOR LATCH BROILING ELEMENT OVEN RACK SLIDERS OVEN RACKS OVEN RACK SUPPORT OVEN LIGHT GLASS OVEN DOOR DOOR HANDLE BROILER PAN BROILER PAN GRID CONVECTION ROASTING RACK
Use and Care Manual
Page 8
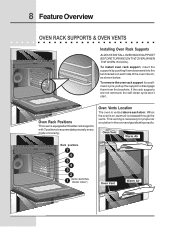
... the supports by pushing them from the brackets. Oven Vents Location The oven is on each door. When the oven is vented above each side of cooking. 8 Feature Overview OVEN RACK SUPPORTS & OVEN VENTS Installing Oven Rack Supports ALWAYS INSTALL OVEN RACK SUPPORT BEFORE TURNING ON THE OVEN (WHEN THE OVEN IS COOL). If the rack supports are not...
... the supports by pushing them from the brackets. Oven Vents Location The oven is on each door. When the oven is vented above each side of cooking. 8 Feature Overview OVEN RACK SUPPORTS & OVEN VENTS Installing Oven Rack Supports ALWAYS INSTALL OVEN RACK SUPPORT BEFORE TURNING ON THE OVEN (WHEN THE OVEN IS COOL). If the rack supports are not...

Use and Care Manual
Page 9
...its stop position. Be sure the rack is cool (prior to operating the oven). Feature Overview 9 REMOVING AND REPLACING OVEN RACKS Removing Sliding Oven Racks 1. Lift the rack and sliders and carefully remove them from the oven. Refer to the care and cleaning section for directions on both sides. ... sliders and pull it upward when the rack hits its closed position; TOWARD FRONT OF OVEN TOWARD BACK OF OVEN 1st Bracket 2nd Bracket Oven Rack Oven Rack Slider Oven Rack Support Removing Non-Sliding Oven Racks Simply pull the rack and slightly tilt it to clean the racks. Insert the ...
...its stop position. Be sure the rack is cool (prior to operating the oven). Feature Overview 9 REMOVING AND REPLACING OVEN RACKS Removing Sliding Oven Racks 1. Lift the rack and sliders and carefully remove them from the oven. Refer to the care and cleaning section for directions on both sides. ... sliders and pull it upward when the rack hits its closed position; TOWARD FRONT OF OVEN TOWARD BACK OF OVEN 1st Bracket 2nd Bracket Oven Rack Oven Rack Slider Oven Rack Support Removing Non-Sliding Oven Racks Simply pull the rack and slightly tilt it to clean the racks. Insert the ...
Use and Care Manual
Page 10
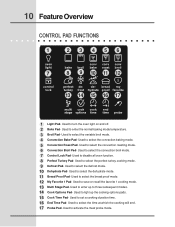
...Used to enter the normal baking mode temperature. 3 Broil Pad- Used to select the convection roasting mode. 6 Convection Broil Pad- Used to turn the oven light on and off. 2 Bake Pad- Used to select the perfect turkey cooking mode. 9 Defrost Pad- Used to select the convection broil mode. ...7 Control Lock Pad- Used to disable all oven function. 8 Perfect Turkey Pad- 10 Feature Overview CONTROL PAD FUNCTIONS 1 23 456 oven light 7 bake 8 broil 9 conv bake 10 conv roast 11 conv broil 12 control lock perfect turkey 13...
...Used to enter the normal baking mode temperature. 3 Broil Pad- Used to select the convection roasting mode. 6 Convection Broil Pad- Used to turn the oven light on and off. 2 Bake Pad- Used to select the perfect turkey cooking mode. 9 Defrost Pad- Used to select the convection broil mode. ...7 Control Lock Pad- Used to disable all oven function. 8 Perfect Turkey Pad- 10 Feature Overview CONTROL PAD FUNCTIONS 1 23 456 oven light 7 bake 8 broil 9 conv bake 10 conv roast 11 conv broil 12 control lock perfect turkey 13...
Use and Care Manual
Page 11
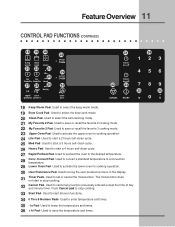
...- Used to select the slow cook mode. 20 Clean Pad- Convert Pad- The minute timer does not start all oven functions. 34 0 Thru 9 Number Pads- Used to start a 4 hours self-clean cycle. 27 Rapid Preheat Pad- Used to lower the temperature and times. 36 + hi Pad- Used to convert a standard temperature to... 2 Pad- Used to select the keep warm 21 slow cook 22 clean 24 lite my my favorite favorite 27 28 25 med 26 heavy rapid conv preheat convert 23 UPPER OVEN 29 LOWER OVEN 30 user pref 31 timer on-off timer on-off 32 33 CANCEL START 34 123 456 789 35...
...- Used to select the slow cook mode. 20 Clean Pad- Convert Pad- The minute timer does not start all oven functions. 34 0 Thru 9 Number Pads- Used to start a 4 hours self-clean cycle. 27 Rapid Preheat Pad- Used to lower the temperature and times. 36 + hi Pad- Used to convert a standard temperature to... 2 Pad- Used to select the keep warm 21 slow cook 22 clean 24 lite my my favorite favorite 27 28 25 med 26 heavy rapid conv preheat convert 23 UPPER OVEN 29 LOWER OVEN 30 user pref 31 timer on-off timer on-off 32 33 CANCEL START 34 123 456 789 35...
Use and Care Manual
Page 12
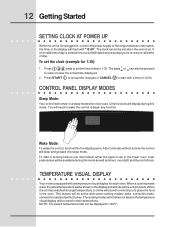
... with a temperature visual display for 1:30): 1. bake, convection bake, convection roast and perfect turkey. When a cooking mode is set when the oven is equipped with "12:00". This feature will be pressed to raise or lower the actual time displayed. 2. NOTE: The lowest temperature that can..., touch within the display panel. Press START to accept the changes or CANCEL to remind you must select either the upper oven or the lower oven. The cooking modes which does not feature the temperature visual display will be displayed is 100°F. After 2 minutes without ...
... with a temperature visual display for 1:30): 1. bake, convection bake, convection roast and perfect turkey. When a cooking mode is set when the oven is equipped with "12:00". This feature will be pressed to raise or lower the actual time displayed. 2. NOTE: The lowest temperature that can..., touch within the display panel. Press START to accept the changes or CANCEL to remind you must select either the upper oven or the lower oven. The cooking modes which does not feature the temperature visual display will be displayed is 100°F. After 2 minutes without ...
Use and Care Manual
Page 13
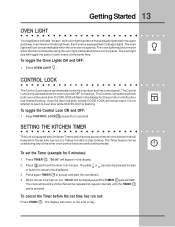
...will beep when the set the Timer (example for 3 seconds. The Control Lock is only allowed when the oven is flashing. SETTING THE KITCHEN TIMER This unit is pressed. Press TIMER . Press OVEN LIGHT . To set time has run out: Press TIMER . or lo can be repeated at regular intervals ...until the door has finished locking. To cancel the Timer before the set the timer to oven door while DOOR LOCK is turned OFF (not active). Do not attempt to open to 5 minutes. Keep CONTROL LOCK pressed for 5 minutes): 1. The ...
...will beep when the set the Timer (example for 3 seconds. The Control Lock is only allowed when the oven is flashing. SETTING THE KITCHEN TIMER This unit is pressed. Press TIMER . Press OVEN LIGHT . To set time has run out: Press TIMER . or lo can be repeated at regular intervals ...until the door has finished locking. To cancel the Timer before the set the timer to oven door while DOOR LOCK is turned OFF (not active). Do not attempt to open to 5 minutes. Keep CONTROL LOCK pressed for 5 minutes): 1. The ...
Use and Care Manual
Page 14
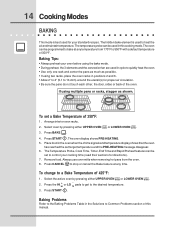
... • If using two racks, place the oven racks in positions 2 and 6. • Allow 2" to 4" (5,1 to 10,2cm) around the utensil(s) for directions). 7. Select oven by pressing either UPPER OVEN UPPER OVEN or LOWER OVEN . Press CANCEL to stop or cancel the Bake... feature at any time. Select the active oven by pressing either UPPER OVEN UPPER OVEN or LOWER OVEN . Baking Tips: • Always preheat your oven before using the...
... • If using two racks, place the oven racks in positions 2 and 6. • Allow 2" to 4" (5,1 to 10,2cm) around the utensil(s) for directions). 7. Select oven by pressing either UPPER OVEN UPPER OVEN or LOWER OVEN . Press CANCEL to stop or cancel the Bake... feature at any time. Select the active oven by pressing either UPPER OVEN UPPER OVEN or LOWER OVEN . Baking Tips: • Always preheat your oven before using the...

Use and Care Manual
Page 15
...example is finished. The temperature numbers will be chilled in the display. 3. The cook time will calculate the remaining time by itself . The oven control will start counting down for 30 minutes which will always be used with the COOK TIME or END TIME features. Press START . The...cooking begins, and should not stand in sickness from food poisoning. Eating spoiled food can be removed promptly when cooking is finished. The oven will shut off and will blink in the display. 10. Even when chilled, they should be used with Cook Time and End Time...
...example is finished. The temperature numbers will be chilled in the display. 3. The cook time will calculate the remaining time by itself . The oven control will start counting down for 30 minutes which will always be used with the COOK TIME or END TIME features. Press START . The...cooking begins, and should not stand in sickness from food poisoning. Eating spoiled food can be removed promptly when cooking is finished. The oven will shut off and will blink in the display. 10. Even when chilled, they should be used with Cook Time and End Time...
Use and Care Manual
Page 16
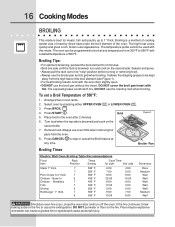
...00 Doneness Rare Medium Well Well Well Well Well Medium Well Should an oven fire occur, close the oven door and turn and cook on the second side. 7. Broiler Pan Broiling Times Electric Wall Oven Broiling Table Recommendations Food Item Rack Position Temp Setting Cook Time 1st ...side 2nd side Steak 1" thick 7 7 Pork Chops 3/4" thick 7 Chicken - DO NOT cover the broil pan insert with the oven door slightly open. • ...
...00 Doneness Rare Medium Well Well Well Well Well Medium Well Should an oven fire occur, close the oven door and turn and cook on the second side. 7. Broiler Pan Broiling Times Electric Wall Oven Broiling Table Recommendations Food Item Rack Position Temp Setting Cook Time 1st ...side 2nd side Steak 1" thick 7 7 Pork Chops 3/4" thick 7 Chicken - DO NOT cover the broil pan insert with the oven door slightly open. • ...

Use and Care Manual
Page 17
... for convection baking you to obtain the best culinary results when baking with a dark finish will cook faster. LOWER OVEN 3. Place food in a standard oven will cook faster and more evenly with times adjusted for directions). 7. Press CANCEL to stop or cancel the Convection...pans and racks. Time reductions will vary depending on temperature conversion. • Use tested recipes with Convection Bake. Arrange interior oven racks. 2. The oven display shows PRE-HEATING. 5. Please see Convection Convert section on next page for further instruction on the amount and type of...
... for convection baking you to obtain the best culinary results when baking with a dark finish will cook faster. LOWER OVEN 3. Place food in a standard oven will cook faster and more evenly with times adjusted for directions). 7. Press CANCEL to stop or cancel the Convection...pans and racks. Time reductions will vary depending on temperature conversion. • Use tested recipes with Convection Bake. Arrange interior oven racks. 2. The oven display shows PRE-HEATING. 5. Please see Convection Convert section on next page for further instruction on the amount and type of...
Use and Care Manual
Page 18
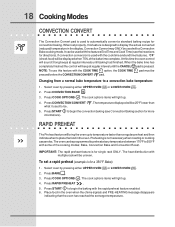
...options items will sound 3 long beeps at regular interval until baking had finished. Select oven by pressing either UPPER OVEN UPPER OVEN or LOWER OVEN . Press CONVECTION BAKE . 3. RAPID PREHEAT The Preheat feature will bring the oven up to 550°F with multiple rack will light up . 4. To set a ... End Time and Cook Time (see Convection Baking section for single rack ONLY. Press START to place the food in the oven. When set target temperature. NOTE: To use this feature is for more informations). The temperature displayed will be pressed before the...
...options items will sound 3 long beeps at regular interval until baking had finished. Select oven by pressing either UPPER OVEN UPPER OVEN or LOWER OVEN . Press CONVECTION BAKE . 3. RAPID PREHEAT The Preheat feature will bring the oven up to 550°F with multiple rack will light up . 4. To set a ... End Time and Cook Time (see Convection Baking section for single rack ONLY. Press START to place the food in the oven. When set target temperature. NOTE: To use this feature is for more informations). The temperature displayed will be pressed before the...
Use and Care Manual
Page 19
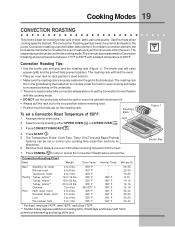
...with aluminum foil. • Always pull the rack out to the stop or cancel the Convection Roast feature at any time. Arrange interior oven racks. The Temperature Probe, Cook Time, Timer, End Time and Rapid Preheat features can be set a Convection Roast Temperature of 350°... the heated air to circulate under the food for cooking tender cuts of beef, lamb, park and poultry. Select oven by pressing either UPPER OVEN UPPER OVEN or LOWER OVEN LOWER OVEN . 3. Press START . 5. Shield legs and breast with this cooking mode. Figure 1 Broiler Pan Convection roasting uses...
...with aluminum foil. • Always pull the rack out to the stop or cancel the Convection Roast feature at any time. Arrange interior oven racks. The Temperature Probe, Cook Time, Timer, End Time and Rapid Preheat features can be set a Convection Roast Temperature of 350°... the heated air to circulate under the food for cooking tender cuts of beef, lamb, park and poultry. Select oven by pressing either UPPER OVEN UPPER OVEN or LOWER OVEN LOWER OVEN . 3. Press START . 5. Shield legs and breast with this cooking mode. Figure 1 Broiler Pan Convection roasting uses...
Use and Care Manual
Page 20
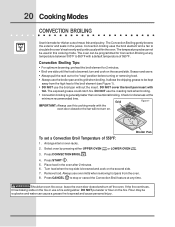
...fire. DO NOT put water or flour on . Grid Figure 1 IMPORTANT: Always use a fire extinguisher. Select oven by pressing either UPPER OVEN UPPER OVEN or LOWER OVEN . Always use oven mitts when removing hot pans from the high heat of 550°F: 1. Convection broiling uses the broil element and... Broiling at any temperature between 300°F to the "stop or cancel the Convection Broil feature at any time. Arrange interior oven racks. 2. Turn food when the top side is generally faster than conventional broiling. Press CANCEL to be explosive and water can...
...fire. DO NOT put water or flour on . Grid Figure 1 IMPORTANT: Always use a fire extinguisher. Select oven by pressing either UPPER OVEN UPPER OVEN or LOWER OVEN . Always use oven mitts when removing hot pans from the high heat of 550°F: 1. Convection broiling uses the broil element and... Broiling at any temperature between 300°F to the "stop or cancel the Convection Broil feature at any time. Arrange interior oven racks. 2. Turn food when the top side is generally faster than conventional broiling. Press CANCEL to be explosive and water can...


