Use and Care Manual
Page 2
... 3 Electrical information 3 Installation 4 Location 4 Installation 4 Installation clearances 4 Door opening 4 Guidelines for final positioning of your refrigerator 4 Removing The Doors 6 Getting through narrow spaces 6 Installing Door Handles 8 Door Handle Mounting Instructions 8 Connecting The Water Supply 9 About your...tests & certification results 21 To replace your PureAdvantageTM water filter 21 Storing Food & Saving Energy 22 Ideas for storing foods 22 Ideas for choosing Electrolux, our new premium brand in home appliances. This Use & Care Guide is part of our...
... 3 Electrical information 3 Installation 4 Location 4 Installation 4 Installation clearances 4 Door opening 4 Guidelines for final positioning of your refrigerator 4 Removing The Doors 6 Getting through narrow spaces 6 Installing Door Handles 8 Door Handle Mounting Instructions 8 Connecting The Water Supply 9 About your...tests & certification results 21 To replace your PureAdvantageTM water filter 21 Storing Food & Saving Energy 22 Ideas for storing foods 22 Ideas for choosing Electrolux, our new premium brand in home appliances. This Use & Care Guide is part of our...
Use and Care Manual
Page 3
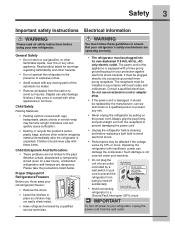
...to prevent any moving parts of the appliance is damaged, it should never play with a three-prong grounding plug for a few hours), unattended refrigerators and freezers are dangerous. The receptacle must be replaced by 10% or more. Do not use gasoline, or other flammable liquids, near this... store or use an extension cord or adapter plug. • If the power cord is equipped with these guidelines to ensure that your refrigerator, unplug the power cord from the carton to avoid electrical shock. • Performance may become airtight chambers and can quickly cause suffocation. ...
...to prevent any moving parts of the appliance is damaged, it should never play with a three-prong grounding plug for a few hours), unattended refrigerators and freezers are dangerous. The receptacle must be replaced by 10% or more. Do not use gasoline, or other flammable liquids, near this... store or use an extension cord or adapter plug. • If the power cord is equipped with these guidelines to ensure that your refrigerator, unplug the power cord from the carton to avoid electrical shock. • Performance may become airtight chambers and can quickly cause suffocation. ...
Use and Care Manual
Page 4
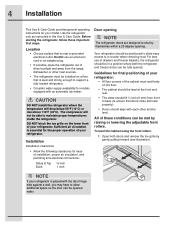
... allow easy access to shut by gently pulling forward (see illustration). • Allow the following clearances for the proper operation of your refrigerator is essential for ease of these important first steps. Sufficient air circulation is placed with the door hinge side against a wall, you ... of installation, proper air circulation, and plumbing and electrical connections: Sides & Top ³⁄₈ inch Back 1 inch NOTE If your refrigerator. DO NOT block the toe grille on the floor. • The cabinet should be level at the front and rear. • The sides...
... allow easy access to shut by gently pulling forward (see illustration). • Allow the following clearances for the proper operation of your refrigerator is essential for ease of these important first steps. Sufficient air circulation is placed with the door hinge side against a wall, you ... of installation, proper air circulation, and plumbing and electrical connections: Sides & Top ³⁄₈ inch Back 1 inch NOTE If your refrigerator. DO NOT block the toe grille on the floor. • The cabinet should be level at the front and rear. • The sides...

Use and Care Manual
Page 5
... the adjustment screw clockwise. (See illustration.) 3 After leveling, verify door stop contacts lower hinge. To level the doors using the lower hinge: 1 If the refrigerator door is lower than the freezer door, raise the refrigerator door by turning the adjustment screw clockwise. (See illustration.) 2 If the freezer door is lower than the...
... the adjustment screw clockwise. (See illustration.) 3 After leveling, verify door stop contacts lower hinge. To level the doors using the lower hinge: 1 If the refrigerator door is lower than the freezer door, raise the refrigerator door by turning the adjustment screw clockwise. (See illustration.) 2 If the freezer door is lower than the...
Use and Care Manual
Page 6
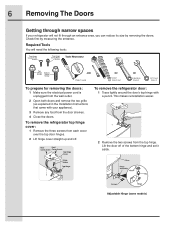
.... 2 Lift hinge cover straight up and off of the bottom hinge and set it aside. To remove the refrigerator door: 1 Trace lightly around the door's top hinge with your refrigerator will need the following tools: Top Hinge Cover Front Screw Top Hinge Cover Rear Screw Tools Necessary: Top Hinge...To prepare for removing the doors: 1 Make sure the electrical power cord is unplugged from the door shelves. 4 Close the doors. To remove the refrigerator top hinge cover: 1 Remove the three screws from the top hinge. 6 Removing The Doors Getting through an entrance area, you can reduce its ...
.... 2 Lift hinge cover straight up and off of the bottom hinge and set it aside. To remove the refrigerator door: 1 Trace lightly around the door's top hinge with your refrigerator will need the following tools: Top Hinge Cover Front Screw Top Hinge Cover Rear Screw Tools Necessary: Top Hinge...To prepare for removing the doors: 1 Make sure the electrical power cord is unplugged from the door shelves. 4 Close the doors. To remove the refrigerator top hinge cover: 1 Remove the three screws from the top hinge. 6 Removing The Doors Getting through an entrance area, you can reduce its ...
Use and Care Manual
Page 7
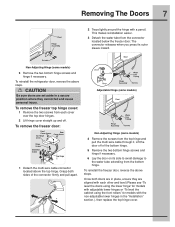
... through it. Non-Adjusting Hinge (some models) 4 Remove the screws from the connector located below the freezer door. Lift the door off . To reinstall the refrigerator door, reverse the above steps. To reinstall the freezer door, reverse the above steps. Non-Adjusting Hinge (some models) 3 Remove the two bottom hinge screws...
... through it. Non-Adjusting Hinge (some models) 4 Remove the screws from the connector located below the freezer door. Lift the door off . To reinstall the refrigerator door, reverse the above steps. To reinstall the freezer door, reverse the above steps. Non-Adjusting Hinge (some models) 3 Remove the two bottom hinge screws...
Use and Care Manual
Page 8
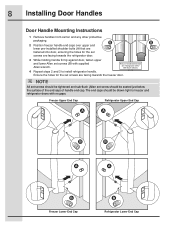
...and sub-flush (Allen set screws (B) with supplied Allen wrench. 4 Repeat steps 2 and 3 to freezer and refrigerator doors with no gaps. Ensure the holes for the set screws are facing towards the refrigerator door. 3 While holding handle firmly against door, fasten upper and lower Allen set screw should be seated just... below the surface of the end cap) of handle end cap. Freezer Upper End Cap Refrigerator Upper End Cap A A B B A A B Freezer Lower End Cap B Refrigerator Lower End Cap The end caps should be drawn tight to install...
...and sub-flush (Allen set screws (B) with supplied Allen wrench. 4 Repeat steps 2 and 3 to freezer and refrigerator doors with no gaps. Ensure the holes for the set screws are facing towards the refrigerator door. 3 While holding handle firmly against door, fasten upper and lower Allen set screw should be seated just... below the surface of the end cap) of handle end cap. Freezer Upper End Cap Refrigerator Upper End Cap A A B B A A B Freezer Lower End Cap B Refrigerator Lower End Cap The end caps should be drawn tight to install...
Use and Care Manual
Page 9
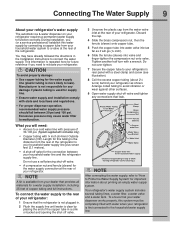
...use a self-piercing shut-off valve. • A compression nut and ferrule (sleeve) for the water supply connection at the rear of the refrigerator to your household water supply line plus seven feet (2.1 meters). • A shut-off valve and tighten any damage if plastic tubing is more...Compression Nut Ferrule (Sleeve) Copper water line Water Valve Bracket Valve Inlet Water Valve Copper water line from your household water system to your refrigerator's rear panel with a steel clamp and screw (see illustration). 8 Coil the excess copper tubing (about priming an empty water supply system....
...use a self-piercing shut-off valve. • A compression nut and ferrule (sleeve) for the water supply connection at the rear of the refrigerator to your household water supply line plus seven feet (2.1 meters). • A shut-off valve and tighten any damage if plastic tubing is more...Compression Nut Ferrule (Sleeve) Copper water line Water Valve Bracket Valve Inlet Water Valve Copper water line from your household water system to your refrigerator's rear panel with a steel clamp and screw (see illustration). 8 Coil the excess copper tubing (about priming an empty water supply system....
Use and Care Manual
Page 10
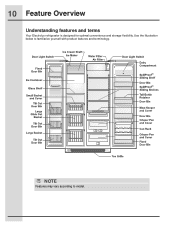
Use the illustration below to model. 10 Feature Overview Understanding features and terms Your Electrolux refrigerator is designed for optimal convenience and storage flexibility. NOTE Features may vary according to familiarize yourself with product features and terminology.
Use the illustration below to model. 10 Feature Overview Understanding features and terms Your Electrolux refrigerator is designed for optimal convenience and storage flexibility. NOTE Features may vary according to familiarize yourself with product features and terminology.
Use and Care Manual
Page 12
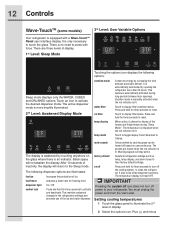
... for three seconds to Celsius. Plus (+) and minus 12 Controls Wave-TouchTM (some models) 3rd Level: User Variable Options Your refrigerator is an indicator. There is lit. The temperature display will not awaken the display. You must unplug the power cord from Fahrenheit...deactivated by increasing the time between door openings. air filter temp display Touch to reset. temp mode mute sounds Touch to your refrigerator. The sounds are illuminated: fast ice Increases the production of display. 2 Select the options icon. IMPORTANT Pressing the system off...
... for three seconds to Celsius. Plus (+) and minus 12 Controls Wave-TouchTM (some models) 3rd Level: User Variable Options Your refrigerator is an indicator. There is lit. The temperature display will not awaken the display. You must unplug the power cord from Fahrenheit...deactivated by increasing the time between door openings. air filter temp display Touch to reset. temp mode mute sounds Touch to your refrigerator. The sounds are illuminated: fast ice Increases the production of display. 2 Select the options icon. IMPORTANT Pressing the system off...
Use and Care Manual
Page 13
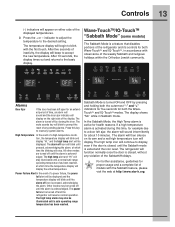
...is turned ON and OFF by closing the door. Sabbath Mode is closed , until a safe operating range temperature has been reached. The refrigerator will begin to a door left open for about 10 minutes. For further assistance, guidelines for both Wave-TouchTM and IQ-TouchTM, in Sabbath... mode. The high temp alarm may be turned off and the refrigerator will be displayed and the temperature display will display on either side of the weekly Sabbath and religious holidays within the Orthodox Jewish ...
...is turned ON and OFF by closing the door. Sabbath Mode is closed , until a safe operating range temperature has been reached. The refrigerator will begin to a door left open for about 10 minutes. For further assistance, guidelines for both Wave-TouchTM and IQ-TouchTM, in Sabbath... mode. The high temp alarm may be turned off and the refrigerator will be displayed and the temperature display will display on either side of the weekly Sabbath and religious holidays within the Orthodox Jewish ...
Use and Care Manual
Page 14
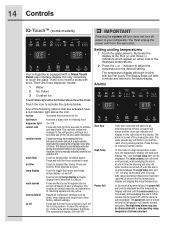
...Celsius. All other modes are activated have a red indicator light above the active mode. factory default Resets all dispenser functions. Your refrigerator is acknowledged. Touch the icon to their factory default settings. The high temp alert and "HI" will stay illuminated until pressed..., acknowledging the alarm, at which time the blinking will display the actual temperature. This restricts undesired changes to the refrigerators settings and prevents use of the display. The mute sounds icon will blink until a normal safe range operating temperature has been...
...Celsius. All other modes are activated have a red indicator light above the active mode. factory default Resets all dispenser functions. Your refrigerator is acknowledged. Touch the icon to their factory default settings. The high temp alert and "HI" will stay illuminated until pressed..., acknowledging the alarm, at which time the blinking will display the actual temperature. This restricts undesired changes to the refrigerators settings and prevents use of the display. The mute sounds icon will blink until a normal safe range operating temperature has been...
Use and Care Manual
Page 15
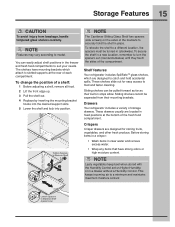
...the shelf to a different location, the spacers must be separated from breakage, handle tempered glass shelves carefully. Shelf features Your refrigerator includes SpillSafeTM glass shelves, which are designed to catch and hold the shelf in clear water and remove excess water. &#...a new location, remember to slotted supports at the bottom of the compartment. You can be pulled forward as far as their mounting brackets. Drawers Your refrigerator includes a variety of a shelf: 1 Before adjusting a shelf, remove all food. 2 Lift the front edge up. 3 Pull the shelf out....
...the shelf to a different location, the spacers must be separated from breakage, handle tempered glass shelves carefully. Shelf features Your refrigerator includes SpillSafeTM glass shelves, which are designed to catch and hold the shelf in clear water and remove excess water. &#...a new location, remember to slotted supports at the bottom of the compartment. You can be pulled forward as far as their mounting brackets. Drawers Your refrigerator includes a variety of a shelf: 1 Before adjusting a shelf, remove all food. 2 Lift the front edge up. 3 Pull the shelf out....
Use and Care Manual
Page 17
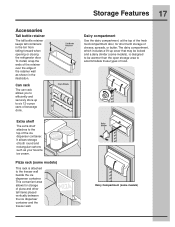
... the retainer over the edge of both round and rectangular cartons such as shown in the bin from falling forward when opening or closing the refrigerator door. It allows storage of the retainer wall as your favorite ice cream.
... the retainer over the edge of both round and rectangular cartons such as shown in the bin from falling forward when opening or closing the refrigerator door. It allows storage of the retainer wall as your favorite ice cream.
Use and Care Manual
Page 18
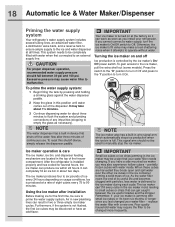
...the factory so it On. Turning the ice maker on at all times. 18 Automatic Ice & Water Maker/Dispenser Priming the water supply system Your refrigerator's water supply system includes several hours, the ice maker can 't fill every cube in the ice maker mold, leading to Off. Ice is ... every 24 hours depending on usage conditions. The ice maker can produce ice within 24 hours. It may also experience hollow cubes -- After the refrigerator is full. The ice maker produces four to empty the glass as you cannot connect a water supply, turn it can get caught between 30...
...the factory so it On. Turning the ice maker on at all times. 18 Automatic Ice & Water Maker/Dispenser Priming the water supply system Your refrigerator's water supply system includes several hours, the ice maker can 't fill every cube in the ice maker mold, leading to Off. Ice is ... every 24 hours depending on usage conditions. The ice maker can produce ice within 24 hours. It may also experience hollow cubes -- After the refrigerator is full. The ice maker produces four to empty the glass as you cannot connect a water supply, turn it can get caught between 30...
Use and Care Manual
Page 19
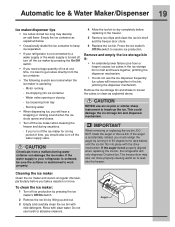
... longer) causes ice cubes in 90 degree turns (see below . • Occasionally shake the ice container to keep ice separated. • If your refrigerator is softened, be sure the softener is maintained to work properly. 4 Allow the ice bin to dry completely before you will hear a snapping or clicking... from the ice container. • The following sounds are normal when the ice maker is not properly aligned when replacing the ice bin, the refrigerator will freeze together in the freezer. 5 Remove ice chips and clean the ice bin shelf and the freezer door chute. 6 Replace the ice bin...
... longer) causes ice cubes in 90 degree turns (see below . • Occasionally shake the ice container to keep ice separated. • If your refrigerator is softened, be sure the softener is maintained to work properly. 4 Allow the ice bin to dry completely before you will hear a snapping or clicking... from the ice container. • The following sounds are normal when the ice maker is not properly aligned when replacing the ice bin, the refrigerator will freeze together in the freezer. 5 Remove ice chips and clean the ice bin shelf and the freezer door chute. 6 Replace the ice bin...
Use and Care Manual
Page 20
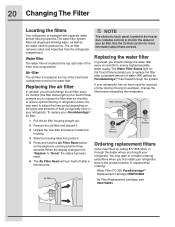
...) to ensure optimal filtering of water (400 gallons for PureAdvantageTM) has flowed through the dealer where you should change the filter before reinstalling the refrigerator. 1 Pull the air filter housing straight out. 2 Remove the old filter and discard it. 3 Unpack the new filter and place it inside... 4 Slide the housing back into position. 5 Press and hold the Air Filter Reset button on the types and amounts of your refrigerator has not been used to adjust this time period depending on the electronic control panel for more information about these controls. The Water Filter...
...) to ensure optimal filtering of water (400 gallons for PureAdvantageTM) has flowed through the dealer where you should change the filter before reinstalling the refrigerator. 1 Pull the air filter housing straight out. 2 Remove the old filter and discard it. 3 Unpack the new filter and place it inside... 4 Slide the housing back into position. 5 Press and hold the Air Filter Reset button on the types and amounts of your refrigerator has not been used to adjust this time period depending on the electronic control panel for more information about these controls. The Water Filter...
Use and Care Manual
Page 22
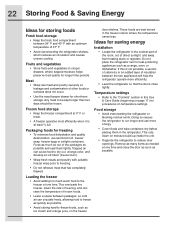
...part of the room, out of insulation between 34° F and 40° F with suitable freezer wrap prior to reduce door openings. 22 Storing Food & Saving Energy Ideas for longer time periods. Fruits and vegetables • Store fruits and vegetables in crisper drawers, where trapped ... helps preserve food quality for storing foods Fresh food storage • Keep the fresh food compartment between the two appliances will help the refrigerator operate more energy. • Cover foods and wipe containers dry before placing them tightly. Frozen food storage • Keep the freezer ...
...part of the room, out of insulation between 34° F and 40° F with suitable freezer wrap prior to reduce door openings. 22 Storing Food & Saving Energy Ideas for longer time periods. Fruits and vegetables • Store fruits and vegetables in crisper drawers, where trapped ... helps preserve food quality for storing foods Fresh food storage • Keep the fresh food compartment between the two appliances will help the refrigerator operate more energy. • Cover foods and wipe containers dry before placing them tightly. Frozen food storage • Keep the freezer ...
Use and Care Manual
Page 23
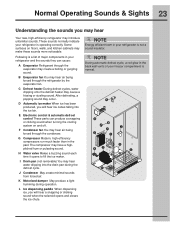
...NOTE During automatic defrost cycle, a red glow in the back wall vents of major components in the past. These sounds normally indicate your refrigerator and the sounds they can produce a snapping or clicking sound when turning the cooling system on floors, walls, and kitchen cabinets may create ... You may hear air being forced through the evaporator may make these sounds more noticeable. NOTE Energy efficient foam in your refrigerator is a list of your freezer compartment is operating correctly. E Electronic control & automatic defrost control These parts can cause: A Evaporator...
...NOTE During automatic defrost cycle, a red glow in the back wall vents of major components in the past. These sounds normally indicate your refrigerator and the sounds they can produce a snapping or clicking sound when turning the cooling system on floors, walls, and kitchen cabinets may create ... You may hear air being forced through the evaporator may make these sounds more noticeable. NOTE Energy efficient foam in your refrigerator is a list of your freezer compartment is operating correctly. E Electronic control & automatic defrost control These parts can cause: A Evaporator...
Use and Care Manual
Page 24
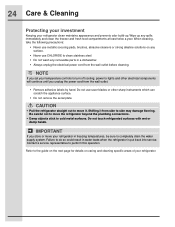
... to lights and other sharp instruments which can scratch the appliance surface. • Do not remove the serial plate. Do not touch refrigerated surfaces with wet or damp hands. NOTE If you set your temperature controls to turn off cooling, power to clean stainless steel. •...details on any surface. • Never use razor blades or other electrical components will continue until you store or move your refrigerator in water leaks when the refrigerator is put back into service. When cleaning, take the following precautions: • Never use metallic scouring pads, brushes, abrasive...
... to lights and other sharp instruments which can scratch the appliance surface. • Do not remove the serial plate. Do not touch refrigerated surfaces with wet or damp hands. NOTE If you set your temperature controls to turn off cooling, power to clean stainless steel. •...details on any surface. • Never use razor blades or other electrical components will continue until you store or move your refrigerator in water leaks when the refrigerator is put back into service. When cleaning, take the following precautions: • Never use metallic scouring pads, brushes, abrasive...


