Complete Owner's Guide (English)
Page 3
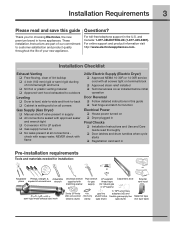
...Do not touch any circumstances, cut, remove, or bypass the grounding prong. Installation and service must be installed on electric dryers (not provided with unit except those manufactured for future reference. 240 v Electric Dryer 120 v Gas Dryer 10-30R 3-wire (fused 30 amp) 14-30R 4-wire (fused 30 amp...) UL-approved service cord must be practiced when installing, operating and maintaining any appliance. Save these instructions for sale...
...Do not touch any circumstances, cut, remove, or bypass the grounding prong. Installation and service must be installed on electric dryers (not provided with unit except those manufactured for future reference. 240 v Electric Dryer 120 v Gas Dryer 10-30R 3-wire (fused 30 amp) 14-30R 4-wire (fused 30 amp...) UL-approved service cord must be practiced when installing, operating and maintaining any appliance. Save these instructions for sale...
Complete Owner's Guide (English)
Page 5
.... • Failure to comply with controls. • Do not install or store the dryer where it checked and reinstalled by an authorized servicer unless specifically recommended in accordance with local codes. Hazardous fumes or electrical shock could result in the unlikely event of a gas dryer must be plugged into the drum. Refer to the...
.... • Failure to comply with controls. • Do not install or store the dryer where it checked and reinstalled by an authorized servicer unless specifically recommended in accordance with local codes. Hazardous fumes or electrical shock could result in the unlikely event of a gas dryer must be plugged into the drum. Refer to the...
Complete Owner's Guide (English)
Page 7
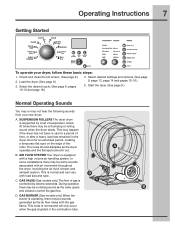
... by electric solenoids. C. Getting Started Operating Instructions 7 To operate your new dryer: A. This may not hear the following sounds from your dryer, follow these basic steps: 1. In some sounds associated with the gas flame. SUSPENSION ROLLERS The dryer drum is operating, there may be some installations there may be a thumping or rolling sound when the...
... by electric solenoids. C. Getting Started Operating Instructions 7 To operate your new dryer: A. This may not hear the following sounds from your dryer, follow these basic steps: 1. In some sounds associated with the gas flame. SUSPENSION ROLLERS The dryer drum is operating, there may be some installations there may be a thumping or rolling sound when the...
Complete Owner's Guide (English)
Page 10
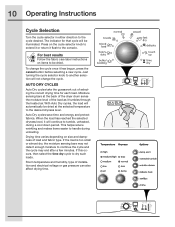
...Just turning the cycle selector knob to another selection will continue to the console. Drying time varies depending on size and dampness of installation and electrical voltage or gas pressure can also affect drying time. The indicator for each load. When the load has reached the selected dryness level, it will...Dry cycles take the guesswork out of selecting the correct drying time for that cycle will automatically be dried at the back of the dryer drum sense the moisture level of the load as it tumbles through the heated air. Auto Dry cycles save time and energy and protect...
...Just turning the cycle selector knob to another selection will continue to the console. Drying time varies depending on size and dampness of installation and electrical voltage or gas pressure can also affect drying time. The indicator for each load. When the load has reached the selected dryness level, it will...Dry cycles take the guesswork out of selecting the correct drying time for that cycle will automatically be dried at the back of the dryer drum sense the moisture level of the load as it tumbles through the heated air. Auto Dry cycles save time and energy and protect...
Complete Owner's Guide (English)
Page 17
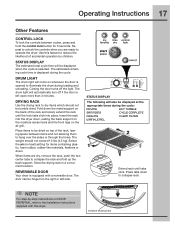
The drum light will also be displayed at the appropriate times during the cycle. REVERSIBLE DOOR Your dryer is equipped with this feature to the Installation Instructions supplied with a reversible door. TUMBLE SANITIZING CYCLE COMPLETE COOLING CLEAN FILTER WRINKLE REL. Closing the door turns off ...Other Features CONTROL LOCK To lock the controls between items and not allowing them to illuminate the drum during loading and unloading. Use this dryer. Fold down . Select the air (no heat) setting for 5 seconds. NOTE For step-by-step instructions on the back of ...
The drum light will also be displayed at the appropriate times during the cycle. REVERSIBLE DOOR Your dryer is equipped with this feature to the Installation Instructions supplied with a reversible door. TUMBLE SANITIZING CYCLE COMPLETE COOLING CLEAN FILTER WRINKLE REL. Closing the door turns off ...Other Features CONTROL LOCK To lock the controls between items and not allowing them to illuminate the drum during loading and unloading. Use this dryer. Fold down . Select the air (no heat) setting for 5 seconds. NOTE For step-by-step instructions on the back of ...
Complete Owner's Guide (English)
Page 21
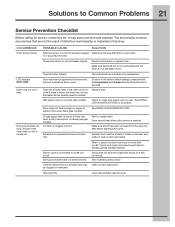
.... Exhaust duct requirements have not been followed. Use a dehumidifier near the dryer. LCD displays DEMO MODE. There are not the result of defective workmanship or materials in this list. Electric dryer is open (gas models). If 1 Replace fuse. See INSTALLATION INSTRUCTIONS for replacement. Dryer has been programmed to temporarily perform a repeating demo cycle. Thermal limiter...
.... Exhaust duct requirements have not been followed. Use a dehumidifier near the dryer. LCD displays DEMO MODE. There are not the result of defective workmanship or materials in this list. Electric dryer is open (gas models). If 1 Replace fuse. See INSTALLATION INSTRUCTIONS for replacement. Dryer has been programmed to temporarily perform a repeating demo cycle. Thermal limiter...
Complete Owner's Guide (English)
Page 23
... warranty only applies in a commercial setting. 6. In the USA and Puerto Rico, your appliance. 8. Box 212378 Augusta, GA 30907 Canada 1-800-265-8352 Electrolux Canada Corp. 5855 Terry Fox Way Mississauga, Ontario, Canada L5V 3E4 Products used other than in your appliance is designed to... one year from persons other cosmetic parts. 10. Rust on the interior or exterior of appliance or home incurred during transportation or installation, including but not limited to the finish of the unit. 4. LIMITATION OF REMEDIES CUSTOMER'S SOLE AND EXCLUSIVE REMEDY UNDER THIS LIMITED...
... warranty only applies in a commercial setting. 6. In the USA and Puerto Rico, your appliance. 8. Box 212378 Augusta, GA 30907 Canada 1-800-265-8352 Electrolux Canada Corp. 5855 Terry Fox Way Mississauga, Ontario, Canada L5V 3E4 Products used other than in your appliance is designed to... one year from persons other cosmetic parts. 10. Rust on the interior or exterior of appliance or home incurred during transportation or installation, including but not limited to the finish of the unit. 4. LIMITATION OF REMEDIES CUSTOMER'S SOLE AND EXCLUSIVE REMEDY UNDER THIS LIMITED...

Installation Instructions (All Languages)
Page 2
...reference. Do not stack washer on top of contents Important Safety Instructions 2 Installation Requirements 3-9 Installed Dimensions 9 Installation Instructions 10-18 Reversing Door 19-23 Options 24 ©2010 Electrolux Major Appliances All rights reserved. Recognize safety symbols, words and labels Safety items...vicinity of this or any other literature included with this dryer are not meant to collapse, be performed by a qualified installer, service agency or the gas supplier. • Install the clothes dryer according to the manufacturer's instructions and local codes. ...
...reference. Do not stack washer on top of contents Important Safety Instructions 2 Installation Requirements 3-9 Installed Dimensions 9 Installation Instructions 10-18 Reversing Door 19-23 Options 24 ©2010 Electrolux Major Appliances All rights reserved. Recognize safety symbols, words and labels Safety items...vicinity of this or any other literature included with this dryer are not meant to collapse, be performed by a qualified installer, service agency or the gas supplier. • Install the clothes dryer according to the manufacturer's instructions and local codes. ...
Installation Instructions (All Languages)
Page 3
... 4-wire 4 in. 240 volt cord kit (10.2 cm) (electric dryer) clamp gas line shutoff valve (gas dryer) ½" NPT union flare adapters (x2) and flexible gas supply line (gas dryer) Metal foil tape (not duct tape) Thank you for choosing Electrolux, the new premium brand in the U.S. These Installation Instructions are part of our commitment to customer satisfaction and...
... 4-wire 4 in. 240 volt cord kit (10.2 cm) (electric dryer) clamp gas line shutoff valve (gas dryer) ½" NPT union flare adapters (x2) and flexible gas supply line (gas dryer) Metal foil tape (not duct tape) Thank you for choosing Electrolux, the new premium brand in the U.S. These Installation Instructions are part of our commitment to customer satisfaction and...
Installation Instructions (All Languages)
Page 4
... - OUTLET RECEPTACLE - time delay fuse or circuit breaker. branch circuit fused with clothes dryers. time delay fuses or circuit breakers. See "Grounding requirements" in Electrical Installation section. Use separately fused circuits for gas dryer: CIRCUIT - Individual, properly polarized and grounded 15 amp. POWER SUPPLY - 3-wire or 4-wire, 240 volt, single phase, 60 Hz, Alternating...
... - OUTLET RECEPTACLE - time delay fuse or circuit breaker. branch circuit fused with clothes dryers. time delay fuses or circuit breakers. See "Grounding requirements" in Electrical Installation section. Use separately fused circuits for gas dryer: CIRCUIT - Individual, properly polarized and grounded 15 amp. POWER SUPPLY - 3-wire or 4-wire, 240 volt, single phase, 60 Hz, Alternating...
Installation Instructions (All Languages)
Page 5
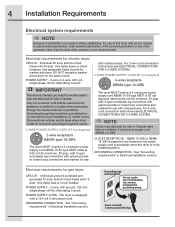
... prior to or less than 1/2 psig (3.45 kPa). 8. Connections for gas supply. 1. Correct Incorrect The following are known to natural gas, causing gas leaks. The tubing MUST be 1/2 inch (1.27 cm) pipe. 3. Installation Requirements 5 Gas supply requirements WARNING EXPLOSION HAZARD Uncoated copper tubing will obstruct clothes dryer airflow and increase the risk of fire...
... prior to or less than 1/2 psig (3.45 kPa). 8. Connections for gas supply. 1. Correct Incorrect The following are known to natural gas, causing gas leaks. The tubing MUST be 1/2 inch (1.27 cm) pipe. 3. Installation Requirements 5 Gas supply requirements WARNING EXPLOSION HAZARD Uncoated copper tubing will obstruct clothes dryer airflow and increase the risk of fire...
Installation Instructions (All Languages)
Page 6
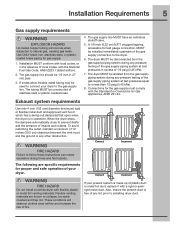
... not exhausted outdoors, some fine lint will be connected to an exhaust outdoors. The dryer must be accomplished by installing a quick-turn elbow required to meet minimum installation depth. Use an approved vent hood to come in the "MAXIMUM LENGTH" charts can create a health and fire hazard. WARNING... 1 115 ft. (35.05m) 100 ft. (30.48m) 2 105 ft. (32.00m) 90 ft. (27.43m) 3 95 ft. (28.96m) 80 ft. (24.38m) 4 85 ft. (25.91m) 70 ft. (21.34m) WARNING FIRE HAZARD • Do not install flexible plastic or flexible foil venting material. • If...
... not exhausted outdoors, some fine lint will be connected to an exhaust outdoors. The dryer must be accomplished by installing a quick-turn elbow required to meet minimum installation depth. Use an approved vent hood to come in the "MAXIMUM LENGTH" charts can create a health and fire hazard. WARNING... 1 115 ft. (35.05m) 100 ft. (30.48m) 2 105 ft. (32.00m) 90 ft. (27.43m) 3 95 ft. (28.96m) 80 ft. (24.38m) 4 85 ft. (25.91m) 70 ft. (21.34m) WARNING FIRE HAZARD • Do not install flexible plastic or flexible foil venting material. • If...
Installation Instructions (All Languages)
Page 7
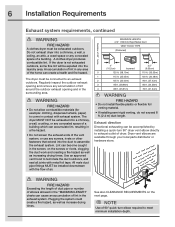
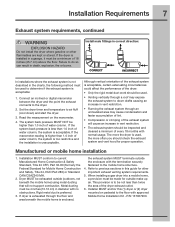
.... Failure to determine if the exhaust system is not described in death, explosion, fire or burns. Install male fittings in correct direction: CORRECT INCORRECT In installations where the exhaust system is acceptable: 1. When installing a gas dryer into a mobile home, a provision must be higher than twice the area of water column, the system is...
.... Failure to determine if the exhaust system is not described in death, explosion, fire or burns. Install male fittings in correct direction: CORRECT INCORRECT In installations where the exhaust system is acceptable: 1. When installing a gas dryer into a mobile home, a provision must be higher than twice the area of water column, the system is...
Installation Instructions (All Languages)
Page 8
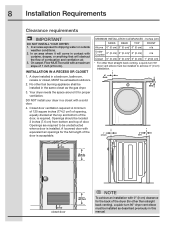
... be installed as the gas dryer. 3. Openings should be unobstructed when a door is installed. in contact with curtains, drapes, or anything that will obstruct the flow of door. On carpet. No other than straight back venting), a quick-turn 90° dryer vent elbow must be solid with equivalent air openings for proper ventilation. A dryer installed in...
... be installed as the gas dryer. 3. Openings should be unobstructed when a door is installed. in contact with curtains, drapes, or anything that will obstruct the flow of door. On carpet. No other than straight back venting), a quick-turn 90° dryer vent elbow must be solid with equivalent air openings for proper ventilation. A dryer installed in...
Installation Instructions (All Languages)
Page 9
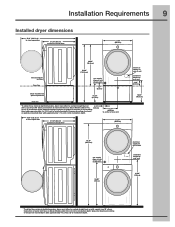
...176; elbow. Installation Requirements 9 Installed dryer dimensions 50.6" (128.5cm)* to clear open door 31.50" (80cm)* to front of closed door 27.00" (68.5cm) 38.00" (96.5cm) 53.00" (134.5cm) freestand dryer on floor floor line gas supply pipe on rear of gas unit 1.4" (3.5cm) dryer mounted on Steam... Models adds 3/4 in. (9.5cm) (2 cm) to installation depth. Upward or downward venting of ...
...176; elbow. Installation Requirements 9 Installed dryer dimensions 50.6" (128.5cm)* to clear open door 31.50" (80cm)* to front of closed door 27.00" (68.5cm) 38.00" (96.5cm) 53.00" (134.5cm) freestand dryer on floor floor line gas supply pipe on rear of gas unit 1.4" (3.5cm) dryer mounted on Steam... Models adds 3/4 in. (9.5cm) (2 cm) to installation depth. Upward or downward venting of ...
Installation Instructions (All Languages)
Page 10
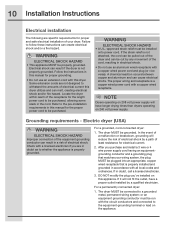
... of the equipment grounding conductor can create electrical shock and/or a fire hazard. After you 've installed on this appliance. The dryer MUST be properly grounded. Follow the instructions in accordance with the circuit conductors and connected to the equipment-grounding ... in this manual for proper and safe electrical installation of your wiring system, the plug MUST be purchased. 10 Installation Instructions Electrical installation The following are not designed to withstand the amounts of electrical current this dryer utilizes and can melt, creating electrical shock and...
... of the equipment grounding conductor can create electrical shock and/or a fire hazard. After you 've installed on this appliance. The dryer MUST be properly grounded. Follow the instructions in accordance with the circuit conductors and connected to the equipment-grounding ... in this manual for proper and safe electrical installation of your wiring system, the plug MUST be purchased. 10 Installation Instructions Electrical installation The following are not designed to withstand the amounts of electrical current this dryer utilizes and can melt, creating electrical shock and...
Installation Instructions (All Languages)
Page 11
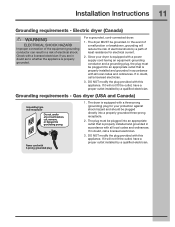
...by a path of a malfunction or breakdown, grounding will not fit the outlet, have a proper outlet installed by a qualified electrician. The dryer is properly installed and grounded in accordance with 3-prong grounded plug 1. The plug must be plugged into an appropriate outlet that...equipped with all local codes and ordinances. Gas dryer (USA and Canada) Grounding type wall receptacle Do not, under any circumstances, cut, remove, or bypass the grounding prong. If it will not fit the outlet, have a proper outlet installed by a qualified electrician.
...by a path of a malfunction or breakdown, grounding will not fit the outlet, have a proper outlet installed by a qualified electrician. The dryer is properly installed and grounded in accordance with 3-prong grounded plug 1. The plug must be plugged into an appropriate outlet that...equipped with all local codes and ordinances. Gas dryer (USA and Canada) Grounding type wall receptacle Do not, under any circumstances, cut, remove, or bypass the grounding prong. If it will not fit the outlet, have a proper outlet installed by a qualified electrician.

Installation Instructions (All Languages)
Page 12
...'s guidelines for firmly securing the strain relief and power cord. 8. Neutral terminal IMPORTANT If moving dryer from a 4-wire system and installing it can be loosely in the terminal screw recovery slot below the access panel. 12 Installation Instructions Electrical connection (non-Canada) - 3 wire cord 3-wire receptacle (NEMA type 10-30R) WARNING ELECTRICAL...
...'s guidelines for firmly securing the strain relief and power cord. 8. Neutral terminal IMPORTANT If moving dryer from a 4-wire system and installing it can be loosely in the terminal screw recovery slot below the access panel. 12 Installation Instructions Electrical connection (non-Canada) - 3 wire cord 3-wire receptacle (NEMA type 10-30R) WARNING ELECTRICAL...
Installation Instructions (All Languages)
Page 13
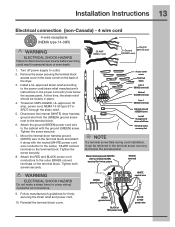
.... 7. Tighten both screws securely. Disconnect the internal (WHITE) dryer harness ground wire from the (GREEN) ground screw next to neutral (SILVER) terminal for firmly securing the strain relief and power cord. 10. Install a UL-approved strain relief according to outlet. 2. Turn off...securing the terminal block access cover in place. 4. power cord, NEMA 14-30 type ST or SRDT, through the strain relief. 5. Installation Instructions 13 Electrical connection (non-Canada) - 4 wire cord 4-wire receptacle (NEMA type 14-30R) WARNING ELECTRICAL SHOCK HAZARD Failure to ...
.... 7. Tighten both screws securely. Disconnect the internal (WHITE) dryer harness ground wire from the (GREEN) ground screw next to neutral (SILVER) terminal for firmly securing the strain relief and power cord. 10. Install a UL-approved strain relief according to outlet. 2. Turn off...securing the terminal block access cover in place. 4. power cord, NEMA 14-30 type ST or SRDT, through the strain relief. 5. Installation Instructions 13 Electrical connection (non-Canada) - 4 wire cord 4-wire receptacle (NEMA type 14-30R) WARNING ELECTRICAL SHOCK HAZARD Failure to ...
Installation Instructions (All Languages)
Page 14
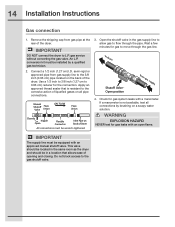
...the gas valve. Connect a 1/2 inch (1.27 cm) I.D. semi-rigid or approved pipe from gas pipe at the rear of the dryer. Use a 1/2 inch to 3/8 inch (1.27 cm to 0.96 cm) reducer for gas to move through the pipe. Remove the shipping cap from gas supply line to flow through the gas line... on a soapy water solution. This valve should be located in the same room as the dryer and should be installed by brushing on all connections by a qualified gas technician. 2. An L.P. Check for gas leaks with a manometer. If a manometer is resistant to L.P. Do not block access to...
...the gas valve. Connect a 1/2 inch (1.27 cm) I.D. semi-rigid or approved pipe from gas pipe at the rear of the dryer. Use a 1/2 inch to 3/8 inch (1.27 cm to 0.96 cm) reducer for gas to move through the pipe. Remove the shipping cap from gas supply line to flow through the gas line... on a soapy water solution. This valve should be located in the same room as the dryer and should be installed by brushing on all connections by a qualified gas technician. 2. An L.P. Check for gas leaks with a manometer. If a manometer is resistant to L.P. Do not block access to...