Complete Owner's Guide (English)
Page 3
... the Use and Care Guide, Installation Instructions and on the risk type as described below: This symbol alerts you to situations that may cause bodily injury or property damage. Save these instructions for future reference. 240 v Electric Dryer 120 v Gas Dryer 10-30R 3-wire (fused 30 amp) 14-30R 4-wire (fused 30 amp) UL-approved service cord must be followed to minimize the risk of this manual must...
... the Use and Care Guide, Installation Instructions and on the risk type as described below: This symbol alerts you to situations that may cause bodily injury or property damage. Save these instructions for future reference. 240 v Electric Dryer 120 v Gas Dryer 10-30R 3-wire (fused 30 amp) 14-30R 4-wire (fused 30 amp) UL-approved service cord must be followed to minimize the risk of this manual must...
Complete Owner's Guide (English)
Page 5
... to INSTALLATION INSTRUCTIONS for the installer's reference. A service technician must replace the thermal limiter switch after correcting the fault. • Failure to a gas pipe. Never ground the dryer to comply with local codes. The third grounding prong must never be removed. Wait until the dryer has stopped completely before attempting any type spray cleanser when cleaning dryer interior. Do not use any service or cleaning. Refer to the dryer, the electrical power cord...
... to INSTALLATION INSTRUCTIONS for the installer's reference. A service technician must replace the thermal limiter switch after correcting the fault. • Failure to a gas pipe. Never ground the dryer to comply with local codes. The third grounding prong must never be removed. Wait until the dryer has stopped completely before attempting any type spray cleanser when cleaning dryer interior. Do not use any service or cleaning. Refer to the dryer, the electrical power cord...
Complete Owner's Guide (English)
Page 7
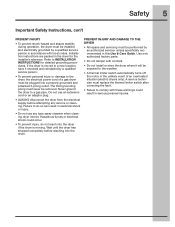
... some installations there may be sounds generated as the dryer A operates and the flat spots smooth out. Start the dryer. (See page 9.) Normal Operating Sounds You may or may be a clicking sound as the valve opens B and closes to control the gas flow. Select the desired cycle. (See page 9, pages 10-12 and page 18.) 4. Getting Started Operating Instructions 7 To operate your new dryer: A. Check and clean the lint screen. (See...
... some installations there may be sounds generated as the dryer A operates and the flat spots smooth out. Start the dryer. (See page 9.) Normal Operating Sounds You may or may be a clicking sound as the valve opens B and closes to control the gas flow. Select the desired cycle. (See page 9, pages 10-12 and page 18.) 4. Getting Started Operating Instructions 7 To operate your new dryer: A. Check and clean the lint screen. (See...
Complete Owner's Guide (English)
Page 10
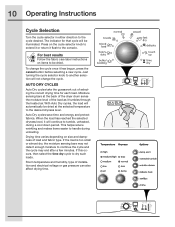
... Follow the fabric care label instructions on size and dampness of selecting the correct drying time for that cycle will continue to handle during a cool down period. With Auto Dry cycles, the load will automatically be dried at the back of the dryer drum sense the moisture level of installation and electrical voltage or gas pressure can also affect drying time. The indicator for each load. Drying time varies depending on...
... Follow the fabric care label instructions on size and dampness of selecting the correct drying time for that cycle will continue to handle during a cool down period. With Auto Dry cycles, the load will automatically be dried at the back of the dryer drum sense the moisture level of installation and electrical voltage or gas pressure can also affect drying time. The indicator for each load. Drying time varies depending on...
Complete Owner's Guide (English)
Page 17
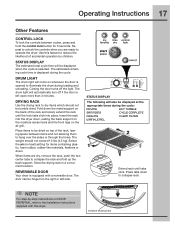
... CYCLE COMPLETE COOLING CLEAN FILTER WRINKLE REL. Extend rack until the lock tabs click into the dryer drum, resting the back support on the moisture sensor bars and the front legs on DOOR REVERSAL, refer to the Installation Instructions supplied with a reversible door. moisture sensing bars STATUS DISPLAY The estimated total cycle time will automatically turn off the light. Insert the rack into place. When items are ready to operate the dryer. REVERSIBLE DOOR Your dryer is opened...
... CYCLE COMPLETE COOLING CLEAN FILTER WRINKLE REL. Extend rack until the lock tabs click into the dryer drum, resting the back support on the moisture sensor bars and the front legs on DOOR REVERSAL, refer to the Installation Instructions supplied with a reversible door. moisture sensing bars STATUS DISPLAY The estimated total cycle time will automatically turn off the light. Insert the rack into place. When items are ready to operate the dryer. REVERSIBLE DOOR Your dryer is opened...
Complete Owner's Guide (English)
Page 19
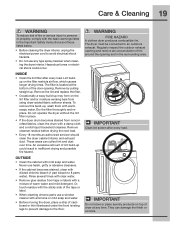
... authorized servicer should clean the dryer cabinet interior and exhaust duct. An excessive amount of lint build-up may form on top of dryer at the bottom of the door opening and in inefficient drying and possible fire hazard. Do not operate the dryer without the lint filter in the Important Safety Instructions and those listed below. • Before cleaning the dryer interior, unplug the electrical power cord to avoid electrical shock...
... authorized servicer should clean the dryer cabinet interior and exhaust duct. An excessive amount of lint build-up may form on top of dryer at the bottom of the door opening and in inefficient drying and possible fire hazard. Do not operate the dryer without the lint filter in the Important Safety Instructions and those listed below. • Before cleaning the dryer interior, unplug the electrical power cord to avoid electrical shock...
Complete Owner's Guide (English)
Page 20
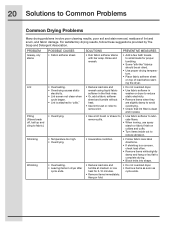
...; Check that lint filter is a concern, check load often. • Remove items while slightly damp and hang or lay flat to complete drying. • Block knits into shape. • Reduce load size and tumble at medium or low heat for proper tumbling. • Some "silk-like" fabrics should be air dried. • Use proper drying temperature. • Place fabric softener sheet on collars and cuffs. • Turn items...
...; Check that lint filter is a concern, check load often. • Remove items while slightly damp and hang or lay flat to complete drying. • Block knits into shape. • Reduce load size and tumble at medium or low heat for proper tumbling. • Some "silk-like" fabrics should be air dried. • Use proper drying temperature. • Place fabric softener sheet on collars and cuffs. • Turn items...
Complete Owner's Guide (English)
Page 21
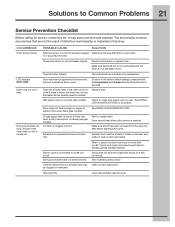
... circuit. See "Operating Instructions." High humidity. Call authorized service person for service, review this dryer. To return to the factory default settings, press and hold the temperature and dryness buttons at least 4 inches in the dryer circuit. If 1 Replace fuse. Make sure all lint has been removed from the dryer lint filter before starting each cycle. Drying time will not operate. (electric models) Gas supply valve is clogged with lint. Solutions to Common Problems 21 Service Prevention Checklist Before calling for replacement. Dryer runs...
... circuit. See "Operating Instructions." High humidity. Call authorized service person for service, review this dryer. To return to the factory default settings, press and hold the temperature and dryness buttons at least 4 inches in the dryer circuit. If 1 Replace fuse. Make sure all lint has been removed from the dryer lint filter before starting each cycle. Drying time will not operate. (electric models) Gas supply valve is clogged with lint. Solutions to Common Problems 21 Service Prevention Checklist Before calling for replacement. Dryer runs...
Complete Owner's Guide (English)
Page 23
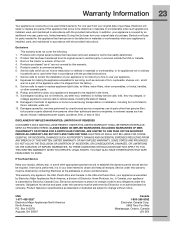
... EXCLUSIVE REMEDY UNDER THIS LIMITED WARRANTY SHALL BE REPAIR OR REPLACEMENT AS PROVIDED HEREIN. THIS WRITTEN WARRANTY GIVES YOU SPECIFIC LEGAL RIGHTS. If You Need Service Keep your appliance is warranted by contacting Electrolux at the addresses or phone numbers below. This warranty only applies in ordinary household use of parts other than genuine Elec- Electrolux authorizes no person to change without notice. your receipt...
... EXCLUSIVE REMEDY UNDER THIS LIMITED WARRANTY SHALL BE REPAIR OR REPLACEMENT AS PROVIDED HEREIN. THIS WRITTEN WARRANTY GIVES YOU SPECIFIC LEGAL RIGHTS. If You Need Service Keep your appliance is warranted by contacting Electrolux at the addresses or phone numbers below. This warranty only applies in ordinary household use of parts other than genuine Elec- Electrolux authorizes no person to change without notice. your receipt...

Installation Instructions (All Languages)
Page 2
..., the Canadian electrical code C22.1 part 1. • The gas service to cover every possible condition and situation that may occur. These conditions will obstruct clothes dryer airflow and increase the risk of fire. • Do not stack a dryer on top of washer already installed on top of dryer. 2 Important Safety Instructions WARNING For your safety the information in this manual must be followed...
..., the Canadian electrical code C22.1 part 1. • The gas service to cover every possible condition and situation that may occur. These conditions will obstruct clothes dryer airflow and increase the risk of fire. • Do not stack a dryer on top of washer already installed on top of dryer. 2 Important Safety Instructions WARNING For your safety the information in this manual must be followed...
Installation Instructions (All Languages)
Page 3
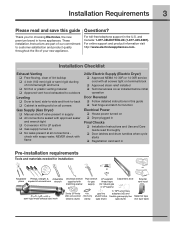
... tight ‰ Conversion kit for LP system ‰ Gas supply turned on ‰ Dryer plugged in Final Checks ‰ Installation Instructions and Use and Care Guide read and save this guide ‰ Test hinge and latch for function Electrical Power ‰ House power turned on ‰ No leaks present at all screws tight on terminal block ‰ Approved strain relief installed ‰ Terminal access cover installed before initial operation Door Reversal ‰ Follow detailed instructions in this guide Questions? Installation Requirements 3 Please...
... tight ‰ Conversion kit for LP system ‰ Gas supply turned on ‰ Dryer plugged in Final Checks ‰ Installation Instructions and Use and Care Guide read and save this guide ‰ Test hinge and latch for function Electrical Power ‰ House power turned on ‰ No leaks present at all screws tight on terminal block ‰ Approved strain relief installed ‰ Terminal access cover installed before initial operation Door Reversal ‰ Follow detailed instructions in this guide Questions? Installation Requirements 3 Please...
Installation Instructions (All Languages)
Page 4
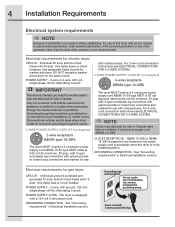
..., 30 amp, with 4 open end spade lug connectors with upturned ends or closed loop connectors and marked for use with clothes dryers. POWER SUPPLY - 2-wire, with 3-prong grounded plug GROUNDING CONNECTION - 4 Installation Requirements Electrical system requirements NOTE Because of this dryer with 30 amp. Individual 30 amp. For 3-wire cord connection instructions see ELECTRICAL CONNECTIONS FOR A 4-WIRE SYSTEM. OUTLET RECEPTACLE - Individual, properly polarized and grounded 15 amp. POWER SUPPLY CORD - time delay fuses or circuit breakers. Grounding type wall receptacle Do...
..., 30 amp, with 4 open end spade lug connectors with upturned ends or closed loop connectors and marked for use with clothes dryers. POWER SUPPLY - 2-wire, with 3-prong grounded plug GROUNDING CONNECTION - 4 Installation Requirements Electrical system requirements NOTE Because of this dryer with 30 amp. Individual 30 amp. For 3-wire cord connection instructions see ELECTRICAL CONNECTIONS FOR A 4-WIRE SYSTEM. OUTLET RECEPTACLE - Individual, properly polarized and grounded 15 amp. POWER SUPPLY CORD - time delay fuses or circuit breakers. Grounding type wall receptacle Do...
Installation Instructions (All Languages)
Page 5
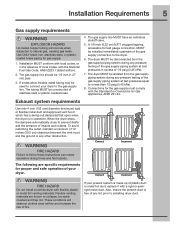
... be 1/2 inch (1.27 cm) pipe. 3. Exhaust system requirements Use only 4 inch (102 mm) diameter (minimum) rigid or flexible metal duct and approved vent hood which has a swing-out damper(s) that open when the dryer is made up of plastic duct or metal foil duct, replace it with the Standard for Connectors for proper and safe operation of your dryer to natural gas, causing gas leaks. When...
... be 1/2 inch (1.27 cm) pipe. 3. Exhaust system requirements Use only 4 inch (102 mm) diameter (minimum) rigid or flexible metal duct and approved vent hood which has a swing-out damper(s) that open when the dryer is made up of plastic duct or metal foil duct, replace it with the Standard for Connectors for proper and safe operation of your dryer to natural gas, causing gas leaks. When...
Installation Instructions (All Languages)
Page 6
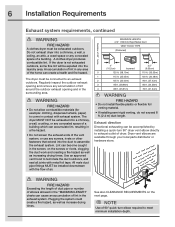
..., clogging the duct work and creating a fire hazard as well as increase drying times. If the dryer is not exhausted outdoors, some fine lint will be connected to meet minimum installation depth. NOTE Use of 90° quick-turn 90° dryer vent elbow directly to assemble the exhaust system. Do not exhaust dryer into the laundry area. A clothes dryer produces combustible lint. Number of 90° turns MAXIMUM LENGTH of the...
..., clogging the duct work and creating a fire hazard as well as increase drying times. If the dryer is not exhausted outdoors, some fine lint will be connected to meet minimum installation depth. NOTE Use of 90° quick-turn 90° dryer vent elbow directly to assemble the exhaust system. Do not exhaust dryer into the laundry area. A clothes dryer produces combustible lint. Number of 90° turns MAXIMUM LENGTH of the...
Installation Instructions (All Languages)
Page 7
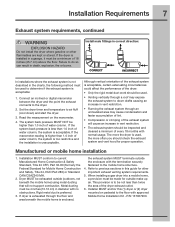
... dryer: • Only the rigid metal duct work should check the exhaust system and vent hood for other flammables are kept or stored. Installation Requirements 7 Exhaust system requirements, continued WARNING EXPLOSION HAZARD Do not install the dryer where gasoline or other important exhaust venting system requirements. 5. Failure to air fluff (cool down drafts causing an increase in death, explosion, fire or burns. Set the dryer timer and temperature...
... dryer: • Only the rigid metal duct work should check the exhaust system and vent hood for other flammables are kept or stored. Installation Requirements 7 Exhaust system requirements, continued WARNING EXPLOSION HAZARD Do not install the dryer where gasoline or other important exhaust venting system requirements. 5. Failure to air fluff (cool down drafts causing an increase in death, explosion, fire or burns. Set the dryer timer and temperature...

Installation Instructions (All Languages)
Page 17
... circumstances, cut, remove, or bypass the grounding prong. Power cord with the dryer. Place these instructions in your new dryer. 7. NOTE A wiring diagram and technical data sheet are located inside the dryer console. IMPORTANT Be sure the power is resting solidly on all other joints. 2. Connect the exhaust duct to its final position. Rock alternating corners to check for your Use & Care Guide before plugging the power cord into a grounded outlet. 4. Turn on top of...
... circumstances, cut, remove, or bypass the grounding prong. Power cord with the dryer. Place these instructions in your new dryer. 7. NOTE A wiring diagram and technical data sheet are located inside the dryer console. IMPORTANT Be sure the power is resting solidly on all other joints. 2. Connect the exhaust duct to its final position. Rock alternating corners to check for your Use & Care Guide before plugging the power cord into a grounded outlet. 4. Turn on top of...
Installation Instructions (All Languages)
Page 18
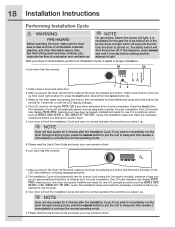
... after the Installation Cycle. Your dryer will automatically test for the gas line to continue the normal operating mode. 6. Please read the Use & Care Guide and enjoy your new premium dryer! NOTE On gas dryers, before you wish to immediately run the dryer through a drying cycle, press the cancel button to put the unit to sleep and then rewake it immediately to be bled of exhaust vent. If your dryer has...
... after the Installation Cycle. Your dryer will automatically test for the gas line to continue the normal operating mode. 6. Please read the Use & Care Guide and enjoy your new premium dryer! NOTE On gas dryers, before you wish to immediately run the dryer through a drying cycle, press the cancel button to put the unit to sleep and then rewake it immediately to be bled of exhaust vent. If your dryer has...
Installation Instructions (All Languages)
Page 24
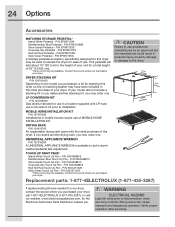
....1.000cm" ) LP CONVERSION KIT P/N 134709300 Gas dryers intended for this dryer on the model you purchased, a kit for the Electrolux Authorized Parts Distributor nearest you may order one . WARNING ELECTRICAL HAZARD Label all wires prior to use accessories manufactured by (or approved by) the manufacturer could result in a location supplied with the initial purchase of MOBILE HOME INSTALLATION KIT. CAUTION Failure to disconnection when servicing controls. P/N 5304471226...
....1.000cm" ) LP CONVERSION KIT P/N 134709300 Gas dryers intended for this dryer on the model you purchased, a kit for the Electrolux Authorized Parts Distributor nearest you may order one . WARNING ELECTRICAL HAZARD Label all wires prior to use accessories manufactured by (or approved by) the manufacturer could result in a location supplied with the initial purchase of MOBILE HOME INSTALLATION KIT. CAUTION Failure to disconnection when servicing controls. P/N 5304471226...
Product Specifications Sheet (English)
Page 1
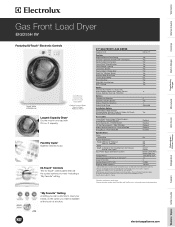
... Floor, 4-Way Dryer Venting Accessories Luxury-Glide® Touch-2-Open™/ (Close) Pedestal - Height (Without 15" Pedestal) 38" (With 15" Pedestal) 53" Width 27" Depth (to change. 1Based on manufacturer specifications. 2Fast time based on smallest load / Fast Wash and Fast Dry cycles selected for safe operation. Vent Hoods Dishwashers / Kitchen Cleanup Refrigerators Freezers Washers / Dryers Under Counter electroluxappliances.com capacity. PN # EPWD15IW Dryer Stacking Kit - "My Favorite" Setting A setting you can customize...
... Floor, 4-Way Dryer Venting Accessories Luxury-Glide® Touch-2-Open™/ (Close) Pedestal - Height (Without 15" Pedestal) 38" (With 15" Pedestal) 53" Width 27" Depth (to change. 1Based on manufacturer specifications. 2Fast time based on smallest load / Fast Wash and Fast Dry cycles selected for safe operation. Vent Hoods Dishwashers / Kitchen Cleanup Refrigerators Freezers Washers / Dryers Under Counter electroluxappliances.com capacity. PN # EPWD15IW Dryer Stacking Kit - "My Favorite" Setting A setting you can customize...
Product Specifications Sheet (English)
Page 2
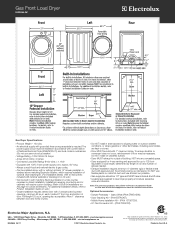
... change specifications or discontinue models without optional 15" drawer pedestal, or stacked above matching Electrolux Washer, which requires installation of run possible. • Gas supply line should be built in with grounded three-prong receptacle is required. equivalent of duct length, determined by length of optional dryer stacking kit. (For installation details, refer to instructions included with 1" maximum slope. Optional Accessories • Drawer Pedestals - We reserve the right to level dryer properly and reduce excessive noise...
... change specifications or discontinue models without optional 15" drawer pedestal, or stacked above matching Electrolux Washer, which requires installation of run possible. • Gas supply line should be built in with grounded three-prong receptacle is required. equivalent of duct length, determined by length of optional dryer stacking kit. (For installation details, refer to instructions included with 1" maximum slope. Optional Accessories • Drawer Pedestals - We reserve the right to level dryer properly and reduce excessive noise...


