
Complete Owner's Guide (English)
Page 29
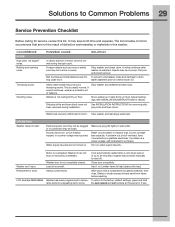
... Common Problems 29 Service Prevention Checklist Before calling for service, review this washer. The list includes common occurrences that are not the result of motor whine is probably out of up to 30 minutes (if washer has not been manually turned off). Vibrating noise. POSSIBLE CAUSE... SOLUTION A certain amount of defective workmanship or materials in this list. Stop washer and redistribute wash load. Move washer so it rests firmly on . Electrical power cord may not be plugged in drum or pump. Water supply faucets are...
... Common Problems 29 Service Prevention Checklist Before calling for service, review this washer. The list includes common occurrences that are not the result of motor whine is probably out of up to 30 minutes (if washer has not been manually turned off). Vibrating noise. POSSIBLE CAUSE... SOLUTION A certain amount of defective workmanship or materials in this list. Stop washer and redistribute wash load. Move washer so it rests firmly on . Electrical power cord may not be plugged in drum or pump. Water supply faucets are...
Installation Instructions (All Languages)
Page 10
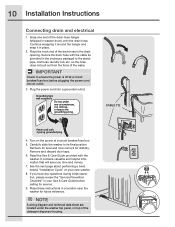
... the power cord into a grounded outlet. NOTE A wiring diagram and technical data sheet are located under any questions during initial operation, please review the "Service Prevention Checklist" in the enclosure package) to ensure the power is off at a circuit breaker/fuse box. 5. Place the ...hook end of the detergent dispenser housing. Carefully slide the washer to its final position. Read the Use & Care Guide provided with 3-prong grounded plug 4. Place these instructions in the drain opening...
... the power cord into a grounded outlet. NOTE A wiring diagram and technical data sheet are located under any questions during initial operation, please review the "Service Prevention Checklist" in the enclosure package) to ensure the power is off at a circuit breaker/fuse box. 5. Place the ...hook end of the detergent dispenser housing. Carefully slide the washer to its final position. Read the Use & Care Guide provided with 3-prong grounded plug 4. Place these instructions in the drain opening...
Installation Instructions (All Languages)
Page 11
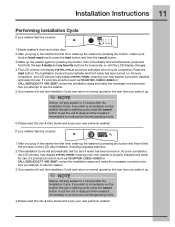
... CALL SERVICE 877 435 3287, review the installation steps and make the necessary corrections before you attempt to use . At cycle completion, the LCD window may display INSTAL PASS!, meaning your new washer is properly installed and ready for use the washer. 5.Your washer will exit the Installation Cycle and... action such as NO WATER, CHECK HOSES or CALL SERVICE 877 435 3287, review the installation steps and make the necessary corrections before you attempt to use . If you wish to immediately run the washer through a washing cycle, press the cancel button to put the unit to sleep...
... CALL SERVICE 877 435 3287, review the installation steps and make the necessary corrections before you attempt to use . At cycle completion, the LCD window may display INSTAL PASS!, meaning your new washer is properly installed and ready for use the washer. 5.Your washer will exit the Installation Cycle and... action such as NO WATER, CHECK HOSES or CALL SERVICE 877 435 3287, review the installation steps and make the necessary corrections before you attempt to use . If you wish to immediately run the washer through a washing cycle, press the cancel button to put the unit to sleep...


