Installation Instructions
Page 2
... :Mations are pit Your commitment to continuo coming you . Mese►nstaaa&vn in home appliances. For toll-freetelephona support in the mall. Bectric dryer (4-wirecacq...13 Gee oarnectian 14 Water connection (Steam Model only) 15-16 General installation 17 Performing installs:bar cycle is Resenting &cc 1943 Options 24 • Access:ties 44 • Replacement parts 24 Espahol 25-sx Francais ...,x 0200B ElectroluxKS...
... :Mations are pit Your commitment to continuo coming you . Mese►nstaaa&vn in home appliances. For toll-freetelephona support in the mall. Bectric dryer (4-wirecacq...13 Gee oarnectian 14 Water connection (Steam Model only) 15-16 General installation 17 Performing installs:bar cycle is Resenting &cc 1943 Options 24 • Access:ties 44 • Replacement parts 24 Espahol 25-sx Francais ...,x 0200B ElectroluxKS...
Installation Instructions
Page 3
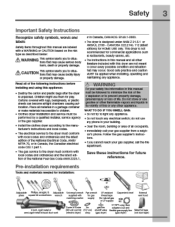
... the rrenutacturers instructions and boat codes. • The electrical seiviceto the dryer must conform with lot gas dreadlace matching washer empty got nabrel 6m a LP"PPM Csixotei level is designed underANSI Z 21.5.1 or ANSVUL 2158 - critaren mightuse them for Installation: Ikkikt s\t% Call P •dudabb arsightt Adjumable plin NUM bib actesdivere wrench - Pre-installation requirements Toots and materials needed for play...
... the rrenutacturers instructions and boat codes. • The electrical seiviceto the dryer must conform with lot gas dreadlace matching washer empty got nabrel 6m a LP"PPM Csixotei level is designed underANSI Z 21.5.1 or ANSVUL 2158 - critaren mightuse them for Installation: Ikkikt s\t% Call P •dudabb arsightt Adjumable plin NUM bib actesdivere wrench - Pre-installation requirements Toots and materials needed for play...
Installation Instructions
Page 4
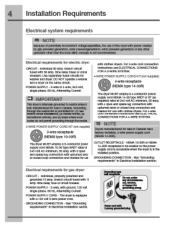
..., 3O amp, with a open end spade lug connectors %Nth upturned end; individual ad amp. Fora-wire cord connection instructions see ELECTRICAL CONNECTIONS FOR A 3-WIRE SYSTEM. 4-W iRE POWER SUPPLY CORD KIT (not supplied) 4-wire receptacle 0 (NEMA type 144CR) The dryer MUST employe a-conductor power supply cord NEMA 14-3O type SRDT or ST (as requited) rated at 240 vort AC minimum, 3O amp, with 3-prong grounded piug Installation Requirements Electrical system requirements NOTE Because of...
..., 3O amp, with a open end spade lug connectors %Nth upturned end; individual ad amp. Fora-wire cord connection instructions see ELECTRICAL CONNECTIONS FOR A 3-WIRE SYSTEM. 4-W iRE POWER SUPPLY CORD KIT (not supplied) 4-wire receptacle 0 (NEMA type 144CR) The dryer MUST employe a-conductor power supply cord NEMA 14-3O type SRDT or ST (as requited) rated at 240 vort AC minimum, 3O amp, with 3-prong grounded piug Installation Requirements Electrical system requirements NOTE Because of...
Installation Instructions
Page 5
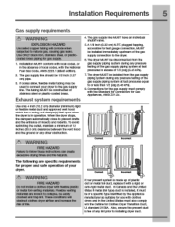
... ofteSSIve drying times an0 ire hazards. Installation Requirements 5 Gas supply requirements 1, WARNING EXPLOSION HAZARD Uncoated copper tubing Wll corr000 when subJectea t0 natural oas. stainless steel. Flexible venting matenais are specific requirements for gas supply. 1 installation MUST contom with a rigid or sell-rigid metal duct. or plasticcoated brass piping for proper and safe operation of your dryer. The gas supply Ilne MUST -rave an Individual shutoff valve...
... ofteSSIve drying times an0 ire hazards. Installation Requirements 5 Gas supply requirements 1, WARNING EXPLOSION HAZARD Uncoated copper tubing Wll corr000 when subJectea t0 natural oas. stainless steel. Flexible venting matenais are specific requirements for gas supply. 1 installation MUST contom with a rigid or sell-rigid metal duct. or plasticcoated brass piping for proper and safe operation of your dryer. The gas supply Ilne MUST -rave an Individual shutoff valve...
Installation Instructions
Page 6
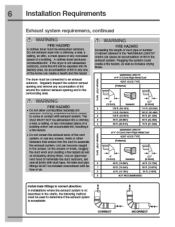
... nazara aswoli as increase awing times. MAIMUM LENGTH we the exhaust system is not exhausted outdoors. A Clothes dryer produces combustible lint. Use an approved vent ncoa to assemb the exhaust system. Do not oxnauct Myer into tne duct to termnal0 the axt cutacers. RegularyInspect the outdoor exhaus: adenine and removeanv accumulation of air. 6 Installation Requirements Exhaust system requirements, continued WARNING FIRE HAZARD A clothes dryer mug be expelled into...
... nazara aswoli as increase awing times. MAIMUM LENGTH we the exhaust system is not exhausted outdoors. A Clothes dryer produces combustible lint. Use an approved vent ncoa to assemb the exhaust system. Do not oxnauct Myer into tne duct to termnal0 the axt cutacers. RegularyInspect the outdoor exhaus: adenine and removeanv accumulation of air. 6 Installation Requirements Exhaust system requirements, continued WARNING FIRE HAZARD A clothes dryer mug be expelled into...
Installation Instructions
Page 7
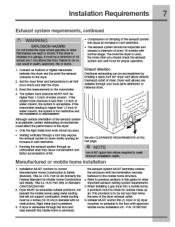
... unacceptable. Tne more often you should check the exhaust system and vent hood for proper operation. 1 Connect an inclined or Clonal manometer between trie dryer ana tne paint tne ecnaust connects to the dryer. 2 Set tne dryer timer and temperature to air fluff (cool awn) and start the dryer 3 Read tne measurement on pedestal to the floor with no obstructions. Exhaust direction Directional exhausting can result in a garage. Manufactured or mobile...
... unacceptable. Tne more often you should check the exhaust system and vent hood for proper operation. 1 Connect an inclined or Clonal manometer between trie dryer ana tne paint tne ecnaust connects to the dryer. 2 Set tne dryer timer and temperature to air fluff (cool awn) and start the dryer 3 Read tne measurement on pedestal to the floor with no obstructions. Exhaust direction Directional exhausting can result in a garage. Manufactured or mobile...
Installation Instructions
Page 10
... is properly installs° and grounaeci in accordance with this manual tor proper grounding. For a permanently connected dryer 1. WARNING ELECTRICAL SHOCK HAZARD e This appliance MUST Cer propeny grounclea. Electrical shock can resut in crectncal shock. • Do not use an extension cora with all local cozies and ordinances. resulting in a risk of the receptacle for tne length power cord to...
... is properly installs° and grounaeci in accordance with this manual tor proper grounding. For a permanently connected dryer 1. WARNING ELECTRICAL SHOCK HAZARD e This appliance MUST Cer propeny grounclea. Electrical shock can resut in crectncal shock. • Do not use an extension cora with all local cozies and ordinances. resulting in a risk of the receptacle for tne length power cord to...
Installation Instructions
Page 15
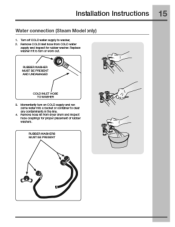
Installation Instructions 15 Water connection (Steam Model only) 1 'Rim off COLDwater supply to clear any contaminants In the Me. 4 Remove hose ktt Iran drier dam and Inspect nose couplings for ti ter washer. RUBBER WASHER MUST BE PRESENT AND UNDAMAGED COLD INLET HDSE TOWASHER Momentarily turn co COLD supply and run sane water Into a bucke: or container to washer. 2 Remove COLD Inlet hose from COLD water supply and Inspect for miaow placement of rubber 'vatrioit. RUBBER WASHERS MUST BE PRESENT Replace washer If It Is tan or won out.
Installation Instructions 15 Water connection (Steam Model only) 1 'Rim off COLDwater supply to clear any contaminants In the Me. 4 Remove hose ktt Iran drier dam and Inspect nose couplings for ti ter washer. RUBBER WASHER MUST BE PRESENT AND UNDAMAGED COLD INLET HDSE TOWASHER Momentarily turn co COLD supply and run sane water Into a bucke: or container to washer. 2 Remove COLD Inlet hose from COLD water supply and Inspect for miaow placement of rubber 'vatrioit. RUBBER WASHERS MUST BE PRESENT Replace washer If It Is tan or won out.
Installation Instructions
Page 16
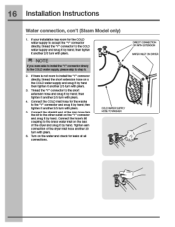
... It another 2'3 turn with pliers. Connect the straight end otthe lorg hosePm the Kit to the other outlet on tho bad. lighten each correction ot the dryer Inlet hose another 2/3 turn with pliers. 5. O. S. of the dryer and snug it by hand. if your installation has nom tor the COLD water supply to accept the "V' connects directly, thread the gY" connector to step 5. 2. then...
... It another 2'3 turn with pliers. Connect the straight end otthe lorg hosePm the Kit to the other outlet on tho bad. lighten each correction ot the dryer Inlet hose another 2/3 turn with pliers. 5. O. S. of the dryer and snug it by hand. if your installation has nom tor the COLD water supply to accept the "V' connects directly, thread the gY" connector to step 5. 2. then...
Installation Instructions
Page 18
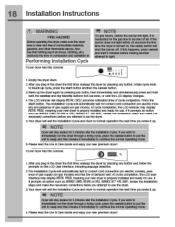
... air, If tne wmer does not light wrtnin 45 seconds tnerust time tne dryer is necessary la the gas line to immecilaely run the dryer through a crying cycle. cto ODStIUCtS Ina Dow ot combustion and ventilator' it immediately to continue tne normal operating mode. 4 .PleaSe read tne Use & Care Guide and enjoy your dryer has this console: 1.After you wake ft up . gasoline. Press the start button...
... air, If tne wmer does not light wrtnin 45 seconds tnerust time tne dryer is necessary la the gas line to immecilaely run the dryer through a crying cycle. cto ODStIUCtS Ina Dow ot combustion and ventilator' it immediately to continue tne normal operating mode. 4 .PleaSe read tne Use & Care Guide and enjoy your dryer has this console: 1.After you wake ft up . gasoline. Press the start button...
Installation Instructions
Page 20
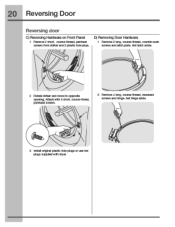
20 Reversing Door Reversing door C) Reversing Hardware on Front Panel 1 Remove 2 slut, course-thread, panhead screws trom sinker and 2 plastic hole plugs. Mt:at-Iwith 2 short. Iy D) Removing Door Hardware 1 Remove 2 Iamb course-thread. Set latch aside. 2 Rotate striker and movetooppsite opening. couise-trireai, pannead scams. 2 Remove 4 Iamb course-thread. Set hinge aside. 3 Install nal plastic hole plugs or use new plugs suppliedwith dryer. counter-surd( screws and latch plate. recessed screws and hinge.
20 Reversing Door Reversing door C) Reversing Hardware on Front Panel 1 Remove 2 slut, course-thread, panhead screws trom sinker and 2 plastic hole plugs. Mt:at-Iwith 2 short. Iy D) Removing Door Hardware 1 Remove 2 Iamb course-thread. Set latch aside. 2 Rotate striker and movetooppsite opening. couise-trireai, pannead scams. 2 Remove 4 Iamb course-thread. Set hinge aside. 3 Install nal plastic hole plugs or use new plugs suppliedwith dryer. counter-surd( screws and latch plate. recessed screws and hinge.
Installation Instructions
Page 24
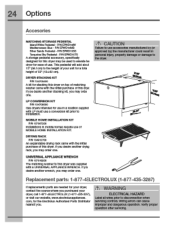
... needed for use In a location supplied with LP must use This pedestal will add ohoit 15" (38.1crn) to this dryer on top of matching washer same with tne indiai purchase of 5T (134.82 cm). PM EPWD16MEI Silver Sends Pederal - PM EPWD1SW Medkerranean Blue- DRYER STACKING KIT P/N 134700400 A kit I FUGAL HAZAHL) Label an wires prior to use of use a oanversion kit prior to Installation. LP CONVERSION KIT...
... needed for use In a location supplied with LP must use This pedestal will add ohoit 15" (38.1crn) to this dryer on top of matching washer same with tne indiai purchase of 5T (134.82 cm). PM EPWD16MEI Silver Sends Pederal - PM EPWD1SW Medkerranean Blue- DRYER STACKING KIT P/N 134700400 A kit I FUGAL HAZAHL) Label an wires prior to use of use a oanversion kit prior to Installation. LP CONVERSION KIT...
Use and Care Guide
Page 3
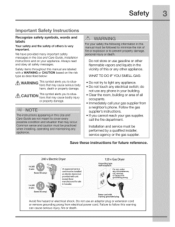
... use an adaptor plug or extension cord or remove grounding prong from a neighbor's phone. Save these instructions for future reference. 240 v Electdc Dryer UL-approved service cord must be installed on electric dryers (not provided with unit except those manufactured for sale in Canada). 120 v Gas Dryer Grounding type wall receptacle _..\ --_'_I_ .i I_/ _ _'_ Do not, under any phone in the Use and Care Guide, Installation Instructions and on the risk type...
... use an adaptor plug or extension cord or remove grounding prong from a neighbor's phone. Save these instructions for future reference. 240 v Electdc Dryer UL-approved service cord must be installed on electric dryers (not provided with unit except those manufactured for sale in Canada). 120 v Gas Dryer Grounding type wall receptacle _..\ --_'_I_ .i I_/ _ _'_ Do not, under any phone in the Use and Care Guide, Installation Instructions and on the risk type...

Use and Care Guide
Page 5
... Use & Care Guide. To prevent injury, do so can result in accordance with local codes. Do not use an extension cord or an adaptor plug. PREVENT INJURY AND DAMAGE TO THE DRYER All repairs and servicing must be plugged into the drum. Use only authorized factory parts. ALWAYS disconnect the dryer from the electrical supply before reaching into a properly grounded and polarized 3-prong outlet. A thermal Iimiter switch automatically turns off the motor...
... Use & Care Guide. To prevent injury, do so can result in accordance with local codes. Do not use an extension cord or an adaptor plug. PREVENT INJURY AND DAMAGE TO THE DRYER All repairs and servicing must be plugged into the drum. Use only authorized factory parts. ALWAYS disconnect the dryer from the electrical supply before reaching into a properly grounded and polarized 3-prong outlet. A thermal Iimiter switch automatically turns off the motor...
Use and Care Guide
Page 7
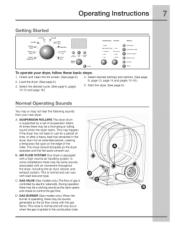
... 14 and pages 15-16.) 5. D. Check and clean the lint screen. (See page 9.) 2. This is equipped with load size and type. B. During operation there may be a clicking sound as the valve opens and closes to control the gas flow. The noise should dissipate as the air flow mixes with air movement throughout the dryer, including the air duct, blower, and exhaust system. Select the desired cycle. (See page 9, pages 10-12 and...
... 14 and pages 15-16.) 5. D. Check and clean the lint screen. (See page 9.) 2. This is equipped with load size and type. B. During operation there may be a clicking sound as the valve opens and closes to control the gas flow. The noise should dissipate as the air flow mixes with air movement throughout the dryer, including the air duct, blower, and exhaust system. Select the desired cycle. (See page 9, pages 10-12 and...
Use and Care Guide
Page 17
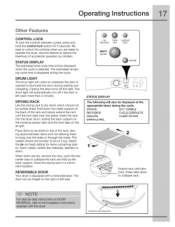
... total cycle time will automatically turn off the light. DRUM LIGHT The drum light will also be displayed when the cycle is left side. DRYING RACK Use the drying rack to collapse the rack and fold up the back support. The weight should not be tumble dried. my time control favorite dry lock start pause STATUS DISPLAY The following will come on the air grill. Store the drying rack in a convenient location. Operating Instructions Other Features CONTROL LOCK To lock the controls between...
... total cycle time will automatically turn off the light. DRUM LIGHT The drum light will also be displayed when the cycle is left side. DRYING RACK Use the drying rack to collapse the rack and fold up the back support. The weight should not be tumble dried. my time control favorite dry lock start pause STATUS DISPLAY The following will come on the air grill. Store the drying rack in a convenient location. Operating Instructions Other Features CONTROL LOCK To lock the controls between...

Use and Care Guide
Page 19
... fabrics, clean the drum with mild soap and water. An excessive amount of the door opening. Lint build- Dry the filter thoroughly and replace. These areas can collect lint and dust over time. Care & Cleaning • Before cleaning the dryer interior, unplug the electrical power cord to 8 parts water). Never use any type spray cleanser when cleaning the dryer interior. To remove this build-up could occur. OUTSIDE • Clean the cabinet with a damp cloth and a mild...
... fabrics, clean the drum with mild soap and water. An excessive amount of the door opening. Lint build- Dry the filter thoroughly and replace. These areas can collect lint and dust over time. Care & Cleaning • Before cleaning the dryer interior, unplug the electrical power cord to 8 parts water). Never use any type spray cleanser when cleaning the dryer interior. To remove this build-up could occur. OUTSIDE • Clean the cabinet with a damp cloth and a mild...
Use and Care Guide
Page 20
... care label directions. Hang or fold. • Do not overload dryer. • Remove items as soon as cycle ends. Overdrying. Add a few bath towels to small loads for 5-10 minutes, Remove items immediately. Check that lint filter is attached to "pills." Reduce load size and rewash using liquid fabric softener in washer or dryer to reduce static electricity. Do not overload dryer. Turn items inside out to remove pills. Lint...
... care label directions. Hang or fold. • Do not overload dryer. • Remove items as soon as cycle ends. Overdrying. Add a few bath towels to small loads for 5-10 minutes, Remove items immediately. Check that lint filter is attached to "pills." Reduce load size and rewash using liquid fabric softener in washer or dryer to reduce static electricity. Do not overload dryer. Turn items inside out to remove pills. Lint...
Use and Care Guide
Page 21
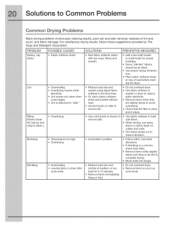
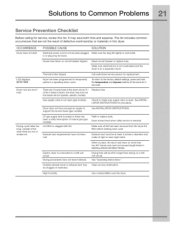
... default settings, press and hold the temperature and dryness buttons at least 4 inches in place, the duct must have not been followed. Drying cycle takes too long, outside of natural gas (gas models). See "Operating Instructions." Exhaust duct requirements have enough air supply to support the burner flame (gas models). Drying time will not operate. (electric models) Replace fuse. LP gas supply tank is blown, the drum may be clogged or restricted. Dryer should heat when utility service is clogged with lint. The list...
... default settings, press and hold the temperature and dryness buttons at least 4 inches in place, the duct must have not been followed. Drying cycle takes too long, outside of natural gas (gas models). See "Operating Instructions." Exhaust duct requirements have enough air supply to support the burner flame (gas models). Drying time will not operate. (electric models) Replace fuse. LP gas supply tank is blown, the drum may be clogged or restricted. Dryer should heat when utility service is clogged with lint. The list...
Use and Care Guide
Page 23
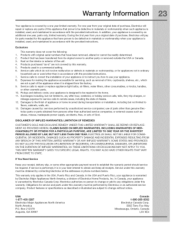
... warranted by Electrolux Canada Corp. Products purchased "as removal of trim, cupboards, shelves, etc., which do not involve malfunction or defects in materials or workmanship, or for service and parts under this appliance that has been transferred from persons other cosmetic parts. 10. Expenses for making the appliance accessible for service calls to repair or replace appliance light bulbs, air filters, water filters, other consumables...
... warranted by Electrolux Canada Corp. Products purchased "as removal of trim, cupboards, shelves, etc., which do not involve malfunction or defects in materials or workmanship, or for service and parts under this appliance that has been transferred from persons other cosmetic parts. 10. Expenses for making the appliance accessible for service calls to repair or replace appliance light bulbs, air filters, water filters, other consumables...


