Installation Instructions
Page 3
...WARNING i-or yoursaw me imormancn In tins manual rrust be performed by a qualified Installer, service agency or the gas supplier • Install the cbthes dryer according to the rrenutacturers instructions and boat codes. • The electrical seiviceto the dryer must conform with lot gas dreadlace matching... or properly damage. Save these instructions for play. ANSI/ NFPA 70, or in Canada, the Canadian electrical code C22.1 part 1. • The gas senAce tothe dryer must conform with nags, bedspreads, or pasha sheets can become alight chambers caushg suffocation. pfirsonal injury or ...
...WARNING i-or yoursaw me imormancn In tins manual rrust be performed by a qualified Installer, service agency or the gas supplier • Install the cbthes dryer according to the rrenutacturers instructions and boat codes. • The electrical seiviceto the dryer must conform with lot gas dreadlace matching... or properly damage. Save these instructions for play. ANSI/ NFPA 70, or in Canada, the Canadian electrical code C22.1 part 1. • The gas senAce tothe dryer must conform with nags, bedspreads, or pasha sheets can become alight chambers caushg suffocation. pfirsonal injury or ...

Installation Instructions
Page 8
...crd For cther than straight back venting). or anything that will come in this manual. Inches (crr) SIDES FEAR TOP FRONT Alcove 0' (0 crn) 0' (0 ant 0'(O cm) We IInds:tr. a q ick-tum 9CP dryer vent elbow must be Installed In the same closet as desalbed previcusly in contact... MINIMUM INSTALLATION CLEARANCES - Openings should be unobstnicted when a door Is installed. 8 Installation Requirements Clearance requirements !1 IMPORTANT DO NOT INSTALL YOUR DRYER: 1, in an area onto n will obstrut the now of comb.etion and ventuabon air. 3. INSTALLATION IN A RECESS OR CLOSET 1....
...crd For cther than straight back venting). or anything that will come in this manual. Inches (crr) SIDES FEAR TOP FRONT Alcove 0' (0 crn) 0' (0 ant 0'(O cm) We IInds:tr. a q ick-tum 9CP dryer vent elbow must be Installed In the same closet as desalbed previcusly in contact... MINIMUM INSTALLATION CLEARANCES - Openings should be unobstnicted when a door Is installed. 8 Installation Requirements Clearance requirements !1 IMPORTANT DO NOT INSTALL YOUR DRYER: 1, in an area onto n will obstrut the now of comb.etion and ventuabon air. 3. INSTALLATION IN A RECESS OR CLOSET 1....
Installation Instructions
Page 10
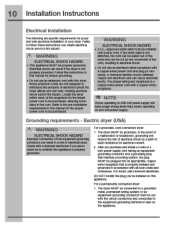
...power cord to be grounded. resulting in ins manual rot tne proper Lower cora to De qurcnased. For a grounded. The dryer MUST be cut by a path of electrical snocir. the cord can be pulled out or the dryer and can be connected to a grounded moth...an equipment grounding conductor must be run with this manual tor proper grounding. rule Wein roar te not attached. WARNING ELECTRICAL SHOCK HAZARD • A U.L.-approved stain roller must be installed onto paver cord. Electric dryer (USA) FA\ WARNING ELECTRICAL SHOCK HAZARD improper ccnnection of the equipment grounair g...
...power cord to be grounded. resulting in ins manual rot tne proper Lower cora to De qurcnased. For a grounded. The dryer MUST be cut by a path of electrical snocir. the cord can be pulled out or the dryer and can be connected to a grounded moth...an equipment grounding conductor must be run with this manual tor proper grounding. rule Wein roar te not attached. WARNING ELECTRICAL SHOCK HAZARD • A U.L.-approved stain roller must be installed onto paver cord. Electric dryer (USA) FA\ WARNING ELECTRICAL SHOCK HAZARD improper ccnnection of the equipment grounair g...
Installation Instructions
Page 14
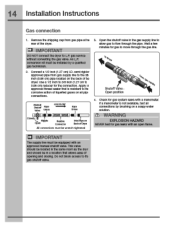
14 Installation Instructions Gas connection 1. MI IMPORTANT DO NOT connect tna Remove the snipping cap from gas pipe at the near ot the dryer.
14 Installation Instructions Gas connection 1. MI IMPORTANT DO NOT connect tna Remove the snipping cap from gas pipe at the near ot the dryer.
Use and Care Guide
Page 3
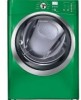
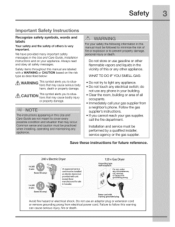
... DO IF YOU SMELL GAS: ,, Do not try to light any appliance. _,Do not touch any other appliance. Failure to follow this manual are labeled with a WARNING or OAUTION based on the risk type as described below: /_ WARNING This symbol alerts you to situations that may... gasoline or other flammable vapors and liquids in the Use and Care Guide, Installation Instructions and on electric dryers (not provided with k_ 3-prong grounded plug _,'_ Avoid fire hazard or electrical shock. Safety ImpoAant Safety Instructions Recognize safety symbols, words and labels Your safety and the safety of...
... DO IF YOU SMELL GAS: ,, Do not try to light any appliance. _,Do not touch any other appliance. Failure to follow this manual are labeled with a WARNING or OAUTION based on the risk type as described below: /_ WARNING This symbol alerts you to situations that may... gasoline or other flammable vapors and liquids in the Use and Care Guide, Installation Instructions and on electric dryers (not provided with k_ 3-prong grounded plug _,'_ Avoid fire hazard or electrical shock. Safety ImpoAant Safety Instructions Recognize safety symbols, words and labels Your safety and the safety of...
Use and Care Guide
Page 12
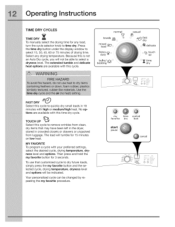
Operatin Instructions TiME DRY CYCLES TiME DRY _[ To manually select the drying time for any drying temperature. The extended tumble and delicate heat options are available with high or medium/high heat. Select this ..., 60 or 75 minutes of drying time. Your personalized cycle can be able to time dry. To use that may have been left in the dryer, stored in 18 minutes with this time dry cycle. Press the time dry button under the display window to remove wrinkles from clean, dry items...
Operatin Instructions TiME DRY CYCLES TiME DRY _[ To manually select the drying time for any drying temperature. The extended tumble and delicate heat options are available with high or medium/high heat. Select this ..., 60 or 75 minutes of drying time. Your personalized cycle can be able to time dry. To use that may have been left in the dryer, stored in 18 minutes with this time dry cycle. Press the time dry button under the display window to remove wrinkles from clean, dry items...


