
Complete Owner's Guide (English)
Page 2
... Started 7 • Normal Operating Sounds 7 • Operating Your Dryer 8-9 • Cycle Selection 10-12 • Drying Temperature 13 • Dryness Level 14 • Options 15-16 • Dryer Features 13 • Dryer Settings Chart 14 Care & Cleaning 19 Solutions to Common Problems 20-21... • Common Drying Problems 20 • Service Prevention Checklist 21-22 Warranty Information 23 Notes 24 ©2008 Electrolux Major Appliances All rights...
... Started 7 • Normal Operating Sounds 7 • Operating Your Dryer 8-9 • Cycle Selection 10-12 • Drying Temperature 13 • Dryness Level 14 • Options 15-16 • Dryer Features 13 • Dryer Settings Chart 14 Care & Cleaning 19 Solutions to Common Problems 20-21... • Common Drying Problems 20 • Service Prevention Checklist 21-22 Warranty Information 23 Notes 24 ©2008 Electrolux Major Appliances All rights...
Complete Owner's Guide (English)
Page 4
..., soaked in, or spotted with cooking oils may contribute to a chemical reaction that could cause a load to catch fire. • Do not dry articles containing rubber, plastic or similar materials such as bras, galoshes, bath mats, rugs, bibs, baby pants, plastic bags and pillows that could...warnings listed below. 4 Safety WARNING To reduce the risk of fire, electrical shock, or injury to persons when using this dryer, comply with these warnings could result in serious personal injuries. • Do not operate the dryer if the lint screen is blocked, damaged or missing. Failure to ...
..., soaked in, or spotted with cooking oils may contribute to a chemical reaction that could cause a load to catch fire. • Do not dry articles containing rubber, plastic or similar materials such as bras, galoshes, bath mats, rugs, bibs, baby pants, plastic bags and pillows that could...warnings listed below. 4 Safety WARNING To reduce the risk of fire, electrical shock, or injury to persons when using this dryer, comply with these warnings could result in serious personal injuries. • Do not operate the dryer if the lint screen is blocked, damaged or missing. Failure to ...
Complete Owner's Guide (English)
Page 8
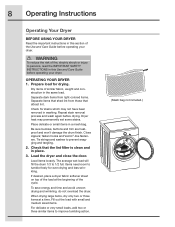
...will fill the drum 1/3 to prevent snagging and tangling. 2. 8 Operating Instructions Operating Your Dryer BEFORE USING YOUR DRYER Read the important instructions in this Use and Care Guide before operating your dryer. Dry items of similar fabric, weight and construction in washing. Tie strings and sashes to 1/2 ...items, dry only two or three items at the beginning of fire, electric shock or injury to improve tumbling action. (Mesh bag not included.) Check that attract lint. Place delicate or small items in place. 3. WARNING To reduce the risk of the cycle. Dryer heat may...
...will fill the drum 1/3 to prevent snagging and tangling. 2. 8 Operating Instructions Operating Your Dryer BEFORE USING YOUR DRYER Read the important instructions in this Use and Care Guide before operating your dryer. Dry items of similar fabric, weight and construction in washing. Tie strings and sashes to 1/2 ...items, dry only two or three items at the beginning of fire, electric shock or injury to improve tumbling action. (Mesh bag not included.) Check that attract lint. Place delicate or small items in place. 3. WARNING To reduce the risk of the cycle. Dryer heat may...
Complete Owner's Guide (English)
Page 9
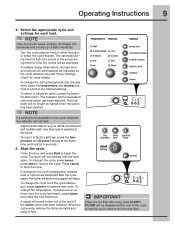
...press the temperature and dryness buttons at the end of the cycle to remind you to a cycle will sound at the end of static electricity. Start the cycle. Operating Instructions 9 4. Turn the cycle selector knob in the future. Adjustments made to remove lint from the filter.... level or options are attempted after every load. If changes to resume the cycle. The dryer will beep. Select the appropriate cycle and settings for each time that option. A suitable drying temperature, dryness level and options will be lighted when the option has been deleted. See ...
...press the temperature and dryness buttons at the end of the cycle to remind you to a cycle will sound at the end of static electricity. Start the cycle. Operating Instructions 9 4. Turn the cycle selector knob in the future. Adjustments made to remove lint from the filter.... level or options are attempted after every load. If changes to resume the cycle. The dryer will beep. Select the appropriate cycle and settings for each time that option. A suitable drying temperature, dryness level and options will be lighted when the option has been deleted. See ...
Complete Owner's Guide (English)
Page 10
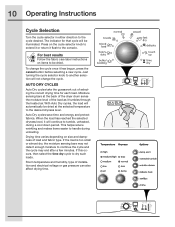
... has begun, press the cancel button before selecting a new cycle. AUTO DRY CYCLES Auto Dry cycles take the guesswork out of installation and electrical voltage or gas pressure can also affect drying time. Auto Dry cycles save time and energy and protect fabrics. Room temperature and humidity, ...type of selecting the correct drying time for that cycle will automatically be dried at the back of the dryer drum sense ...
... has begun, press the cancel button before selecting a new cycle. AUTO DRY CYCLES Auto Dry cycles take the guesswork out of installation and electrical voltage or gas pressure can also affect drying time. Auto Dry cycles save time and energy and protect fabrics. Room temperature and humidity, ...type of selecting the correct drying time for that cycle will automatically be dried at the back of the dryer drum sense ...
Complete Owner's Guide (English)
Page 12
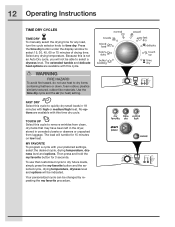
... To program a cycle with high or medium/high heat. Select any load, turn the cycle selector knob to remove wrinkles from luggage. Use the time dry cycle and the air (no heat) setting. Then press and hold the my favorite button for 3 seconds. Because this cycle. The extended tumble and delicate... changed by repeating the my favorite procedure. To use heat to select 15, 30, 45, 60 or 75 minutes of drying time. WARNING FIRE HAZARD To avoid fire hazard, do not use that may have been left in the dryer, stored in 18 minutes with your preferred settings, select the desired cycle...
... To program a cycle with high or medium/high heat. Select any load, turn the cycle selector knob to remove wrinkles from luggage. Use the time dry cycle and the air (no heat) setting. Then press and hold the my favorite button for 3 seconds. Because this cycle. The extended tumble and delicate... changed by repeating the my favorite procedure. To use heat to select 15, 30, 45, 60 or 75 minutes of drying time. WARNING FIRE HAZARD To avoid fire hazard, do not use that may have been left in the dryer, stored in 18 minutes with your preferred settings, select the desired cycle...
Complete Owner's Guide (English)
Page 16
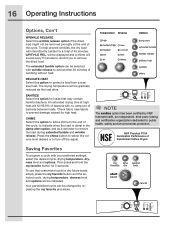
... tumble option can be selected with your preferred settings, select the desired cycle, drying temperature, dryness level and options. SANITIZE Select this option to add a chime to the end of Residential Clothes Dryers Saving Favorites To program a cycle with wrinkle release to indicate when the load is... damp in the damp alert option, and as the load dries. Your personalized cycle can be changed by high heat. WRINKLE REL...
... tumble option can be selected with your preferred settings, select the desired cycle, drying temperature, dryness level and options. SANITIZE Select this option to add a chime to the end of Residential Clothes Dryers Saving Favorites To program a cycle with wrinkle release to indicate when the load is... damp in the damp alert option, and as the load dries. Your personalized cycle can be changed by high heat. WRINKLE REL...
Complete Owner's Guide (English)
Page 17
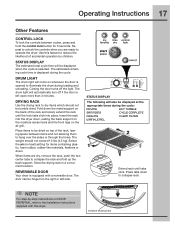
... kg). Place items to be displayed at the appropriate times during the cycle: DRYING EXT. Store the drying rack in a convenient location. STATUS DISPLAY The following will automatically turn off the light. Use this dryer. Closing the door turns off if the door is left side. Insert the...sides or through the holes. Repeat to unlock the controls when you are dry, remove the rack, push the two center tabs to the Installation Instructions supplied with a reversible door. REVERSIBLE DOOR Your dryer is selected. STATUS DISPLAY The estimated total cycle time will come on ...
... kg). Place items to be displayed at the appropriate times during the cycle: DRYING EXT. Store the drying rack in a convenient location. STATUS DISPLAY The following will automatically turn off the light. Use this dryer. Closing the door turns off if the door is left side. Insert the...sides or through the holes. Repeat to unlock the controls when you are dry, remove the rack, push the two center tabs to the Installation Instructions supplied with a reversible door. REVERSIBLE DOOR Your dryer is selected. STATUS DISPLAY The estimated total cycle time will come on ...

Complete Owner's Guide (English)
Page 18
... differ slightly on default dryness level and factory settings for electric dryers. 18 Operating Instructions Dryer Settings Chart These Temperature, Dryness levels and Options are available with the following cycles: bulky/ heavy mixed towels normal casual fast delicate touch time bedding duty load dry up dry Estimated Cycle 60 min 70 min 55 min 50...
... differ slightly on default dryness level and factory settings for electric dryers. 18 Operating Instructions Dryer Settings Chart These Temperature, Dryness levels and Options are available with the following cycles: bulky/ heavy mixed towels normal casual fast delicate touch time bedding duty load dry up dry Estimated Cycle 60 min 70 min 55 min 50...
Complete Owner's Guide (English)
Page 19
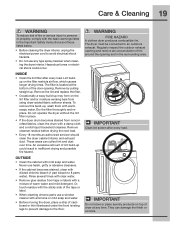
... clean with diluted chlorine bleach (1 part bleach to the floor. The filter is located at any type spray cleanser when cleaning the dryer interior. Dry the filter thoroughly and replace. These areas can damage the finish or controls. Or, touch residue with the sticky side of the ...air flow, which causes longer drying times. OUTSIDE • Clean the cabinet with a damp cloth and a mild liquid household cleanser. They can collect lint and dust over time. INSIDE • Clean the lint filter after every load. The dryer must be connected to avoid electrical shock hazards. • Do...
... clean with diluted chlorine bleach (1 part bleach to the floor. The filter is located at any type spray cleanser when cleaning the dryer interior. Dry the filter thoroughly and replace. These areas can damage the finish or controls. Or, touch residue with the sticky side of the ...air flow, which causes longer drying times. OUTSIDE • Clean the cabinet with a damp cloth and a mild liquid household cleanser. They can collect lint and dust over time. INSIDE • Clean the lint filter after every load. The dryer must be connected to avoid electrical shock hazards. • Do...
Complete Owner's Guide (English)
Page 20
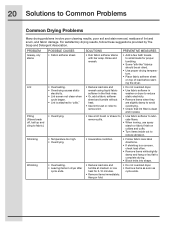
...8226; Reduce load size and tumble at medium or low heat for proper tumbling. • Some "silk-like" fabrics should be air dried. • Use proper drying temperature. • Place fabric softener sheet on collars and cuffs. • Turn items inside out to reduce abrasion. • Irreversible condition... and tumble without heat. • Use lint brush or roller to remove lint. • Do not overload dryer. • Use fabric softener in washer or dryer to reduce static electricity. • Remove items when they are slightly damp to avoid overdrying. • Check that lint filter is ...
...8226; Reduce load size and tumble at medium or low heat for proper tumbling. • Some "silk-like" fabrics should be air dried. • Use proper drying temperature. • Place fabric softener sheet on collars and cuffs. • Turn items inside out to reduce abrasion. • Irreversible condition... and tumble without heat. • Use lint brush or roller to remove lint. • Do not overload dryer. • Use fabric softener in washer or dryer to reduce static electricity. • Remove items when they are slightly damp to avoid overdrying. • Check that lint filter is ...
Complete Owner's Guide (English)
Page 21
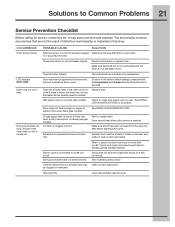
...workmanship or materials in INSTALLATION INSTRUCTIONS. Lint filter is restored. Dryer should heat when utility service is clogged with lint. Electric dryer is empty or there has been a utility interruption of rigid or semi-rigid metal. Drying procedures have not been met. When in place, the duct ... a 208 volt circuit. Make sure all lint has been removed from the dryer lint filter before starting each cycle. Use a dehumidifier near the dryer. See INSTALLATION INSTRUCTIONS. Drying time will not operate. (electric models) Gas supply valve is not securely plugged Make sure the plug fits ...
...workmanship or materials in INSTALLATION INSTRUCTIONS. Lint filter is restored. Dryer should heat when utility service is clogged with lint. Electric dryer is empty or there has been a utility interruption of rigid or semi-rigid metal. Drying procedures have not been met. When in place, the duct ... a 208 volt circuit. Make sure all lint has been removed from the dryer lint filter before starting each cycle. Use a dehumidifier near the dryer. See INSTALLATION INSTRUCTIONS. Drying time will not operate. (electric models) Gas supply valve is not securely plugged Make sure the plug fits ...
Complete Owner's Guide (English)
Page 22
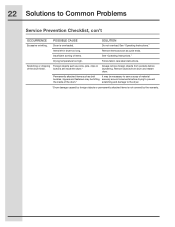
...Scratching or chipping Foreign objects such as coins, pins, clips or of items. See "Operating Instructions." POSSIBLE CAUSE Dryer is not covered by foreign objects or permanently attached items is overloaded. Remove items as soon as belt It may ...of the drum.* scratching and damage to the dryer. *Drum damage caused by the warranty. Drying temperature too high. Remove objects from pockets before drying to Common Problems Service Prevention Checklist, con't OCCURRENCE Excessive wrinkling. Items left in dryer too long. See "Operating Instructions." Insufficient ...
...Scratching or chipping Foreign objects such as coins, pins, clips or of items. See "Operating Instructions." POSSIBLE CAUSE Dryer is not covered by foreign objects or permanently attached items is overloaded. Remove items as soon as belt It may ...of the drum.* scratching and damage to the dryer. *Drum damage caused by the warranty. Drying temperature too high. Remove objects from pockets before drying to Common Problems Service Prevention Checklist, con't OCCURRENCE Excessive wrinkling. Items left in dryer too long. See "Operating Instructions." Insufficient ...
Product Specifications Sheet (English)
Page 1
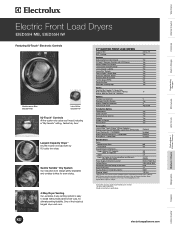
... Favorite (1), Heavy Duty, Bulky / Bedding, Mixed Load, Towels, Normal, 11 Casual, Delicate, Touch Up, Timed Dry Options Temperature Selections Electronic Auto Dry System Manual Timed Dry Selections End-of the industry's longest dryer vent runs. 27" ELECTRIC FRONT LOAD DRYERS Capacity IEC NSF® Certified 8.0 Cu. Mediterranean Blue MB Island White IW Overall Exterior Dimensions - NOTE: Always...
... Favorite (1), Heavy Duty, Bulky / Bedding, Mixed Load, Towels, Normal, 11 Casual, Delicate, Touch Up, Timed Dry Options Temperature Selections Electronic Auto Dry System Manual Timed Dry Selections End-of the industry's longest dryer vent runs. 27" ELECTRIC FRONT LOAD DRYERS Capacity IEC NSF® Certified 8.0 Cu. Mediterranean Blue MB Island White IW Overall Exterior Dimensions - NOTE: Always...
Installation Instructions (All Languages)
Page 5
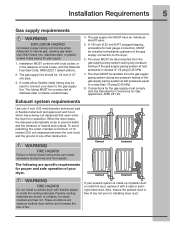
... MUST be used to connect your dryer to prevent drafts and the entrance ...dryer with the National Fuel Gas Code, ANSI Z223.1 (latest edition). 2. Correct Incorrect If your dryer. When the dryer... damper(s) that open when the dryer is free of any pressure testing... gas supply. 1. The dryer MUST be disconnected from the...Uncoated copper tubing will obstruct clothes dryer airflow and increase the...dryer duct. The dryer MUST be isolated from the gas supply piping system during any lint prior to the dryer...27 cm) pipe. 3. These conditions will corrode when subjected...
... MUST be used to connect your dryer to prevent drafts and the entrance ...dryer with the National Fuel Gas Code, ANSI Z223.1 (latest edition). 2. Correct Incorrect If your dryer. When the dryer... damper(s) that open when the dryer is free of any pressure testing... gas supply. 1. The dryer MUST be disconnected from the...Uncoated copper tubing will obstruct clothes dryer airflow and increase the...dryer duct. The dryer MUST be isolated from the gas supply piping system during any lint prior to the dryer...27 cm) pipe. 3. These conditions will corrode when subjected...
Installation Instructions (All Languages)
Page 6
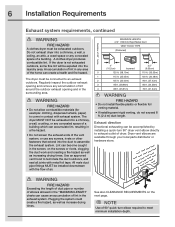
...drying times. Regularly inspect the outdoor exhaust opening and in the exhaust system. NOTE Use of 90° quick-turn 90° dryer vent elbow directly to exhaust outlet of air. Do not exhaust dryer...on the next page. Exhaust direction Directional exhausting can become caught in contact with the flow of dryer. An accumulation of lint in any screws, rivets or other fasteners that extend into a chimney, a...ft. (33.53m) 1 115 ft. (35.05m) 100 ft. (30.48m) 2 105 ft. (32.00m) 90 ft. (27.43m) 3 95 ft. (28.96m) 80 ft. (24.38m) 4 85 ft. (25.91m) 70 ft. (21.34m) ...
...drying times. Regularly inspect the outdoor exhaust opening and in the exhaust system. NOTE Use of 90° quick-turn 90° dryer vent elbow directly to exhaust outlet of air. Do not exhaust dryer...on the next page. Exhaust direction Directional exhausting can become caught in contact with the flow of dryer. An accumulation of lint in any screws, rivets or other fasteners that extend into a chimney, a...ft. (33.53m) 1 115 ft. (35.05m) 100 ft. (30.48m) 2 105 ft. (32.00m) 90 ft. (27.43m) 3 95 ft. (28.96m) 80 ft. (24.38m) 4 85 ft. (25.91m) 70 ft. (21.34m) ...
Installation Instructions (All Languages)
Page 10
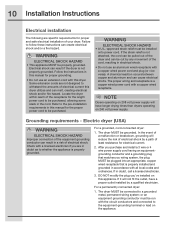
.... For a permanently connected dryer: 1. Electrical shock can cause electrical shorts. If the strain relief is properly installed and grounded in doubt, call a licensed electrician. 3. If it will not fit the outlet, have longer drying times than dryers operating on the appliance. ...or an equipment grounding conductor must be run with a copper wired receptacle. WARNING ELECTRICAL SHOCK HAZARD • A U.L.-approved strain relief must be installed onto...
.... For a permanently connected dryer: 1. Electrical shock can cause electrical shorts. If the strain relief is properly installed and grounded in doubt, call a licensed electrician. 3. If it will not fit the outlet, have longer drying times than dryers operating on the appliance. ...or an equipment grounding conductor must be run with a copper wired receptacle. WARNING ELECTRICAL SHOCK HAZARD • A U.L.-approved strain relief must be installed onto...

Installation Instructions (All Languages)
Page 18
... display INSTAL CYCLE and show estimated time of air. If you wish to immediately run the dryer through a drying cycle, press the cancel button to put the unit to sleep and then rewake it is turned on electric models) and presence of combustible materials, gasoline, and other flammable vapors. At cycle completion...
... display INSTAL CYCLE and show estimated time of air. If you wish to immediately run the dryer through a drying cycle, press the cancel button to put the unit to sleep and then rewake it is turned on electric models) and presence of combustible materials, gasoline, and other flammable vapors. At cycle completion...
Installation Instructions (All Languages)
Page 24
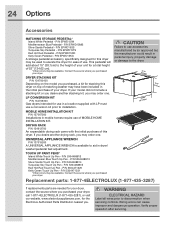
...source where you purchased your dryer, call 1-877-4ELECTROLUX (1-877-435-3287), or visit our website, www.electroluxappliances.com, for the Electrolux Authorized Parts Distributor nearest ...dryer. (6287.5.080c"m) (3185.1.000cm" ) LP CONVERSION KIT P/N 134709300 Gas dryers intended for this dryer may order one . P/N 5304468812 Mediterranean Blue Touch Up Pen - P/N 5304471231 *Other colors may order one . WARNING ELECTRICAL...a conversion kit prior to disconnection when servicing controls. DRYING RACK P/N 134912700 An expandable drying rack came with LP must use . UNIVERSAL APPLIANCE ...
...source where you purchased your dryer, call 1-877-4ELECTROLUX (1-877-435-3287), or visit our website, www.electroluxappliances.com, for the Electrolux Authorized Parts Distributor nearest ...dryer. (6287.5.080c"m) (3185.1.000cm" ) LP CONVERSION KIT P/N 134709300 Gas dryers intended for this dryer may order one . P/N 5304468812 Mediterranean Blue Touch Up Pen - P/N 5304471231 *Other colors may order one . WARNING ELECTRICAL...a conversion kit prior to disconnection when servicing controls. DRYING RACK P/N 134912700 An expandable drying rack came with LP must use . UNIVERSAL APPLIANCE ...


