
Use and Care Manual
Page 2
...Contents 2 Safety 3 Important Safety Instructions 3 Feature Overview 4 How your Dishwasher Cleans 4 Operating Instructions 5 Getting Started 5 Normal Operating Sounds 5 Wash Cycle Selections 6 Cycle Selections 6 Energy Option Selections 7 Operation Selections 7 Status Window 8 Preparing & Loading Dishes 9 Dish Preparation 9 Loading the Top Rack 9 Loading the Bottom Rack 10 Adjusting Rack Height 10 Loading the Silverware Basket 11 Adding a dish 11 Dishwasher Dispenser & Detergents 12 Filling the Detergent Dispenser 12 How much Detergent to use this guide Thank you .
...Contents 2 Safety 3 Important Safety Instructions 3 Feature Overview 4 How your Dishwasher Cleans 4 Operating Instructions 5 Getting Started 5 Normal Operating Sounds 5 Wash Cycle Selections 6 Cycle Selections 6 Energy Option Selections 7 Operation Selections 7 Status Window 8 Preparing & Loading Dishes 9 Dish Preparation 9 Loading the Top Rack 9 Loading the Bottom Rack 10 Adjusting Rack Height 10 Loading the Silverware Basket 11 Adding a dish 11 Dishwasher Dispenser & Detergents 12 Filling the Detergent Dispenser 12 How much Detergent to use this guide Thank you .
Use and Care Manual
Page 3
... not wash plastic items unless marked "dishwasher safe" or the equivalent. Such establishments require a higher dishwasher water temperature to operate on all instructions before using your new Electrolux dishwasher. • Read all hot water faucets and let water flow from the dishwasher when it is in a dishwasher. • Do not abuse, sit on, or stand on the door or dish rack of the dishwasher. • Store dishwasher detergent and rinse agents out of...
... not wash plastic items unless marked "dishwasher safe" or the equivalent. Such establishments require a higher dishwasher water temperature to operate on all instructions before using your new Electrolux dishwasher. • Read all hot water faucets and let water flow from the dishwasher when it is in a dishwasher. • Do not abuse, sit on, or stand on the door or dish rack of the dishwasher. • Store dishwasher detergent and rinse agents out of...
Use and Care Manual
Page 4
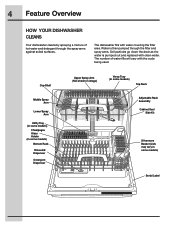
... some models) Bottom Rack Rinse Aid Dispenser Detergent Dispenser Upper Spray Arm (Not shown in image) Versa Tray (in some models) Top Rack Adjustable Rack Assembly Cabinet Seal Side Kit Silverware Basket (Lids may vary in some models) Serial Label 4 Feature Overview HOW YOUR DISHWASHER CLEANS Your dishwasher cleans by spraying a mixture of water fills will vary with the cycle being used. The number of hot water and detergent through the filter and spray arms. Soil particles go down the drain as the water is pumped out and replaced with water...
... some models) Bottom Rack Rinse Aid Dispenser Detergent Dispenser Upper Spray Arm (Not shown in image) Versa Tray (in some models) Top Rack Adjustable Rack Assembly Cabinet Seal Side Kit Silverware Basket (Lids may vary in some models) Serial Label 4 Feature Overview HOW YOUR DISHWASHER CLEANS Your dishwasher cleans by spraying a mixture of water fills will vary with the cycle being used. The number of hot water and detergent through the filter and spray arms. Soil particles go down the drain as the water is pumped out and replaced with water...
Use and Care Manual
Page 5
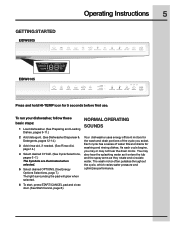
... detergent. (See Dishwasher Dispenser & Detergents, pages 12-14.) 3 Add rinse aid, if needed. (See Rinse Aid, page 14.) 4 Select desired CYCLE. (See Cycle Selections, pages 6 -7.) The Symbols are illuminated when selected. 5 Select desired OPTIONS. (See Energy Options Selections, page 7.) The light surrounding the pad will glow when selected. 6 To start, press START/CANCEL pad and close door. (See Start/Cancel, page 8.) NORMAL OPERATING SOUNDS Your dishwasher uses energy efficient motors for the wash and drain portions of water fills...
... detergent. (See Dishwasher Dispenser & Detergents, pages 12-14.) 3 Add rinse aid, if needed. (See Rinse Aid, page 14.) 4 Select desired CYCLE. (See Cycle Selections, pages 6 -7.) The Symbols are illuminated when selected. 5 Select desired OPTIONS. (See Energy Options Selections, page 7.) The light surrounding the pad will glow when selected. 6 To start, press START/CANCEL pad and close door. (See Start/Cancel, page 8.) NORMAL OPERATING SOUNDS Your dishwasher uses energy efficient motors for the wash and drain portions of water fills...
Use and Care Manual
Page 6
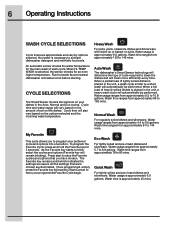
... saved. Auto Wash The dishwasher's Smart Sensor technology will determine the type of cycle required to clean the dishes and will vary based on the amount of each cycle. Eco Wash For lightly soiled and pre-rinsed dishes and silverware. Quick Wash For lightly soiled and pre-rinsed dishes and silverware. 6 Operating Instructions WASH CYCLE SELECTIONS Cycle times are approximate and vary by Start/Cancel to have chosen. An automatic sensor checks the water temperature...
... saved. Auto Wash The dishwasher's Smart Sensor technology will determine the type of cycle required to clean the dishes and will vary based on the amount of each cycle. Eco Wash For lightly soiled and pre-rinsed dishes and silverware. Quick Wash For lightly soiled and pre-rinsed dishes and silverware. 6 Operating Instructions WASH CYCLE SELECTIONS Cycle times are approximate and vary by Start/Cancel to have chosen. An automatic sensor checks the water temperature...
Use and Care Manual
Page 7
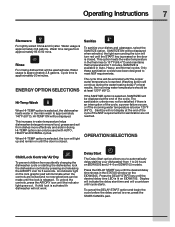
... incoming water temperature should be used with AUTO, HEAVY and NORMAL cycles. If child lock is lit on EIDW6105 models. If the SANITIZE option is released. Sanitize To sanitize your dishwasher from accidently changing the dishwasher cycle or starting your dishes and glassware, select the SANITIZE option. Washing action will be displayed at the end of the cycle. Press the DELAY START key until the lock is selected, SANITIZED will continue during the water heating delay. Operating Instructions 7 Stemware For lightly soiled...
... incoming water temperature should be used with AUTO, HEAVY and NORMAL cycles. If child lock is lit on EIDW6105 models. If the SANITIZE option is released. Sanitize To sanitize your dishwasher from accidently changing the dishwasher cycle or starting your dishes and glassware, select the SANITIZE option. Washing action will be displayed at the end of the cycle. Press the DELAY START key until the lock is selected, SANITIZED will continue during the water heating delay. Operating Instructions 7 Stemware For lightly soiled...

Use and Care Manual
Page 8
... normal operation or programming of delay start a cycle, press the START/CANCEL key once and close the door. The STATUS window indicates the following activity: 1-24 Indicates number of the dishwasher. It also NOTE flashes if the door is displayed in the center of these codes are critical to indicate a water heat delay. hd WASHING CLEAN Flashes to the machine function and safe operation, the control shall shut down and indicate an error code 'Er' (See Error Codes on the left corner. SANITIZED SANITIZED...
... normal operation or programming of delay start a cycle, press the START/CANCEL key once and close the door. The STATUS window indicates the following activity: 1-24 Indicates number of the dishwasher. It also NOTE flashes if the door is displayed in the center of these codes are critical to indicate a water heat delay. hd WASHING CLEAN Flashes to the machine function and safe operation, the control shall shut down and indicate an error code 'Er' (See Error Codes on the left corner. SANITIZED SANITIZED...

Use and Care Manual
Page 9
...; Long-handled knives and utensils can be sure disposal is selected. • Load items with a non-scratch utensil or let dish soak before starting dishwasher. • Load glasses in top rack. Gently scrape away burned-on food with open ends facing down for better cleaning and draining. • Damage may cause discoloration of stainless steel and plastics if allowed to block rotation of middle spray arm...
...; Long-handled knives and utensils can be sure disposal is selected. • Load items with a non-scratch utensil or let dish soak before starting dishwasher. • Load glasses in top rack. Gently scrape away burned-on food with open ends facing down for better cleaning and draining. • Damage may cause discoloration of stainless steel and plastics if allowed to block rotation of middle spray arm...
Use and Care Manual
Page 10
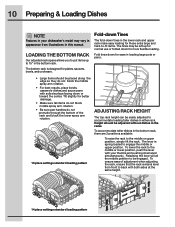
... manual. To lower the rack to the middle or upper position, simply lift the rack. LOADING THE BOTTOM RACK Our adjusted rack space allows you to put items up for normal use or folded down or toward the center. The lever is designed for plates, saucers, bowls, and cookware. Releasing the lever will all the middle position to back with your dishwasher's model...
... manual. To lower the rack to the middle or upper position, simply lift the rack. LOADING THE BOTTOM RACK Our adjusted rack space allows you to put items up for normal use or folded down or toward the center. The lever is designed for plates, saucers, bowls, and cookware. Releasing the lever will all the middle position to back with your dishwasher's model...
Use and Care Manual
Page 11
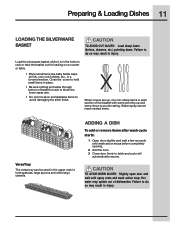
... protrudes through bottom of basket or rack to block the lower spray arm. • Do not mix silver and stainless items to avoid damaging the silver finish. ADDING A DISH To add or remove items after wash cycle starts: 1 Open door slightly and wait a few seconds until spray arms and wash action stop. Water spray cannot reach nested items. VersaTray The versa tray can be used in the upper rack to hold small...
... protrudes through bottom of basket or rack to block the lower spray arm. • Do not mix silver and stainless items to avoid damaging the silver finish. ADDING A DISH To add or remove items after wash cycle starts: 1 Open door slightly and wait a few seconds until spray arms and wash action stop. Water spray cannot reach nested items. VersaTray The versa tray can be used in the upper rack to hold small...
Use and Care Manual
Page 12
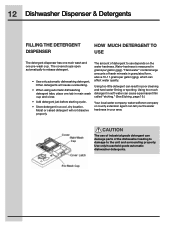
... water hardness. 12 Dishwasher Dispenser & Detergents FILLING THE DETERGENT DISPENSER HOW MUCH DETERGENT TO USE The detergent dispenser has one main wash and one tab in main wash cup and close. • Add detergent just before starting cycle. • Store detergent in a cool, dry location. The covered cups open automatically to use of industrial grade detergent can affect water quality. Other detergents will not dissolve properly. The amount of detergent to release detergent. • Use only automatic dishwashing detergent. Using...
... water hardness. 12 Dishwasher Dispenser & Detergents FILLING THE DETERGENT DISPENSER HOW MUCH DETERGENT TO USE The detergent dispenser has one main wash and one tab in main wash cup and close. • Add detergent just before starting cycle. • Store detergent in a cool, dry location. The covered cups open automatically to use of industrial grade detergent can affect water quality. Other detergents will not dissolve properly. The amount of detergent to release detergent. • Use only automatic dishwashing detergent. Using...
Use and Care Manual
Page 13
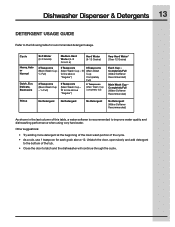
... line above "Regular") 8 Teaspoons (Main Wash Cup completely full) Very Hard Water* (Over 12 Grains) Each Cup - Unlatch the door, open slowly and add detergent to the bottom of the tub. • Close the door to the following table for each grain above 12. Dishwasher Dispenser & Detergents 13 DETERGENT USAGE GUIDE Refer to latch and the dishwasher will continue through the cycle. Completely Full (Water Softener Recommended) Rinse No Detergent...
... line above "Regular") 8 Teaspoons (Main Wash Cup completely full) Very Hard Water* (Over 12 Grains) Each Cup - Unlatch the door, open slowly and add detergent to the bottom of the tub. • Close the door to the following table for each grain above 12. Dishwasher Dispenser & Detergents 13 DETERGENT USAGE GUIDE Refer to latch and the dishwasher will continue through the cycle. Completely Full (Water Softener Recommended) Rinse No Detergent...

Use and Care Manual
Page 14
... the cycle on the EIDW6305 model. To add liquid rinse aid: 1 Turn dispenser cap 1/4 turn counterclockwise and lift out. 2 Pour in rinse aid until liquid reaches the flat surface marked MAX in the Rinse Aid dispenser. 14 Dishwasher Dispenser & Detergents RINSE AID Rinse aid greatly improves drying and reduces water spots and filming. The rinse aid dispenser, located next to a higher number. If the rinse aid is low, the LOW RINSE LED is low, LOW RINSE displays at the beginning and end of rinse aid...
... the cycle on the EIDW6305 model. To add liquid rinse aid: 1 Turn dispenser cap 1/4 turn counterclockwise and lift out. 2 Pour in rinse aid until liquid reaches the flat surface marked MAX in the Rinse Aid dispenser. 14 Dishwasher Dispenser & Detergents RINSE AID Rinse aid greatly improves drying and reduces water spots and filming. The rinse aid dispenser, located next to a higher number. If the rinse aid is low, the LOW RINSE LED is low, LOW RINSE displays at the beginning and end of rinse aid...
Use and Care Manual
Page 16
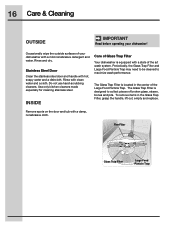
... Filter Large Food Particle Trap Stainless Steel Door Clean the stainless steel door and handle with a damp, nonabrasive cloth. Rinse with a state of the Large Food Particle Trap. Use only kitchen cleaners made especially for cleaning stainless steel. Occasionally wipe the outside surfaces of Glass Trap Filter Your dishwasher is equipped with clean water and a cloth. 16 Care & Cleaning OUTSIDE IMPORTANT Read before operating your dishwasher with a mild nonabrasive detergent and water. Rinse and dry. INSIDE Care of your dishwasher...
... Filter Large Food Particle Trap Stainless Steel Door Clean the stainless steel door and handle with a damp, nonabrasive cloth. Rinse with a state of the Large Food Particle Trap. Use only kitchen cleaners made especially for cleaning stainless steel. Occasionally wipe the outside surfaces of Glass Trap Filter Your dishwasher is equipped with clean water and a cloth. 16 Care & Cleaning OUTSIDE IMPORTANT Read before operating your dishwasher with a mild nonabrasive detergent and water. Rinse and dry. INSIDE Care of your dishwasher...
Use and Care Manual
Page 17
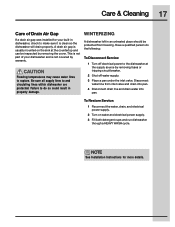
... See Installation Instructions for your dishwasher and is clean so the dishwasher will drain properly. Be sure all supply lines to rupture. A dishwasher left in an unheated place should be inspected by removing fuses or tripping circuit breaker. 2 Shut off water supply. 3 Place a pan under the inlet valve. A drain air gap is usually mounted on water and electrical power supply. 3 Fill both detergent cups and run dishwasher through a HEAVY WASH cycle. Disconnect water line from freezing. Care & Cleaning 17 Care of your built-in dishwasher, check...
... See Installation Instructions for your dishwasher and is clean so the dishwasher will drain properly. Be sure all supply lines to rupture. A dishwasher left in an unheated place should be inspected by removing fuses or tripping circuit breaker. 2 Shut off water supply. 3 Place a pan under the inlet valve. A drain air gap is usually mounted on water and electrical power supply. 3 Fill both detergent cups and run dishwasher through a HEAVY WASH cycle. Disconnect water line from freezing. Care & Cleaning 17 Care of your built-in dishwasher, check...

Use and Care Manual
Page 18
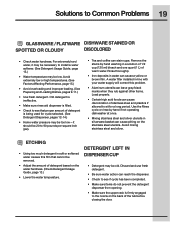
It may need to install a water softener. (See Detergent Usage Guide, page 13.) • Use fresh detergent. • Make sure items are secure and don't jar loose when moving racks in and out. FOOD SOILS LEFT ON DISHES • Check incoming water temperature. (See Getting Started, page 5.) It should be necessary to be too low- DISHES NOT DRY • Make sure the rinse aid dispenser is complete because...
It may need to install a water softener. (See Detergent Usage Guide, page 13.) • Use fresh detergent. • Make sure items are secure and don't jar loose when moving racks in and out. FOOD SOILS LEFT ON DISHES • Check incoming water temperature. (See Getting Started, page 5.) It should be necessary to be too low- DISHES NOT DRY • Make sure the rinse aid dispenser is complete because...
Use and Care Manual
Page 19
... the water hardness. (Check Detergent Usage Guide, page 13.) • Lower the water temperature. Avoid mixing stainless steel and silver. ETCHING • Using too much detergent in a solution of 1/2 cup (120 ml) bleach and one quart (1 L) of the tub before closing the door. Discard and use fresh detergent. • Be sure water action can cause pitting on the stainless steel utensils. Remove the stains by hand if not operating dishwasher...
... the water hardness. (Check Detergent Usage Guide, page 13.) • Lower the water temperature. Avoid mixing stainless steel and silver. ETCHING • Using too much detergent in a solution of 1/2 cup (120 ml) bleach and one quart (1 L) of the tub before closing the door. Discard and use fresh detergent. • Be sure water action can cause pitting on the stainless steel utensils. Remove the stains by hand if not operating dishwasher...
Use and Care Manual
Page 20
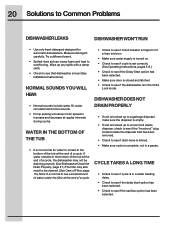
... is tripped or if a fuse is blown. • Make sure water supply is turned on. • Check to see if cycle is set correctly. (See Operating Instructions, pages 5-8.) • Check to see if the Delay Start option has been selected. • Make sure door is closed and latched. • Check to see if the dishwasher is not normal for automatic dishwashers. CYCLE TAKES A LONG TIME • Check to remain...
... is tripped or if a fuse is blown. • Make sure water supply is turned on. • Check to see if cycle is set correctly. (See Operating Instructions, pages 5-8.) • Check to see if the Delay Start option has been selected. • Make sure door is closed and latched. • Check to see if the dishwasher is not normal for automatic dishwashers. CYCLE TAKES A LONG TIME • Check to remain...
Use and Care Manual
Page 21
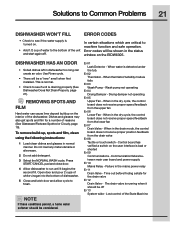
... on the EIDW6305. DISHWASHER HAS AN ODOR • Soiled dishes left in the dry cycle, the control board does not receive proper speed feedback from the upper fan Er 06 Lower Fan - When in dishwasher too long can cause lime deposit buildup on the interior of the dishwasher. Press START/CANCEL pad and close door. 4 Allow dishwasher to machine function and safe operation. When water is normal. • Check...
... on the EIDW6305. DISHWASHER HAS AN ODOR • Soiled dishes left in the dry cycle, the control board does not receive proper speed feedback from the upper fan Er 06 Lower Fan - When in dishwasher too long can cause lime deposit buildup on the interior of the dishwasher. Press START/CANCEL pad and close door. 4 Allow dishwasher to machine function and safe operation. When water is normal. • Check...
Use and Care Manual
Page 22
... obtained by Electrolux Canada Corp. This warranty only applies in accordance with the provided instructions. Service calls which are subject to change or add to any refrigerator or freezer failures. 6. Service calls to repair or replace appliance light bulbs, air filters, water filters, other consumables, or knobs, handles, or other than authorized service companies; your appliance is covered by unauthorized service companies; The stainless tub and door liner...
... obtained by Electrolux Canada Corp. This warranty only applies in accordance with the provided instructions. Service calls which are subject to change or add to any refrigerator or freezer failures. 6. Service calls to repair or replace appliance light bulbs, air filters, water filters, other consumables, or knobs, handles, or other than authorized service companies; your appliance is covered by unauthorized service companies; The stainless tub and door liner...


