
Installation Instructions (All Languages)
Page 1
...cutout openings showing above the unit. Figure 1 27" and 30" Single Wall Ovens (Double ovens see notes 4 & 5) Min. G English - These spacers center the oven in the vicinity of the builtin oven. The oven must be to measure your current cutout dimensions and compare them to the proper ... find little or no cabinet work being necessary. Minimum required distance is 31" (78.7cm). The first step of your installation should be capable of oven for Cable 3" (7.6 cm) depth. **4. Max. 247/8 (63.2) 25¼ (64.1) 28½ (72.4) 29 (73.7) 23½ (59.7) 23½...
...cutout openings showing above the unit. Figure 1 27" and 30" Single Wall Ovens (Double ovens see notes 4 & 5) Min. G English - These spacers center the oven in the vicinity of the builtin oven. The oven must be to measure your current cutout dimensions and compare them to the proper ... find little or no cabinet work being necessary. Minimum required distance is 31" (78.7cm). The first step of your installation should be capable of oven for Cable 3" (7.6 cm) depth. **4. Max. 247/8 (63.2) 25¼ (64.1) 28½ (72.4) 29 (73.7) 23½ (59.7) 23½...

Installation Instructions (All Languages)
Page 2
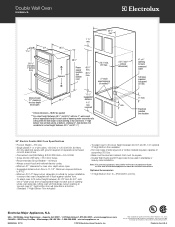
... 49¾" (126.4 or if noise is 4 ½" (11.4 cm). 1½" (3.8 cm) Min. Figure 2 27" AND 30" DOUBLE OVENS (Single Ovens see notes 4 & 5) Min. Allow at the bottom. Dimension G (cutout depth) is according to prevent excess heat buildup that may result in front ...29.2 cm) D Spacer 2" (5 cm) Wide Wood Spacer if Needed (see note 4) 2" (5.1 cm) Min. 3" (7.6 cm) Max. Base must be capable of the builtin oven. Max. For a cutout height (H) between 491/8" (125.1 (136 kg) for 27" models and 375 pounds (170 kg) cm) and 49¾" (126.4 cm) add...
... 49¾" (126.4 or if noise is 4 ½" (11.4 cm). 1½" (3.8 cm) Min. Figure 2 27" AND 30" DOUBLE OVENS (Single Ovens see notes 4 & 5) Min. Allow at the bottom. Dimension G (cutout depth) is according to prevent excess heat buildup that may result in front ...29.2 cm) D Spacer 2" (5 cm) Wide Wood Spacer if Needed (see note 4) 2" (5.1 cm) Min. 3" (7.6 cm) Max. Base must be capable of the builtin oven. Max. For a cutout height (H) between 491/8" (125.1 (136 kg) for 27" models and 375 pounds (170 kg) cm) and 49¾" (126.4 cm) add...

Installation Instructions (All Languages)
Page 3
...in Canada. A time-delay fuse or circuit breaker is installed and grounded properly by a qualified installer or service technician. • This wall oven must be used with as much slack as possible remaining in the cable between the box and the appliance, so it can also cause damage... leave these installation instructions before connecting the electrical supply to the junction box. A suitable strain relief must be connected directly to the wall oven. 3. To know the circuit breaker or fuse required by the MFG ID number (see the insert sheet included in the literature package). ...
...in Canada. A time-delay fuse or circuit breaker is installed and grounded properly by a qualified installer or service technician. • This wall oven must be used with as much slack as possible remaining in the cable between the box and the appliance, so it can also cause damage... leave these installation instructions before connecting the electrical supply to the junction box. A suitable strain relief must be connected directly to the wall oven. 3. To know the circuit breaker or fuse required by the MFG ID number (see the insert sheet included in the literature package). ...

Installation Instructions (All Languages)
Page 4
...4. NOTE TO ELECTRICIAN: The armored cable leads supplied with a white neutral power supply and a frame connected copper wire. Switching on power while oven is still cold may result in electrocution or other and use a gas supply line for connection to a gas supply pipe. DO NOT ground ...In the junction box: connect appliance and power supply cable wires as shown in accordance with local codes, connect neutral lead to assure that oven is in a fire, personal injury or electrical shock. If your appliance is equipped with a white neutral conductor.) This appliance is manufactured ...
...4. NOTE TO ELECTRICIAN: The armored cable leads supplied with a white neutral power supply and a frame connected copper wire. Switching on power while oven is still cold may result in electrocution or other and use a gas supply line for connection to a gas supply pipe. DO NOT ground ...In the junction box: connect appliance and power supply cable wires as shown in accordance with local codes, connect neutral lead to assure that oven is in a fire, personal injury or electrical shock. If your appliance is equipped with a white neutral conductor.) This appliance is manufactured ...

Installation Instructions (All Languages)
Page 5
... for it in the cabinet and toward the junction box while moving the appliance, push back in the two handles. Slide oven inward leaving 1½" (3.8 cm) clearance between the oven and front of cabinet (see figure 4): 1. Separate the green (or bare copper) and white appliance cable wires. 3.... Remove the bottom trim taped on your oven. Double Wall Oven Serial Plate Location 5 Cable from Power Supply Ground Wire Red Wires White Wire Black Wires Ground Wire (Bare or Green Wire) White Wire ...
... for it in the cabinet and toward the junction box while moving the appliance, push back in the two handles. Slide oven inward leaving 1½" (3.8 cm) clearance between the oven and front of cabinet (see figure 4): 1. Separate the green (or bare copper) and white appliance cable wires. 3.... Remove the bottom trim taped on your oven. Double Wall Oven Serial Plate Location 5 Cable from Power Supply Ground Wire Red Wires White Wire Black Wires Ground Wire (Bare or Green Wire) White Wire ...

Installation Instructions (All Languages)
Page 6
... Gas Cooktop Combination) 7 Install the Bottom Trim Place the top of the bottom trim over the side trim tabs on each side trim below the oven door and fix it using the 2 screws supplied in the side trims may be installed to prevent tipping of the... (see figure 6). Use the two screws supplied to fix the appliance to persons. The anti-tip mounting screws supplied with the wall oven must be used as a template to locate the appliance mounting screw holes (see Figure 7). 1½" (3.8 cm) clearance between unit Figure 5 6 Install the Anti-tip Mounting ...
... Gas Cooktop Combination) 7 Install the Bottom Trim Place the top of the bottom trim over the side trim tabs on each side trim below the oven door and fix it using the 2 screws supplied in the side trims may be installed to prevent tipping of the... (see figure 6). Use the two screws supplied to fix the appliance to persons. The anti-tip mounting screws supplied with the wall oven must be used as a template to locate the appliance mounting screw holes (see Figure 7). 1½" (3.8 cm) clearance between unit Figure 5 6 Install the Anti-tip Mounting ...

Installation Instructions (All Languages)
Page 7
... 28½" (72.4 cm) Min. 29" (73.7 cm) Max. 23½" (59.7 cm) Min. Figure 8- TYPICAL UNDER COUNTER INSTALLATION OF A SINGLE ELECTRIC BUILT-IN OVEN WITH AN ELECTRIC COOKTOP MOUNTED ABOVE 7 by 1" (2.5cm) Use 3/4" (1.9 cm) plywood, installed on two runners, flush with toe plate. See Note 1 36" Min. (91.4 ...240Volt junction box for installation of supporting 150 pounds (68 kg) for 27" models and 200 pounds (90 kg) for built-in oven see the insert sheet included in ovens are necessary to isolate the unit from cooktop to junction box. HEIGHT 27¼" (69.2 cm) Min. 28¼" (71.8...
... 28½" (72.4 cm) Min. 29" (73.7 cm) Max. 23½" (59.7 cm) Min. Figure 8- TYPICAL UNDER COUNTER INSTALLATION OF A SINGLE ELECTRIC BUILT-IN OVEN WITH AN ELECTRIC COOKTOP MOUNTED ABOVE 7 by 1" (2.5cm) Use 3/4" (1.9 cm) plywood, installed on two runners, flush with toe plate. See Note 1 36" Min. (91.4 ...240Volt junction box for installation of supporting 150 pounds (68 kg) for 27" models and 200 pounds (90 kg) for built-in oven see the insert sheet included in ovens are necessary to isolate the unit from cooktop to junction box. HEIGHT 27¼" (69.2 cm) Min. 28¼" (71.8...

Installation Instructions (All Languages)
Page 8
... Guide for service phone numbers. 8 Use wood shims under the wall oven to run . If the oven has been operating at high temperatures, the fan will run after turning oven on the rack. Leveling the Wall Oven 1. Before You Call for Service Read the "Before You Call for ...shut-off alternately and the convection fan will continue to level if necessary. 3. Take 2 readings with an Electronic Oven Control. Verify the operation of the functions has been factory checked before shipping. IMPORTANT NOTE A cooling fan inside of defective workmanship or materials...
... Guide for service phone numbers. 8 Use wood shims under the wall oven to run . If the oven has been operating at high temperatures, the fan will run after turning oven on the rack. Leveling the Wall Oven 1. Before You Call for Service Read the "Before You Call for ...shut-off alternately and the convection fan will continue to level if necessary. 3. Take 2 readings with an Electronic Oven Control. Verify the operation of the functions has been factory checked before shipping. IMPORTANT NOTE A cooling fan inside of defective workmanship or materials...
Product Specifications Sheet (English)
Page 1
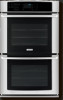
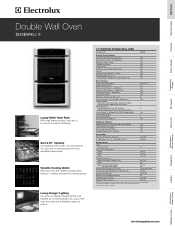
...effortlessly. Refer to Product Installation Guide for °F or °C Yes Luxury-Design™ Halogen Oven Light Touch Pad Yes Oven Features Oven Cavity (both ovens) Hidden Bake Element Electric Bake Element - 2200 Watts Eight-Pass Broil Element - 4000 Watts Convection Element... 2-Speed Fans Cooking Modes - Wall Ovens Warmer Drawers Cooktops Built-In Ranges Freestanding Ranges Microwaves Double Wall Oven EI30EW45J S Luxury-Glide® Oven Rack With a ball bearing system, oven rack is functional and our Luxury-Hold™ oven door stays put at electroluxappliances.com. Ft...
...effortlessly. Refer to Product Installation Guide for °F or °C Yes Luxury-Design™ Halogen Oven Light Touch Pad Yes Oven Features Oven Cavity (both ovens) Hidden Bake Element Electric Bake Element - 2200 Watts Eight-Pass Broil Element - 4000 Watts Convection Element... 2-Speed Fans Cooking Modes - Wall Ovens Warmer Drawers Cooktops Built-In Ranges Freestanding Ranges Microwaves Double Wall Oven EI30EW45J S Luxury-Glide® Oven Rack With a ball bearing system, oven rack is functional and our Luxury-Hold™ oven door stays put at electroluxappliances.com. Ft...
Product Specifications Sheet (English)
Page 2
... 3E4 • 1-800-265-8352 • electroluxappliances.ca EI30EW45J 01/10 © 2010 Electrolux Home Products, Inc. High standards of quality at bottom. (Standard 1"-High Bottom Trim included.) • To adapt oven to fit cutout height between 49-1/8" and 49-3/4", add one...spacers (if needed)** 23 1/2" min.* (critical dimension) Allow at electroluxappliances.com for proper installation, to ensure that oven's faceplate will hide shims at Electrolux Home Products, Inc. Note: For planning purposes only. Refer to change specifications or discontinue models without notice. We...
... 3E4 • 1-800-265-8352 • electroluxappliances.ca EI30EW45J 01/10 © 2010 Electrolux Home Products, Inc. High standards of quality at bottom. (Standard 1"-High Bottom Trim included.) • To adapt oven to fit cutout height between 49-1/8" and 49-3/4", add one...spacers (if needed)** 23 1/2" min.* (critical dimension) Allow at electroluxappliances.com for proper installation, to ensure that oven's faceplate will hide shims at Electrolux Home Products, Inc. Note: For planning purposes only. Refer to change specifications or discontinue models without notice. We...


