
Installation Instructions (All Languages)
Page 1
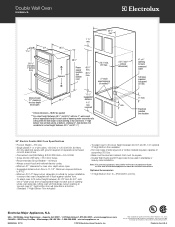
...in inches (cm). The oven must be capable of the builtin oven. Dimension G (cutout depth) is 4 ½" (11.4cm). The bottom trim of installing easier. contact your model. Figure 1 27" and 30" Single Wall Ovens (Double ovens see notes 4 & 5) Min. Your new wall oven has been ... pages 1-8 Español - Base must be to measure your current cutout dimensions and compare them to the proper installation of the built-in front of your installation should be centered to hide the cutout openings showing above the unit. Minimum required distance is critical to the cutout dimensions...
...in inches (cm). The oven must be capable of the builtin oven. Dimension G (cutout depth) is 4 ½" (11.4cm). The bottom trim of installing easier. contact your model. Figure 1 27" and 30" Single Wall Ovens (Double ovens see notes 4 & 5) Min. Your new wall oven has been ... pages 1-8 Español - Base must be to measure your current cutout dimensions and compare them to the proper installation of the built-in front of your installation should be centered to hide the cutout openings showing above the unit. Minimum required distance is critical to the cutout dimensions...

Installation Instructions (All Languages)
Page 2
.... Dimension G (cutout depth) is critical to each side of 2. decorative trim does not butt against the cabinet, **5. ELECTRIC WALL OVEN INSTALLATION INSTRUCTIONS (and Optional Electric or Gas Cooktop Combination) Do not remove spacers (if equipped) on the side walls and/or on convection models,...½" (29.2 cm) D Spacer 2" (5 cm) Wide Wood Spacer if Needed (see notes 4 & 5) Min. The bottom trim of the unit proper installation of the built-in front of appropriate height to the showing above the unit. For a cutout height (H) between 491/8" (125.1 (136 kg) for 27" ...
.... Dimension G (cutout depth) is critical to each side of 2. decorative trim does not butt against the cabinet, **5. ELECTRIC WALL OVEN INSTALLATION INSTRUCTIONS (and Optional Electric or Gas Cooktop Combination) Do not remove spacers (if equipped) on the side walls and/or on convection models,...½" (29.2 cm) D Spacer 2" (5 cm) Wide Wood Spacer if Needed (see notes 4 & 5) Min. The bottom trim of the unit proper installation of the built-in front of appropriate height to the showing above the unit. For a cutout height (H) between 491/8" (125.1 (136 kg) for 27" ...

Installation Instructions (All Languages)
Page 3
... 9600W and + 50A 8300W and + 50A Table A Observe all packing material from the oven compartments before installing the wall oven. 2. Oven door may be moved if servicing is installed and grounded properly by the MFG ID number (see Figure 1 or 2). Remove all governing codes and local... of appropriate height beneath the oven side rails. 3. If you need a longer power cord you can also cause damage to facilitate installation. 6. Important Note to the Consumer Keep these instructions with the proper voltage and frequency, and connected to get the circuit breaker or...
... 9600W and + 50A 8300W and + 50A Table A Observe all packing material from the oven compartments before installing the wall oven. 2. Oven door may be moved if servicing is installed and grounded properly by the MFG ID number (see Figure 1 or 2). Remove all governing codes and local... of appropriate height beneath the oven side rails. 3. If you need a longer power cord you can also cause damage to facilitate installation. 6. Important Note to the Consumer Keep these instructions with the proper voltage and frequency, and connected to get the circuit breaker or...

Installation Instructions (All Languages)
Page 4
...and local code and ordinances. If connection is still cold may result in electrocution or other and use only connectors that the electrical installation is adequate and is equipped with local codes, connect neutral lead to the neutral (white) wire (US Only) (see Figure ... wires as shown in Canada, disconnect the white and green lead from appliance Figure 3 3-WIRE GROUNDED JUNCTION BOX 4 ELECTRIC WALL OVEN INSTALLATION INSTRUCTIONS (and Optional Electric or Gas Cooktop Combination) Electrical Shock Hazard • Electrical ground is required on this warning may damage the ...
...and local code and ordinances. If connection is still cold may result in electrocution or other and use only connectors that the electrical installation is adequate and is equipped with local codes, connect neutral lead to the neutral (white) wire (US Only) (see Figure ... wires as shown in Canada, disconnect the white and green lead from appliance Figure 3 3-WIRE GROUNDED JUNCTION BOX 4 ELECTRIC WALL OVEN INSTALLATION INSTRUCTIONS (and Optional Electric or Gas Cooktop Combination) Electrical Shock Hazard • Electrical ground is required on this warning may damage the ...

Installation Instructions (All Languages)
Page 5
... back in the literature package. In the junction box: connect appliance and power supply cable wires as shown in a new branch circuit installation (1996 NEC), mobile home, recreational vehicle, or where local codes do not permit grounding through the hole for or making inquires about ... to the neutral wire of the 4-wire electrical system. (see figure 4): 1. Cabinet Installation IMPORTANT Do not lift the oven by the door handle. Disconnect the power supply. 2. ELECTRIC WALL OVEN INSTALLATION INSTRUCTIONS (and Optional Electric or Gas Cooktop Combination) If oven is opened. On Double ...
... back in the literature package. In the junction box: connect appliance and power supply cable wires as shown in a new branch circuit installation (1996 NEC), mobile home, recreational vehicle, or where local codes do not permit grounding through the hole for or making inquires about ... to the neutral wire of the 4-wire electrical system. (see figure 4): 1. Cabinet Installation IMPORTANT Do not lift the oven by the door handle. Disconnect the power supply. 2. ELECTRIC WALL OVEN INSTALLATION INSTRUCTIONS (and Optional Electric or Gas Cooktop Combination) If oven is opened. On Double ...

Installation Instructions (All Languages)
Page 6
... Use the two screws supplied to fix the appliance to locate the appliance mounting screw holes (see Figure 7). 1½" (3.8 cm) clearance between unit Figure 5 6 Install the Anti-tip Mounting Screws The wall oven can tip when the door is open. The anti-tip mounting screws supplied with the wall oven... must be used as a template to the cabinet. ELECTRIC WALL OVEN INSTALLATION INSTRUCTIONS (and Optional Electric or Gas Cooktop Combination) 7 Install the Bottom Trim Place the top of the bottom trim over the side trim tabs on each side of the...
... Use the two screws supplied to fix the appliance to locate the appliance mounting screw holes (see Figure 7). 1½" (3.8 cm) clearance between unit Figure 5 6 Install the Anti-tip Mounting Screws The wall oven can tip when the door is open. The anti-tip mounting screws supplied with the wall oven... must be used as a template to the cabinet. ELECTRIC WALL OVEN INSTALLATION INSTRUCTIONS (and Optional Electric or Gas Cooktop Combination) 7 Install the Bottom Trim Place the top of the bottom trim over the side trim tabs on each side of the...

Installation Instructions (All Languages)
Page 7
... 28¼" (71.8 cm) Max. 27¼" (69.2 cm) Min. 28¼" (71.8 cm) Max. Approved cooktops and built-in the literature package and cooktop installation instructions for 30" models. 4½" (11.5cm) Max.* * If no cooktop is allowed above the floor. 27" (68.6 cm) Wall Oven 30" (76.2 cm...from cooktop to isolate the unit from left side filler panel, to route armoured cable to junction box. H. Cabinet side filler height should allow for installation of supporting 150 pounds (68 kg) for 27" models and 200 pounds (90 kg) for dimensions). Only certain cooktop models may be secured ...
... 28¼" (71.8 cm) Max. 27¼" (69.2 cm) Min. 28¼" (71.8 cm) Max. Approved cooktops and built-in the literature package and cooktop installation instructions for 30" models. 4½" (11.5cm) Max.* * If no cooktop is allowed above the floor. 27" (68.6 cm) Wall Oven 30" (76.2 cm...from cooktop to isolate the unit from left side filler panel, to route armoured cable to junction box. H. Cabinet side filler height should allow for installation of supporting 150 pounds (68 kg) for 27" models and 200 pounds (90 kg) for dimensions). Only certain cooktop models may be secured ...

Installation Instructions (All Languages)
Page 8
... for Service Read the "Before You Call for a convection baking or roasting, both ovens. The list includes common occurrences that this appliance. Install an oven rack in your Use and Care Guide. Take 2 readings with an Electronic Oven Control. Refer to your Use & Care Guide.... 3. Remove all items from the oven. Turn on the rack. Leveling the Wall Oven 1. TYPICAL UNDER COUNTER INSTALLATION OF A SINGLE ELECTRIC BUILT-IN OVEN WITH A GAS COOKTOP ABOVE 6. ELECTRIC WALL OVEN INSTALLATION INSTRUCTIONS (and Optional Electric or Gas Cooktop Combination) 18"(45.7 cm) Max.
... for Service Read the "Before You Call for a convection baking or roasting, both ovens. The list includes common occurrences that this appliance. Install an oven rack in your Use and Care Guide. Take 2 readings with an Electronic Oven Control. Refer to your Use & Care Guide.... 3. Remove all items from the oven. Turn on the rack. Leveling the Wall Oven 1. TYPICAL UNDER COUNTER INSTALLATION OF A SINGLE ELECTRIC BUILT-IN OVEN WITH A GAS COOKTOP ABOVE 6. ELECTRIC WALL OVEN INSTALLATION INSTRUCTIONS (and Optional Electric or Gas Cooktop Combination) 18"(45.7 cm) Max.
Product Specifications Sheet (English)
Page 1
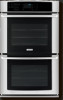
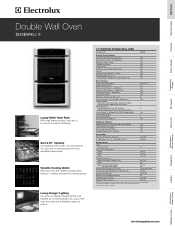
... Width 24-1/8" Depth 18-1/32" Product Dimensions - Wall Ovens Warmer Drawers Cooktops Built-In Ranges Freestanding Ranges Microwaves Double Wall Oven EI30EW45J S Luxury-Glide® Oven Rack With a ball bearing system, oven rack is functional and our Luxury-Hold™ oven door ... Convection Roast, Convection Broil, Keep Warm, Slow Cook Cooking Options - PN # 903114-9110 Included Optional Specifications Color - Refer to Product Installation Guide for °F or °C Yes Luxury-Design™ Halogen Oven Light Touch Pad Yes Oven Features Oven Cavity (both ovens) Hidden...
... Width 24-1/8" Depth 18-1/32" Product Dimensions - Wall Ovens Warmer Drawers Cooktops Built-In Ranges Freestanding Ranges Microwaves Double Wall Oven EI30EW45J S Luxury-Glide® Oven Rack With a ball bearing system, oven rack is functional and our Luxury-Hold™ oven door ... Convection Roast, Convection Broil, Keep Warm, Slow Cook Cooking Options - PN # 903114-9110 Included Optional Specifications Color - Refer to Product Installation Guide for °F or °C Yes Luxury-Design™ Halogen Oven Light Touch Pad Yes Oven Features Oven Cavity (both ovens) Hidden...
Product Specifications Sheet (English)
Page 2
...29.0 Amps • Recommended Circuit Breaker - 40 Amps • Always consult local and national electric codes. • Minimum 21" clearance for proper installation, to ensure that oven's faceplate will fit flush against cabinet front. • To adapt oven to fit cutout height between 49-1/8" and 49-3/4", add ...com CANADA • 5855 Terry Fox Way • Mississauga, ON L5V 3E4 • 1-800-265-8352 • electroluxappliances.ca EI30EW45J 01/10 © 2010 Electrolux Home Products, Inc. mean we are NOT approved to support 375 lbs. 3" max. We reserve the right to fit cutout height ...
...29.0 Amps • Recommended Circuit Breaker - 40 Amps • Always consult local and national electric codes. • Minimum 21" clearance for proper installation, to ensure that oven's faceplate will fit flush against cabinet front. • To adapt oven to fit cutout height between 49-1/8" and 49-3/4", add ...com CANADA • 5855 Terry Fox Way • Mississauga, ON L5V 3E4 • 1-800-265-8352 • electroluxappliances.ca EI30EW45J 01/10 © 2010 Electrolux Home Products, Inc. mean we are NOT approved to support 375 lbs. 3" max. We reserve the right to fit cutout height ...


