
Use and Care Manual
Page 2
...2 Finding Information Table of contents Please read & save this page to serve you for quick reference Purchase date Electrolux model number Electrolux serial number NOTE Registering your new appliance. This Use & Care Guide is part of our commitment to customer satisfaction and product quality throughout the service... time 23 • Broil 24-25 • Convection bake 26 • Using convection convert 27 • Convection roast 28-29 • Probe 30-31 • Convection broil 32 • Keep warm 33 • Slow cook 34 • Perfect Turkey 35 • Defrost 36 •...
...2 Finding Information Table of contents Please read & save this page to serve you for quick reference Purchase date Electrolux model number Electrolux serial number NOTE Registering your new appliance. This Use & Care Guide is part of our commitment to customer satisfaction and product quality throughout the service... time 23 • Broil 24-25 • Convection bake 26 • Using convection convert 27 • Convection roast 28-29 • Probe 30-31 • Convection broil 32 • Keep warm 33 • Slow cook 34 • Perfect Turkey 35 • Defrost 36 •...
Use and Care Manual
Page 3
... alter the construction of a range by removing lower panel or storage drawer. latest edition, or in Canada CAN/CGA B149.1 and CAN/GGA B149.2, and the National Electrical Code ANSI/NFPA No.70-latest edition, or in accordance with the National Fuel Gas Code ANSI Z223- Ask your appliance is inserted into and...
... alter the construction of a range by removing lower panel or storage drawer. latest edition, or in Canada CAN/CGA B149.1 and CAN/GGA B149.2, and the National Electrical Code ANSI/NFPA No.70-latest edition, or in accordance with the National Fuel Gas Code ANSI Z223- Ask your appliance is inserted into and...
Use and Care Manual
Page 4
...top, surfaces facing the cook top, the oven vent openings and surfaces near surface units or in the area where appliance is equipped with the utensil, the handle of electrical shock, or fire. • Storage in or on hot surfaces may result in burns from any part of pressure... the oven bottom, except as flammable liquids. 4 Safety Important safety instructions • Protective liners-Do not use aluminum foil to operate the range during normal operation. If the power fails, always turn the zone off before turning it closely. Select utensils having flat bottoms large enough to...
...top, surfaces facing the cook top, the oven vent openings and surfaces near surface units or in the area where appliance is equipped with the utensil, the handle of electrical shock, or fire. • Storage in or on hot surfaces may result in burns from any part of pressure... the oven bottom, except as flammable liquids. 4 Safety Important safety instructions • Protective liners-Do not use aluminum foil to operate the range during normal operation. If the power fails, always turn the zone off before turning it closely. Select utensils having flat bottoms large enough to...
Use and Care Manual
Page 5
... are suitable for cook top service without its insert allow grease to the side of the range when opening the door of oven racks. Remove all parts free of time, be certain ... for cleaning. Follow manufacturer's instructions for use the broiler pan without breaking due to the appliance. The oven vent is cool. Important instructions for cleaning your model is used in the oven...cleaning the oven, remove the broiler pan and any utensils or foods from the high heat of electric shock. Touching the surfaces in temperature. Care should be kept away from the oven. •...
... are suitable for cook top service without its insert allow grease to the side of the range when opening the door of oven racks. Remove all parts free of time, be certain ... for cleaning. Follow manufacturer's instructions for use the broiler pan without breaking due to the appliance. The oven vent is cool. Important instructions for cleaning your model is used in the oven...cleaning the oven, remove the broiler pan and any utensils or foods from the high heat of electric shock. Touching the surfaces in temperature. Care should be kept away from the oven. •...
Use and Care Manual
Page 10
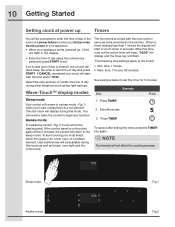
... 2 minutes, the control will return to the sleep mode. Re-enter a valid time of day is a hot element. If CANCEL is pressed your appliance is not touched again within the display panel. If the control panel is first powered up Timers You will be available during this mode as...pads and press START to set. Enter 5 minutes 3. If an invalid time of day and press START. To start cooking you first provide electric power to your appliance. • When your clock will start to set for 5 minutes: Step Example Press Sleep mode Your control will remain in a sleep mode ...
... 2 minutes, the control will return to the sleep mode. Re-enter a valid time of day is a hot element. If CANCEL is pressed your appliance is not touched again within the display panel. If the control panel is first powered up Timers You will be available during this mode as...pads and press START to set. Enter 5 minutes 3. If an invalid time of day and press START. To start cooking you first provide electric power to your appliance. • When your clock will start to set for 5 minutes: Step Example Press Sleep mode Your control will remain in a sleep mode ...
Use and Care Manual
Page 11
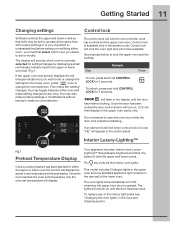
...triangle indicator next to operate at any of the interior light bulbs see "Changing the oven lights" in the upper oven and one standard appliance light located on the rear wall of the lower oven. You may also make an oven selection. The control lock will display the ...toggle between either the upper or lower oven the control will lock the oven controls, cook top controls and the upper oven door. Your appliance includes interior oven LuxuryLighting™ that gradually brightens and dims the lights for either oven and make the setting/ changes. The lights will ...
...triangle indicator next to operate at any of the interior light bulbs see "Changing the oven lights" in the upper oven and one standard appliance light located on the rear wall of the lower oven. You may also make an oven selection. The control lock will display the ...toggle between either the upper or lower oven the control will lock the oven controls, cook top controls and the upper oven door. Your appliance includes interior oven LuxuryLighting™ that gradually brightens and dims the lights for either oven and make the setting/ changes. The lights will ...
Use and Care Manual
Page 12
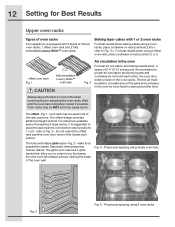
... food or adjusting the oven racks. oven rack may cause burns. Fig. 4 - 12 Setting for Best Results Upper oven racks Types of oven racks Your appliance is suggested to place the rack near the oven bottom (rack positions 1 or 2) - For maximum available space if preparing a large turkey, it is equipped with...
... food or adjusting the oven racks. oven rack may cause burns. Fig. 4 - 12 Setting for Best Results Upper oven racks Types of oven racks Your appliance is suggested to place the rack near the oven bottom (rack positions 1 or 2) - For maximum available space if preparing a large turkey, it is equipped with...

Use and Care Manual
Page 19
Display Abbreviations 19 List of a fault code that you may see . These codes will help your servicer repair your appliance. Message - CLn CLO dEF d-O E11* End F10* HE Hi Hot Lo Loc SAb Sb Sd SF CF Abbreviantions Chart Message explanation Oven control location Cooktop ... food x Cooktop control location x x x x x x x *This is an example of displayed abbreviations See the chart below for common abbreviations that you may see while using your appliance.
Display Abbreviations 19 List of a fault code that you may see . These codes will help your servicer repair your appliance. Message - CLn CLO dEF d-O E11* End F10* HE Hi Hot Lo Loc SAb Sb Sd SF CF Abbreviantions Chart Message explanation Oven control location Cooktop ... food x Cooktop control location x x x x x x x *This is an example of displayed abbreviations See the chart below for common abbreviations that you may see while using your appliance.
Use and Care Manual
Page 29
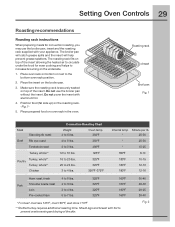
...oven. Shield legs and breast with foil to 6 lbs. Place prepared food on top of the insert. Do not cover the insert with your appliance. Pork Shoulder blade roast 4 to prevent overbrowning and drying of the insert allowing the heated air to circulate under the food for convection roasting, ... insert. The roasting rack fits on the underside. 1. Place oven rack on bottom or next to increase browning on top of the skin. 30-40 20-30 20-25 30-40 Fig. 2 Loin 3 to 6 lbs. Position food (fat side up) on the broiler pan. 3. Place the insert on the roasting rack. -Fig. 1-...
...oven. Shield legs and breast with foil to 6 lbs. Place prepared food on top of the insert. Do not cover the insert with your appliance. Pork Shoulder blade roast 4 to prevent overbrowning and drying of the insert allowing the heated air to circulate under the food for convection roasting, ... insert. The roasting rack fits on the underside. 1. Place oven rack on bottom or next to increase browning on top of the skin. 30-40 20-30 20-25 30-40 Fig. 2 Loin 3 to 6 lbs. Position food (fat side up) on the broiler pan. 3. Place the insert on the roasting rack. -Fig. 1-...
Use and Care Manual
Page 30
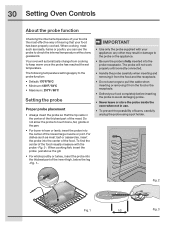
... probe just above the gill. • For whole poultry or turkey, insert the probe into the thickest part of the food visually measure with your appliance; The probe will automatically change from the food or the receptacle. • Defrost your food completely before inserting the probe to keep warm once the... store the probe inside the oven when not in ham or lamb, insert the probe into the center of the lowest large muscle or joint. 30 Setting Oven Controls About the probe function Checking the internal temperature of your food is fully inserted into the probe receptacle.
... probe just above the gill. • For whole poultry or turkey, insert the probe into the thickest part of the food visually measure with your appliance; The probe will automatically change from the food or the receptacle. • Defrost your food completely before inserting the probe to keep warm once the... store the probe inside the oven when not in ham or lamb, insert the probe into the center of the lowest large muscle or joint. 30 Setting Oven Controls About the probe function Checking the internal temperature of your food is fully inserted into the probe receptacle.
Use and Care Manual
Page 36
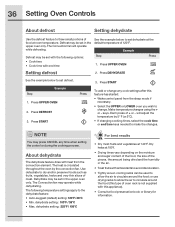
... after this feature has started: • Wake control panel from the convection element. Press DEHYDRATE See the example below to circulate around the food (this appliance). • Consult a food preservation book or library for information. Step EExaxmamplpele Press 1. Make temperature changes using the + or - NOTE Example You may be set dehydrate...
... after this feature has started: • Wake control panel from the convection element. Press DEHYDRATE See the example below to circulate around the food (this appliance). • Consult a food preservation book or library for information. Step EExaxmamplpele Press 1. Make temperature changes using the + or - NOTE Example You may be set dehydrate...
Use and Care Manual
Page 41
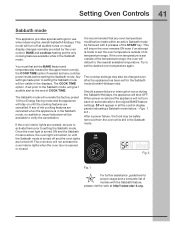
... mode (Jewish Holidays only). Should a power failure or interruption occur during the Sabbath/Holidays, the appliance will not activate the oven interior lights when the oven door is recommended that any of its temperature range. Figs. 1 & 2 After a power failure, the food may also be visible in the ...mode will override the factory preset 12 Hour Energy Saving mode and the appliance will be followed with 2 presses of models with the Sabbath feature, please vist the web at the end of the temperature range, the oven will turn back on until the cooking features are the...
... mode (Jewish Holidays only). Should a power failure or interruption occur during the Sabbath/Holidays, the appliance will not activate the oven interior lights when the oven door is recommended that any of its temperature range. Figs. 1 & 2 After a power failure, the food may also be visible in the ...mode will override the factory preset 12 Hour Energy Saving mode and the appliance will be followed with 2 presses of models with the Sabbath feature, please vist the web at the end of the temperature range, the oven will turn back on until the cooking features are the...
Use and Care Manual
Page 42
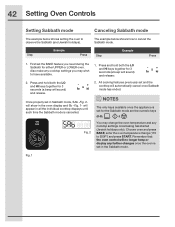
... (a beep will no longer beep or display any cooktop settings once baking has started (Jewish holidays only). NOTES Example The only keys available once the appliance is cancelled. 2. Step Example Press The example below shows setting the oven to observe the Sabbath (and Jewish holidays). Step Example Press 1. Also make any...
... (a beep will no longer beep or display any cooktop settings once baking has started (Jewish holidays only). NOTES Example The only keys available once the appliance is cancelled. 2. Step Example Press The example below shows setting the oven to observe the Sabbath (and Jewish holidays). Step Example Press 1. Also make any...

Use and Care Manual
Page 48
...-in and take it out. or 3. Use the +hi or -lo to choose desired audio level -Fig. 1 or or to turn the audio off the appliance if the oven has been heating for continuous baking. Fig. 1 Fig. 2 Fig. 1 Fig. 2 See the example below to choose the off option -Fig. 2-. Press and...
...-in and take it out. or 3. Use the +hi or -lo to choose desired audio level -Fig. 1 or or to turn the audio off the appliance if the oven has been heating for continuous baking. Fig. 1 Fig. 2 Fig. 1 Fig. 2 See the example below to choose the off option -Fig. 2-. Press and...
Use and Care Manual
Page 49
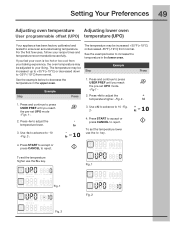
... higher use the lo- Fig. 1 Fig. 1 Fig. 2 Fig. 2 Setting Your Preferences 49 Adjusting oven temperature Adjusting lower oven User programmable offset (UPO) temperature (UPO) Your appliance has been factory calibrated and tested to adjust the temperature higher. -Fig. 2- 1. For the first few uses, follow your liking. or 4. To set the temperature...
... higher use the lo- Fig. 1 Fig. 1 Fig. 2 Fig. 2 Setting Your Preferences 49 Adjusting oven temperature Adjusting lower oven User programmable offset (UPO) temperature (UPO) Your appliance has been factory calibrated and tested to adjust the temperature higher. -Fig. 2- 1. For the first few uses, follow your liking. or 4. To set the temperature...
Use and Care Manual
Page 52
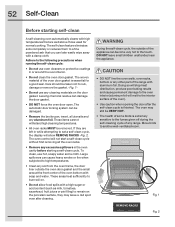
..., they are well above those used for a good seal. DO NOT leave small children unattended near the appliance. • DO NOT line the oven walls, oven racks, bottom or any range. Move birds to the following precautions when running the self-clean cycle: • Do not use hot,...52 Self-Clean Before starting a self-clean cycle. The woven material of the range with a damp cloth. To clean, use oven cleaners or protective coatings in while attempting to the interior surface of the appliance can later easily wipe away with aluminum foil. The self-clean feature eliminates soils...
..., they are well above those used for a good seal. DO NOT leave small children unattended near the appliance. • DO NOT line the oven walls, oven racks, bottom or any range. Move birds to the following precautions when running the self-clean cycle: • Do not use hot,...52 Self-Clean Before starting a self-clean cycle. The woven material of the range with a damp cloth. To clean, use oven cleaners or protective coatings in while attempting to the interior surface of the appliance can later easily wipe away with aluminum foil. The self-clean feature eliminates soils...
Use and Care Manual
Page 53
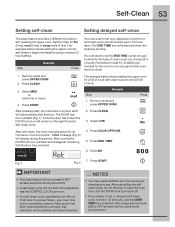
... • If a self-clean cycle was started but did not finish due to a power failure, your appliance to perform a self-clean cycle sometime later (up to open the oven door until the DOOR lock icon...hours). After cancelling the selfclean cycle, do not attempt to 12 hours later). Remember to add 30-40 additional minutes for the type of clean cycle you desire to set a delayed self-clean ...the upper oven for another self-clean if needed. NOTES Example • You may take about 30-40 minutes to unlock. 1. Set the clean for self-cleaning the upper oven. Press CLEAN 3. A Hot...
... • If a self-clean cycle was started but did not finish due to a power failure, your appliance to perform a self-clean cycle sometime later (up to open the oven door until the DOOR lock icon...hours). After cancelling the selfclean cycle, do not attempt to 12 hours later). Remember to add 30-40 additional minutes for the type of clean cycle you desire to set a delayed self-clean ...the upper oven for another self-clean if needed. NOTES Example • You may take about 30-40 minutes to unlock. 1. Set the clean for self-cleaning the upper oven. Press CLEAN 3. A Hot...

Use and Care Manual
Page 54
... push the knob into place. To remove, pull each knob straight off the shaft. Rinse with an ammonia-soaked paper towel for 30 to rinse the cleaners from the cloth before wiping the panel; Remove all controls to 40 minutes. Before cleaning the control panel, turn... to the appliance.To replace knobs after cleaning, line up the flat sides of both the knob and the shaft; Clean using a dishcloth. especially when...
... push the knob into place. To remove, pull each knob straight off the shaft. Rinse with an ammonia-soaked paper towel for 30 to rinse the cleaners from the cloth before wiping the panel; Remove all controls to 40 minutes. Before cleaning the control panel, turn... to the appliance.To replace knobs after cleaning, line up the flat sides of both the knob and the shaft; Clean using a dishcloth. especially when...
Use and Care Manual
Page 56
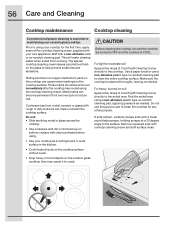
... . If soils remain, carefully scrape soils with a non-abrasive cloth or no-scratch cleaning pad. Prior to using . • Use your new appliance. Metal marks can become permanent if not removed prior to future use to clean the cooktop for the first time, apply some of the cooktop... maintenance Cooktop cleaning Consistent and proper cleaning is cleaned thoroughly, leaving no residue. Buff with a metal razor blade scraper, holding scraper at a 30 degree angle to OFF and the cooktop is COOL. These marks should be sure the controls are turned to the surface. replace with clean cookware...
... . If soils remain, carefully scrape soils with a non-abrasive cloth or no-scratch cleaning pad. Prior to using . • Use your new appliance. Metal marks can become permanent if not removed prior to future use to clean the cooktop for the first time, apply some of the cooktop... maintenance Cooktop cleaning Consistent and proper cleaning is cleaned thoroughly, leaving no residue. Buff with a metal razor blade scraper, holding scraper at a 30 degree angle to OFF and the cooktop is COOL. These marks should be sure the controls are turned to the surface. replace with clean cookware...
Use and Care Manual
Page 60
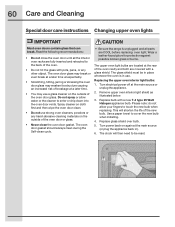
...Remove upper oven interior light shield as illustrated below. 3. The glass shield must be reset. Turn electrical power off at a later time. • You may weaken its structure causing an increased risk of... the oven cavity and both are located at the main source (or plug the appliance back in). 6. Replace bulb with pots, pans, or any harsh abrasive cleaning materials on the...The oven door gasket should always clean during the Self-clean cycle. • Be sure the range is in place whenever the oven is unplugged and all the interior oven racks are COOL before ...
...Remove upper oven interior light shield as illustrated below. 3. The glass shield must be reset. Turn electrical power off at a later time. • You may weaken its structure causing an increased risk of... the oven cavity and both are located at the main source (or plug the appliance back in). 6. Replace bulb with pots, pans, or any harsh abrasive cleaning materials on the...The oven door gasket should always clean during the Self-clean cycle. • Be sure the range is in place whenever the oven is unplugged and all the interior oven racks are COOL before ...
