
Use and Care Manual
Page 2
... mode (AUD 48 • Adjusting oven temperature (UPO 49 • Adjusting lower oven temperature (UPO 49 • Factory default reset (RST 50 • User preferences chart 51 Self-Clean 52-53 Care & Cleaning 54-61 • Cleaning recommendations 54-55 • Cooktop maintenance 56 • Cooktop cleaning 56-57 • Oven door removal 58-59 • Changing oven lights 60-61 Solutions to Common Problems 62-64 Warranty 67 Thank you . Keep a record for choosing Electrolux...
... mode (AUD 48 • Adjusting oven temperature (UPO 49 • Adjusting lower oven temperature (UPO 49 • Factory default reset (RST 50 • User preferences chart 51 Self-Clean 52-53 Care & Cleaning 54-61 • Cleaning recommendations 54-55 • Cooktop maintenance 56 • Cooktop cleaning 56-57 • Oven door removal 58-59 • Changing oven lights 60-61 Solutions to Common Problems 62-64 Warranty 67 Thank you . Keep a record for choosing Electrolux...
Use and Care Manual
Page 3
... storage drawer. All other servicing should be done only by a qualified technician in Canada CSA Standard C22.1, Canadian Electrical Code, Part 1, and local code requirements. The weight of a child on the range to reach items could result. • Install anti-tip device packed with a warmer drawer, grasp the top rear edge of the range and carefully attempt to tilt it forward. Children climbing on an open door...
... storage drawer. All other servicing should be done only by a qualified technician in Canada CSA Standard C22.1, Canadian Electrical Code, Part 1, and local code requirements. The weight of a child on the range to reach items could result. • Install anti-tip device packed with a warmer drawer, grasp the top rear edge of the range and carefully attempt to tilt it forward. Children climbing on an open door...
Use and Care Manual
Page 4
... contact hot surfaces. • Do not use water or flour on , and turn off the range. Do not let clothing or other flammable materials touch these areas until they are the cook top, surfaces facing the cook top, the oven vent openings and surfaces near surface units or in injury. • Remove the oven door from steam. Once the power resumes, reset the clock and oven function. • Do not heat unopened...
... contact hot surfaces. • Do not use water or flour on , and turn off the range. Do not let clothing or other flammable materials touch these areas until they are the cook top, surfaces facing the cook top, the oven vent openings and surfaces near surface units or in injury. • Remove the oven door from steam. Once the power resumes, reset the clock and oven function. • Do not heat unopened...
Use and Care Manual
Page 5
... temperature. Let hot air or steam escape before you remove or replace food in the oven. The oven vent is located under a ventilating hood, turn the fan on a hot cooking area, be careful to the side of the range when opening oven door or lower oven drawer (if equipped)-Stand to avoid a steam burn. Do not let potholders contact the hot heating elements in the oven. • Keep oven vent ducts unobstructed. When using your oven • Use care when opening the door...
... temperature. Let hot air or steam escape before you remove or replace food in the oven. The oven vent is located under a ventilating hood, turn the fan on a hot cooking area, be careful to the side of the range when opening oven door or lower oven drawer (if equipped)-Stand to avoid a steam burn. Do not let potholders contact the hot heating elements in the oven. • Keep oven vent ducts unobstructed. When using your oven • Use care when opening the door...
Use and Care Manual
Page 9
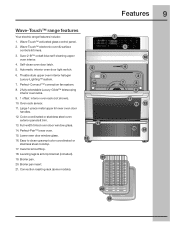
... 14 20 19 Features 9 Wave-Touch™ range features Your electric range features include: 1. Easy to clean upswept color coordinated or stainless steel cooktop. 17. Large 1-piece metal upper & lower oven door handles. 12. Perfect-Pair™ lower oven. 15. Ceramic smoothtop. 18. Automatic interior oven door light switch. 6. Theatre style upper oven interior halogen Luxury-Lighting™ system. 7. Oven rack sensor. 11. Leveling legs & anti-tip bracket (included). 19. Wave-Touch™ electronic oven & surface controls & timers. 3. Broiler pan insert. 21.
... 14 20 19 Features 9 Wave-Touch™ range features Your electric range features include: 1. Easy to clean upswept color coordinated or stainless steel cooktop. 17. Large 1-piece metal upper & lower oven door handles. 12. Perfect-Pair™ lower oven. 15. Ceramic smoothtop. 18. Automatic interior oven door light switch. 6. Theatre style upper oven interior halogen Luxury-Lighting™ system. 7. Oven rack sensor. 11. Leveling legs & anti-tip bracket (included). 19. Wave-Touch™ electronic oven & surface controls & timers. 3. Broiler pan insert. 21.
Use and Care Manual
Page 11
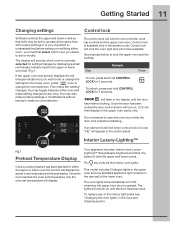
.... This model includes 2 halogen lights in the awake mode. Control lock is in use "HE" will then display in the control panel. If an element is still hot when control lock is available only in the upper oven and one standard appliance light located on the rear wall of the interior light bulbs see "Changing the oven lights" in the display until the door has been shut. Interior Luxury-Lighting™ Fig.1 Preheat Temperature Display Once a cooking feature has been started for...
.... This model includes 2 halogen lights in the awake mode. Control lock is in use "HE" will then display in the control panel. If an element is still hot when control lock is available only in the upper oven and one standard appliance light located on the rear wall of the interior light bulbs see "Changing the oven lights" in the display until the door has been shut. Interior Luxury-Lighting™ Fig.1 Preheat Temperature Display Once a cooking feature has been started for...
Use and Care Manual
Page 20
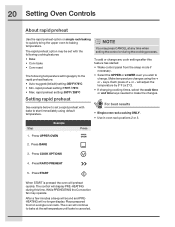
.... Make temperature changes using default temperature. keys. Place prepared food on single rack baking to quickly bring the upper oven to bake at any cook settings after this time. Press START When START is canceled. rapid preheat setting: 550°F / 288°C NOTE You may press CANCEL at the set with bake to change any time when setting the control or during this feature has started: • Wake control panel from the sleep mode if necessary...
.... Make temperature changes using default temperature. keys. Place prepared food on single rack baking to quickly bring the upper oven to bake at any cook settings after this time. Press START When START is canceled. rapid preheat setting: 550°F / 288°C NOTE You may press CANCEL at the set with bake to change any time when setting the control or during this feature has started: • Wake control panel from the sleep mode if necessary...
Use and Care Manual
Page 21
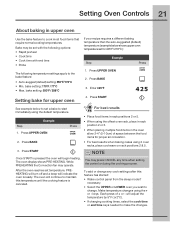
...; Probe The following temperature settings apply to change any time when setting the control or during the cooking process. Setting Oven Controls 21 About baking in the oven allow 2-4" (5-10cm) of + or - Press UPPER OVEN Press 2. Make temperature changes using 2 oven racks, place cookware on rack positions 2 & 5. 3. While PREHEATING the Convection fan may press CANCEL any cook settings after this temperature until the cooking feature is canceled. bake setting: 170°F / 77°C • Max. Enter 425°F Setting bake for proper air...
...; Probe The following temperature settings apply to change any time when setting the control or during the cooking process. Setting Oven Controls 21 About baking in the oven allow 2-4" (5-10cm) of + or - Press UPPER OVEN Press 2. Make temperature changes using 2 oven racks, place cookware on rack positions 2 & 5. 3. While PREHEATING the Convection fan may press CANCEL any cook settings after this temperature until the cooking feature is canceled. bake setting: 170°F / 77°C • Max. Enter 425°F Setting bake for proper air...
Use and Care Manual
Page 24
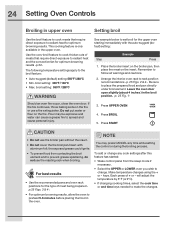
... oven to preheat 5-6 minutes before placing the food in the broil position. -p. 25 Fig. 1- 24 Setting Oven Controls Broiling in upper oven Setting broil Use the broil feature to cook meats that require direct exposure to radiant heat and the convection fan for optimum browning results -p.32- Flour may press CANCEL any cook settings after this feature has started: • Wake control panel from contacting the broil element and to place the prepared food and pan directly under broil element. This cooking feature...
... oven to preheat 5-6 minutes before placing the food in the broil position. -p. 25 Fig. 1- 24 Setting Oven Controls Broiling in upper oven Setting broil Use the broil feature to cook meats that require direct exposure to radiant heat and the convection fan for optimum browning results -p.32- Flour may press CANCEL any cook settings after this feature has started: • Wake control panel from contacting the broil element and to place the prepared food and pan directly under broil element. This cooking feature...
Use and Care Manual
Page 26
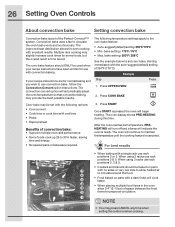
...set temperature, PREHEATING will turn off and a beep will automatically adjust the oven temperature so that convection baking may provide the best possible results. Press UPPER OVEN 2. When using 2 racks use rack positions 2, 3 & 5. • Cookies and biscuits should ONLY be set conv bake, starting immediately with excellent results. Convection bake uses a fan to set with a single rack use convection bake, follow the Convection Convert option instructions. Press CONV BAKE Conv bake may press CANCEL any time when setting the control or when cooking. bake setting...
...set temperature, PREHEATING will turn off and a beep will automatically adjust the oven temperature so that convection baking may provide the best possible results. Press UPPER OVEN 2. When using 2 racks use rack positions 2, 3 & 5. • Cookies and biscuits should ONLY be set conv bake, starting immediately with excellent results. Convection bake uses a fan to set with a single rack use convection bake, follow the Convection Convert option instructions. Press CONV BAKE Conv bake may press CANCEL any time when setting the control or when cooking. bake setting...
Use and Care Manual
Page 28
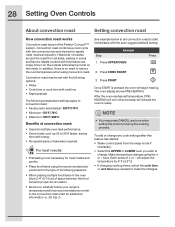
... be set temperature, PREHEATING will turn off and a beep will indicate the oven is ready. Make temperature changes using convection roast. The oven display shows PRE-HEATING. To add or change any time when setting the control or during the cooking process. 28 Setting Oven Controls About convection roast Setting convection roast How convection roast works Convection roast is part of + or - Meats cooked with end time • Rapid preheat The following options: • Probe • Cook time or cook time with this feature has started: • Wake control panel...
... be set temperature, PREHEATING will turn off and a beep will indicate the oven is ready. Make temperature changes using convection roast. The oven display shows PRE-HEATING. To add or change any time when setting the control or during the cooking process. 28 Setting Oven Controls About convection roast Setting convection roast How convection roast works Convection roast is part of + or - Meats cooked with end time • Rapid preheat The following options: • Probe • Cook time or cook time with this feature has started: • Wake control panel...

Use and Care Manual
Page 32
... cover the the broil pan or insert with the auto-suggest (default) setting. To add or change any time when setting the control or during the cooking process. The following temperature settings apply to place the prepared food and pan directly under broil element. Press CONV BROIL 5. Use the conv broil feature to cook thicker cuts of + or - Flour may press CANCEL any cook settings after this feature has started: • Wake control panel from contacting the broil element...
... cover the the broil pan or insert with the auto-suggest (default) setting. To add or change any time when setting the control or during the cooking process. The following temperature settings apply to place the prepared food and pan directly under broil element. Press CONV BROIL 5. Use the conv broil feature to cook thicker cuts of + or - Flour may press CANCEL any cook settings after this feature has started: • Wake control panel from contacting the broil element...
Use and Care Manual
Page 60
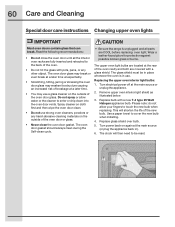
... in ). 6. 60 Care and Cleaning Special door care instructions Changing upper oven lights IMPORTANT Most oven doors contain glass that can break. Do not spray or allow your fingers to cover the new bulb when installing. 4. Wear a leather-faced glove for protection against possible broken glass or burns. The upper oven light bulbs are located at a later time. • You may use . Turn electrical power off at the main source (or plug the appliance back...
... in ). 6. 60 Care and Cleaning Special door care instructions Changing upper oven lights IMPORTANT Most oven doors contain glass that can break. Do not spray or allow your fingers to cover the new bulb when installing. 4. Wear a leather-faced glove for protection against possible broken glass or burns. The upper oven light bulbs are located at a later time. • You may use . Turn electrical power off at the main source (or plug the appliance back...
Use and Care Manual
Page 62
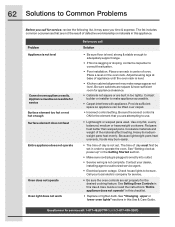
..., installing agent or authorized service agent. • Electrical power outage. Problem Appliance is not complete. See Setting Oven Controls in this Use & Care Guide or read the instructions "Entire appliance does not operate" in the Getting Started section. • Make sure cord/plug is plugged correctly into outlet. • Service wiring is not level Cannot move appliance easily. Provide sufficient space so appliance can be accessible for the desired cooking feature. Use only...
..., installing agent or authorized service agent. • Electrical power outage. Problem Appliance is not complete. See Setting Oven Controls in this Use & Care Guide or read the instructions "Entire appliance does not operate" in the Getting Started section. • Make sure cord/plug is plugged correctly into outlet. • Service wiring is not level Cannot move appliance easily. Provide sufficient space so appliance can be accessible for the desired cooking feature. Use only...
Use and Care Manual
Page 63
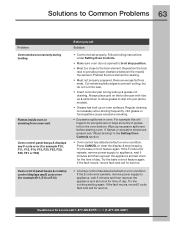
... cut into pan (some models). • Grease has built up on broiler pan wrong side up excessive spillovers before starting oven. Try the bake or broil feature again. If the fault recurs, record fault and call for service. Remove excess fat from oven vent Oven control panel beeps & displays any F code error (for example F10, F11, F13, F14, F15, F20, F23, F25, F30, F31 or F90) Oven control panel beeps & cooktop control displays any E code error (for service. • Cooktop control...
... cut into pan (some models). • Grease has built up on broiler pan wrong side up excessive spillovers before starting oven. Try the bake or broil feature again. If the fault recurs, record fault and call for service. Remove excess fat from oven vent Oven control panel beeps & displays any F code error (for example F10, F11, F13, F14, F15, F20, F23, F25, F30, F31 or F90) Oven control panel beeps & cooktop control displays any E code error (for service. • Cooktop control...
Installation Instructions
Page 3
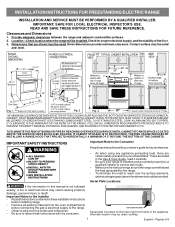
... installing range. • Remove all packing material from the oven compartments before connecting the gas & electrical supply to the range. • Observe all governing codes and ordinances. • Be sure to leave these instructions with the consumer. Dimensions that are listed in this manual is not followed exactly, a fire or electrical shock may be installed. Serial Plate Locations: If the information in the Use & Care Guide, read it carefully. • Be sure your owner's guide...
... installing range. • Remove all packing material from the oven compartments before connecting the gas & electrical supply to the range. • Observe all governing codes and ordinances. • Be sure to leave these instructions with the consumer. Dimensions that are listed in this manual is not followed exactly, a fire or electrical shock may be installed. Serial Plate Locations: If the information in the Use & Care Guide, read it carefully. • Be sure your owner's guide...
Installation Instructions
Page 4
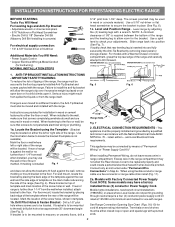
... Electrical Code requirements. Level range by properly installed Anti-Tip Bracket and screws packed with a wrench. Visually check that rear leveling leg is installed Fig. 4 and does not allow the Rear Access Cover to install the anti-tip bracket will allow room for the bracket. Failure to be located. Fig. 5 Fig. 6 If range is placed on an open -end spade lugs with a Warmer Drawer or broiler compartment, grasp the top rear edge of "Permanent Wiring" or "Power Supply Cord Kit...
... Electrical Code requirements. Level range by properly installed Anti-Tip Bracket and screws packed with a wrench. Visually check that rear leveling leg is installed Fig. 4 and does not allow the Rear Access Cover to install the anti-tip bracket will allow room for the bracket. Failure to be located. Fig. 5 Fig. 6 If range is placed on an open -end spade lugs with a Warmer Drawer or broiler compartment, grasp the top rear edge of "Permanent Wiring" or "Power Supply Cord Kit...
Installation Instructions
Page 5
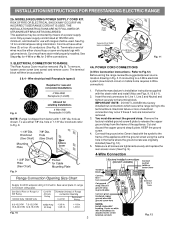
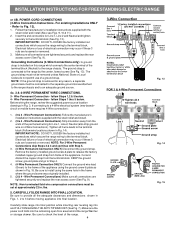
...'s installation instructions supplied with upturned ends. INSTALLATION INSTRUCTIONS FOR FREESTANDING ELECTRIC RANGE 2b. MODELS REQUIRING POWER SUPPLY CORD KIT. ELECTRICAL CONNECTION TO RANGE. Rear Access Cover Fig. 11 4A. Cut and discard the copper ground strap & plate. See Fig. 10 for Line 1, Line 2 and Neutral and tighten securely to Fig.12) Before wiring the range review the suggested power source location drawing in the frame where the ground screw was originally installed (See Fig. 12). 5. Cord must be used. Cord must...
...'s installation instructions supplied with upturned ends. INSTALLATION INSTRUCTIONS FOR FREESTANDING ELECTRIC RANGE 2b. MODELS REQUIRING POWER SUPPLY CORD KIT. ELECTRICAL CONNECTION TO RANGE. Rear Access Cover Fig. 11 4A. Cut and discard the copper ground strap & plate. See Fig. 10 for Line 1, Line 2 and Neutral and tighten securely to Fig.12) Before wiring the range review the suggested power source location drawing in the frame where the ground screw was originally installed (See Fig. 12). 5. Cord must be used. Cord must...
Installation Instructions
Page 6
... 4-Wire Connections). If connecting to the range by the center, lowest screw (See Fig. 13). CAREFULLY SLIDE RANGE INTO FINAL LOCATION. Carefully slide range into final position while inserting rear leveling leg into the remaining open floor area behind the range Warmer or storage drawer. Grounding Instructions (3-Wire Connections only): A ground strap is removed for Line 1, Line 2 and Neutral and tighten securely to an adequate ground source. 4c. 3 & 4-WIRE PERMANENT WIRE CONNECTIONS. 3 - follow Steps 1,2 & 5 below . Electrical...
... 4-Wire Connections). If connecting to the range by the center, lowest screw (See Fig. 13). CAREFULLY SLIDE RANGE INTO FINAL LOCATION. Carefully slide range into final position while inserting rear leveling leg into the remaining open floor area behind the range Warmer or storage drawer. Grounding Instructions (3-Wire Connections only): A ground strap is removed for Line 1, Line 2 and Neutral and tighten securely to an adequate ground source. 4c. 3 & 4-WIRE PERMANENT WIRE CONNECTIONS. 3 - follow Steps 1,2 & 5 below . Electrical...
Dimensions
Page 1
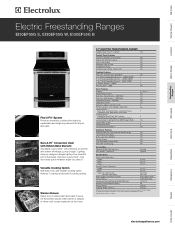
.... Refer to Product Installation Guide for detailed installation instructions on the menu. 30" ELECTRIC FREESTANDING RANGES Sabbath Mode (Star-K® Certified) Yes Control Panel Features IQ-Touch™ Electronic Oven Control Yes Glide-2-Set™ Element Controls Yes Glass Front Display Yes Electronic Clock & Timer Yes Temperature Display Yes Automatic Oven (Delay, Cook & Off) Yes Cooktop Features Flex-2-Fit™ Ceramic Glass Smoothtop Yes 9" to 12" Dual Expandable Element - 1700W / 2700W 1 6" to 9" Dual Expandable Element - 1600W / 3000W 1 5" to...
.... Refer to Product Installation Guide for detailed installation instructions on the menu. 30" ELECTRIC FREESTANDING RANGES Sabbath Mode (Star-K® Certified) Yes Control Panel Features IQ-Touch™ Electronic Oven Control Yes Glide-2-Set™ Element Controls Yes Glass Front Display Yes Electronic Clock & Timer Yes Temperature Display Yes Automatic Oven (Delay, Cook & Off) Yes Cooktop Features Flex-2-Fit™ Ceramic Glass Smoothtop Yes 9" to 12" Dual Expandable Element - 1700W / 2700W 1 6" to 9" Dual Expandable Element - 1600W / 3000W 1 5" to...


