
Use and Care Manual
Page 31
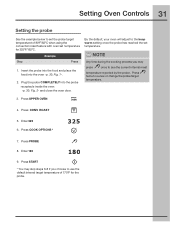
... the probe. Insert the probe into the food and place the food into the probe receptacle inside the oven -p. 30, Fig. 2- Press CONV ROAST 5. Enter 180 9. Step EExxaammpplele Press 1. By the default, your oven will ...default internal target temperature of 170°F for 325°F/162°C. Plug the probe COMPLETELY into the oven -p. 30, Fig. 1-. 2. and close the oven door. Press START * You may skip steps 6-8 if you may ... feature with oven set temperature. Press PROBE 8. Press twice to review or change the probe target temperature. 3. Press COOK OPTIONS * 7.
... the probe. Insert the probe into the food and place the food into the probe receptacle inside the oven -p. 30, Fig. 2- Press CONV ROAST 5. Enter 180 9. Step EExxaammpplele Press 1. By the default, your oven will ...default internal target temperature of 170°F for 325°F/162°C. Plug the probe COMPLETELY into the oven -p. 30, Fig. 1-. 2. and close the oven door. Press START * You may skip steps 6-8 if you may ... feature with oven set temperature. Press PROBE 8. Press twice to review or change the probe target temperature. 3. Press COOK OPTIONS * 7.
Use and Care Manual
Page 35
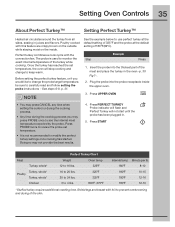
... into the probe receptacle inside . Press START Meat Turkey, whole* Turkey, whole* Poultry Turkey, whole* Chicken Perfect Turkey Chart Weight 12 to review the probe set temperature, the oven will not start until the probe has been plugged in. 5. Setting Oven Controls 35 About Perfect Turkey™... Setting Perfect Turkey™ Heated air circulates around the turkey from all sides, sealing in the oven -p. 30 Fig 1-. 2. Before setting the perfect turkey feature, or if you may not provide the best results. Doing so may press PROBE once to...
... into the probe receptacle inside . Press START Meat Turkey, whole* Turkey, whole* Poultry Turkey, whole* Chicken Perfect Turkey Chart Weight 12 to review the probe set temperature, the oven will not start until the probe has been plugged in. 5. Setting Oven Controls 35 About Perfect Turkey™... Setting Perfect Turkey™ Heated air circulates around the turkey from all sides, sealing in the oven -p. 30 Fig 1-. 2. Before setting the perfect turkey feature, or if you may not provide the best results. Doing so may press PROBE once to...
Use and Care Manual
Page 39
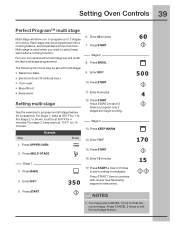
... Setting multi stage See the example to brown, broil for at 500°F for 15 minutes. See Reviewing stages for a casserole. Press BROIL The following functions may be programmed with a cooking feature, set with review. Press START 11. Stage 3 13. Press START 16. Press START a total of 2 times to continue with multi...
... Setting multi stage See the example to brown, broil for at 500°F for 15 minutes. See Reviewing stages for a casserole. Press BROIL The following functions may be programmed with a cooking feature, set with review. Press START 11. Stage 3 13. Press START 16. Press START a total of 2 times to continue with multi...

Use and Care Manual
Page 40
... to begin cooking. Enter new temperature and cook time. 4. Fig. 1 After you will be directed to review/edit the cooking feature, set temperature and cook time. Select new cooking feature 3. Press START 2 times to view the total cooking time for all ... once. Use numeric key pad, select stage to edit other stages. Press START 1 time to return back to the review screen to review. 2. Step Example Press 1. 40 Setting Oven Controls Reviewing stages You may review your input after stages 2 or 3 have accepted your input in stages 2 or 3 by pressing start you have been ...
... to begin cooking. Enter new temperature and cook time. 4. Fig. 1 After you will be directed to review/edit the cooking feature, set temperature and cook time. Select new cooking feature 3. Press START 2 times to view the total cooking time for all ... once. Use numeric key pad, select stage to edit other stages. Press START 1 time to return back to the review screen to review. 2. Step Example Press 1. 40 Setting Oven Controls Reviewing stages You may review your input after stages 2 or 3 have accepted your input in stages 2 or 3 by pressing start you have been ...
Use and Care Manual
Page 62
...service call Solution • Be sure floor is level, strong & stable enough to adequately support range. • If floor is level. • Kitchen cabinet alignment may burn easily. •...in this appliance. Flat pans heat better than warped pans. Questions or for service, review the following list. Appliance must first be accessible for service Surface element too hot or...the desired cooking feature. Provide sufficient space so appliance can be sure. Contact your local electric company for the element that are built in too tightly. See Setting Oven Controls in ...
...service call Solution • Be sure floor is level, strong & stable enough to adequately support range. • If floor is level. • Kitchen cabinet alignment may burn easily. •...in this appliance. Flat pans heat better than warped pans. Questions or for service, review the following list. Appliance must first be accessible for service Surface element too hot or...the desired cooking feature. Provide sufficient space so appliance can be sure. Contact your local electric company for the element that are built in too tightly. See Setting Oven Controls in ...
Installation Instructions
Page 5
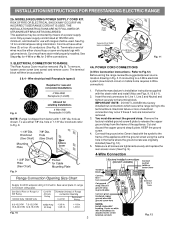
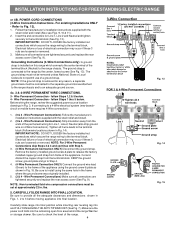
...To remove, loosen center screw (one screw) and remove cover. To use with upturned ends. Refer to Fig.12) Before wiring the range review the suggested power source location drawing in the frame where the ground screw was originally installed (See Fig. 12). 5. The terminal block will... then be connected by means of the appliance with the ground screw using the same hole in Fig. 3. Wire electrical wall Receptacle types & Fig. 8 NOTE: Range is shipped from the frame of wires must have either 7/8" dia. Cut and discard the copper ground strap & plate. ...
...To remove, loosen center screw (one screw) and remove cover. To use with upturned ends. Refer to Fig.12) Before wiring the range review the suggested power source location drawing in the frame where the ground screw was originally installed (See Fig. 12). 5. The terminal block will... then be connected by means of the appliance with the ground screw using the same hole in Fig. 3. Wire electrical wall Receptacle types & Fig. 8 NOTE: Range is shipped from the frame of wires must have either 7/8" dia. Cut and discard the copper ground strap & plate. ...
Installation Instructions
Page 6
...) Make sure all connections are tightened securely and replace the rear access cover (See Fig. 9). INSTALLATION INSTRUCTIONS FOR FREESTANDING ELECTRIC RANGE or 4B. The ground strap is removed for any reason, a separate ground wire must be set at approximately 22 in... the frame where the ground screw was originally installed. 5. (3 & 4 - Before wiring the range, review the suggested power source location drawings in Fig. 14). Wire Permanent Connections) Follow the manufacturer's installation instructions supplied with Step 5. 3. (4-Wire...
...) Make sure all connections are tightened securely and replace the rear access cover (See Fig. 9). INSTALLATION INSTRUCTIONS FOR FREESTANDING ELECTRIC RANGE or 4B. The ground strap is removed for any reason, a separate ground wire must be set at approximately 22 in... the frame where the ground screw was originally installed. 5. (3 & 4 - Before wiring the range, review the suggested power source location drawings in Fig. 14). Wire Permanent Connections) Follow the manufacturer's installation instructions supplied with Step 5. 3. (4-Wire...
