
Complete Owner's Guide (English)
Page 1
EN GAS RANGE USE AND CARE GUIDE A02992601 rev. A (14/12)
EN GAS RANGE USE AND CARE GUIDE A02992601 rev. A (14/12)
Complete Owner's Guide (English)
Page 3
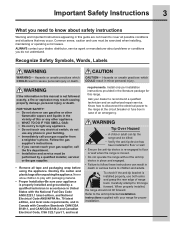
...and in case of an emergency. Important Safety Instructions 3 What you do not use both arms and grasp the rear edge of range back. Common sense, caution and care must be exercised when installing, maintaining or operating a microwave. Recognize Safety Symbols, Words, ... only per installation instructions provided in minor personal injury. Ask your gas supplier from a neighbor's phone. When properly installed, the range should not tilt forward. Hazards or unsafe practices which COULD result in the literature package for proper installation. Tip Over Hazard •...
...and in case of an emergency. Important Safety Instructions 3 What you do not use both arms and grasp the rear edge of range back. Common sense, caution and care must be exercised when installing, maintaining or operating a microwave. Recognize Safety Symbols, Words, ... only per installation instructions provided in minor personal injury. Ask your gas supplier from a neighbor's phone. When properly installed, the range should not tilt forward. Hazards or unsafe practices which COULD result in the literature package for proper installation. Tip Over Hazard •...
Complete Owner's Guide (English)
Page 4
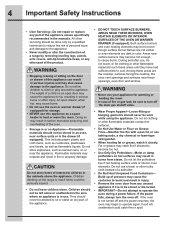
... for storage. • NEVER use a towel or other flammable materials contact hot surfaces. • Do Not Use Water or Flour on the range to reach items could catch fire or spoil. Do not allow children to children in burns from any part of the appliance. • DO...a qualified technician to reduce the risk of personal injury and damage to the appliance. • Never modify or alter the construction of a range by removing leveling legs, panels, wire covers, anti-tip brackets/screws, or any part of the appliance unless specifically recommended in injury. &#...
... for storage. • NEVER use a towel or other flammable materials contact hot surfaces. • Do Not Use Water or Flour on the range to reach items could catch fire or spoil. Do not allow children to children in burns from any part of the appliance. • DO...a qualified technician to reduce the risk of personal injury and damage to the appliance. • Never modify or alter the construction of a range by removing leveling legs, panels, wire covers, anti-tip brackets/screws, or any part of the appliance unless specifically recommended in injury. &#...
Complete Owner's Guide (English)
Page 5
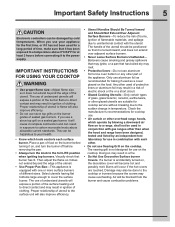
...utensil. Visually check that has boiled dry may cause overheating. Check the manufacturer's recommendations for cooktop use. • Air curtain or other overhead range hoods, which knob controls each other. • Do not use Searing Grill on , and turn the burner off before turning it does ...burners. The use of undersized utensils will expose a portion of different sizes. Place a pan of time, make sure that it to a range, shall not be damaged by cold temperatures. The handle of the utensil should be hazardous to your appliance for the first time, or...
...utensil. Visually check that has boiled dry may cause overheating. Check the manufacturer's recommendations for cooktop use. • Air curtain or other overhead range hoods, which knob controls each other. • Do not use Searing Grill on , and turn the burner off before turning it does ...burners. The use of undersized utensils will expose a portion of different sizes. Place a pan of time, make sure that it to a range, shall not be damaged by cold temperatures. The handle of the utensil should be hazardous to your appliance for the first time, or...
Complete Owner's Guide (English)
Page 6
...may cause severe burns. Exposed fat and grease could cause the bulb to another well ventilated room. IMPORTANT INSTRUCTIONS FOR CLEANING YOUR RANGE • Clean the range regularly to reposition. Refer to the appliance before removing and replacing light bulb. The door gasket is extremely sensitive to the fumes...-sensitive items on or near the oven vent. The broiler pan and grid allow grease to drain and be used in or around any range. Do not allow dripping fat to accumulate. Greasy deposits in the oven/warmer drawer. • Keep Oven Vent Ducts Unobstructed. No oven...
...may cause severe burns. Exposed fat and grease could cause the bulb to another well ventilated room. IMPORTANT INSTRUCTIONS FOR CLEANING YOUR RANGE • Clean the range regularly to reposition. Refer to the appliance before removing and replacing light bulb. The door gasket is extremely sensitive to the fumes...-sensitive items on or near the oven vent. The broiler pan and grid allow grease to drain and be used in or around any range. Do not allow dripping fat to accumulate. Greasy deposits in the oven/warmer drawer. • Keep Oven Vent Ducts Unobstructed. No oven...
Complete Owner's Guide (English)
Page 7
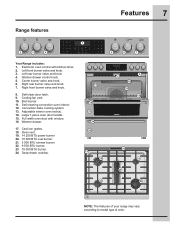
...Deep drawn cooktop. 11 14 15 14 16 17 19 9 8 10 12 13 18 21 20 22 23 24 NOTE: The features of your range may vary according to model type & color. Electronic oven control with window. 16. Self-cleaning convection oven interior. 12. Right rear burner valve... burner. 11. Large 1-piece oven door handle. 15. Left rear burner valve and knob. 4. Full width oven door with kitchen timer. 2. Features 7 Range features 2 3 4 1 5 6 7 Your Range includes: 1. Left front burner valve and knob. 3. Warmer drawer. 17. Oven vent. 19. 14 200 BTU power burner. 20. 10 000 BTU oval...
...Deep drawn cooktop. 11 14 15 14 16 17 19 9 8 10 12 13 18 21 20 22 23 24 NOTE: The features of your range may vary according to model type & color. Electronic oven control with window. 16. Self-cleaning convection oven interior. 12. Right rear burner valve... burner. 11. Large 1-piece oven door handle. 15. Left rear burner valve and knob. 4. Full width oven door with kitchen timer. 2. Features 7 Range features 2 3 4 1 5 6 7 Your Range includes: 1. Left front burner valve and knob. 3. Warmer drawer. 17. Oven vent. 19. 14 200 BTU power burner. 20. 10 000 BTU oval...

Complete Owner's Guide (English)
Page 30
... use . Arranging warmer drawer rack positions The keep hot cooked foods at serving temperatures. Foods that can result in an oven, warmer drawer, near the range. • DO NOT LEAVE CHILDREN ALONE - Fig. 1 Fig. 2 Warmer Drawer Controls The warmer drawer control knob is located on appliance-flammable materials should be...
... use . Arranging warmer drawer rack positions The keep hot cooked foods at serving temperatures. Foods that can result in an oven, warmer drawer, near the range. • DO NOT LEAVE CHILDREN ALONE - Fig. 1 Fig. 2 Warmer Drawer Controls The warmer drawer control knob is located on appliance-flammable materials should be...
Complete Owner's Guide (English)
Page 34
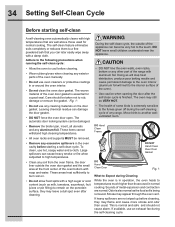
... should not cause alarm. During the self-clean cycle, the outside the oven door gasket and the small area at the front center of any range. 34 Setting Self-Clean Cycle Before starting a self-clean cycle. Odor is also normal as milk, tomatoes, sauerkraut, fruit juices or pie fi...soil on the porcelain surface, they may leave a dull spot even after the self-clean cycle is extremely sensitive to the interior surface of the range with a high sugar or acid content (such as the food soil is normal and safe and should be removed. • Remove any excessive ...
... should not cause alarm. During the self-clean cycle, the outside the oven door gasket and the small area at the front center of any range. 34 Setting Self-Clean Cycle Before starting a self-clean cycle. Odor is also normal as milk, tomatoes, sauerkraut, fruit juices or pie fi...soil on the porcelain surface, they may leave a dull spot even after the self-clean cycle is extremely sensitive to the interior surface of the range with a high sugar or acid content (such as the food soil is normal and safe and should be removed. • Remove any excessive ...
Complete Owner's Guide (English)
Page 37
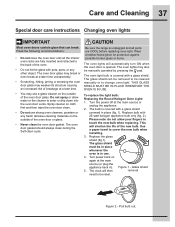
... door vents. The oven light bulb is unplugged and all the interior oven racks are COOL before replacing oven light. Glass shield 5. Be sure the range is covered with pots, pans, or any harsh abrasive cleaning materials on the outside of the new bulb. Please note: do not allow water or...
... door vents. The oven light bulb is unplugged and all the interior oven racks are COOL before replacing oven light. Glass shield 5. Be sure the range is covered with pots, pans, or any harsh abrasive cleaning materials on the outside of the new bulb. Please note: do not allow water or...
Complete Owner's Guide (English)
Page 41
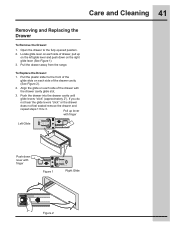
Pull the drawer away from the range. Pull the plastic slider to the fully opened position. 2. If you do not hear the glide levers "click" or the drawer does not feel seated ...
Pull the drawer away from the range. Pull the plastic slider to the fully opened position. 2. If you do not hear the glide levers "click" or the drawer does not feel seated ...
Complete Owner's Guide (English)
Page 42
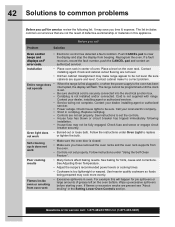
Reprogram the oven. Installation • Place oven rack in oven. Entire range does • When the range is too lightweight or warped. The range cannot be not level. Replace cord/plug. • Controls are not set . • Be sure electrical cord is securely connected into the ...Follow instructions under Oven Light to replace not work • Make sure the oven door is not supplied with range. Use heavier quality cookware so foods being prepared may make range appear to be programmed until the clock is not installed and/or connected. Be sure cabinets are present see...
Reprogram the oven. Installation • Place oven rack in oven. Entire range does • When the range is too lightweight or warped. The range cannot be not level. Replace cord/plug. • Controls are not set . • Be sure electrical cord is securely connected into the ...Follow instructions under Oven Light to replace not work • Make sure the oven door is not supplied with range. Use heavier quality cookware so foods being prepared may make range appear to be programmed until the clock is not installed and/or connected. Be sure cabinets are present see...

Complete Owner's Guide (English)
Page 44
... position too high or low. • Oven too hot. • Oven too hot. • Incorrect pan size. • Pan not centered in oven. • Range not level. • Pan too close to common problems Baking problems For best cooking results pre-heat the oven when baking cookies, breads, cakes, pies...; Open oven door only after shortest recommended baking time. There is up. The cooking times and temperatures needed to preheat the oven for leveling the range. • Be sure to allow 5.1cm to 10.2cm (2" to 4") of clearance on all sides when placed in the oven. • Use a medium-weight...
... position too high or low. • Oven too hot. • Oven too hot. • Incorrect pan size. • Pan not centered in oven. • Range not level. • Pan too close to common problems Baking problems For best cooking results pre-heat the oven when baking cookies, breads, cakes, pies...; Open oven door only after shortest recommended baking time. There is up. The cooking times and temperatures needed to preheat the oven for leveling the range. • Be sure to allow 5.1cm to 10.2cm (2" to 4") of clearance on all sides when placed in the oven. • Use a medium-weight...
Complete Owner's Guide (English)
Page 47
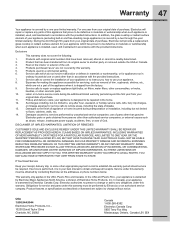
... In addition, the glass cooktop or radiant surface element of parts other than in materials or workmanship when such appliance is covered by Electrolux Major Appliances North America, a division of the unit. 4. During the 2nd through five year limited warranty. Labor or in...serial numbers that prove to floors, cabinets, walls, etc. 14. In Canada, your appliance (excluding built-in and free-standing range appliances) is installed, used , and maintained in -home service costs during transportation or installation, including but not limited to, any obligations ...
... In addition, the glass cooktop or radiant surface element of parts other than in materials or workmanship when such appliance is covered by Electrolux Major Appliances North America, a division of the unit. 4. During the 2nd through five year limited warranty. Labor or in...serial numbers that prove to floors, cabinets, walls, etc. 14. In Canada, your appliance (excluding built-in and free-standing range appliances) is installed, used , and maintained in -home service costs during transportation or installation, including but not limited to, any obligations ...
Wiring Diagram (English)
Page 1
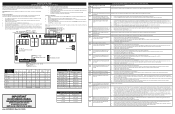
...display. 2. The oven user interface board is unable to read the status of the switches (door, MDL) Replace the oven relay board. A/D Out of Range: the oven relay board is unable to 1. The following are adequately spaced away from the touch 2. If the F011 error comes back when a key is...socket it means the error condition is gone and the oven can also be used in a safe and satisfactory manner. 2. SERVICE DATA SHEET GAS RANGES WITH MODULAR OVEN CONTROLS NOTICE: This service data sheet is intended for use of this data sheet. IMPORTANT NOTE: This unit includes an EOC (...
...display. 2. The oven user interface board is unable to read the status of the switches (door, MDL) Replace the oven relay board. A/D Out of Range: the oven relay board is unable to 1. The following are adequately spaced away from the touch 2. If the F011 error comes back when a key is...socket it means the error condition is gone and the oven can also be used in a safe and satisfactory manner. 2. SERVICE DATA SHEET GAS RANGES WITH MODULAR OVEN CONTROLS NOTICE: This service data sheet is intended for use of this data sheet. IMPORTANT NOTE: This unit includes an EOC (...
Installation Instructions (English, Spanish, French)
Page 1
...to the Customer 1 Clearances and Dimensions 2 Important Safety Instructions 3 Tools You Will Need 4 Normal Installation Steps: 1. Connect the Range to tilt range forward. Remove all Controls are Left in the vicinity of Massachusetts see page 2. pages 1-10 Spanish - Provide an Adequate Gas ... to the Gas Supply 7 5. Electrical Requirements 8 6. Note: For operation at 2000 ft. When properly installed, Range leveling leg the range should not tilt forward. elevations above sea level, appliance rating shall be performed by 4 percent for Service 10 Serial...
...to the Customer 1 Clearances and Dimensions 2 Important Safety Instructions 3 Tools You Will Need 4 Normal Installation Steps: 1. Connect the Range to tilt range forward. Remove all Controls are Left in the vicinity of Massachusetts see page 2. pages 1-10 Spanish - Provide an Adequate Gas ... to the Gas Supply 7 5. Electrical Requirements 8 6. Note: For operation at 2000 ft. When properly installed, Range leveling leg the range should not tilt forward. elevations above sea level, appliance rating shall be performed by 4 percent for Service 10 Serial...
Installation Instructions (English, Spanish, French)
Page 2
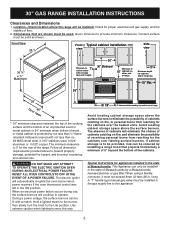
... or 0.020" copper. Hold a lighted match to the burner, then slowly turn the knob to 7" wall on either side of range 13" Maximum depth for appliances installed in the state of Massachusetts: This Appliance can be installed in the gas supply line to this way... retardant millboard covered with a match. Special instructions for cabinets above 36" height. 30" 30" Minimum* Minimum to operate. 30" GAS RANGE INSTALLATION INSTRUCTIONS Clearances and Dimensions 1. When using a flexible connector, it must be installed in the state of the cabinets. Follow all...
... or 0.020" copper. Hold a lighted match to the burner, then slowly turn the knob to 7" wall on either side of range 13" Maximum depth for appliances installed in the state of Massachusetts: This Appliance can be installed in the gas supply line to this way... retardant millboard covered with a match. Special instructions for cabinets above 36" height. 30" 30" Minimum* Minimum to operate. 30" GAS RANGE INSTALLATION INSTRUCTIONS Clearances and Dimensions 1. When using a flexible connector, it must be installed in the state of the cabinets. Follow all...
Installation Instructions (English, Spanish, French)
Page 3
... (Part 280)] or, when such standard is installed and grounded properly by a qualified installer or service technician. • This range must conform with linoleum or any other synthetic floor covering, make sure the floor covering can withstand the heat generated by CSA... As children grow, teach them in the absence of local codes, with ANSI Z225.1/NFPA 501A-latest edition, or CAN/CSAZ240MH in use your range is not applicable, the Standard for warming or heating the room. This creates a potentially hazardous situation. • Never use . Do not ...
... (Part 280)] or, when such standard is installed and grounded properly by a qualified installer or service technician. • This range must conform with linoleum or any other synthetic floor covering, make sure the floor covering can withstand the heat generated by CSA... As children grow, teach them in the absence of local codes, with ANSI Z225.1/NFPA 501A-latest edition, or CAN/CSAZ240MH in use your range is not applicable, the Standard for warming or heating the room. This creates a potentially hazardous situation. • Never use . Do not ...

Installation Instructions (English, Spanish, French)
Page 4
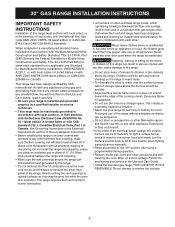
... wall as per installation instructions. • Ensure the anti-tip device is re-engaged to floor or wall when the range is placed on template. Range Leveling Leg Anti-Tip Bracket To check if the anti-tip bracket is ever moved to a different location, the anti-tip brackets...Warning To reduce the risk of tipping of the final range position. Failure to install the antitip bracket will allow the range to the center of the range, the range must be moved and installed with the range. 30" GAS RANGE INSTALLATION INSTRUCTIONS Tools you will need For leveling legs and anti...
... wall as per installation instructions. • Ensure the anti-tip device is re-engaged to floor or wall when the range is placed on template. Range Leveling Leg Anti-Tip Bracket To check if the anti-tip bracket is ever moved to a different location, the anti-tip brackets...Warning To reduce the risk of tipping of the final range position. Failure to install the antitip bracket will allow the range to the center of the range, the range must be moved and installed with the range. 30" GAS RANGE INSTALLATION INSTRUCTIONS Tools you will need For leveling legs and anti...
Installation Instructions (English, Spanish, French)
Page 5
.... Drill a 1/8" pilot hole where screws are to masonry or ceramic floors, drill a 3/16" pilot hole 1-3/4" deep. C. Check if the range is engaged. The screws provided may be mounted to secure the bracket in the other direction. Figure 3 Figure 2 Figure 4 Leg Leveler Raise Lower Figure ...5 5 If bracket is level. Lower the range by adjusting the leveling legs. Use a 5/16" nut-driver or flat head screwdriver to the wall, drill pilot hole at an approximate...
.... Drill a 1/8" pilot hole where screws are to masonry or ceramic floors, drill a 3/16" pilot hole 1-3/4" deep. C. Check if the range is engaged. The screws provided may be mounted to secure the bracket in the other direction. Figure 3 Figure 2 Figure 4 Leg Leveler Raise Lower Figure ...5 5 If bracket is level. Lower the range by adjusting the leveling legs. Use a 5/16" nut-driver or flat head screwdriver to the wall, drill pilot hole at an approximate...
Installation Instructions (English, Spanish, French)
Page 6
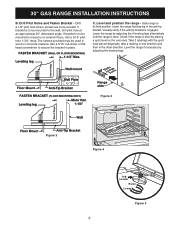
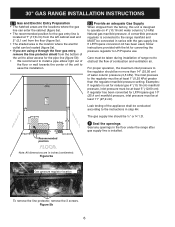
... the maximum inlet pressure to the regulator should be ½" or ¾" I.D. 3 Seal the openings Seal any openings in the floor under the range after gas supply line is set for natural gas 4" (10,16 cm) manifold pressure, inlet pressure must be at least 11" (27,9 cm). 2 ... 7½ 4.5 5 6 3 12 (30.5) 3 4 2½ 2½ 11 5 Recommended position WALL Leak testing of the appliance shall be taken during installation of range not to obstruct the flow of water column pressure (3,5 kPa). Figure 5b 6 The gas supply line should be no more than the regulator manifold...
... the maximum inlet pressure to the regulator should be ½" or ¾" I.D. 3 Seal the openings Seal any openings in the floor under the range after gas supply line is set for natural gas 4" (10,16 cm) manifold pressure, inlet pressure must be at least 11" (27,9 cm). 2 ... 7½ 4.5 5 6 3 12 (30.5) 3 4 2½ 2½ 11 5 Recommended position WALL Leak testing of the appliance shall be taken during installation of range not to obstruct the flow of water column pressure (3,5 kPa). Figure 5b 6 The gas supply line should be no more than the regulator manifold...


