Electrolux E30DF74TPS Support and Manuals
Get Help and Manuals for this Electrolux item
View All Support Options Below
Free Electrolux E30DF74TPS manuals!
Problems with Electrolux E30DF74TPS?
Ask a Question
Free Electrolux E30DF74TPS manuals!
Problems with Electrolux E30DF74TPS?
Ask a Question
Electrolux E30DF74TPS Videos

Electrolux E30DF74TPS Range
Duration: :50
Total Views: 40
Duration: :50
Total Views: 40
Electrolux E30DF74TPS Cuisinière
Duration: :56
Total Views: 11
Duration: :56
Total Views: 11
Popular Electrolux E30DF74TPS Manual Pages
Complete Owners Guide English - Page 2
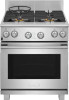
... as the beginning of features, photo galleries, product manuals (complete owner's guide, installation instructions, wiring diagrams, product spec sheets), specifications, reviews, related accessories, and video guides. Printed in the U.S. CONTENTS
3 9 Before Setting Surface Controls 13 Setting Surface Burners 14 Before Setting Oven Controls 17 Setting Oven Controls 26 Care and Cleaning 32 Before...
Complete Owners Guide English - Page 3
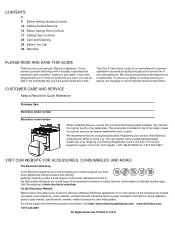
... may result in the vicinity of the range back.
Safety items throughout this manual is not hazard related.
If the information in this manual are not meant to follow these instructions can tip the range and be performed by a qualified installer, servicer, or the gas supplier. Range leveling leg
Anti-tip bracket
To check if...
Complete Owners Guide English - Page 7
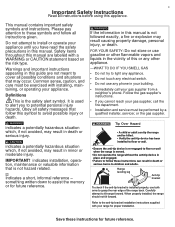
...instructions for use . Never leave surface burners unattended at
high heat settings - ware, or other part...drawer (some models). Use potholders and grasp the rack with aluminum
cook top service without its insert....
Remove all controls are flaming foods under a venti- manufacturer's recommendations for Do not cover the broiler insert with
Before manually...
Complete Owners Guide English - Page 8
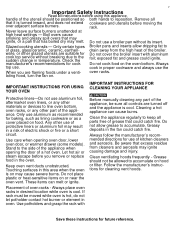
... SELF CLEANING OVENS
Do not clean the oven door gasket. Before using this manual.
IMPORTANT INSTRUCTIONS FOR SERVICE AND MAINTENANCE
Do not repair or replace any part of any kind should be done only by a qualified technician. Save these instructions for a good seal. Remove the oven door from the oven, storage drawer or warming drawer (if equipped...
Complete Owners Guide English - Page 12
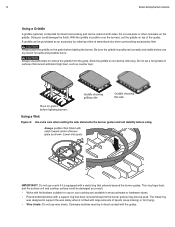
... cooktop surface could damage the finish. Cookware bottoms must be in direct contact with a support ring that does not extend beyond the burner grates. A griddle can be used on ... accessory by ordering online at www.electrolux-store.com/cooking-accessories.html. The metal ring was designed to remove the griddle from the grate. 12
Before Setting Surface Controls
Using a Griddle
A ...
Complete Owners Guide English - Page 14

... from the oven. Some models are equipped with a cooling... bottom or any other parts of the oven racks...instructions provided in this vent for an extended period of electric shock or fire.
• Always use , warm air passes through this manual...comes with aluminum foil. Improper installation or use of removal, racks ...Setting Oven Controls
BEFORE SETTING OVEN CONTROLS
Oven Vent Location
...
Complete Owners Guide English - Page 33
... Some models are...support range.
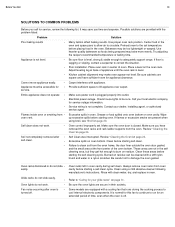
Entire appliance does not operate • Make sure power cord is level, strong & stable enough to the set..., and replace in center...Review "Cleaning the Oven"on oven bottom. Be careful not to clean soil from • oven vent. Before You Call
33
SOLUTIONS TO COMMON PROBLEMS
Before you call for service, review the following manufacturer's instructions...
Wiring Diagram English - Page 1
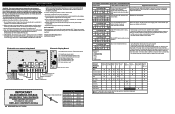
... 3 - If the motor does not rotate, replace the lock motor assembly. - SAFE SERVICING PRACTICES To avoid the possibility of personal injury and/or property damage, it in the appliance repair trade. Broil Mode Indicator Light D5- Shorted RTD sensor probe / wiring problem. SERVICE DATA SHEET Dual Fuel Range with the proper installation of any safety device.
4.
Installation Instructions English - Page 1
....
2. The anti-tip bracket supplied with your appliance is installed and grounded by a qualified installer or service technician.
pages 19-36 Français -
Read all governing codes and ordinances. 5. Observe all instructions contained in your manual carefully.
3. Read your Use and Care manual. pages 1-18
Español - pages 37-54 1 Canada
Table of this or...
Installation Instructions English - Page 2
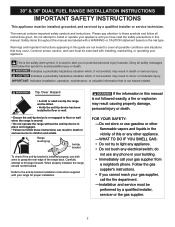
...-tip bracket installation instructions supplied with your gas supplier from a neighbor's phone. If the information in this manual are not meant to children and adults. do not use both arms to grasp the rear edge of this guide are labeled with installing, maintaining, or operating your building. • Immediately call the fire department. -Installation and service must...
Installation Instructions English - Page 3

....
• To eliminate the risk of burns or fire by a qualified technician. Failure to follow the below instructions and precautions for Manufactured Home Installation 1982 (Manufactured Home Sites, Communities and Setups), ANSI Z225.1/ NFPA 501A-latest edition, or with local codes in United States and with CAN/CSA-Z240 MH in Canada.
• Before...
Installation Instructions English - Page 4

...or fuse box in case of the appliance unless specifically recommended in the manuals. Handle halogen lights (if equipped) with this ...servicing should be installed in the gas supply line to recommend a qualified technician and an authorized repair service.
Installation Instructions and follow them carefully when making the installation.
• Do not repair or replace any part...
Installation Instructions English - Page 11
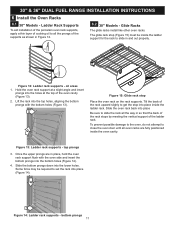
...in and out properly. Figure 15: Glide rack stop into place
Be sure to set the rack into place (Figure 14). To prevent possible damage to the oven, ... DUAL FUEL RANGE INSTALLATION INSTRUCTIONS
6 Install the Oven Racks
6.1 30" Models - Figure 12: Ladder rack supports - Hold the oven rack support at the top of the supports as shown in place, hold the oven rack support flush with the bottom...
Installation Instructions English - Page 12
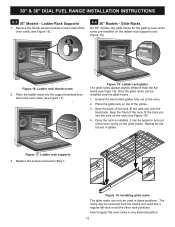
... glides. Replace the screws removed in any desired position.
12 Insert regular flat oven racks in Step 1. Glide Racks
On 36" models, the glide tracks for the top set of the rack, fit the track pin into the support brackets located on each side of the glides.
3. 30" & 36" DUAL FUEL RANGE INSTALLATION INSTRUCTIONS
6.3 36" Models - Remove...
Installation Instructions English - Page 18
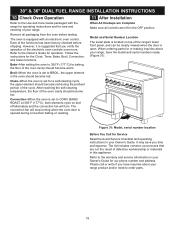
... viewed when the door is set to CONV. BAKE/ ROAST at 350°F (177°C), both elements cycle on top of the oven cavity should become warm. The convection fan will turn.
Figure 31: Model, serial number location
Before You Call for Service
Read the Avoid Service Checklist and operating instructions in the OFF position.
Electrolux E30DF74TPS Reviews
We have not received any reviews for Electrolux yet.