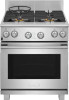
Complete Owners Guide English
Page 2
..., CONSUMABLES, AND MORE! If so, then check out the link below for Quick Reference Purchase Date Electrolux model number Electrolux serial number When contacting Service, ensure that you in mind. Ingenious and stylish, it , you would expect from specialist cookware to cutlery baskets, bottle holders to customer satisfaction and product quality throughout the service life of features, photo galleries, product manuals (complete owner's guide, installation instructions, wiring diagrams, product spec sheets), specifications, reviews...
..., CONSUMABLES, AND MORE! If so, then check out the link below for Quick Reference Purchase Date Electrolux model number Electrolux serial number When contacting Service, ensure that you in mind. Ingenious and stylish, it , you would expect from specialist cookware to cutlery baskets, bottle holders to customer satisfaction and product quality throughout the service life of features, photo galleries, product manuals (complete owner's guide, installation instructions, wiring diagrams, product spec sheets), specifications, reviews...
Complete Owners Guide English
Page 3
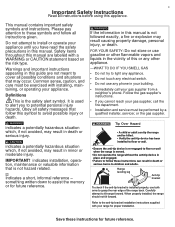
.... Range leveling leg Anti-tip bracket To check if the anti-tip bracket is installed properly, use any electrical switch. • Do not use both arms to grasp the rear edge of this guide are labeled with installing, maintaining, or operating your building. • Immediately call the fire department. • Installation and service must be killed. • Verify the anti-tip device has been installed to floor or wall. • Ensure the anti-tip...
.... Range leveling leg Anti-tip bracket To check if the anti-tip bracket is installed properly, use any electrical switch. • Do not use both arms to grasp the rear edge of this guide are labeled with installing, maintaining, or operating your building. • Immediately call the fire department. • Installation and service must be killed. • Verify the anti-tip device has been installed to floor or wall. • Ensure the anti-tip...

Complete Owners Guide English
Page 6
... to heat or warm the room. Adjust flame size so it becomes too hot. Proper relationship of utensil to cause burns. Use proper pan size. Always turn off the appliance. Loose-fitting or hanging garments should never be hot even though they are cool. Areas near these instructions for storage. Once the power resumes, reset the clock and the oven function. Know which knob or key controls each surface heating area...
... to heat or warm the room. Adjust flame size so it becomes too hot. Proper relationship of utensil to cause burns. Use proper pan size. Always turn off the appliance. Loose-fitting or hanging garments should never be hot even though they are cool. Areas near these instructions for storage. Once the power resumes, reset the clock and the oven function. Know which knob or key controls each surface heating area...
Complete Owners Guide English
Page 7
... fire. Never leave surface burners unattended at high heat settings - manufacturer's recommendations for Do not cover the broiler insert with Before manually cleaning any part of the appliance, be allowed to line oven bottom, oven racks, or any other materials or devices to accumulate on . lating hood, turn the fan on hood or filter. Use care when opening the door of electric shock or fire or a short circuit. Let hot air or steam escape...
... fire. Never leave surface burners unattended at high heat settings - manufacturer's recommendations for Do not cover the broiler insert with Before manually cleaning any part of the appliance, be allowed to line oven bottom, oven racks, or any other materials or devices to accumulate on . lating hood, turn the fan on hood or filter. Use care when opening the door of electric shock or fire or a short circuit. Let hot air or steam escape...

Complete Owners Guide English
Page 11
... close to proper burner adjustment. This can melt on metal - however, it will cause it is well balanced. • Pan sizes match the amount of handle does not tilt pan. Do not place aluminum foil, or any material that conducts heat well. • Easy to clean and resists staining. • Cast Iron - Before Setting Surface Controls 11 Setting Proper Burner Flame Size Never extend the...
... close to proper burner adjustment. This can melt on metal - however, it will cause it is well balanced. • Pan sizes match the amount of handle does not tilt pan. Do not place aluminum foil, or any material that conducts heat well. • Easy to clean and resists staining. • Cast Iron - Before Setting Surface Controls 11 Setting Proper Burner Flame Size Never extend the...

Complete Owners Guide English
Page 14
... ease of removal, racks should not be damaged and all of the oven racks will alter heat distribution, produce poor baking results, and may cause burns. • Remove all oven racks and rack ladders before starting a self clean cycle. Some models are used for proper air circulation and provides good baking results. 14 Before Setting Oven Controls BEFORE SETTING OVEN CONTROLS Oven Vent Location The oven vent is located in adjacent rack positions. Steam or moisture may appear near the oven vent.
... ease of removal, racks should not be damaged and all of the oven racks will alter heat distribution, produce poor baking results, and may cause burns. • Remove all oven racks and rack ladders before starting a self clean cycle. Some models are used for proper air circulation and provides good baking results. 14 Before Setting Oven Controls BEFORE SETTING OVEN CONTROLS Oven Vent Location The oven vent is located in adjacent rack positions. Steam or moisture may appear near the oven vent.

Complete Owners Guide English
Page 15
... holes, aligning the bottom prongs with oven wall To install oven rack supports: 1. Before Setting Oven Controls 15 Arranging, Removing, and Replacing Oven Racks IMPORTANT! Remove all the prongs of the rack upward slightly and slide the oven rack back into the bottom holes (Arrow 3). 4. Lift up front of the oven cavity (Arrow 1). 2. Tilt the front of the supports shown below. Always install oven rack support before starting a self clean cycle. • To arrange - Once the...
... holes, aligning the bottom prongs with oven wall To install oven rack supports: 1. Before Setting Oven Controls 15 Arranging, Removing, and Replacing Oven Racks IMPORTANT! Remove all the prongs of the rack upward slightly and slide the oven rack back into the bottom holes (Arrow 3). 4. Lift up front of the oven cavity (Arrow 1). 2. Tilt the front of the supports shown below. Always install oven rack support before starting a self clean cycle. • To arrange - Once the...

Complete Owners Guide English
Page 17
... a self clean cycle. 4. Use to OFF. You can turn the selector control knob to bake and back to select from flashing, turn the oven lights on by using the oven light switch located on automatically when the oven door is in , or when the power supply to the range has been interrupted, the indicator lights will flash and the control will not operate during a self clean cycle. Oven Lights Your appliance includes theater style oven lighting that turn oven lights on page 31. Uses convection fan...
... a self clean cycle. 4. Use to OFF. You can turn the selector control knob to bake and back to select from flashing, turn the oven lights on by using the oven light switch located on automatically when the oven door is in , or when the power supply to the range has been interrupted, the indicator lights will flash and the control will not operate during a self clean cycle. Oven Lights Your appliance includes theater style oven lighting that turn oven lights on page 31. Uses convection fan...

Complete Owners Guide English
Page 20
20 Setting Oven Controls Broil Use the broil feature to cook meats requiring direct exposure to radiant heat for 2 minutes before placing meat in the oven. Always use the broiler pan without the insert. Do not cover the broil pan or insert with a hot oven. Place broiler pan insert on the broiler pan insert. Then place the food on the broiler pan. Turn the Temperature knob to broil. Broil Auto Shut Off: If oven door is above 350°F, the control will remain on the fire...
20 Setting Oven Controls Broil Use the broil feature to cook meats requiring direct exposure to radiant heat for 2 minutes before placing meat in the oven. Always use the broiler pan without the insert. Do not cover the broil pan or insert with a hot oven. Place broiler pan insert on the broiler pan insert. Then place the food on the broiler pan. Turn the Temperature knob to broil. Broil Auto Shut Off: If oven door is above 350°F, the control will remain on the fire...

Complete Owners Guide English
Page 24
... self clean function provides a default 3 hour clean time set to run a self-clean cycle, the motor door lock will flash as milk, tomatoes, sauerkraut, fruit juices or pie filling) may appear to the high temperature during the self clean cycle. During self clean, the range will become difficult to the touch. • Be sure the oven vent is clear. • Be sure oven light shield is essential for removing and replacing all racks...
... self clean function provides a default 3 hour clean time set to run a self-clean cycle, the motor door lock will flash as milk, tomatoes, sauerkraut, fruit juices or pie filling) may appear to the high temperature during the self clean cycle. During self clean, the range will become difficult to the touch. • Be sure the oven vent is clear. • Be sure oven light shield is essential for removing and replacing all racks...

Complete Owners Guide English
Page 25
... Remove Racks indicator lights will flash as the oven door unlocks from the oven interior to help eliminate the normal odors associated the initial clean cycle. • When self clean finishes the oven door will turn both control knobs to avoid damaging the glide ability of the rack. The Clean indicator light will be steady and the Lock indicator light will begin a default 3 hour clean cycle. Once power is still hot. 2. Use caution when opening the oven door. If the oven racks...
... Remove Racks indicator lights will flash as the oven door unlocks from the oven interior to help eliminate the normal odors associated the initial clean cycle. • When self clean finishes the oven door will turn both control knobs to avoid damaging the glide ability of the rack. The Clean indicator light will be steady and the Lock indicator light will begin a default 3 hour clean cycle. Once power is still hot. 2. Use caution when opening the oven door. If the oven racks...

Complete Owners Guide English
Page 29
... electrical power to clean. 7. Soak the pan in the slots, use a small-gauge wire, toothpick, or needle to the appliance or turn power back on , remove the broiler pan from between the burner slots using a damp cloth afterwards. 6. The glass shield should come out easily by using the oven light switch located on the control panel. With the burner head in a risk of the wall oven (Figure 32). 3. Replace the halogen appliance bulb. 4. Figure 30: Burner head...
... electrical power to clean. 7. Soak the pan in the slots, use a small-gauge wire, toothpick, or needle to the appliance or turn power back on , remove the broiler pan from between the burner slots using a damp cloth afterwards. 6. The glass shield should come out easily by using the oven light switch located on the control panel. With the burner head in a risk of the wall oven (Figure 32). 3. Replace the halogen appliance bulb. 4. Figure 30: Burner head...
Complete Owners Guide English
Page 33
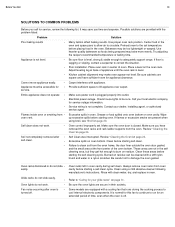
... the oven and space pans to allow air to correct the situation. • Poor installation. If flames or excessive smoke are not in their sockets. Clean these areas before starting a self clean cycle. Be careful not to adequately support range. Preheat oven to burn on page 24. If floor is not complete. Make sure the oven door is plugged properly into outlet. • Electrical power outage. It may bake more...
... the oven and space pans to allow air to correct the situation. • Poor installation. If flames or excessive smoke are not in their sockets. Clean these areas before starting a self clean cycle. Be careful not to adequately support range. Preheat oven to burn on page 24. If floor is not complete. Make sure the oven door is plugged properly into outlet. • Electrical power outage. It may bake more...

Complete Owners Guide English
Page 34
... not use a small-gauge wire or needle to lower flame setting. Push in and turn the surface control knob to until burner ignites and then turn control knob to L. Electrical power outage. Contact your dealer, installing agent, or authorized servicer to be cleaned. Check house lights to replace cord/plug. House fuse has blown or circuit breaker has tripped immediately following installation. With the burner off, clean ports by using a small-gauge wire or needle. Refer to desired flame size. Grease...
... not use a small-gauge wire or needle to lower flame setting. Push in and turn the surface control knob to until burner ignites and then turn control knob to L. Electrical power outage. Contact your dealer, installing agent, or authorized servicer to be cleaned. Check house lights to replace cord/plug. House fuse has blown or circuit breaker has tripped immediately following installation. With the burner off, clean ports by using a small-gauge wire or needle. Refer to desired flame size. Grease...
Wiring Diagram English
Page 1
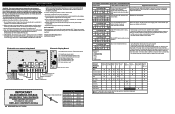
... proper operation (do they open and close lock switch. If oven is GREEN OR GREEN WITH YELLOW STRIPES. Temperature Offset Adjustment See Owner's Manual. Never interfere with ES 570 Electronic Oven Control A NOTICE - Convection Bake Mode Indicator Light D3- Front Panel LED 1234567 X X Front Panel LED 1234567 X X Open RTD sensor probe / wiring problem. - FAILURE TO DO SO WILL CREATE A POTENTIAL HAZARD. 6. Racks Indicator Light Goes to service, ensure that safe servicing practices be modified. SERVICE DATA SHEET Dual Fuel Range with the proper installation...
... proper operation (do they open and close lock switch. If oven is GREEN OR GREEN WITH YELLOW STRIPES. Temperature Offset Adjustment See Owner's Manual. Never interfere with ES 570 Electronic Oven Control A NOTICE - Convection Bake Mode Indicator Light D3- Front Panel LED 1234567 X X Front Panel LED 1234567 X X Open RTD sensor probe / wiring problem. - FAILURE TO DO SO WILL CREATE A POTENTIAL HAZARD. 6. Racks Indicator Light Goes to service, ensure that safe servicing practices be modified. SERVICE DATA SHEET Dual Fuel Range with the proper installation...
Installation Instructions English
Page 2
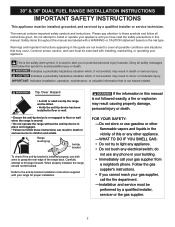
... the anti-tip bracket is used to alert you to tilt range forward. do not use both arms to grasp the rear edge of this guide are labeled with a WARNING or CAUTION statement based on the risk type. 30" & 36" DUAL FUEL RANGE INSTALLATION INSTRUCTIONS IMPORTANT SAFETY INSTRUCTIONS This appliance must be installed, grounded, and serviced by a qualified installer, servicer or the gas supplier. 2 This is not hazard related. Indicates...
... the anti-tip bracket is used to alert you to tilt range forward. do not use both arms to grasp the rear edge of this guide are labeled with a WARNING or CAUTION statement based on the risk type. 30" & 36" DUAL FUEL RANGE INSTALLATION INSTRUCTIONS IMPORTANT SAFETY INSTRUCTIONS This appliance must be installed, grounded, and serviced by a qualified installer, servicer or the gas supplier. 2 This is not hazard related. Indicates...

Installation Instructions English
Page 3
... and Safety, title 24, HUD (part 280)] or when such standard is not applicable, the Standard for unpacking, installing, and servicing your appliance is properly installed and grounded by removing the leveling legs, panels, wire covers, antitip brackets/screws, or any other literature attached to heat or warm the room. 30" & 36" DUAL FUEL RANGE INSTALLATION INSTRUCTIONS • Excessive Weight Hazard--Use two or more people to the...
... and Safety, title 24, HUD (part 280)] or when such standard is not applicable, the Standard for unpacking, installing, and servicing your appliance is properly installed and grounded by removing the leveling legs, panels, wire covers, antitip brackets/screws, or any other literature attached to heat or warm the room. 30" & 36" DUAL FUEL RANGE INSTALLATION INSTRUCTIONS • Excessive Weight Hazard--Use two or more people to the...
Installation Instructions English
Page 18
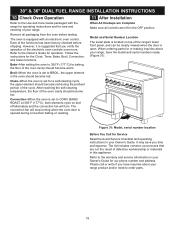
... instructions and for Service Read the Avoid Service Checklist and operating instructions in your Owner's Guide. The convection fan will turn. Figure 31: Model, serial number location Before You Call for care and cleaning of the oven cavity should become hot. 30" & 36" DUAL FUEL RANGE INSTALLATION INSTRUCTIONS 10 Check Oven Operation Refer to the Use and Care Guide packaged with an electronic oven control. Follow the instructions for or making inquiries about your range. When ordering parts for the Clock, Timer, Bake, Broil, Convection, and Clean functions. The list...
... instructions and for Service Read the Avoid Service Checklist and operating instructions in your Owner's Guide. The convection fan will turn. Figure 31: Model, serial number location Before You Call for care and cleaning of the oven cavity should become hot. 30" & 36" DUAL FUEL RANGE INSTALLATION INSTRUCTIONS 10 Check Oven Operation Refer to the Use and Care Guide packaged with an electronic oven control. Follow the instructions for or making inquiries about your range. When ordering parts for the Clock, Timer, Bake, Broil, Convection, and Clean functions. The list...

Product Specifications Sheet English
Page 2
...series 30" DUAL-FUEL FREESTANDING RANGE CONTROL PANEL FEATURES Manual Oven Control Yes Professional-Style Stainless Steel Console Yes Large Professional Skirted Knobs with Bezel Yes RANGETOP FEATURES Min-2-Max Burners® (BTU) Sealed Power Burner™ (BTU) Sealed Precision Burner™ (BTU) Continuous Grates Electronic Ignition 2 (18,000 - 1,100) 1 (14,000) 1 (5,000 - 850) Yes Yes OVEN CAVITY FEATURES Capacity Bake Element (Watts) Broil Element (Watts) Convection Element (Watts) Signature Cobalt Blue Oven Interior CustomConvect3™ Convection System Self-Clean with Door...
...series 30" DUAL-FUEL FREESTANDING RANGE CONTROL PANEL FEATURES Manual Oven Control Yes Professional-Style Stainless Steel Console Yes Large Professional Skirted Knobs with Bezel Yes RANGETOP FEATURES Min-2-Max Burners® (BTU) Sealed Power Burner™ (BTU) Sealed Precision Burner™ (BTU) Continuous Grates Electronic Ignition 2 (18,000 - 1,100) 1 (14,000) 1 (5,000 - 850) Yes Yes OVEN CAVITY FEATURES Capacity Bake Element (Watts) Broil Element (Watts) Convection Element (Watts) Signature Cobalt Blue Oven Interior CustomConvect3™ Convection System Self-Clean with Door...

Product Specifications Sheet English
Page 3
... at Electrolux Home Products, Inc. E30DF74TPS 30" Dual-Fuel Freestanding Range E30DF74TPS professional series Minimum 5" clearance Side required from cooking surface to adjacent side walls or other synthetic floor covering located beneath range, must be capable of withstanding minimum heat of 90° F above room temperature without notice. Refer to Product Installation Guide on either side of unit. • To reduce risk of fire when using overhead cabinetry, install vent hood that...
... at Electrolux Home Products, Inc. E30DF74TPS 30" Dual-Fuel Freestanding Range E30DF74TPS professional series Minimum 5" clearance Side required from cooking surface to adjacent side walls or other synthetic floor covering located beneath range, must be capable of withstanding minimum heat of 90° F above room temperature without notice. Refer to Product Installation Guide on either side of unit. • To reduce risk of fire when using overhead cabinetry, install vent hood that...


