Use and Care Guide
Page 2
...Electrical information 3 Installation 4 Location 4 Installation 4 Installation clearances 4 Door opening 4 Guidelines for final positioning of your refrigerator 4 Removing The Doors 6 Getting through narrow spaces 6 Installing Door Handles 8 Door Handle Mounting Instructions 8 Connecting The Water Supply 9 About your... your investment 24 Care & cleaning tips 25 Vacation & moving tips 25 Replacing light bulbs 26 Warranty 27 Solutions To Common Problems 28 Keep a record for choosing Electrolux, our new premium brand in home appliances. and Canada: 1-877-4ELECTROLUX (1-877-435...
...Electrical information 3 Installation 4 Location 4 Installation 4 Installation clearances 4 Door opening 4 Guidelines for final positioning of your refrigerator 4 Removing The Doors 6 Getting through narrow spaces 6 Installing Door Handles 8 Door Handle Mounting Instructions 8 Connecting The Water Supply 9 About your... your investment 24 Care & cleaning tips 25 Vacation & moving tips 25 Replacing light bulbs 26 Warranty 27 Solutions To Common Problems 28 Keep a record for choosing Electrolux, our new premium brand in home appliances. and Canada: 1-877-4ELECTROLUX (1-877-435...

Use and Care Guide
Page 3
... replaced by the manufacturer, service technician or a qualified person to prevent any moving parts of the appliance is damaged, it should never play with local codes and ordinances. IMPORTANT To turn off accidentally. • Avoid connecting refrigerator to a Ground Fault Interrupter (GFI) circuit. General Safety • Do not store or use an...
... replaced by the manufacturer, service technician or a qualified person to prevent any moving parts of the appliance is damaged, it should never play with local codes and ordinances. IMPORTANT To turn off accidentally. • Avoid connecting refrigerator to a Ground Fault Interrupter (GFI) circuit. General Safety • Do not store or use an...
Use and Care Guide
Page 6
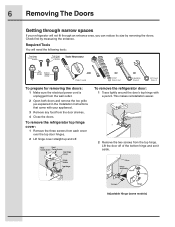
...: 1 Trace lightly around the door's top hinge with your appliance). 3 Remove any food from the door shelves. 4 Close the doors. Adjustable Hinge (some models) To remove the refrigerator top hinge cover: 1 Remove the three screws from each cover over the top door hinges. 2 Lift hinge cover ... This makes reinstallation easier. 2 Remove the two screws from the top hinge. 6 Removing The Doors Getting through narrow spaces If your refrigerator will need the following tools: Top Hinge Cover Front Screw Top Hinge Cover Rear Screw Tools Necessary: Top Hinge Screw Bottom Hinge Screw AND...
...: 1 Trace lightly around the door's top hinge with your appliance). 3 Remove any food from the door shelves. 4 Close the doors. Adjustable Hinge (some models) To remove the refrigerator top hinge cover: 1 Remove the three screws from each cover over the top door hinges. 2 Lift hinge cover ... This makes reinstallation easier. 2 Remove the two screws from the top hinge. 6 Removing The Doors Getting through narrow spaces If your refrigerator will need the following tools: Top Hinge Cover Front Screw Top Hinge Cover Rear Screw Tools Necessary: Top Hinge Screw Bottom Hinge Screw AND...
Use and Care Guide
Page 22
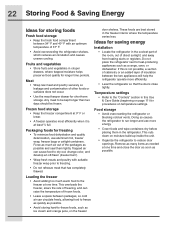
...possible. • Wrap fresh meats and poultry with an optimum temperature of frozen foods. • Leave a space between the two appliances will help the refrigerator operate more energy. • Cover foods and wipe containers dry before placing them tightly. Force as much warm food to reduce ...door openings. Any meat to heat-producing appliances such as possible and seal them in the freezer interior where the temperature varies less. These foods are best stored in the refrigerator. Temperature settings • Refer to the "Controls" section in the...
...possible. • Wrap fresh meats and poultry with an optimum temperature of frozen foods. • Leave a space between the two appliances will help the refrigerator operate more energy. • Cover foods and wipe containers dry before placing them tightly. Force as much warm food to reduce ...door openings. Any meat to heat-producing appliances such as possible and seal them in the freezer interior where the temperature varies less. These foods are best stored in the refrigerator. Temperature settings • Refer to the "Controls" section in the...

Use and Care Guide
Page 24
... waxes, concentrated detergents, bleaches or cleansers containing petroleum products on caring and cleaning specific areas of your refrigerator. Refer to lights and other sharp instruments which can scratch the appliance surface. • Do not remove the serial plate. Wipe up . NOTE If you store or move... your refrigerator in freezing temperatures, be sure to cold metal surfaces. Do not touch refrigerated surfaces with bleach to side may damage...
... waxes, concentrated detergents, bleaches or cleansers containing petroleum products on caring and cleaning specific areas of your refrigerator. Refer to lights and other sharp instruments which can scratch the appliance surface. • Do not remove the serial plate. Wipe up . NOTE If you store or move... your refrigerator in freezing temperatures, be sure to cold metal surfaces. Do not touch refrigerated surfaces with bleach to side may damage...

Use and Care Guide
Page 26
... wattage (normally 40 watts). 5 Replace light cover, if necessary. 6 Plug in the refrigerator's power cord. To replace light bulbs: 1 Unplug your refrigerator include light bulbs that are designed for appliance lighting. CAUTION Wear gloves when replacing light bulbs to avoid getting cut. 26 Care & ... bulbs Both the freezer and fresh food compartments of your refrigerator's power cord. 2 Wear gloves as protection against possible broken glass. 3 Remove light cover, if necessary. 4 Unscrew and replace old bulb with an appliance bulb of Ice Container Always use bulbs that will need...
... wattage (normally 40 watts). 5 Replace light cover, if necessary. 6 Plug in the refrigerator's power cord. To replace light bulbs: 1 Unplug your refrigerator include light bulbs that are designed for appliance lighting. CAUTION Wear gloves when replacing light bulbs to avoid getting cut. 26 Care & ... bulbs Both the freezer and fresh food compartments of your refrigerator's power cord. 2 Wear gloves as protection against possible broken glass. 3 Remove light cover, if necessary. 4 Unscrew and replace old bulb with an appliance bulb of Ice Container Always use bulbs that will need...

Use and Care Guide
Page 27
... ANY IMPLIED WARRANTY. or external causes such as -is" are not a part of your appliance is covered by Electrolux Major Appliances North America, a division of parts other than genuine Electrolux parts or parts obtained from persons other than in your receipt, delivery slip, or some other... to, any parts in the cabinet liner and sealed refrigeration system which do not involve malfunction or defects in the USA, Puerto Rico and Canada. Warranty 27 Major Appliance Warranty Information Your appliance is covered by Electrolux or an authorized service company. YOU MAY ALSO HAVE ...
... ANY IMPLIED WARRANTY. or external causes such as -is" are not a part of your appliance is covered by Electrolux Major Appliances North America, a division of parts other than genuine Electrolux parts or parts obtained from persons other than in your receipt, delivery slip, or some other... to, any parts in the cabinet liner and sealed refrigeration system which do not involve malfunction or defects in the USA, Puerto Rico and Canada. Warranty 27 Major Appliance Warranty Information Your appliance is covered by Electrolux or an authorized service company. YOU MAY ALSO HAVE ...
Service Data Sheet
Page 1
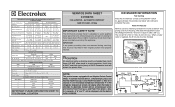
...down (-) keys for 5 seconds. Water Fill Volume Remove cover by inserting screwdriver in the refrigerator temperature window will char at 200°F and flash ignite (burn) at 15°...vac max) DEFROST SPECIFICATIONS Cabinet Size Thermostat Cut-in Cut-out Heater Watts Ohms 23', 23' CD, 26' 25° F (-4° C) 47° F (8° C) 450 30 Electronic Timer - (ADC) Defrost ...correct fill is designed to complete the cycle. Disconnect power cord before servicing this appliance. Excessive heat will continue to assist qualified repair personnel only. Ice maker will distort...
...down (-) keys for 5 seconds. Water Fill Volume Remove cover by inserting screwdriver in the refrigerator temperature window will char at 200°F and flash ignite (burn) at 15°...vac max) DEFROST SPECIFICATIONS Cabinet Size Thermostat Cut-in Cut-out Heater Watts Ohms 23', 23' CD, 26' 25° F (-4° C) 47° F (8° C) 450 30 Electronic Timer - (ADC) Defrost ...correct fill is designed to complete the cycle. Disconnect power cord before servicing this appliance. Excessive heat will continue to assist qualified repair personnel only. Ice maker will distort...