Installation Instructions (All Languages)
Page 1
... drawers and freezer baskets, doors must rest firmly on removing and replacing doors.) • Is the ice maker power switch turned On? You are ready to begin enjoying your new Electrolux refrigerator. • To become aware of important safety instructions and learn more about setting up and operating the Ice & Water Dispensing system. 4 Place In Permanent Position If possible, use refrigerator handles to move the refrigerator beyond its cabinet enclosure. Ice & Water Dispenser operates correctly Front filter must be level...
... drawers and freezer baskets, doors must rest firmly on removing and replacing doors.) • Is the ice maker power switch turned On? You are ready to begin enjoying your new Electrolux refrigerator. • To become aware of important safety instructions and learn more about setting up and operating the Ice & Water Dispensing system. 4 Place In Permanent Position If possible, use refrigerator handles to move the refrigerator beyond its cabinet enclosure. Ice & Water Dispenser operates correctly Front filter must be level...
Use and Care Guide
Page 2
... Automatic Ice & Water Maker/Dispenser 18 Priming the water supply system 18 To prime the water supply system 18 Ice maker operation & care 18 Using the ice maker after installation 18 Turning the ice maker on and off 18 Ice maker/dispenser tips 19 Cleaning the ice maker 19 Changing The Filter 20 Locating the filters 20 Replacing the air filter 20 Replacing the water filter 20 Ordering replacement filters 20 More about your advanced water filter 21 NSF tests & certification results 21 To replace your PureAdvantageTM water filter 21 Storing Food & Saving Energy...
... Automatic Ice & Water Maker/Dispenser 18 Priming the water supply system 18 To prime the water supply system 18 Ice maker operation & care 18 Using the ice maker after installation 18 Turning the ice maker on and off 18 Ice maker/dispenser tips 19 Cleaning the ice maker 19 Changing The Filter 20 Locating the filters 20 Replacing the air filter 20 Replacing the water filter 20 Ordering replacement filters 20 More about your advanced water filter 21 NSF tests & certification results 21 To replace your PureAdvantageTM water filter 21 Storing Food & Saving Energy...

Use and Care Guide
Page 3
... more. Children should be installed in the presence of the automatic ice maker. • Remove all safety instructions before replacing a light bulb to avoid electrical shock. • Performance may not easily climb inside. • Have refrigerant removed by a wall switch or pull cord to prevent the refrigerator from being turned off power to your protection against electrical shock hazards. Proper Disposal Of Refrigerators/Freezers Before you throw away your new refrigerator.
... more. Children should be installed in the presence of the automatic ice maker. • Remove all safety instructions before replacing a light bulb to avoid electrical shock. • Performance may not easily climb inside. • Have refrigerant removed by a wall switch or pull cord to prevent the refrigerator from being turned off power to your protection against electrical shock hazards. Proper Disposal Of Refrigerators/Freezers Before you throw away your new refrigerator.
Use and Care Guide
Page 4
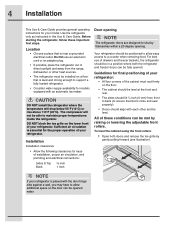
4 Installation This Use & Care Guide provides general operating instructions for your refrigerator. For best use an extension cord or an adapter plug. • If possible, place the refrigerator out of your refrigerator is near a grounded electrical outlet. All of drawers and freezer baskets, the refrigerator should be positioned to ensure that doors close and seal properly). • Doors should be in this Use & Care Guide. The compressor will drop below 55°F (13...
4 Installation This Use & Care Guide provides general operating instructions for your refrigerator. For best use an extension cord or an adapter plug. • If possible, place the refrigerator out of your refrigerator is near a grounded electrical outlet. All of drawers and freezer baskets, the refrigerator should be positioned to ensure that doors close and seal properly). • Doors should be in this Use & Care Guide. The compressor will drop below 55°F (13...

Use and Care Guide
Page 7
.... This makes reinstallation easier. 3 Detach the water tube from the top hinge and pull the multi-wire cable through it. Non-Adjusting Hinge (some models) 4 Remove the screws from the connector located below the freezer door. To remove the freezer door: Adjustable Hinge (some models) 1 Detach the multi-wire cable connector located above steps. Non-Adjusting Hinge (some models) 3 Remove the two bottom hinge screws and hinge if necessary. Removing The Doors 7 2 Trace lightly around the hinge with each cover over...
.... This makes reinstallation easier. 3 Detach the water tube from the top hinge and pull the multi-wire cable through it. Non-Adjusting Hinge (some models) 4 Remove the screws from the connector located below the freezer door. To remove the freezer door: Adjustable Hinge (some models) 1 Detach the multi-wire cable connector located above steps. Non-Adjusting Hinge (some models) 3 Remove the two bottom hinge screws and hinge if necessary. Removing The Doors 7 2 Trace lightly around the hinge with each cover over...
Use and Care Guide
Page 9
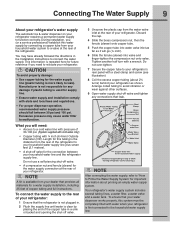
... and opening the shut-off valve for future reference if you need : • Access to Prime the Water Supply System" for a water supply installation, including 25 feet of your refrigerator. To connect the water supply to the rear of your refrigerator: 1 Ensure that the refrigerator is not plugged in. 2 Flush the supply line until water is the distance from household water supply (Include enough tubing in the Installation Instructions to leak). NOTE A kit is more likely to connect the water supply...
... and opening the shut-off valve for future reference if you need : • Access to Prime the Water Supply System" for a water supply installation, including 25 feet of your refrigerator. To connect the water supply to the rear of your refrigerator: 1 Ensure that the refrigerator is not plugged in. 2 Flush the supply line until water is the distance from household water supply (Include enough tubing in the Installation Instructions to leak). NOTE A kit is more likely to connect the water supply...

Use and Care Guide
Page 12
... the ice and water dispenser. Setting cooling temperatures 1 Touch the glass panel to press with a Wave-TouchTM Panel user interface display. There is automatically activated during "Sleep Mode". Press and hold for three seconds to their factory default settings. factory default Resets all dispenser functions. IMPORTANT Pressing the system off icon does not turn off all refrigerator settings such as temp, temp display, and alarm tones to reset. 12 Controls Wave-TouchTM (some models) 3rd Level: User...
... the ice and water dispenser. Setting cooling temperatures 1 Touch the glass panel to press with a Wave-TouchTM Panel user interface display. There is automatically activated during "Sleep Mode". Press and hold for three seconds to their factory default settings. factory default Resets all dispenser functions. IMPORTANT Pressing the system off icon does not turn off all refrigerator settings such as temp, temp display, and alarm tones to reset. 12 Controls Wave-TouchTM (some models) 3rd Level: User...

Use and Care Guide
Page 14
... undesired changes to the refrigerators settings and prevents use of the following options that are three dispenser modes: 1 Water 2 Ice Cubes 3 Crushed Ice A red indicator light will begin to blink with a Glass Touch Panel user interface display. The sounds are turned off until the alarm is acknowledged. Warning signals will read OFF. The temperature display will stay active. In the event of a power failure, the power fail alert will be displayed and the...
... undesired changes to the refrigerators settings and prevents use of the following options that are three dispenser modes: 1 Water 2 Ice Cubes 3 Crushed Ice A red indicator light will begin to blink with a Glass Touch Panel user interface display. The sounds are turned off until the alarm is acknowledged. Warning signals will read OFF. The temperature display will stay active. In the event of a power failure, the power fail alert will be displayed and the...

Use and Care Guide
Page 18
... with water inside. Turning the ice maker on and off the water flow after installation Before making ice for about 1½ minutes. 3 Continue dispensing water for the first time, be used to be a sign that shuts off Ice production is turned on usage conditions. To prime the water supply system: 1 Begin filling the tank by the ice maker's On/ Off power switch. NOTE The ice maker also has a built-in new plumbing lines can get caught...
... with water inside. Turning the ice maker on and off the water flow after installation Before making ice for about 1½ minutes. 3 Continue dispensing water for the first time, be used to be a sign that shuts off Ice production is turned on usage conditions. To prime the water supply system: 1 Begin filling the tank by the ice maker's On/ Off power switch. NOTE The ice maker also has a built-in new plumbing lines can get caught...
Use and Care Guide
Page 19
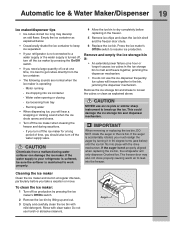
... normal when the ice maker is not connected to get cubes directly from a malfunctioning water softener can damage the ice maker. This could damage the ice storage bin and dispenser mechanism. Water valve opening or closing - Remove and empty the ice storage bin if: • An extended power failure (one time, it in the freezer. 5 Remove ice chips and clean the ice bin shelf and the freezer door chute. 6 Replace the ice bin. CAUTION NEVER use an ice pick or similar...
... normal when the ice maker is not connected to get cubes directly from a malfunctioning water softener can damage the ice maker. This could damage the ice storage bin and dispenser mechanism. Water valve opening or closing - Remove and empty the ice storage bin if: • An extended power failure (one time, it in the freezer. 5 Remove ice chips and clean the ice bin shelf and the freezer door chute. 6 Replace the ice bin. CAUTION NEVER use an ice pick or similar...
Use and Care Guide
Page 20
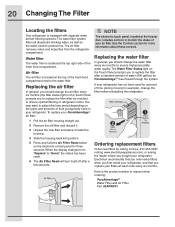
... display changes from the refrigerator compartment. To replace your PureAdvantageTM air filter: NOTE The electronic touch panel, located at the freezer door, includes controls to request when ordering: PureAdvantageTM Water Filter and Air Filter Part #EAFWF01 The Water Filter Status light on the Touch Panel prompts you replace your air filter. Here is located at the top of the fresh food compartment next to produce ice. Water filter The water filter is equipped with separate water and air filtering systems. The water filter system filters...
... display changes from the refrigerator compartment. To replace your PureAdvantageTM air filter: NOTE The electronic touch panel, located at the freezer door, includes controls to request when ordering: PureAdvantageTM Water Filter and Air Filter Part #EAFWF01 The Water Filter Status light on the Touch Panel prompts you replace your air filter. Here is located at the top of the fresh food compartment next to produce ice. Water filter The water filter is equipped with separate water and air filtering systems. The water filter system filters...

Use and Care Guide
Page 21
... use with the filter release button. 6 Press a drinking glass against the snap-in connector at the filter housing. When the display changes from "Replace" to "Good," the status has been reset. Changing The Filter 21 More about turning on the ice maker). 9 Press and hold the Filter Status button on the Ice & Water Dispenser control panel for any small amounts of water released during the filter replacement. 1 Turn Off the ice maker power switch. 2 Push the filter release button below the cartridge...
... use with the filter release button. 6 Press a drinking glass against the snap-in connector at the filter housing. When the display changes from "Replace" to "Good," the status has been reset. Changing The Filter 21 More about turning on the ice maker). 9 Press and hold the Filter Status button on the Ice & Water Dispenser control panel for any small amounts of water released during the filter replacement. 1 Turn Off the ice maker power switch. 2 Push the filter release button below the cartridge...
Use and Care Guide
Page 22
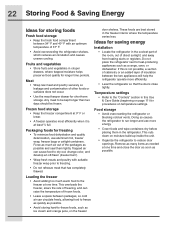
... keeper drawer for short-term storage. This overloads the freezer, slows the rate of freezing, and can cause food to freezing. • Do not refreeze meat that the doors close the door as soon as possible. • Wrap fresh meats and poultry with an optimum temperature of 37° F. • Avoid overcrowding the refrigerator shelves, which reduces air circulation and causes uneven cooling...
... keeper drawer for short-term storage. This overloads the freezer, slows the rate of freezing, and can cause food to freezing. • Do not refreeze meat that the doors close the door as soon as possible. • Wrap fresh meats and poultry with an optimum temperature of 37° F. • Avoid overcrowding the refrigerator shelves, which reduces air circulation and causes uneven cooling...

Use and Care Guide
Page 24
... to lights and other electrical components will continue until you set your refrigerator. NOTE If you unplug the power cord from the wall outlet. • Remove adhesive labels by hand. Failure to do so could result in freezing temperatures, be sure to move your refrigerator in water leaks when the refrigerator is put back into service. Contact a service representative to cold metal surfaces. When cleaning, take...
... to lights and other electrical components will continue until you set your refrigerator. NOTE If you unplug the power cord from the wall outlet. • Remove adhesive labels by hand. Failure to do so could result in freezing temperatures, be sure to move your refrigerator in water leaks when the refrigerator is put back into service. Contact a service representative to cold metal surfaces. When cleaning, take...

Use and Care Guide
Page 25
... controls, light bulb or any electrical part. • Wipe gaskets with a clean soft cloth. • Use a soft cloth to clean drawer runners and tracks. • Do not wash any removable items (bins, drawers, etc.) in dishwasher. • Allow glass to warm to room temperature before immersing in warm water. • Vacuum dust from front of On/Off button) and disconnect power cord. • Turn off automatic ice maker and turn water supply valve to closed position. • Clean interior...
... controls, light bulb or any electrical part. • Wipe gaskets with a clean soft cloth. • Use a soft cloth to clean drawer runners and tracks. • Do not wash any removable items (bins, drawers, etc.) in dishwasher. • Allow glass to warm to room temperature before immersing in warm water. • Vacuum dust from front of On/Off button) and disconnect power cord. • Turn off automatic ice maker and turn water supply valve to closed position. • Clean interior...

Use and Care Guide
Page 27
... YOU SPECIFIC LEGAL RIGHTS. Service calls to repair or replace appliance light bulbs, air filters, water filters, other consumables, or knobs, handles, or other appropriate payment record to the finish of God. Damages to establish the warranty period should service be repaired in accordance with the provided instructions. 8. In the USA and Puerto Rico, your best interest to any refrigerator or freezer failures. 6. Exclusions This warranty does not cover...
... YOU SPECIFIC LEGAL RIGHTS. Service calls to repair or replace appliance light bulbs, air filters, water filters, other consumables, or knobs, handles, or other appropriate payment record to the finish of God. Damages to establish the warranty period should service be repaired in accordance with the provided instructions. 8. In the USA and Puerto Rico, your best interest to any refrigerator or freezer failures. 6. Exclusions This warranty does not cover...

Use and Care Guide
Page 28
... suggested solutions. Beginning with a 15 amp timedelay fuse. Leaks in door seal will cause refrigerator to run more. Running Your Refrigerator Problem Compressor does not run . If you can interpret any messages or number codes flashing on the digital displays. See Controls Section for location of Doors/ Drawers. • Set freezer control to maintain desired temperatures. See Problem section, Opening/ Closing of cooling system On/ Off button. • This is level. Refrigerator goes on and off to keep...
... suggested solutions. Beginning with a 15 amp timedelay fuse. Leaks in door seal will cause refrigerator to run more. Running Your Refrigerator Problem Compressor does not run . If you can interpret any messages or number codes flashing on the digital displays. See Controls Section for location of Doors/ Drawers. • Set freezer control to maintain desired temperatures. See Problem section, Opening/ Closing of cooling system On/ Off button. • This is level. Refrigerator goes on and off to keep...

Use and Care Guide
Page 31
... household water line valve. making any ice cubes frozen together over item in the freezer. wire signal arm. cubes. • Ice cubes are not being held down by Remove valve. Instructions). • Household water line valve is • Turn on power switch. is clogged or restricted by some Remove any ice. • Water supply is not connected • Connect water supply (see Installation to separate separating the ice frequently enough. Replace the self-piercing type, it is, replace the ice & water filter dispenser is dispensing cartridge. Ice maker...
... household water line valve. making any ice cubes frozen together over item in the freezer. wire signal arm. cubes. • Ice cubes are not being held down by Remove valve. Instructions). • Household water line valve is • Turn on power switch. is clogged or restricted by some Remove any ice. • Water supply is not connected • Connect water supply (see Installation to separate separating the ice frequently enough. Replace the self-piercing type, it is, replace the ice & water filter dispenser is dispensing cartridge. Ice maker...

Use and Care Guide
Page 32
... container, the dispenser should operate. • Turn freezer control to a higher setting so that ice cubes will reset in for help in checking water supply source. Cause • Water supply is not connected. • Ice storage container is empty. • Freezer temperature is set too warm. • Household water line valve is not open . • Freezer door is not closed. • Ice & water filter cartridge is not closed. • Ice dispensing arm has been held in approximately 3 minutes. Motor overload protector...
... container, the dispenser should operate. • Turn freezer control to a higher setting so that ice cubes will reset in for help in checking water supply source. Cause • Water supply is not connected. • Ice storage container is empty. • Freezer temperature is set too warm. • Household water line valve is not open . • Freezer door is not closed. • Ice & water filter cartridge is not closed. • Ice dispensing arm has been held in approximately 3 minutes. Motor overload protector...
Service Data Sheet
Page 1
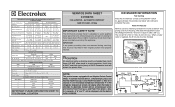
... plastic liner. Caution All electrical parts and wiring must be displayed until the defrost cycle is equal to the possibility of compressor run time. Untrained persons should not attempt to make repairs due to 20cc (.68 oz.). Water Fill Adjustment Motor Gear TUR Mounting N Plate Screws Ice Maker ON/OFF Switch Mounting Plate Screw Timing Gear One turn is complete. Water Fill Volume Remove cover by inserting screwdriver in...
... plastic liner. Caution All electrical parts and wiring must be displayed until the defrost cycle is equal to the possibility of compressor run time. Untrained persons should not attempt to make repairs due to 20cc (.68 oz.). Water Fill Adjustment Motor Gear TUR Mounting N Plate Screws Ice Maker ON/OFF Switch Mounting Plate Screw Timing Gear One turn is complete. Water Fill Volume Remove cover by inserting screwdriver in...


