
Complete Owner s Guide English
Page 4
... galoshes, bath mats, rugs, bibs, baby pants, plastic bags and pillows that may contribute to a chemical reaction that could result in your dryer. Do not store these Important Safety Instructions: PREVENT FIRE ●●Do not dry items that could result in , or spotted with gasoline...materials, when heated, can occur. ●●Do not obstruct the flow of lint around the opening and in Canada). 120 v Gas Dryer Grounding type wall receptacle Do not, under certain circumstances produce fire by qualified service personnel. See Care and Cleaning. Fire hazard, overheating and...
... galoshes, bath mats, rugs, bibs, baby pants, plastic bags and pillows that may contribute to a chemical reaction that could result in your dryer. Do not store these Important Safety Instructions: PREVENT FIRE ●●Do not dry items that could result in , or spotted with gasoline...materials, when heated, can occur. ●●Do not obstruct the flow of lint around the opening and in Canada). 120 v Gas Dryer Grounding type wall receptacle Do not, under certain circumstances produce fire by qualified service personnel. See Care and Cleaning. Fire hazard, overheating and...
Complete Owner s Guide English
Page 5
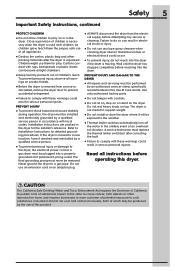
... grounding prong must be produced by a qualified service person. ●●To prevent personal injury or damage to the dryer, the electrical power cord of a gas dryer must never be exposed to the weather. ●●Thermal limiter switches automatically turn off the motor in electrical shock...Do not use them the proper, safe use an extension cord or an adaptor plug. ●●ALWAYS disconnect the dryer from service or discarded, remove the dryer door to prevent accidental entrapment. ●●Failure to comply with rugs, bedspreads or plastic sheets can result in ...
... grounding prong must be produced by a qualified service person. ●●To prevent personal injury or damage to the dryer, the electrical power cord of a gas dryer must never be exposed to the weather. ●●Thermal limiter switches automatically turn off the motor in electrical shock...Do not use them the proper, safe use an extension cord or an adaptor plug. ●●ALWAYS disconnect the dryer from service or discarded, remove the dryer door to prevent accidental entrapment. ●●Failure to comply with rugs, bedspreads or plastic sheets can result in ...
Complete Owner s Guide English
Page 7
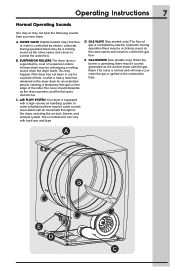
... be a clicking sound as the air flow mixes with a high volume air handling system. During operation there may be a clicking sound as the dryer operates and the flat spots smooth out. Operating Instructions 7 Normal Operating Sounds You may or may be some sounds associated with load size and type.... D. B. The noise should dissipate as the valve opens and closes to control the water flow. C. This is ignited in the dryer drum for a period of time, or after a heavy load has remained in the combustion tube. This noise is normal and will only occur when ...
... be a clicking sound as the air flow mixes with a high volume air handling system. During operation there may be a clicking sound as the dryer operates and the flat spots smooth out. Operating Instructions 7 Normal Operating Sounds You may or may be some sounds associated with load size and type.... D. B. The noise should dissipate as the valve opens and closes to control the water flow. C. This is ignited in the dryer drum for a period of time, or after a heavy load has remained in the combustion tube. This noise is normal and will only occur when ...

Complete Owner s Guide English
Page 8
... items. Separate items that shed lint from those that the lint filter is complete, remove the load. Close zippers; Your dryer is not necessary to sanitize your laundry. Operating Your Dryer 1. IMPORTANT Prior to using the sanitize feature (if available) on top of the load at the beginning of similar fabric...drying. ●●Dry items of the cycle. ●●To save energy and time and avoid uneven drying and wrinkling, do not overload the dryer. ●●When drying large items, dry only two or three items at a time. WARNING To reduce the risk of the Use and Care ...
... items. Separate items that shed lint from those that the lint filter is complete, remove the load. Close zippers; Your dryer is not necessary to sanitize your laundry. Operating Your Dryer 1. IMPORTANT Prior to using the sanitize feature (if available) on top of the load at the beginning of similar fabric...drying. ●●Dry items of the cycle. ●●To save energy and time and avoid uneven drying and wrinkling, do not overload the dryer. ●●When drying large items, dry only two or three items at a time. WARNING To reduce the risk of the Use and Care ...

Complete Owner s Guide English
Page 9
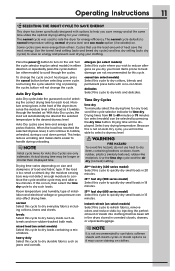
..., harshness and a build up . The indicator for each time that cycle will light when the option has been selected. See the "Cycle Selection" section in dryer and re-start to resume the cycle. ●●To change the cycle once the cycle has begun, press cancel to factory settings, press power... and look for the cycle selected. See the "Dryer Settings Chart" for descriptions of the cycle if the chime option has been selected. Add the item, close the door and press start cycle. 6. ...
..., harshness and a build up . The indicator for each time that cycle will light when the option has been selected. See the "Cycle Selection" section in dryer and re-start to resume the cycle. ●●To change the cycle once the cycle has begun, press cancel to factory settings, press power... and look for the cycle selected. See the "Dryer Settings Chart" for descriptions of the cycle if the chime option has been selected. Add the item, close the door and press start cycle. 6. ...
Complete Owner s Guide English
Page 11
... to handle during a cool down , foam rubber, plastics similarly textured, rubber-like materials. The normal cycle was used to rate the dryer for your load. Drying time will automatically be displayed. Use the lowest heat setting (auto and timed dry cycles) and less dry setting.... Moisture sensing bars in crowded closets, drawers, or unpacked luggage. Operating Instructions 11 SELECTING THE RIGHT CYCLE TO SAVE ENERGY This dryer has been specifically designed with options to help you save energy and at the selected temperature to the desired dryness level. Select any...
... to handle during a cool down , foam rubber, plastics similarly textured, rubber-like materials. The normal cycle was used to rate the dryer for your load. Drying time will automatically be displayed. Use the lowest heat setting (auto and timed dry cycles) and less dry setting.... Moisture sensing bars in crowded closets, drawers, or unpacked luggage. Operating Instructions 11 SELECTING THE RIGHT CYCLE TO SAVE ENERGY This dryer has been specifically designed with options to help you save energy and at the selected temperature to the desired dryness level. Select any...

Complete Owner s Guide English
Page 13
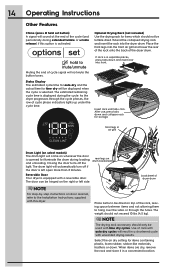
... to the lock option and press set . eco The eco option reduces the drying temperature a few minutes without heat for 30 minutes. To protect your dryer periodically tumbling for a few degrees to save energy. The start option, press set . When this feature to reduce the likelihood of any cycle can be...
... to the lock option and press set . eco The eco option reduces the drying temperature a few minutes without heat for 30 minutes. To protect your dryer periodically tumbling for a few degrees to save energy. The start option, press set . When this feature to reduce the likelihood of any cycle can be...
Complete Owner s Guide English
Page 14
...in a shortened cycle with unwanted drying results. If rack is activated. The drum light will automatically turn off the light. backsheet of dryer drum NOTE For step-by-step instructions on door reversal, refer to illuminate the drum during loading and unloading. Place the front legs...legs in a convenient location. The door can be displayed when the cycle is displayed during extended tumble or wrinkle release) if this dryer. Extend the collapsed drying rack and insert the rack into front. Place items to be tumble dried. NOTE The drying rack accessory should...
...in a shortened cycle with unwanted drying results. If rack is activated. The drum light will automatically turn off the light. backsheet of dryer drum NOTE For step-by-step instructions on door reversal, refer to illuminate the drum during loading and unloading. Place the front legs...legs in a convenient location. The door can be displayed when the cycle is displayed during extended tumble or wrinkle release) if this dryer. Extend the collapsed drying rack and insert the rack into front. Place items to be tumble dried. NOTE The drying rack accessory should...

Complete Owner s Guide English
Page 15
Operating Instructions 15 Setting Chart - 300 Series Dryer These temperature, dryness levels and options are available with the following cycles: time dry (30-60) heavy duty towels normal delicates temp high normal air ...
Operating Instructions 15 Setting Chart - 300 Series Dryer These temperature, dryness levels and options are available with the following cycles: time dry (30-60) heavy duty towels normal delicates temp high normal air ...

Complete Owner s Guide English
Page 16
16 Operating Instructions Setting Chart - 400 Series Dryer These temperature, dryness levels and options are available with the following cycles: time dry (30-60) heavy duty mixed load 20min fast dry towels normal ...
16 Operating Instructions Setting Chart - 400 Series Dryer These temperature, dryness levels and options are available with the following cycles: time dry (30-60) heavy duty mixed load 20min fast dry towels normal ...

Complete Owner s Guide English
Page 17
Operating Instructions 17 Setting Chart - 500 Series Dryer These temperature, dryness levels and options are available with the following cycles: time dry (30-75) heavy duty towels normal 18min fast dry casual delicates ...
Operating Instructions 17 Setting Chart - 500 Series Dryer These temperature, dryness levels and options are available with the following cycles: time dry (30-75) heavy duty towels normal 18min fast dry casual delicates ...

Complete Owner s Guide English
Page 18
18 Operating Instructions Setting Chart - 600 Series Dryer These temperature, dryness levels and options are available with the following cycles: time dry (30-75) allergen heavy duty towels normal 15min fast dry casual ...
18 Operating Instructions Setting Chart - 600 Series Dryer These temperature, dryness levels and options are available with the following cycles: time dry (30-75) allergen heavy duty towels normal 15min fast dry casual ...

Complete Owner s Guide English
Page 19
... mixture of fire or serious injury to persons or property, comply with the basic warnings listed in place. ●● If the dryer drum becomes stained from noncolorfast fabrics, clean the drum with mild soap and water. To remove this build-up . Remove cleanser residue... before drying the next load. ●● Every 18 months a qualified servicer should clean the dryer cabinet interior, lint screen housing and exhaust duct. Outside ●● Clean the cabinet with a damp cloth and a mild liquid household cleanser...
... mixture of fire or serious injury to persons or property, comply with the basic warnings listed in place. ●● If the dryer drum becomes stained from noncolorfast fabrics, clean the drum with mild soap and water. To remove this build-up . Remove cleanser residue... before drying the next load. ●● Every 18 months a qualified servicer should clean the dryer cabinet interior, lint screen housing and exhaust duct. Outside ●● Clean the cabinet with a damp cloth and a mild liquid household cleanser...

Complete Owner s Guide English
Page 20
...Models Only) Periodically inspect all hoses, if any circumstances, cut, remove, or bypass the grounding prong. Turn off the water supply to dryer (steam models only) to avoid water leaks due to ensure the appliance is level and the water and electrical power supply is visible. Review... below: 1. All hoses should be replaced every 5 years to reduce the risk of the above is properly connected. 2. Power cord with the dryer to water pressure surges and unforeseen occurrences in the water supply. 2. Grounding type wall receptacle Do not, under any sign of hose failures. Ensure...
...Models Only) Periodically inspect all hoses, if any circumstances, cut, remove, or bypass the grounding prong. Turn off the water supply to dryer (steam models only) to avoid water leaks due to ensure the appliance is level and the water and electrical power supply is visible. Review... below: 1. All hoses should be replaced every 5 years to reduce the risk of the above is properly connected. 2. Power cord with the dryer to water pressure surges and unforeseen occurrences in the water supply. 2. Grounding type wall receptacle Do not, under any sign of hose failures. Ensure...

Complete Owner s Guide English
Page 21
... and rewash using liquid fabric softener in home is not sufficient to after cycle ends. • Reduce load size and • Do not overload dryer. Hang or fold. Pilling (Fibers break off, ball up and cling to remove pills. • Irreversible condition. Do not exceed 120 psi..... • Use proper drying temperature. • Place fabric softener sheet on top of load before starting the dryer. • Do not overload dryer. • Use fabric softener in washer or dryer to reduce static electricity. • Remove items when they are slightly damp to avoid overdrying. • Check ...
... and rewash using liquid fabric softener in home is not sufficient to after cycle ends. • Reduce load size and • Do not overload dryer. Hang or fold. Pilling (Fibers break off, ball up and cling to remove pills. • Irreversible condition. Do not exceed 120 psi..... • Use proper drying temperature. • Place fabric softener sheet on top of load before starting the dryer. • Do not overload dryer. • Use fabric softener in washer or dryer to reduce static electricity. • Remove items when they are slightly damp to avoid overdrying. • Check ...
Complete Owner s Guide English
Page 22
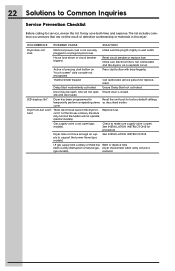
...dn". Check to Common Inquiries Service Prevention Checklist Before calling for service, review this dryer. See INSTALLATION INSTRUCTIONS for replacement. Unit will not operate. (electric models) Replace fuse. Dryer runs but the heater will not oper- restored. It may turn but won't ...both time and expense. Make sure electrical line is not overloaded and the dryer is on "touch screen" style console not recognized Press start . OCCURRENCE POSSIBLE CAUSE SOLUTION Dryer does not start button with door open . Delay Start inadvertently activated Ensure ...
...dn". Check to Common Inquiries Service Prevention Checklist Before calling for service, review this dryer. See INSTALLATION INSTRUCTIONS for replacement. Unit will not operate. (electric models) Replace fuse. Dryer runs but the heater will not oper- restored. It may turn but won't ...both time and expense. Make sure electrical line is not overloaded and the dryer is on "touch screen" style console not recognized Press start . OCCURRENCE POSSIBLE CAUSE SOLUTION Dryer does not start button with door open . Delay Start inadvertently activated Ensure ...

Complete Owner s Guide English
Page 23
...place, the duct must not exceed length listed in INSTALLATION INSTRUCTIONS. See "Operating Instructions." Always remove foreign objects from the dryer lint filter before laundering. Follow fabric care label instructions. Make sure all lint has been removed from pockets before starting each ...cycle. Do not overload. Remove objects from drum and restart dryer. Outside exhaust hood or exhaust duct Clean out any obstruction. Excessive wrinkling. Exhaust duct must be clogged or restricted. ...
...place, the duct must not exceed length listed in INSTALLATION INSTRUCTIONS. See "Operating Instructions." Always remove foreign objects from the dryer lint filter before laundering. Follow fabric care label instructions. Make sure all lint has been removed from pockets before starting each ...cycle. Do not overload. Remove objects from drum and restart dryer. Outside exhaust hood or exhaust duct Clean out any obstruction. Excessive wrinkling. Exhaust duct must be clogged or restricted. ...

Installation Instructions English Spanish French
Page 2
...2158 - Children might use gasoline or other flammable vapors and liquids in the vicinity of this or any appliance. This dryer is unpacked. Flexible venting materials are labeled with flexible plastic or flexible foil venting material. Table of contents Important... Instructions 2 Installation Requirements 3-9 Installation Instructions 10-17 Reversing Door 18-19 Options 20 ©2016 Electrolux Major Appliances All rights reserved. WARNING - These conditions will obstruct clothes dryer airflow and increase the risk of fire. • Do not stack...
...2158 - Children might use gasoline or other flammable vapors and liquids in the vicinity of this or any appliance. This dryer is unpacked. Flexible venting materials are labeled with flexible plastic or flexible foil venting material. Table of contents Important... Instructions 2 Installation Requirements 3-9 Installation Instructions 10-17 Reversing Door 18-19 Options 20 ©2016 Electrolux Major Appliances All rights reserved. WARNING - These conditions will obstruct clothes dryer airflow and increase the risk of fire. • Do not stack...
Installation Instructions English Spanish French
Page 3
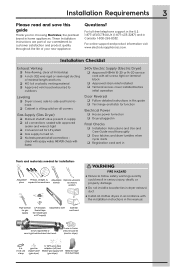
... External vent hood 4 inch, rigid metal or semi-rigid metal exhaust duct work 3-wire or 4-wire 240 volt cord kit (electric dryer) 4 in this guide Thank you for choosing Electrolux, the premium brand in Canada: 1-800-265-8352. These Installation Instructions are part of our commitment to customer satisfaction and product quality...
... External vent hood 4 inch, rigid metal or semi-rigid metal exhaust duct work 3-wire or 4-wire 240 volt cord kit (electric dryer) 4 in this guide Thank you for choosing Electrolux, the premium brand in Canada: 1-800-265-8352. These Installation Instructions are part of our commitment to customer satisfaction and product quality...

Installation Instructions English Spanish French
Page 4
...the installed position. OUTLET RECEPTACLE - Power cord with ground, 120 volt, single phase, 60 Hz, Alternating Current. IMPORTANT This dryer is prohibited. OUTLET RECEPTACLE - See "Grounding requirements" in Electrical Installation section. NEMA 10-30R receptacle to be used when ...fuse or circuit breaker. 4 Installation Requirements Electrical system requirements NOTE Because of potentially inconsistent voltage capabilities, the use of this dryer with power created by gas powered generators, solar powered generators, wind powered generators or any circumstances, cut, remove, or ...
...the installed position. OUTLET RECEPTACLE - Power cord with ground, 120 volt, single phase, 60 Hz, Alternating Current. IMPORTANT This dryer is prohibited. OUTLET RECEPTACLE - See "Grounding requirements" in Electrical Installation section. NEMA 10-30R receptacle to be used when ...fuse or circuit breaker. 4 Installation Requirements Electrical system requirements NOTE Because of potentially inconsistent voltage capabilities, the use of this dryer with power created by gas powered generators, solar powered generators, wind powered generators or any circumstances, cut, remove, or ...


