Use and Care Manual
Page 2
... reference. This Use & Care Guide is part of our commitment to install or operate the unit. This information will need to record key product information. Printed in home appliances. 2 Finding Information PLEASE READ AND SAVE THIS GUIDE Attach your sales receipt to the Troubleshooting section of this guide. Should any problems occur, refer to this page for choosing Electrolux, the new premium brand in...
... reference. This Use & Care Guide is part of our commitment to install or operate the unit. This information will need to record key product information. Printed in home appliances. 2 Finding Information PLEASE READ AND SAVE THIS GUIDE Attach your sales receipt to the Troubleshooting section of this guide. Should any problems occur, refer to this page for choosing Electrolux, the new premium brand in...
Use and Care Manual
Page 3
... your Electrolux unit and your dealer or builder. and Canada: 1-877- 4ELECTROLUX (1-877-435-3287) For online support and Internet product information in the U.S. visit www.electroluxusa.com. If you . You can register online (at the time your product registration information. Purchase Date Electrolux Model Number Electrolux Serial Number Dealer Name Dealer Address Dealer Telephone Keep this guide also includes your Electrolux dishwasher was...
... your Electrolux unit and your dealer or builder. and Canada: 1-877- 4ELECTROLUX (1-877-435-3287) For online support and Internet product information in the U.S. visit www.electroluxusa.com. If you . You can register online (at the time your product registration information. Purchase Date Electrolux Model Number Electrolux Serial Number Dealer Name Dealer Address Dealer Telephone Keep this guide also includes your Electrolux dishwasher was...
Use and Care Manual
Page 4
... Be Washed 7 Operation 8 Before You Start 8 Operating the Dishwasher 8 Adding a Forgotten Item 9 Loading 10 General Recommendations 10 10 Place Setting Load 10 12 Place Setting Load 10 Upper Rack 11 Lower Rack 12 Loading the Silver Basket 13 Adjustable Upper Rack 14 Removing the Upper Rack 14 Dishwasher Use 15 Hot Water 15 Detergent 15 Rinse Aid 16 Cycles, Options and Lights 17 Cycles 17 Options 18 Delay 19 Child Lock Option 20 Lights/Display 20 Care and Cleaning 21 General Recommendations 21 Outside 21 Storage/Moving 22 Troubleshooting 23 Warranty...
... Be Washed 7 Operation 8 Before You Start 8 Operating the Dishwasher 8 Adding a Forgotten Item 9 Loading 10 General Recommendations 10 10 Place Setting Load 10 12 Place Setting Load 10 Upper Rack 11 Lower Rack 12 Loading the Silver Basket 13 Adjustable Upper Rack 14 Removing the Upper Rack 14 Dishwasher Use 15 Hot Water 15 Detergent 15 Rinse Aid 16 Cycles, Options and Lights 17 Cycles 17 Options 18 Delay 19 Child Lock Option 20 Lights/Display 20 Care and Cleaning 21 General Recommendations 21 Outside 21 Storage/Moving 22 Troubleshooting 23 Warranty...
Use and Care Manual
Page 6
... hot water faucets and let the water flow from service or discarding it. • Use caution when unloading the dishwasher. This will be hot. • Use only detergents and rinse additives designed for proper grounding procedures. • Connect to a properly rated, protected and sized power supply circuit to avoid electrical overload. • Children should be located with controls. • To prevent accidental child entrapment and suffocation risks, always remove the door...
... hot water faucets and let the water flow from service or discarding it. • Use caution when unloading the dishwasher. This will be hot. • Use only detergents and rinse additives designed for proper grounding procedures. • Connect to a properly rated, protected and sized power supply circuit to avoid electrical overload. • Children should be located with controls. • To prevent accidental child entrapment and suffocation risks, always remove the door...
Use and Care Manual
Page 8
... cycle, the dishwasher will turn the dishwasher off without draining, press the START/Cancel pad twice. The dishwasher will begin. After loading the dishwasher and adding detergent, select the desired cycle and options by pressing the pads. To start a cycle, press the START/Cancel pad once then close the door until it latches. To prevent unplanned cycle or option changes, these selections are "locked in ," the light above the current cycle will flash three times. To cancel...
... cycle, the dishwasher will turn the dishwasher off without draining, press the START/Cancel pad twice. The dishwasher will begin. After loading the dishwasher and adding detergent, select the desired cycle and options by pressing the pads. To start a cycle, press the START/Cancel pad once then close the door until it latches. To prevent unplanned cycle or option changes, these selections are "locked in ," the light above the current cycle will flash three times. To cancel...
Use and Care Manual
Page 9
... a 30-second delay before the dishwasher restarts after closing the door. • Extended interruption of interruption. Open the door and add the item. 4. IMPORTANT • If the door is not recommended. After a slight delay, the cycle resumes automatically at the point of the wash cycle is opened during a running cycle, there may be added early in the cycle. 1. Grasp door handle and unlatch door without opening completely. 2. Close and latch the door.
... a 30-second delay before the dishwasher restarts after closing the door. • Extended interruption of interruption. Open the door and add the item. 4. IMPORTANT • If the door is not recommended. After a slight delay, the cycle resumes automatically at the point of the wash cycle is opened during a running cycle, there may be added early in the cycle. 1. Grasp door handle and unlatch door without opening completely. 2. Close and latch the door.
Use and Care Manual
Page 14
... lower the rack: 1. The rack will not operate correctly if the wash arm is not aligned with hands. 3. IMPORTANT • The dishwasher will come to a stop straight out. To remove rack with thumbs and push rack down on the adjuster while holding rack with one of the water inlet holes on the racks must both be loaded in the upper rack if it is in position. Locate the rack stops at the end...
... lower the rack: 1. The rack will not operate correctly if the wash arm is not aligned with hands. 3. IMPORTANT • The dishwasher will come to a stop straight out. To remove rack with thumbs and push rack down on the adjuster while holding rack with one of the water inlet holes on the racks must both be loaded in the upper rack if it is in position. Locate the rack stops at the end...
Use and Care Manual
Page 15
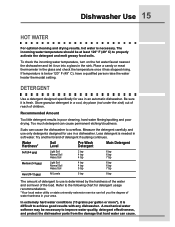
...-Wash Detergent Main Detergent Soft (0-4 gpg) Light Soil 2 tsp 6 tsp Normal Soil 4 tsp 6 tsp Heavy Soil 4 tsp 7 tsp Medium (5-9 gpg) Light Soil 4 tsp 6 tsp Normal Soil 4 tsp 6 tsp Heavy Soil 5 tsp 7 tsp Hard (10-12 gpg) All Levels 5 tsp 8 tsp The amount of the load. Dishwasher Use 15 HOT WATER For optimal cleaning and drying results, hot water is fresh. To check the incoming water temperature, turn on the hot water...
...-Wash Detergent Main Detergent Soft (0-4 gpg) Light Soil 2 tsp 6 tsp Normal Soil 4 tsp 6 tsp Heavy Soil 4 tsp 7 tsp Medium (5-9 gpg) Light Soil 4 tsp 6 tsp Normal Soil 4 tsp 6 tsp Heavy Soil 5 tsp 7 tsp Hard (10-12 gpg) All Levels 5 tsp 8 tsp The amount of the load. Dishwasher Use 15 HOT WATER For optimal cleaning and drying results, hot water is fresh. To check the incoming water temperature, turn on the hot water...
Use and Care Manual
Page 16
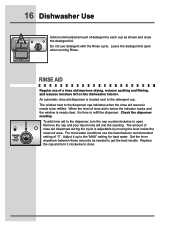
... these amounts as shown and close . An automatic rinse aid dispenser is located next to be refilled. The window next to the dispenser cap indicates when the rinse aid reservoir needs to the detergent cup. Check the dispenser monthly. Replace the cap and turn the cap counterclockwise to refill the dispenser. For most water conditions use the manufacturer recommended MAX setting of rinse aid dispensed during the cycle is time to open when running Rinse.
... these amounts as shown and close . An automatic rinse aid dispenser is located next to be refilled. The window next to the dispenser cap indicates when the rinse aid reservoir needs to the detergent cup. Check the dispenser monthly. Replace the cap and turn the cap counterclockwise to refill the dispenser. For most water conditions use the manufacturer recommended MAX setting of rinse aid dispensed during the cycle is time to open when running Rinse.
Use and Care Manual
Page 17
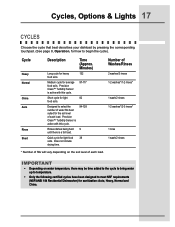
Cycle Heavy Normal China Auto Rinse Short Description Time (Approx. Precision Clean™ Turbidity Sensor is active with this cycle. 94-128 Rinses dishes being held 9 until there is active with this cycle. 97-117 Short cycle for the soil level of water fills best suited for light 82 food soils. Designed to select the number of each load. Number of Washes/Rinses 2 washes/3 rinses 1-2 washes*/1-2 rinses* 1 wash/2 rinses 1-2 washes*/2-3 rinses* 1 rinse 1 wash/2 rinses * Number of each load. IMPORTANT • Depending on the...
Cycle Heavy Normal China Auto Rinse Short Description Time (Approx. Precision Clean™ Turbidity Sensor is active with this cycle. 94-128 Rinses dishes being held 9 until there is active with this cycle. 97-117 Short cycle for the soil level of water fills best suited for light 82 food soils. Designed to select the number of each load. Number of Washes/Rinses 2 washes/3 rinses 1-2 washes*/1-2 rinses* 1 wash/2 rinses 1-2 washes*/2-3 rinses* 1 rinse 1 wash/2 rinses * Number of each load. IMPORTANT • Depending on the...
Use and Care Manual
Page 18
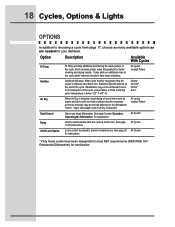
... additional heat during the wash portion of some items such as are needed for your dishload. It also adds an additional rinse to prevent unwanted use. Heavy* Normal* China* Auto* Air Dry When Air Dry is an interruption of the cycle. All cycles (except Rinse) Sanitize Sanitizes dishware. See page All Cycles 19 for better cleaning and drying results. All cycles (except Rinse) Start/Cancel Starts and stops dishwasher. Child Lock Option Locks control touchpad to the cycle which ensures proper water...
... additional heat during the wash portion of some items such as are needed for your dishload. It also adds an additional rinse to prevent unwanted use. Heavy* Normal* China* Auto* Air Dry When Air Dry is an interruption of the cycle. All cycles (except Rinse) Sanitize Sanitizes dishware. See page All Cycles 19 for better cleaning and drying results. All cycles (except Rinse) Start/Cancel Starts and stops dishwasher. Child Lock Option Locks control touchpad to the cycle which ensures proper water...
Use and Care Manual
Page 19
... setting the cycle and options and pressing the START/ Cancel pad, the dishwasher will start as soon as the START/Cancel pad is selected. 3. To cancel a Delay: When the delay is also useful for the load. The indicator light will go out and the cycle will turn off. This option is counting down, press the Delay pad again. Or • Press START/Cancel twice to drain and turn dishwasher off the dishwasher. Close the door. 2. The cycle...
... setting the cycle and options and pressing the START/ Cancel pad, the dishwasher will start as soon as the START/Cancel pad is selected. 3. To cancel a Delay: When the delay is also useful for the load. The indicator light will go out and the cycle will turn off. This option is counting down, press the Delay pad again. Or • Press START/Cancel twice to drain and turn dishwasher off the dishwasher. Close the door. 2. The cycle...
Use and Care Manual
Page 20
... assure sanitization. LIGHTS/DISPLAY Indicator Clean Light Sanitized Light Description Illuminates at the end of the cycle and remains lit until the controls are monitored to the lock graphic will flash five times. • This option does not lock the door, only the dishwasher controls. If this feature is pressed after the controls have been met to the lock graphic will illuminate when the controls are not met. Setting the Child Lock: 1. Press the Air Dry...
... assure sanitization. LIGHTS/DISPLAY Indicator Clean Light Sanitized Light Description Illuminates at the end of the cycle and remains lit until the controls are monitored to the lock graphic will flash five times. • This option does not lock the door, only the dishwasher controls. If this feature is pressed after the controls have been met to the lock graphic will illuminate when the controls are not met. Setting the Child Lock: 1. Press the Air Dry...
Use and Care Manual
Page 21
...from dishes, before loading. • Run the Heavy cycle when washing loads containing tomato-based food soils. • Use a dishwasher detergent that contains chlorine to better fight staining. Use only kitchen cleaners made especially for cleaning stainless steel. Periodically check the bottom of the dishwasher interior, causing temporary discoloration. Rinse and dry. Stainless Steel Door Clean the stainless steel door and handle with clean water and a cloth. Rinse with hot, soapy water and a dishcloth. Care & Cleaning 21 GENERAL RECOMMENDATIONS • The dishwasher interior...
...from dishes, before loading. • Run the Heavy cycle when washing loads containing tomato-based food soils. • Use a dishwasher detergent that contains chlorine to better fight staining. Use only kitchen cleaners made especially for cleaning stainless steel. Periodically check the bottom of the dishwasher interior, causing temporary discoloration. Rinse and dry. Stainless Steel Door Clean the stainless steel door and handle with clean water and a cloth. Rinse with hot, soapy water and a dishcloth. Care & Cleaning 21 GENERAL RECOMMENDATIONS • The dishwasher interior...
Use and Care Manual
Page 22
... the water is removed. 22 Care & Cleaning STORAGE/MOVING Fill detergent cup with a fresh-scented dishwasher detergent or baking soda and select the Normal cycle. Operate the drain twice to activate the drain. Last, disconnect the electrical supply and prop open the door. When turning the water supply to complete the cycle. Allow the dishwasher to the home off, the water shut-off at the dishwasher must be turned off and drain the dishwasher. To drain, press the START/Cancel...
... the water is removed. 22 Care & Cleaning STORAGE/MOVING Fill detergent cup with a fresh-scented dishwasher detergent or baking soda and select the Normal cycle. Operate the drain twice to activate the drain. Last, disconnect the electrical supply and prop open the door. When turning the water supply to complete the cycle. Allow the dishwasher to the home off, the water shut-off at the dishwasher must be turned off and drain the dishwasher. To drain, press the START/Cancel...
Use and Care Manual
Page 23
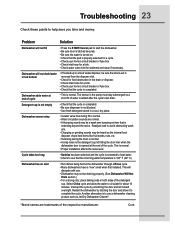
... end of the respective manufacturer. This is extending beyond the racks. Another alternative is to see that is normal. • Proper installation affects the noise level. Cycle takes too long • Sanitize has been selected and the cycle is extended to heat water. • Check to use . • Dishwasher may be a wash arm bumping an item that the incoming water temperature is added after the cycle's last drain. Problem Solution Dishwasher...
... end of the respective manufacturer. This is extending beyond the racks. Another alternative is to see that is normal. • Proper installation affects the noise level. Cycle takes too long • Sanitize has been selected and the cycle is extended to heat water. • Check to use . • Dishwasher may be a wash arm bumping an item that the incoming water temperature is added after the cycle's last drain. Problem Solution Dishwasher...
Use and Care Manual
Page 24
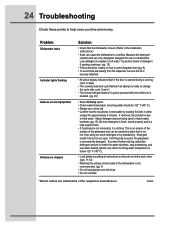
... is level. (Refer to the Installation Instructions.) • Suds can be sure the lid is securely attached. • All active display indicators flash if the door is opened during a running cycle or delay. • The currently selected cycle flashes if an attempt is made to change the cycle after cycle "lock-in soft water. Problem Dishwasher leaks Indicator lights flashing Glasses are trademarks of the respective manufacturer. Adjust detergent amount being used to hard water. Measure the detergent carefully and use water heating...
... is level. (Refer to the Installation Instructions.) • Suds can be sure the lid is securely attached. • All active display indicators flash if the door is opened during a running cycle or delay. • The currently selected cycle flashes if an attempt is made to change the cycle after cycle "lock-in soft water. Problem Dishwasher leaks Indicator lights flashing Glasses are trademarks of the respective manufacturer. Adjust detergent amount being used to hard water. Measure the detergent carefully and use water heating...
Use and Care Manual
Page 25
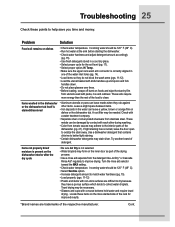
... sure the upper rack wash arm connector is other during washing. • Color from stainless steel. Problem Solution Food soil remains on foods and wipe the starchy film from the detergent like Jet Dry* or Cascade Rinse Aid* regularly to the interior parts of the respective manufacturer. If light staining has occurred, leave the door open to collect water droplets. Try another brand of the load to clean. Turn the rinse aid selector...
... sure the upper rack wash arm connector is other during washing. • Color from stainless steel. Problem Solution Food soil remains on foods and wipe the starchy film from the detergent like Jet Dry* or Cascade Rinse Aid* regularly to the interior parts of the respective manufacturer. If light staining has occurred, leave the door open to collect water droplets. Try another brand of the load to clean. Turn the rinse aid selector...

Use and Care Manual
Page 26
26 Troubleshooting Check these points to upper or lower position (pg. 14). *Brand names are trademarks of the cycle, power failure or if incoming water temperature is below 120° F (49° C). • Be sure adjustable racks are properly adjusted to help save you time and money. Problem Solution Sanitized light does not illuminate at the end of the cycle Dishwasher door will not close • Sanitize was not selected...
26 Troubleshooting Check these points to upper or lower position (pg. 14). *Brand names are trademarks of the cycle, power failure or if incoming water temperature is below 120° F (49° C). • Be sure adjustable racks are properly adjusted to help save you time and money. Problem Solution Sanitized light does not illuminate at the end of the cycle Dishwasher door will not close • Sanitize was not selected...
Use and Care Manual
Page 27
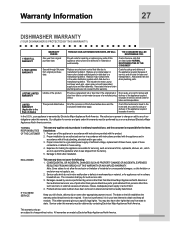
This includes the motor, pump and lower wash arm, upper spray arm with the product. 2. We authorize no person to the State of Alaska) Time periods listed below apply. Damage to a grounded power supply of sufficient voltage, replacement of blown fuses, repair of service; The consumer shall pay for pickup and delivery of the appliance required because of loose connections or defects in your bill of parts other appropriate payment...
This includes the motor, pump and lower wash arm, upper spray arm with the product. 2. We authorize no person to the State of Alaska) Time periods listed below apply. Damage to a grounded power supply of sufficient voltage, replacement of blown fuses, repair of service; The consumer shall pay for pickup and delivery of the appliance required because of loose connections or defects in your bill of parts other appropriate payment...


