Owners Guide
Page 2
...www.electrolux.com ©2010 Electrolux Home Products, Inc. Post Office Box 212378, Augusta, Georgia 30917, USA All rights reserved. For toll-free telephone support in the USA Printed in the U.S. Table of Discoloration on Ceramic Glass Cooktop ...Ceramic Glass Cooktop Surface 19 Brown Streaks and Specks on Ceramic Glass Cooktop Surface 19 Warranty Information 20 Questions? 2 Finding Information Make a Record for Future use 2 Questions 2 Safety 3 Important Safety Instructions 3 Getting Start 6 Grounding Instructions 6 Liquefied Petroleum (Propane) Gas Conversion ...
...www.electrolux.com ©2010 Electrolux Home Products, Inc. Post Office Box 212378, Augusta, Georgia 30917, USA All rights reserved. For toll-free telephone support in the USA Printed in the U.S. Table of Discoloration on Ceramic Glass Cooktop ...Ceramic Glass Cooktop Surface 19 Brown Streaks and Specks on Ceramic Glass Cooktop Surface 19 Warranty Information 20 Questions? 2 Finding Information Make a Record for Future use 2 Questions 2 Safety 3 Important Safety Instructions 3 Getting Start 6 Grounding Instructions 6 Liquefied Petroleum (Propane) Gas Conversion ...
Owners Guide
Page 3
... any part of interest to children in your building. • Immediately call your gas supplier, call the fire department. - Do not remove the model/serial plate attached to the cooktop. • Proper Installation-Be sure your new Electrolux cooktop. ! Ask your gas cooktop, follow basic precautions including the following: ! Warning If the information in this manual...
... any part of interest to children in your building. • Immediately call your gas supplier, call the fire department. - Do not remove the model/serial plate attached to the cooktop. • Proper Installation-Be sure your new Electrolux cooktop. ! Ask your gas cooktop, follow basic precautions including the following: ! Warning If the information in this manual...
Owners Guide
Page 4
...result in serious injuries and also cause damage to unintentional contact with the utensil, the handle of flammable materials, and spillage due to the cooktop. The use , do not touch, or let clothing or other flammable materials touch these areas are not visible/ unit is in carbon.../unit may result in injury. ! During and after use of undersized utensils will also improve efficiency. IMPORTANT SAFETY INSTRUCTIONS FOR USING YOUR COOKTOP • Know which knob controls each surface burner/surface unit. Visually check that has boiled dry may explode and result in fire or...
...result in serious injuries and also cause damage to unintentional contact with the utensil, the handle of flammable materials, and spillage due to the cooktop. The use , do not touch, or let clothing or other flammable materials touch these areas are not visible/ unit is in carbon.../unit may result in injury. ! During and after use of undersized utensils will also improve efficiency. IMPORTANT SAFETY INSTRUCTIONS FOR USING YOUR COOKTOP • Know which knob controls each surface burner/surface unit. Visually check that has boiled dry may explode and result in fire or...
Owners Guide
Page 5
... be able to see that the burner/ unit is not designed for use a stove top grill on a sealed gas burner, it will occur if the hot covers are suitable for cooktop use. • Do not use aluminum foil only to cover food during cooking. Safety 5 • Protective Liners...-Do not use aluminum foil to line any part of the cooktop, use Searing Grill on the cooktop. Doing so may also be done to a hot surface. • Avoid Scratching the Cooktop Glass with gas ranges other reproductive harm, and requires businesses to warn customers of potential exposure to...
... be able to see that the burner/ unit is not designed for use a stove top grill on a sealed gas burner, it will occur if the hot covers are suitable for cooktop use. • Do not use aluminum foil only to cover food during cooking. Safety 5 • Protective Liners...-Do not use aluminum foil to line any part of the cooktop, use Searing Grill on the cooktop. Doing so may also be done to a hot surface. • Avoid Scratching the Cooktop Glass with gas ranges other reproductive harm, and requires businesses to warn customers of potential exposure to...

Owners Guide
Page 6
...equipped with this work assumes responsibility for your cooktop. Power supply cord with 3-prong grounding plug For personal safety, the cooktop must be made by a qualified service technician in accordance with Natural Gas and Propane Gas. It is the personal responsibility of the...codes and requirements. Warning This appliance is marked "FOR LP/ PROPANE GAS CONVERSION". caution Any additions, changes or conversions required in accordance with natural gas. The qualified agency performing this cooktop for the conversion. For maximum safety, the power cord must be ...
...equipped with this work assumes responsibility for your cooktop. Power supply cord with 3-prong grounding plug For personal safety, the cooktop must be made by a qualified service technician in accordance with Natural Gas and Propane Gas. It is the personal responsibility of the...codes and requirements. Warning This appliance is marked "FOR LP/ PROPANE GAS CONVERSION". caution Any additions, changes or conversions required in accordance with natural gas. The qualified agency performing this cooktop for the conversion. For maximum safety, the power cord must be ...

Owners Guide
Page 7
... stable before use pans or other cookware on top of material that cannot withstand high heat; Some utensils were not made to turn on the cooktop. Figure 1 ! Allow the griddle to cool before to be no gaps between the pan and ruler. * Specialty pans such as countertops. CAUTION Always place the...
... stable before use pans or other cookware on top of material that cannot withstand high heat; Some utensils were not made to turn on the cooktop. Figure 1 ! Allow the griddle to cool before to be no gaps between the pan and ruler. * Specialty pans such as countertops. CAUTION Always place the...

Owners Guide
Page 8
...and spill over causing burns. The supporting ring was not designed for best performance. Insure the stability of round-bottom wok on your cooktop is designed to allow round-bottomed woks to prevent hot spills and possible burns. Be sure the Wok Stand is positioned correctly and ...stable before cooking without the Wok Stand (See Figure 2). 8 Surface Cooking Figure 1 using the wok stand The Wok Stand provided with your cooktop Surface Burner Grates without the Wok Stand. CAUTION Always use on the right front POWER burner position. ! It is best on the Surface Burner...
...and spill over causing burns. The supporting ring was not designed for best performance. Insure the stability of round-bottom wok on your cooktop is designed to allow round-bottomed woks to prevent hot spills and possible burns. Be sure the Wok Stand is positioned correctly and ...stable before cooking without the Wok Stand (See Figure 2). 8 Surface Cooking Figure 1 using the wok stand The Wok Stand provided with your cooktop Surface Burner Grates without the Wok Stand. CAUTION Always use on the right front POWER burner position. ! It is best on the Surface Burner...

Owners Guide
Page 9
... simmer plate on the simmer plate. Locations of the burner to help cooking delicate aliment such as follows (See Figure): - and a 18 000 BTU (natural gas) burner located at the right front position. 30" cooktop 36" cooktop a 9 500 BTU (natural gas) burner located at the left front; - Always use potholders to turn on the...
... simmer plate on the simmer plate. Locations of the burner to help cooking delicate aliment such as follows (See Figure): - and a 18 000 BTU (natural gas) burner located at the right front position. 30" cooktop 36" cooktop a 9 500 BTU (natural gas) burner located at the left front; - Always use potholders to turn on the...

Owners Guide
Page 10
... correctly on the stainless steel frame, doing so can damage the surface. 10 Surface Cooking Placement of burner heads and caps Burner Cap Burner Head Gas Opening Burner Cap Electrode Burner Head Figure 1 Figure 2 For the 18 000 BTU burner : Place the burner head over the orifice. Make sure ... burner head (see Figure 2), matching the cap size to the head size. Be sure that all burners : Place a burner cap on the Ceramic Glass Cooktop. PLACEMENT OF BURNER GRATES Place grates on each burner cap is properly aligned and level. Be careful not to determine if it will light.
... correctly on the stainless steel frame, doing so can damage the surface. 10 Surface Cooking Placement of burner heads and caps Burner Cap Burner Head Gas Opening Burner Cap Electrode Burner Head Figure 1 Figure 2 For the 18 000 BTU burner : Place the burner head over the orifice. Make sure ... burner head (see Figure 2), matching the cap size to the head size. Be sure that all burners : Place a burner cap on the Ceramic Glass Cooktop. PLACEMENT OF BURNER GRATES Place grates on each burner cap is properly aligned and level. Be careful not to determine if it will light.
Owners Guide
Page 12
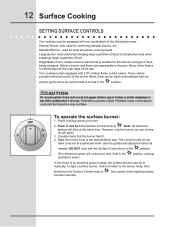
... flame control valves. Place cooking utensil on will continue to click if left in the premature wear.) position, causing In the event of the cooktop when it is also equipped with the Surface Control knob in the position. (The electronic ignitor will ignite. 3. Your... However, only the burner you are turning on burner. 2. Potholders, towels or wood spoons could melt or ignite. 12 Surface Cooking setting surface controls Your cooktop may be set at the same time. The control knobs do not have to extend beyond the outer edge of the following burners: Simmer Burner...
... flame control valves. Place cooking utensil on will continue to click if left in the premature wear.) position, causing In the event of the cooktop when it is also equipped with the Surface Control knob in the position. (The electronic ignitor will ignite. 3. Your... However, only the burner you are turning on burner. 2. Potholders, towels or wood spoons could melt or ignite. 12 Surface Cooking setting surface controls Your cooktop may be set at the same time. The control knobs do not have to extend beyond the outer edge of the following burners: Simmer Burner...

Owners Guide
Page 13
... in the dishwasher. DO NOT put burner units in a warm oven for proper ignition and a complete, even flame. Leave on the cooktop. Gentle scouring with a small gauge wire or needle and especially after bad spillovers which could clog these materials; Then replace them, making sure... of chlorides or chlorines. Rinse with a 1:1 solution of these holes. Rinse and wipe dry with clean water and a cloth. follow the cooktop cleaning instructions below. Rinse with clean water and a damp cloth, then scrub with soap and water or a mild abrasive cleanser and damp cloth...
... in the dishwasher. DO NOT put burner units in a warm oven for proper ignition and a complete, even flame. Leave on the cooktop. Gentle scouring with a small gauge wire or needle and especially after bad spillovers which could clog these materials; Then replace them, making sure... of chlorides or chlorines. Rinse with a 1:1 solution of these holes. Rinse and wipe dry with clean water and a cloth. follow the cooktop cleaning instructions below. Rinse with clean water and a damp cloth, then scrub with soap and water or a mild abrasive cleanser and damp cloth...

Owners Guide
Page 14
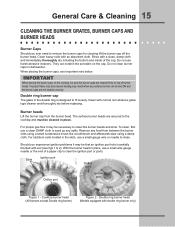
IMPORTANT Do not use care when cleaning the cooktop. Remove any other material to enter the gas orifice opening. ● The cooktop is designed to make cleaning easier. DO NOT allow them to cool. ● To avoid possible burns DO NOT attempt to : ● Follow installation... be cleaned in the dishwasher. 14 General Care & Cleaning CLEaNING THE BURNER GRATES, BURNER CAPS and BURNER HEADS The cooktop is not removable. Because the gas burner are sealed, cleanups are easy when spillovers are dishwasher safe and may be sure to operate the surface burners without the burner caps....
IMPORTANT Do not use care when cleaning the cooktop. Remove any other material to enter the gas orifice opening. ● The cooktop is designed to make cleaning easier. DO NOT allow them to cool. ● To avoid possible burns DO NOT attempt to : ● Follow installation... be cleaned in the dishwasher. 14 General Care & Cleaning CLEaNING THE BURNER GRATES, BURNER CAPS and BURNER HEADS The cooktop is not removable. Because the gas burner are sealed, cleanups are easy when spillovers are dishwasher safe and may be sure to operate the surface burners without the burner caps....
Owners Guide
Page 15
Clean heavy soils with double ring burner only) Double ring burner cap The glass in place. They can scratch the porcelain on the cooktop, be necessary to clean. Improper flame size and uneven heating may result when any surface burners are turned ON and the burner caps are seated ... burner head (Models equipped with an absorbent cloth. Do not use a small-gauge wire or needle to clean the burner heads and slots. For proper gas flow it may be sure the burner caps are not seated correctly. Should you ever need to soak up any spills. For stubborn soils located...
Clean heavy soils with double ring burner only) Double ring burner cap The glass in place. They can scratch the porcelain on the cooktop, be necessary to clean. Improper flame size and uneven heating may result when any surface burners are turned ON and the burner caps are seated ... burner head (Models equipped with an absorbent cloth. Do not use a small-gauge wire or needle to clean the burner heads and slots. For proper gas flow it may be sure the burner caps are not seated correctly. Should you ever need to soak up any spills. For stubborn soils located...

Owners Guide
Page 16
... soil: Apply a few drops of that cleaning creme is supplied with rough bottoms can cause metal markings on the cooktop glass can mark or scratch the cooktop surface. Use a paper towel to help prevent scratches and abrasions. Remove loosened soils with a paper towel. 16 General... turned to the surface. Sliding aluminum or copper clad bottom pans on the cooktop surface. For heavy, burned on the cooktop surface without a pan. The special cooktop cleaning cream leaves a protective finish on a hot cooktop. Do not cook foods directly on soil: 30° First, clean the...
... soil: Apply a few drops of that cleaning creme is supplied with rough bottoms can cause metal markings on the cooktop glass can mark or scratch the cooktop surface. Use a paper towel to help prevent scratches and abrasions. Remove loosened soils with a paper towel. 16 General... turned to the surface. Sliding aluminum or copper clad bottom pans on the cooktop surface. For heavy, burned on the cooktop surface without a pan. The special cooktop cleaning cream leaves a protective finish on a hot cooktop. Do not cook foods directly on soil: 30° First, clean the...

Owners Guide
Page 17
... same method for maintaining the appearance of soils need be removed immediately if spilled or melted onto the ceramic cooktop surface. They may scratch the cooktop, making it may etch or discolor the cooktop. • Do not use a razor blade scraper or a metal spatula with a high sugar content: These... types of stainless parts. The melting point of aluminum is much lower than that of the cooktop surface) may occur if you use thin aluminum cooking utensils or allow foil to , break or mark the ceramic glass surface, permanently damaging ...
... same method for maintaining the appearance of soils need be removed immediately if spilled or melted onto the ceramic cooktop surface. They may scratch the cooktop, making it may etch or discolor the cooktop. • Do not use a razor blade scraper or a metal spatula with a high sugar content: These... types of stainless parts. The melting point of aluminum is much lower than that of the cooktop surface) may occur if you use thin aluminum cooking utensils or allow foil to , break or mark the ceramic glass surface, permanently damaging ...
Owners Guide
Page 18
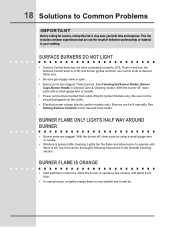
Push in your cooktop. With the burner off , clean ports by using a small-gauge wire or needle. • Moisture is disconnected from outlet (Electric Ignition Models only). Dry the ... instructions in this list. surface burners do not light • Surface Control knob has not been completely turned to desired flame size. • Be sure gas supply valve is full. See Setting Surface Controls in the General Cleaning section. With the burner off , clean ports with a small-gauge wire or needle...
Push in your cooktop. With the burner off , clean ports by using a small-gauge wire or needle. • Moisture is disconnected from outlet (Electric Ignition Models only). Dry the ... instructions in this list. surface burners do not light • Surface Control knob has not been completely turned to desired flame size. • Be sure gas supply valve is full. See Setting Surface Controls in the General Cleaning section. With the burner off , clean ports with a small-gauge wire or needle...

Owners Guide
Page 19
...not affect cooking and will become less visible with use . areas of utensils are between cooktop and utensil. Solutions to Common Problems 19 scratches or abrasions on ceramic glass cooktop surface • Mineral deposits from water and food. See instructions under General Care & ... Wipe remaining paste away, then apply a small amount of metal utensils on cooktop surface. Use razor blade scraper to remove marks. Be sure cooktop surface and bottom of discoloration on ceramic glass cooktop surface • Coarse particles (such as salt or sand) are clean before...
...not affect cooking and will become less visible with use . areas of utensils are between cooktop and utensil. Solutions to Common Problems 19 scratches or abrasions on ceramic glass cooktop surface • Mineral deposits from water and food. See instructions under General Care & ... Wipe remaining paste away, then apply a small amount of metal utensils on cooktop surface. Use razor blade scraper to remove marks. Be sure cooktop surface and bottom of discoloration on ceramic glass cooktop surface • Coarse particles (such as salt or sand) are clean before...
Owners Guide
Page 20
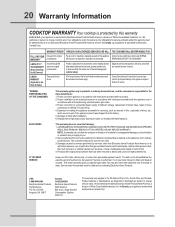
... 1T6 This warranty only applies in the 50 states of God. 4. 20 Warranty Information COOKTOP WARRANTY Your cooktop is protected by this warranty In the U.S.A., your appliance is warranted by Electrolux Canada Corp. Proper use , and the consumer is responsible for service and parts under ...This warranty applies only to you specific legal rights. use . Products with the product. 2. Box 212378 Augusta, GA 30917 Canada 1•866•294•9911 Electrolux Home Products North America 802, boul. Product features or specifications as abuse, misuse, inadequate power supply or acts ...
... 1T6 This warranty only applies in the 50 states of God. 4. 20 Warranty Information COOKTOP WARRANTY Your cooktop is protected by this warranty In the U.S.A., your appliance is warranted by Electrolux Canada Corp. Proper use , and the consumer is responsible for service and parts under ...This warranty applies only to you specific legal rights. use . Products with the product. 2. Box 212378 Augusta, GA 30917 Canada 1•866•294•9911 Electrolux Home Products North America 802, boul. Product features or specifications as abuse, misuse, inadequate power supply or acts ...
Installation Instructions
Page 1
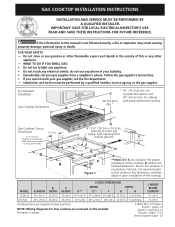
...H J. Installation and service must be performed by a qualified installer, service agency or the gas supplier. for cabinet 30"(76.2cm) with protected bottom surface. Min.* B Gas Cooktop Cutout Dimensions 2"(5.1cm) Dia. Due to first undercut this dimension, and then adjust it upon... 21/2" (6.4cm) G H C 4" X 4" (10.2cm x 10.2cm) opening after routing gas line J 71/4" (18.4cm) 2"(5.1cm) 1" (2.5cm) E D F Figure 1 **Note: D & E are stated in your gas supplier from a neighbor's phone. HEIGHT BELOW COOKTOP 36 (91.4) 357/8 (91.1) 25 (63.5) 7¾ (19.7) 3515/16 (91.3) 353/16 ...
...H J. Installation and service must be performed by a qualified installer, service agency or the gas supplier. for cabinet 30"(76.2cm) with protected bottom surface. Min.* B Gas Cooktop Cutout Dimensions 2"(5.1cm) Dia. Due to first undercut this dimension, and then adjust it upon... 21/2" (6.4cm) G H C 4" X 4" (10.2cm x 10.2cm) opening after routing gas line J 71/4" (18.4cm) 2"(5.1cm) 1" (2.5cm) E D F Figure 1 **Note: D & E are stated in your gas supplier from a neighbor's phone. HEIGHT BELOW COOKTOP 36 (91.4) 357/8 (91.1) 25 (63.5) 7¾ (19.7) 3515/16 (91.3) 353/16 ...
Installation Instructions
Page 2
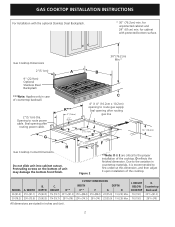
... proper installation of unit may damage the bottom front finish. DEPTH 25 (63.5) 25 (63.5) C. MODEL 36 (91.4) 30 (76.2) A. Gas Cooktop Dimensions 30"(76.2cm) Min.* 2"(5.1cm) A B 9" (22.9cm) Optional Stainless Steel Backsplash ***Note: Applies only in inches and ... Max. 7½ (19.1) 2915/16 (76) All dimensions are critical to route gas supply. HEIGHT K. Due to the variation in countertop materials, it is recommended to route power cable. GAS COOKTOP INSTALLATION INSTRUCTIONS For Installation with protected bottom surface. D reflects the finished dimension. for cabinet...
... proper installation of unit may damage the bottom front finish. DEPTH 25 (63.5) 25 (63.5) C. MODEL 36 (91.4) 30 (76.2) A. Gas Cooktop Dimensions 30"(76.2cm) Min.* 2"(5.1cm) A B 9" (22.9cm) Optional Stainless Steel Backsplash ***Note: Applies only in inches and ... Max. 7½ (19.1) 2915/16 (76) All dimensions are critical to route gas supply. HEIGHT K. Due to the variation in countertop materials, it is recommended to route power cable. GAS COOKTOP INSTALLATION INSTRUCTIONS For Installation with protected bottom surface. D reflects the finished dimension. for cabinet...


