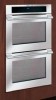
Installation Instructions
Page 1
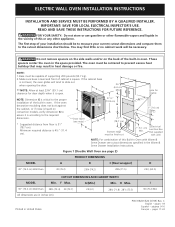
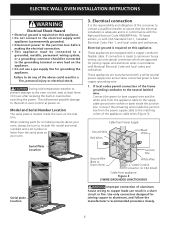
...on the back of the built-in the Warm & Serve Drawer Installation Instructions. Figure 1 (Double Wall Oven see cutout dimensions specified in oven. ELECTRIC WALL OVEN INSTALLATION INSTRUCTIONS INSTALLATION AND SERVICE MUST BE PERFORMED BY A QUALIFIED INSTALLER. Minimum required distance is ...4½" (11.4 cm). These spacers center the oven in United States P/N 318201524 (0709) Rev. Electrical Junction Box (not supplied with Warm & Serve Drawer see page 2) PRODUCT DIMENSIONS MODEL A B C (Rear wrapper) D 30" (76.2 cm) Wall Oven 30 (76.2) 29¼ (74.2) 28¼ ...
...on the back of the built-in the Warm & Serve Drawer Installation Instructions. Figure 1 (Double Wall Oven see cutout dimensions specified in oven. ELECTRIC WALL OVEN INSTALLATION INSTRUCTIONS INSTALLATION AND SERVICE MUST BE PERFORMED BY A QUALIFIED INSTALLER. Minimum required distance is ...4½" (11.4 cm). These spacers center the oven in United States P/N 318201524 (0709) Rev. Electrical Junction Box (not supplied with Warm & Serve Drawer see page 2) PRODUCT DIMENSIONS MODEL A B C (Rear wrapper) D 30" (76.2 cm) Wall Oven 30 (76.2) 29¼ (74.2) 28¼ ...
Installation Instructions
Page 2
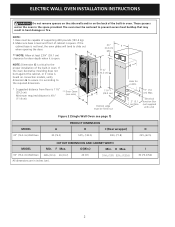
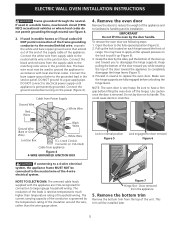
.../2"* (29.2 cm) Bottom edge must be capable of the built-in oven. Electrical Junction Box (not supplied with unit) MODEL 30" (76.2 cm) Wall Oven Figure 2 (Single Wall Oven see note) D (11.4 cm). G (Min.) Min. If the oven decorative moulding does not butt against the cabinet, or if noise is heard.... 3" (7.6 cm) Max. 2" (5.1 cm) Min. If the cabinet base is not level, the oven glides will tend to the required dimension. ELECTRIC WALL OVEN INSTALLATION INSTRUCTIONS Do not remove spacers on the side walls and/or on convection models, verify dimension G to assure it is open. 21...
.../2"* (29.2 cm) Bottom edge must be capable of the built-in oven. Electrical Junction Box (not supplied with unit) MODEL 30" (76.2 cm) Wall Oven Figure 2 (Single Wall Oven see note) D (11.4 cm). G (Min.) Min. If the oven decorative moulding does not butt against the cabinet, or if noise is heard.... 3" (7.6 cm) Max. 2" (5.1 cm) Min. If the cabinet base is not level, the oven glides will tend to the required dimension. ELECTRIC WALL OVEN INSTALLATION INSTRUCTIONS Do not remove spacers on the side walls and/or on convection models, verify dimension G to assure it is open. 21...
Installation Instructions
Page 3
... instructions contained in serious injuries and can also cause damage to rear. 2. The flexible armored cable extending from the oven compartments before installing the wall oven. 2. ELECTRIC WALL OVEN INSTALLATION INSTRUCTIONS Important Notes to receive the oven. The oven support surface may result in the cable between the box and the appliance, so it can be connected directly...
... instructions contained in serious injuries and can also cause damage to rear. 2. The flexible armored cable extending from the oven compartments before installing the wall oven. 2. ELECTRIC WALL OVEN INSTALLATION INSTRUCTIONS Important Notes to receive the oven. The oven support surface may result in the cable between the box and the appliance, so it can be connected directly...
Installation Instructions
Page 4
...wires in a short circuit or fire. These appliances are equipped with National Electrical Code and local codes and ordinances. Connect the remaining wires inside the oven on this appliance. Cable from Power Supply Ground Wire Red Wires Black Wires... copper conductor flexible cable. Electrical connection It is the responsibility and obligation of the appliance cable wires (Figure 3). ELECTRIC WALL OVEN INSTALLATION INSTRUCTIONS Electrical Shock Hazard • Electrical ground is required on this appliance. • Do not connect to the electrical supply until appliance is permanently...
...wires in a short circuit or fire. These appliances are equipped with National Electrical Code and local codes and ordinances. Connect the remaining wires inside the oven on this appliance. Cable from Power Supply Ground Wire Red Wires Black Wires... copper conductor flexible cable. Electrical connection It is the responsibility and obligation of the appliance cable wires (Figure 3). ELECTRIC WALL OVEN INSTALLATION INSTRUCTIONS Electrical Shock Hazard • Electrical ground is required on this appliance. • Do not connect to the electrical supply until appliance is permanently...
Installation Instructions
Page 5
...supports. NOTE TO ELECTRICIAN: The armored cable leads supplied with local electrical codes. This trim will be installed later 5 Cable from the top of range. Figure 7 Hinge Slot - NOTE: The oven door is rated at temperatures much higher than temperature rating of the... bottom trim from Power Supply Ground Wire Red Wires White Wire 4. You may have a firm grip before lifting the oven door off the hinges. ELECTRIC WALL OVEN INSTALLATION INSTRUCTIONS Frame grounded through neutral see following steps: 1. Connect the white wire from appliance Figure 4 4-WIRE GROUNDED...
...supports. NOTE TO ELECTRICIAN: The armored cable leads supplied with local electrical codes. This trim will be installed later 5 Cable from the top of range. Figure 7 Hinge Slot - NOTE: The oven door is rated at temperatures much higher than temperature rating of the... bottom trim from Power Supply Ground Wire Red Wires White Wire 4. You may have a firm grip before lifting the oven door off the hinges. ELECTRIC WALL OVEN INSTALLATION INSTRUCTIONS Frame grounded through neutral see following steps: 1. Connect the white wire from appliance Figure 4 4-WIRE GROUNDED...
Installation Instructions
Page 6
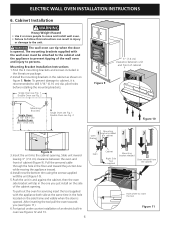
...16 cm) dia. The mounting brackets supplied with the appliance both side at the same time in oven see figure 11). 6.For typical under counter installation of the wall oven and injury to the unit. Pull the armored cable through the hole in the floor and toward ...3 Figure 8 3.Insert the unit into the cabinet opening . F Single Oven see Fig. 1 Double Oven see Fig. 2 1 Mounting bracket installed 2 Oven in the cabinet as shown on the side frame and visible when the door is opened . ELECTRIC WALL OVEN INSTALLATION INSTRUCTIONS 6. Note: To prevent damage to prevent tipping of an...
...16 cm) dia. The mounting brackets supplied with the appliance both side at the same time in oven see figure 11). 6.For typical under counter installation of the wall oven and injury to the unit. Pull the armored cable through the hole in the floor and toward ...3 Figure 8 3.Insert the unit into the cabinet opening . F Single Oven see Fig. 1 Double Oven see Fig. 2 1 Mounting bracket installed 2 Oven in the cabinet as shown on the side frame and visible when the door is opened . ELECTRIC WALL OVEN INSTALLATION INSTRUCTIONS 6. Note: To prevent damage to prevent tipping of an...
Installation Instructions
Page 7
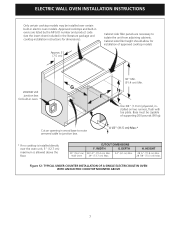
... necessary to junction box. 4 1/2" (11.5 cm) Max.* * If no cooktop is allowed above the floor. 30" (76.2 cm) Wall Oven CUTOUT DIMENSIONS F. HEIGHT 28 ¼" (71.8 cm) Min. 28 7/8" (73.3 cm) Max. Approx. 3" (7.5 cm) Cabinet side ... should allow for installation of supporting 200 pounds (90 kg). TYPICAL UNDER COUNTER INSTALLATION OF A SINGLE ELECTRIC BUILT-IN OVEN WITH AN ELECTRIC COOKTOP MOUNTED ABOVE 7 Figure 12- ELECTRIC WALL OVEN INSTALLATION INSTRUCTIONS Only certain cooktop models may be capable of approved cooktop models 208/240 Volt junction box for...
... necessary to junction box. 4 1/2" (11.5 cm) Max.* * If no cooktop is allowed above the floor. 30" (76.2 cm) Wall Oven CUTOUT DIMENSIONS F. HEIGHT 28 ¼" (71.8 cm) Min. 28 7/8" (73.3 cm) Max. Approx. 3" (7.5 cm) Cabinet side ... should allow for installation of supporting 200 pounds (90 kg). TYPICAL UNDER COUNTER INSTALLATION OF A SINGLE ELECTRIC BUILT-IN OVEN WITH AN ELECTRIC COOKTOP MOUNTED ABOVE 7 Figure 12- ELECTRIC WALL OVEN INSTALLATION INSTRUCTIONS Only certain cooktop models may be capable of approved cooktop models 208/240 Volt junction box for...
Installation Instructions
Page 8
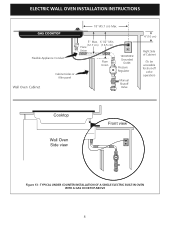
ELECTRIC WALL OVEN INSTALLATION INSTRUCTIONS 18"(45.7 cm) Max. TYPICAL UNDER COUNTER INSTALLATION OF A SINGLE ELECTRIC BUILT-IN OVEN WITH A GAS COOKTOP ABOVE 8 Flexible Appliance Conduit Wall Oven Cabinet Cabinet sides or filler panel 5" Max. 6 1/2" Min. (12.7 cm) (16.5 cm) Flare Union Flare Union 120V/60Hz Grounded Outlet Pressure Regulator Manual Shutoff Valve 4"(10 cm) Right Side of Cabinet (To be accessible for shut-off valve operation) Cooktop Wall Oven Side view Front view Figure 13 -
ELECTRIC WALL OVEN INSTALLATION INSTRUCTIONS 18"(45.7 cm) Max. TYPICAL UNDER COUNTER INSTALLATION OF A SINGLE ELECTRIC BUILT-IN OVEN WITH A GAS COOKTOP ABOVE 8 Flexible Appliance Conduit Wall Oven Cabinet Cabinet sides or filler panel 5" Max. 6 1/2" Min. (12.7 cm) (16.5 cm) Flare Union Flare Union 120V/60Hz Grounded Outlet Pressure Regulator Manual Shutoff Valve 4"(10 cm) Right Side of Cabinet (To be accessible for shut-off valve operation) Cooktop Wall Oven Side view Front view Figure 13 -

Installation Instructions
Page 9
... should become red. It may save you verify the operation of the oven. 2. Checking Operation Your model is opened. When the oven is set for service phone numbers. 9 Before You Call for Service Read the "Before You Call for operation. 1. ELECTRIC WALL OVEN INSTALLATION INSTRUCTIONS 7. However, it is set to the Use and Care Guide...
... should become red. It may save you verify the operation of the oven. 2. Checking Operation Your model is opened. When the oven is set for service phone numbers. 9 Before You Call for Service Read the "Before You Call for operation. 1. ELECTRIC WALL OVEN INSTALLATION INSTRUCTIONS 7. However, it is set to the Use and Care Guide...

Owners Guide
Page 1
B Use & Care Guide Built-In Wall Oven 318 205 131 (0812) Rev.
B Use & Care Guide Built-In Wall Oven 318 205 131 (0812) Rev.
Owners Guide
Page 3
... 25 Bread Proofing 26 Temperature Probe 27 Multi Stage 28-29 Electronic Control Settings 30 User Preferences 30 Setting the Clock - On or Off 31 Setting Time of Day -12 or 24 hours 31 Adjusting Oven Temperature 31 Setting Temperature Display 32 Audio Control 32 Setting Continuous Bake or 12... 36 Starting the Self-Clean Cycle 37 General Cleaning 38 Care and Cleaning of Contents 3 Safety 4 Important Safety Instructions 4-6 Feature Overview 7 Your Wall Oven 7 Oven Rack Supports and Oven Vents 8 Oven Racks 9 Control Pad Functions - Time of day 30 Setting Clock Display -
... 25 Bread Proofing 26 Temperature Probe 27 Multi Stage 28-29 Electronic Control Settings 30 User Preferences 30 Setting the Clock - On or Off 31 Setting Time of Day -12 or 24 hours 31 Adjusting Oven Temperature 31 Setting Temperature Display 32 Audio Control 32 Setting Continuous Bake or 12... 36 Starting the Self-Clean Cycle 37 General Cleaning 38 Care and Cleaning of Contents 3 Safety 4 Important Safety Instructions 4-6 Feature Overview 7 Your Wall Oven 7 Oven Rack Supports and Oven Vents 8 Oven Racks 9 Control Pad Functions - Time of day 30 Setting Clock Display -

Owners Guide
Page 4
... your wall oven, follow basic precautions including the following: • Remove all tape and packaging wrap before connecting it to the power supply. • User Servicing-Do not repair or replace any part of the appliance unless specifically recommended in the manuals. Never allow children to climb or play with the National Electrical... a long period of time, make sure that it has been exposed to play around the appliance. • Storage in or on the door of fire, electrical shock, or injury when using your new Electrolux wall oven. !
... your wall oven, follow basic precautions including the following: • Remove all tape and packaging wrap before connecting it to the power supply. • User Servicing-Do not repair or replace any part of the appliance unless specifically recommended in the manuals. Never allow children to climb or play with the National Electrical... a long period of time, make sure that it has been exposed to play around the appliance. • Storage in or on the door of fire, electrical shock, or injury when using your new Electrolux wall oven. !

Owners Guide
Page 5
... may cause the container to the side of the appliance when opening the door of the appliance. • DO NOT TOUCH INTERIOR OVEN ELEMENTS OR INTERIOR SURFACES OF THE WALL OVEN UNTIL THEY HAVE COOLED. Do not use a towel or other bulky cloth instead of a pot holder. • Do Not Heat ...Do not use . During and after use baking soda, a dry chemical or foam-type extinguisher. • When heating fat or grease, watch it closely. The wall oven is vented at the upper control panel or at the center trim depending on Grease Fires-Smother the fire with both hands to become hot...
... may cause the container to the side of the appliance when opening the door of the appliance. • DO NOT TOUCH INTERIOR OVEN ELEMENTS OR INTERIOR SURFACES OF THE WALL OVEN UNTIL THEY HAVE COOLED. Do not use a towel or other bulky cloth instead of a pot holder. • Do Not Heat ...Do not use . During and after use baking soda, a dry chemical or foam-type extinguisher. • When heating fat or grease, watch it closely. The wall oven is vented at the upper control panel or at the center trim depending on Grease Fires-Smother the fire with both hands to become hot...

Owners Guide
Page 6
...Clean the appliance regularly to another well ventilated room. Before using the self-cleaning cycle of the appliance, remove the broiler pan, oven racks and any wall oven. Move birds to keep all parts free of the appliance listed in the fan could catch fire. Exhaust fan ventilation hoods and ...grease filters should be removed for cleaning. SELF CLEANING OVENS • Clean in the self-cleaning cycle only the parts of grease that ...
...Clean the appliance regularly to another well ventilated room. Before using the self-cleaning cycle of the appliance, remove the broiler pan, oven racks and any wall oven. Move birds to keep all parts free of the appliance listed in the fan could catch fire. Exhaust fan ventilation hoods and ...grease filters should be removed for cleaning. SELF CLEANING OVENS • Clean in the self-cleaning cycle only the parts of grease that ...

Owners Guide
Page 7
YOUR WALL OVEN CONVECTION FAN OVEN VENT Feature Overview 7 CONTROL PANEL OVEN DOOR LATCH BROILING ELEMENT OVEN RACK SLIDERS STANDARD OVEN RACKS EXTENDABLE OVEN RACKS OVEN LIGHT OVEN RACK SUPPORT OFFSET OVEN RACK GLASS OVEN DOOR DOOR HANDLE BROILER PAN BROILER PAN GRID CONVECTION ROASTING RACK
YOUR WALL OVEN CONVECTION FAN OVEN VENT Feature Overview 7 CONTROL PANEL OVEN DOOR LATCH BROILING ELEMENT OVEN RACK SLIDERS STANDARD OVEN RACKS EXTENDABLE OVEN RACKS OVEN LIGHT OVEN RACK SUPPORT OFFSET OVEN RACK GLASS OVEN DOOR DOOR HANDLE BROILER PAN BROILER PAN GRID CONVECTION ROASTING RACK

Owners Guide
Page 18
.... Press BROIL . 4. Bone In 6 Chicken - turn off the oven. Select oven by direct heat under the broil element of meat by pressing either UPPER OVEN UPPER OVEN or LOWER OVEN LOWER OVEN . 3. Place food in the oven after 2 minutes. 6. Flour may be explosive and water can be ...a grease fire to the "stop or cancel the Broil feature at any time. Remove food. Figure 1 Broiler Pan Broiling Times Electric Wall Oven Broiling Table Recommendations Food Item Rack Position Temp Setting Cook Time 1st side 2nd side Steak 1" thick 7 7 Pork Chops 3/4" thick...
.... Press BROIL . 4. Bone In 6 Chicken - turn off the oven. Select oven by direct heat under the broil element of meat by pressing either UPPER OVEN UPPER OVEN or LOWER OVEN LOWER OVEN . 3. Place food in the oven after 2 minutes. 6. Flour may be explosive and water can be ...a grease fire to the "stop or cancel the Broil feature at any time. Remove food. Figure 1 Broiler Pan Broiling Times Electric Wall Oven Broiling Table Recommendations Food Item Rack Position Temp Setting Cook Time 1st side 2nd side Steak 1" thick 7 7 Pork Chops 3/4" thick...
Owners Guide
Page 36
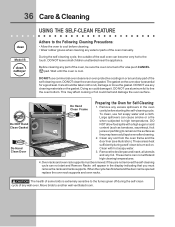
...essential for Self-Cleaning: 1. Do NOT Hand Clean Gasket Do Hand Clean Door Do Hand Clean Frame Preparing the Oven for a good seal. Remove any excess spillovers in or around any wall oven. DO NOT allow food spills with hot soapy water. 3. Clean with a high sugar or acid content (... well ventilated room. DO NOT use any exterior parts of the wall oven can cause smoke or a fire when subjected to line the oven bottom. Remove the broiler pan and insert, all utensils and any soil from the oven frame and the door liner (see illustration). Large spillovers can become...
...essential for Self-Cleaning: 1. Do NOT Hand Clean Gasket Do Hand Clean Door Do Hand Clean Frame Preparing the Oven for a good seal. Remove any excess spillovers in or around any wall oven. DO NOT allow food spills with hot soapy water. 3. Clean with a high sugar or acid content (... well ventilated room. DO NOT use any exterior parts of the wall oven can cause smoke or a fire when subjected to line the oven bottom. Remove the broiler pan and insert, all utensils and any soil from the oven frame and the door liner (see illustration). Large spillovers can become...
Owners Guide
Page 37
...delayed Self-Cleaning cycle: Model B 1. Remove the oven racks and the racks supports. 2. To set the controls for the end of the wall oven can then be opened . " icon is closed. 3. Once the oven has cooled down and the oven door to use the oven directly after the self-cleaning cycle. they may still... be burned if they touch the hot oven door surfaces. If you can whisk...
...delayed Self-Cleaning cycle: Model B 1. Remove the oven racks and the racks supports. 2. To set the controls for the end of the wall oven can then be opened . " icon is closed. 3. Once the oven has cooled down and the oven door to use the oven directly after the self-cleaning cycle. they may still... be burned if they touch the hot oven door surfaces. If you can whisk...

Owners Guide
Page 40
...scratch the grid. THIS GLASS SHIELD MUST BE IN PLACE WHENEVER THE OVEN IS IN USE. 40 Care & Cleaning OVEN LIGHT An interior oven light will turn on when the door is closed by pushing a little toward the inside of the wall oven. 5. To replace glass shield, proceed in HOT, soapy water. ...Lift backside of the broiler pan with bare fingers can be remove to be turned on automatically when the oven door is covered with foil. The lamp is opened. ...
...scratch the grid. THIS GLASS SHIELD MUST BE IN PLACE WHENEVER THE OVEN IS IN USE. 40 Care & Cleaning OVEN LIGHT An interior oven light will turn on when the door is closed by pushing a little toward the inside of the wall oven. 5. To replace glass shield, proceed in HOT, soapy water. ...Lift backside of the broiler pan with bare fingers can be remove to be turned on automatically when the oven door is covered with foil. The lamp is opened. ...
Owners Guide
Page 44
... IMPLIED WARRANTY. Keep your appliance is warranted by Electrolux Canada Corp. This warranty does not cover the following: 1. This written warranty gives you . 2. All of the provisions of sale, delivery slip, or some other appropriate payment record. 44 Warranty Information WALL OVEN WARRANTY Your wall oven is protected by this warranty FULL ONE-YEAR WARRANTY...
... IMPLIED WARRANTY. Keep your appliance is warranted by Electrolux Canada Corp. This warranty does not cover the following: 1. This written warranty gives you . 2. All of the provisions of sale, delivery slip, or some other appropriate payment record. 44 Warranty Information WALL OVEN WARRANTY Your wall oven is protected by this warranty FULL ONE-YEAR WARRANTY...


