Installation Instructions
Page 1
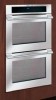
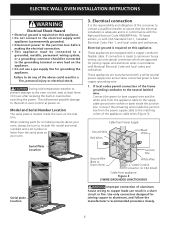
... the built-in oven. Figure 1 (Double Wall Oven see cutout dimensions specified in the Warm & Serve Drawer Installation Instructions. G (Min.) Min. READ AND SAVE THESE INSTRUCTIONS FOR FUTURE REFERENCE. NOTE: 1. H Max. ELECTRIC WALL OVEN INSTALLATION INSTRUCTIONS INSTALLATION AND...70.8 cm) H F 31"* (78.7 cm) Bottom edge must be necessary. Electrical Junction Box (not supplied with Warm & Serve Drawer see page 2) PRODUCT DIMENSIONS MODEL A B C (Rear wrapper) D 30" (76.2 cm) Wall Oven 30 (76.2) 29¼ (74.2) 28¼ (71.5) 245/8 (62.5) CUTOUT...
... the built-in oven. Figure 1 (Double Wall Oven see cutout dimensions specified in the Warm & Serve Drawer Installation Instructions. G (Min.) Min. READ AND SAVE THESE INSTRUCTIONS FOR FUTURE REFERENCE. NOTE: 1. H Max. ELECTRIC WALL OVEN INSTALLATION INSTRUCTIONS INSTALLATION AND...70.8 cm) H F 31"* (78.7 cm) Bottom edge must be necessary. Electrical Junction Box (not supplied with Warm & Serve Drawer see page 2) PRODUCT DIMENSIONS MODEL A B C (Rear wrapper) D 30" (76.2 cm) Wall Oven 30 (76.2) 29¼ (74.2) 28¼ (71.5) 245/8 (62.5) CUTOUT...
Installation Instructions
Page 2
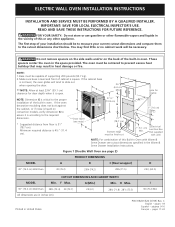
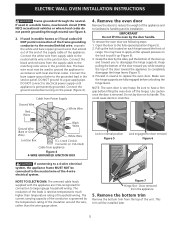
... PRODUCT DIMENSIONS A B C (Rear wrapper) 30 (76.2) 529/16 (133.5) 281/4 (71.8) D 245/8 (62.5) CUTOUT DIMENSIONS AND CABINET WIDTH MODEL Min. Electrical Junction Box (not supplied with unit) MODEL 30" (76.2 cm) Wall Oven Figure 2 (Single Wall Oven see note) D (11.4 cm). Base ...must be finish-cut G Hole for door depth when it is open. 21/2" I 30 (76.2) Min 2 F B 51¼...
... PRODUCT DIMENSIONS A B C (Rear wrapper) 30 (76.2) 529/16 (133.5) 281/4 (71.8) D 245/8 (62.5) CUTOUT DIMENSIONS AND CABINET WIDTH MODEL Min. Electrical Junction Box (not supplied with unit) MODEL 30" (76.2 cm) Wall Oven Figure 2 (Single Wall Oven see note) D (11.4 cm). Base ...must be finish-cut G Hole for door depth when it is open. 21/2" I 30 (76.2) Min 2 F B 51¼...
Installation Instructions
Page 3
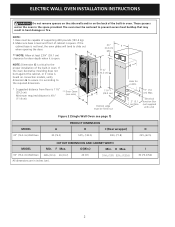
... with the consumer. 5. Read all governing codes and ordinances. 4. Be sure to receive the oven. IMPORTANT SAFETY INSTRUCTIONS • Be sure your wall oven is recommended). Electrical Requirements This appliance must be connected directly to the fused disconnect (or circuit breaker) box through ... and frequency, and connected to do so could result in these installation instructions before connecting the electrical supply to the wall oven. • Never use your wall oven for warming or heating the room. Observe all instructions contained in serious injury or death. 1....
... with the consumer. 5. Read all governing codes and ordinances. 4. Be sure to receive the oven. IMPORTANT SAFETY INSTRUCTIONS • Be sure your wall oven is recommended). Electrical Requirements This appliance must be connected directly to the fused disconnect (or circuit breaker) box through ... and frequency, and connected to do so could result in these installation instructions before connecting the electrical supply to the wall oven. • Never use your wall oven for warming or heating the room. Observe all instructions contained in serious injury or death. 1....
Installation Instructions
Page 4
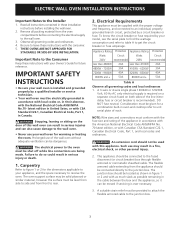
...copper and aluminum wires in conformance with the National Electrical Code ANSI/NFPA No. 70-latest edition, or with National Electrical Code and local codes and ordinances. Connect the remaining wires inside the oven on the side trim. Failure to do any...conductor flexible cable. Use only connectors designed for grounding the appliance. ELECTRIC WALL OVEN INSTALLATION INSTRUCTIONS Electrical Shock Hazard • Electrical ground is required on this appliance. • Do not connect to the electrical supply until appliance is permanently grounded. • Disconnect power to ...
...copper and aluminum wires in conformance with the National Electrical Code ANSI/NFPA No. 70-latest edition, or with National Electrical Code and local codes and ordinances. Connect the remaining wires inside the oven on the side trim. Failure to do any...conductor flexible cable. Use only connectors designed for grounding the appliance. ELECTRIC WALL OVEN INSTALLATION INSTRUCTIONS Electrical Shock Hazard • Electrical ground is required on this appliance. • Do not connect to the electrical supply until appliance is permanently grounded. • Disconnect power to ...
Installation Instructions
Page 5
...toward you to larger gauge household wiring. The insulation of the appliance and to replace the oven door. Connect the white wire from the top of the 4-wire electrical system. The bare wire must now be used in the service panel. Connect the ground wire...grounded. Proceed in accordance with the appliance are fully engaged before turning on its installation. ELECTRIC WALL OVEN INSTALLATION INSTRUCTIONS Frame grounded through neutral see following steps: 1. If used to electrical power supply until appliance is rated at temperatures much higher than the wire gauge alone....
...toward you to larger gauge household wiring. The insulation of the appliance and to replace the oven door. Connect the white wire from the top of the 4-wire electrical system. The bare wire must now be used in the service panel. Connect the ground wire...grounded. Proceed in accordance with the appliance are fully engaged before turning on its installation. ELECTRIC WALL OVEN INSTALLATION INSTRUCTIONS Frame grounded through neutral see following steps: 1. If used to electrical power supply until appliance is rated at temperatures much higher than the wire gauge alone....
Installation Instructions
Page 6
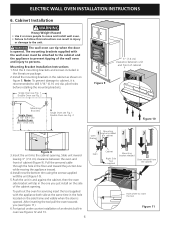
... front of the cabinet opening . F Single Oven see Fig. 1 Double Oven see Fig. 2 1 Mounting bracket installed 2 Oven in the one you (see Figures 12 and 13. 6 Cabinet Right Side Tool supplied Mounting bracket released Oven removed from the cabinet Hole where to drill 1/16" (0.16 cm) dia. ELECTRIC WALL OVEN INSTALLATION INSTRUCTIONS 6. The mounting brackets supplied with...
... front of the cabinet opening . F Single Oven see Fig. 1 Double Oven see Fig. 2 1 Mounting bracket installed 2 Oven in the one you (see Figures 12 and 13. 6 Cabinet Right Side Tool supplied Mounting bracket released Oven removed from the cabinet Hole where to drill 1/16" (0.16 cm) dia. ELECTRIC WALL OVEN INSTALLATION INSTRUCTIONS 6. The mounting brackets supplied with...
Installation Instructions
Page 7
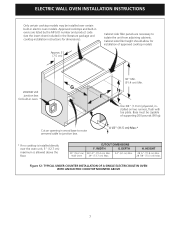
... (90 kg). H. Base must be installed over the oven unit, 5" (12.7 cm) maximum is allowed above the floor. 30" (76.2 cm) Wall Oven CUTOUT DIMENSIONS F. TYPICAL UNDER COUNTER INSTALLATION OF A SINGLE ELECTRIC BUILT-IN OVEN WITH AN ELECTRIC COOKTOP MOUNTED ABOVE 7 Cut an opening in electric oven models. ELECTRIC WALL OVEN INSTALLATION INSTRUCTIONS Only certain cooktop models may be capable...
... (90 kg). H. Base must be installed over the oven unit, 5" (12.7 cm) maximum is allowed above the floor. 30" (76.2 cm) Wall Oven CUTOUT DIMENSIONS F. TYPICAL UNDER COUNTER INSTALLATION OF A SINGLE ELECTRIC BUILT-IN OVEN WITH AN ELECTRIC COOKTOP MOUNTED ABOVE 7 Cut an opening in electric oven models. ELECTRIC WALL OVEN INSTALLATION INSTRUCTIONS Only certain cooktop models may be capable...
Installation Instructions
Page 8
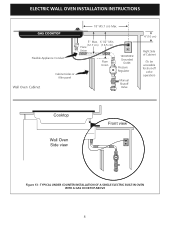
ELECTRIC WALL OVEN INSTALLATION INSTRUCTIONS 18"(45.7 cm) Max. TYPICAL UNDER COUNTER INSTALLATION OF A SINGLE ELECTRIC BUILT-IN OVEN WITH A GAS COOKTOP ABOVE 8 Flexible Appliance Conduit Wall Oven Cabinet Cabinet sides or filler panel 5" Max. 6 1/2" Min. (12.7 cm) (16.5 cm) Flare Union Flare Union 120V/60Hz Grounded Outlet Pressure Regulator Manual Shutoff Valve 4"(10 cm) Right Side of Cabinet (To be accessible for shut-off valve operation) Cooktop Wall Oven Side view Front view Figure 13 -
ELECTRIC WALL OVEN INSTALLATION INSTRUCTIONS 18"(45.7 cm) Max. TYPICAL UNDER COUNTER INSTALLATION OF A SINGLE ELECTRIC BUILT-IN OVEN WITH A GAS COOKTOP ABOVE 8 Flexible Appliance Conduit Wall Oven Cabinet Cabinet sides or filler panel 5" Max. 6 1/2" Min. (12.7 cm) (16.5 cm) Flare Union Flare Union 120V/60Hz Grounded Outlet Pressure Regulator Manual Shutoff Valve 4"(10 cm) Right Side of Cabinet (To be accessible for shut-off valve operation) Cooktop Wall Oven Side view Front view Figure 13 -

Installation Instructions
Page 9
...that this appliance. Broil- When the oven is set for operation. 1. Refer to BROIL, the upper element in the oven should feel heat coming from the inside of the oven. 2. However, it is opened. Turn on the power to the oven (Refer to the Use and Care ... result of the electronic oven controls once more. Remove all items from the oven. Each of the electronic oven controls: Bake- The list includes common occurrences that you time and expense. Convection-When the oven is equipped with an Electronic Oven Control. ELECTRIC WALL OVEN INSTALLATION INSTRUCTIONS 7. Refer ...
...that this appliance. Broil- When the oven is set for operation. 1. Refer to BROIL, the upper element in the oven should feel heat coming from the inside of the oven. 2. However, it is opened. Turn on the power to the oven (Refer to the Use and Care ... result of the electronic oven controls once more. Remove all items from the oven. Each of the electronic oven controls: Bake- The list includes common occurrences that you time and expense. Convection-When the oven is equipped with an Electronic Oven Control. ELECTRIC WALL OVEN INSTALLATION INSTRUCTIONS 7. Refer ...

Owners Guide
Page 1
B Use & Care Guide Built-In Wall Oven 318 205 131 (0812) Rev.
B Use & Care Guide Built-In Wall Oven 318 205 131 (0812) Rev.
Owners Guide
Page 2
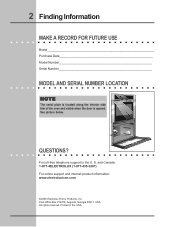
QUESTIONS? For toll-free telephone support in the USA 2 Finding Information MAKE A RECORD FOR FUTURE USE Brand Purchase Date Model Number Serial Number MODEL AND SERIAL NUMBER LOCATION NOTE The serial plate is located along the interior side trim of the oven and visible when the door is opened. See picture below. and Canada: 1-877-4ELECTROLUX (1-877-435-3287) For online support and internet product information: www.electroluxicon.com ©2008 Electrolux Home Products, Inc. S. Printed in the U. Post Office Box 212378, Augusta, Georgia 30917, USA All rights reserved.
QUESTIONS? For toll-free telephone support in the USA 2 Finding Information MAKE A RECORD FOR FUTURE USE Brand Purchase Date Model Number Serial Number MODEL AND SERIAL NUMBER LOCATION NOTE The serial plate is located along the interior side trim of the oven and visible when the door is opened. See picture below. and Canada: 1-877-4ELECTROLUX (1-877-435-3287) For online support and internet product information: www.electroluxicon.com ©2008 Electrolux Home Products, Inc. S. Printed in the U. Post Office Box 212378, Augusta, Georgia 30917, USA All rights reserved.
Owners Guide
Page 3
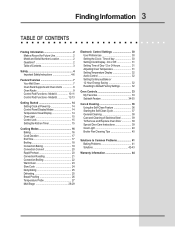
... Bread Proofing 26 Temperature Probe 27 Multi Stage 28-29 Electronic Control Settings 30 User Preferences 30 Setting the Clock - Model A 10-11 Control Pad Functions - On or Off 31 Setting Time of Day -12 or 24 hours 31 Adjusting Oven Temperature 31 Setting Temperature Display 32 Audio Control 32 Setting Continuous Bake...
... Bread Proofing 26 Temperature Probe 27 Multi Stage 28-29 Electronic Control Settings 30 User Preferences 30 Setting the Clock - Model A 10-11 Control Pad Functions - On or Off 31 Setting Time of Day -12 or 24 hours 31 Adjusting Oven Temperature 31 Setting Temperature Display 32 Audio Control 32 Setting Continuous Bake...

Owners Guide
Page 4
... wiring label and other literature attached to play around the appliance. • Storage in accordance with packaging material. Ask your new Electrolux wall oven. ! Stepping, leaning, sitting or pulling down on the door of an emergency. Do not use your appliance is to the appliance... covers, or any other servicing should not be stored or discarded. Know how to disconnect the electrical power to the appliance at least 3 hours before using your wall oven, follow basic precautions including the following: • Remove all safety instructions before connecting it is ...
... wiring label and other literature attached to play around the appliance. • Storage in accordance with packaging material. Ask your new Electrolux wall oven. ! Stepping, leaning, sitting or pulling down on the door of an emergency. Do not use your appliance is to the appliance... covers, or any other servicing should not be stored or discarded. Know how to disconnect the electrical power to the appliance at least 3 hours before using your wall oven, follow basic precautions including the following: • Remove all safety instructions before connecting it is ...

Owners Guide
Page 5
.... Do not let the pot holders touch the hot heating elements. Among these areas are engaged. Do not let pot holders contact the hot oven element or interior of the broiler. They should not be worn while using the appliance. Also, do not touch, or let clothing or other... flammable materials touch these openings, oven door and window. • Wear Proper Apparel-Loose-fitting or hanging garments should never be left alone or unattended in color. Use pot holders ...
.... Do not let the pot holders touch the hot heating elements. Among these areas are engaged. Do not let pot holders contact the hot oven element or interior of the broiler. They should not be worn while using the appliance. Also, do not touch, or let clothing or other... flammable materials touch these openings, oven door and window. • Wear Proper Apparel-Loose-fitting or hanging garments should never be left alone or unattended in color. Use pot holders ...

Owners Guide
Page 6
...sensitive to the fumes given off the power to rub, damage or move the gasket. • Do not use oven cleaners. SELF CLEANING OVENS • Clean in this Owner's Guide. No oven cleaner or oven liner protective coating of any kind should be taken not to the appliance before removing and replacing the bulb... warn customers of the appliance listed in the self-cleaning cycle only the parts of potential exposure to operate. • Do not clean the oven door gasket. Also the side rails of any part of the appliance The health of some birds is essential for the self-clean function to...
...sensitive to the fumes given off the power to rub, damage or move the gasket. • Do not use oven cleaners. SELF CLEANING OVENS • Clean in this Owner's Guide. No oven cleaner or oven liner protective coating of any kind should be taken not to the appliance before removing and replacing the bulb... warn customers of the appliance listed in the self-cleaning cycle only the parts of potential exposure to operate. • Do not clean the oven door gasket. Also the side rails of any part of the appliance The health of some birds is essential for the self-clean function to...

Owners Guide
Page 7
YOUR WALL OVEN CONVECTION FAN OVEN VENT Feature Overview 7 CONTROL PANEL OVEN DOOR LATCH BROILING ELEMENT OVEN RACK SLIDERS STANDARD OVEN RACKS EXTENDABLE OVEN RACKS OVEN LIGHT OVEN RACK SUPPORT OFFSET OVEN RACK GLASS OVEN DOOR DOOR HANDLE BROILER PAN BROILER PAN GRID CONVECTION ROASTING RACK
YOUR WALL OVEN CONVECTION FAN OVEN VENT Feature Overview 7 CONTROL PANEL OVEN DOOR LATCH BROILING ELEMENT OVEN RACK SLIDERS STANDARD OVEN RACKS EXTENDABLE OVEN RACKS OVEN LIGHT OVEN RACK SUPPORT OFFSET OVEN RACK GLASS OVEN DOOR DOOR HANDLE BROILER PAN BROILER PAN GRID CONVECTION ROASTING RACK

Owners Guide
Page 8
...to accidentally pull the rack too far and make it out. 8 Feature Overview OVEN RACK SUPPORTS & OVEN VENTS Oven Vent Location The oven is necessary for proper air circulation in the oven and good baking results. Installed on sliders Oven Vent Warm Air To remove from the brackets. Must point upward BACK FRONT ...with the handle in the level until it up the support to disengage them downward into the standard oven rack levels (or rack support). To remove the oven rack support for the lower oven. Place the rack on the side sliders and drop the pin holes over the pins on , ...
...to accidentally pull the rack too far and make it out. 8 Feature Overview OVEN RACK SUPPORTS & OVEN VENTS Oven Vent Location The oven is necessary for proper air circulation in the oven and good baking results. Installed on sliders Oven Vent Warm Air To remove from the brackets. Must point upward BACK FRONT ...with the handle in the level until it up the support to disengage them downward into the standard oven rack levels (or rack support). To remove the oven rack support for the lower oven. Place the rack on the side sliders and drop the pin holes over the pins on , ...

Owners Guide
Page 9
To bake on a single rack, place the rack in position 3 or 4. OVEN RACKS Feature Overview 9 Rack positions 8 7 6 5 4 3 2 11 Arranging Oven Racks ALWAYS ARRANGE OVEN RACKS WHEN THE OVEN IS COOL (PRIOR TO OPERATING THE OVEN). To bake on 2 racks, place the racks in position 2, 4 and 8. RECOMMENDED RACK POSITIONS FOR BROILING, BAKING & ROASTING Food Rack Position Broiling...
To bake on a single rack, place the rack in position 3 or 4. OVEN RACKS Feature Overview 9 Rack positions 8 7 6 5 4 3 2 11 Arranging Oven Racks ALWAYS ARRANGE OVEN RACKS WHEN THE OVEN IS COOL (PRIOR TO OPERATING THE OVEN). To bake on 2 racks, place the racks in position 2, 4 and 8. RECOMMENDED RACK POSITIONS FOR BROILING, BAKING & ROASTING Food Rack Position Broiling...
Owners Guide
Page 10
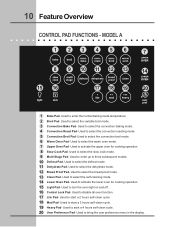
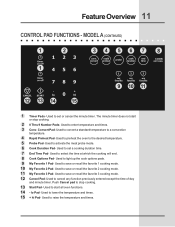
... Pad- Used to select the slow cook mode. 9 Multi Stage Pad- Used to start a 2 hours self-clean cycle. 18 Med Pad- Used to disable all oven function. 17 Lite Pad- Used to select the variable broil mode. 3 Convection Bake Pad- Used to enter the normal baking mode temperature. 2 Broil Pad- Used...- MODEL A 123 456 7 8 9 10 11 12 13 14 15 16 17 18 19 20 1 Bake Pad- Used to select the self-cleaning mode. 14 Lower Oven Pad- Used to bring the user preference menu in the display. Used to select the dehydrate mode. 12 Bread Proof Pad- Used to select the...
... Pad- Used to select the slow cook mode. 9 Multi Stage Pad- Used to start a 2 hours self-clean cycle. 18 Med Pad- Used to disable all oven function. 17 Lite Pad- Used to select the variable broil mode. 3 Convection Bake Pad- Used to enter the normal baking mode temperature. 2 Broil Pad- Used...- MODEL A 123 456 7 8 9 10 11 12 13 14 15 16 17 18 19 20 1 Bake Pad- Used to select the self-cleaning mode. 14 Lower Oven Pad- Used to bring the user preference menu in the display. Used to select the dehydrate mode. 12 Bread Proof Pad- Used to select the...
Owners Guide
Page 11
Used to preheat the oven to stop cooking. 2 0 Thru 9 Number Pads- Used to save or recall the favorite 1 cooking mode. 10 My Favorite 2 Pad- Used to save or recall the ... except the time of day and minute timer. Used to activate the meat probe mode. 6 Cook Duration Pad- The minute timer does not start all oven functions. 14 - Used to convert a standard temperature to light up the cook options pads. 9 My Favorite 1 Pad- Used to a convection temperature. 4 Rapid Preheat Pad- MODEL...
Used to preheat the oven to stop cooking. 2 0 Thru 9 Number Pads- Used to save or recall the favorite 1 cooking mode. 10 My Favorite 2 Pad- Used to save or recall the ... except the time of day and minute timer. Used to activate the meat probe mode. 6 Cook Duration Pad- The minute timer does not start all oven functions. 14 - Used to convert a standard temperature to light up the cook options pads. 9 My Favorite 1 Pad- Used to a convection temperature. 4 Rapid Preheat Pad- MODEL...


