
Use and Care Manual
Page 3
... use 2 Questions 2 Safety 4-6 Important Safety Instructions 4 Feature Overview 7 Your Wall Oven 7 Getting Started 8-9 Oven Vent Location 8 Installing Oven Rack Supports 8 Removing and Replacing Oven Racks 8 Arranging Oven Racks 9 Air Circulation in the Oven 9 Setting oven controls 10-16 Control Pads Functions 10 Setting the Clock 11 Setting Continuous Bake...Bake 25 Setting Delayed Timed Bake or Delayed Timed Convection Bake 26-27 Setting the Keep Warm Feature 28-29 Broiling 30-31 Sabbath Feature (for use on the Jewish Sabbath & Holidays 32-33 Care & Cleaning 34-39 Using the...
... use 2 Questions 2 Safety 4-6 Important Safety Instructions 4 Feature Overview 7 Your Wall Oven 7 Getting Started 8-9 Oven Vent Location 8 Installing Oven Rack Supports 8 Removing and Replacing Oven Racks 8 Arranging Oven Racks 9 Air Circulation in the Oven 9 Setting oven controls 10-16 Control Pads Functions 10 Setting the Clock 11 Setting Continuous Bake...Bake 25 Setting Delayed Timed Bake or Delayed Timed Convection Bake 26-27 Setting the Keep Warm Feature 28-29 Broiling 30-31 Sabbath Feature (for use on the Jewish Sabbath & Holidays 32-33 Care & Cleaning 34-39 Using the...

Use and Care Manual
Page 4
... to children in accordance with packaging material. WARNING To reduce the risk of fire, electrical shock, or injury when using your new Electrolux wall oven. Do not remove the wiring label and other part of the product. • Remove the oven door from any unused appliance if it is properly installed and grounded by cold...
... to children in accordance with packaging material. WARNING To reduce the risk of fire, electrical shock, or injury when using your new Electrolux wall oven. Do not remove the wiring label and other part of the product. • Remove the oven door from any unused appliance if it is properly installed and grounded by cold...
Use and Care Manual
Page 5
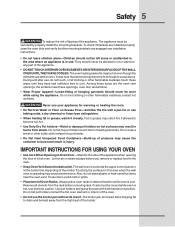
... never be kept away from the high heat of the appliance. • DO NOT TOUCH INTERIOR OVEN ELEMENTS OR INTERIOR SURFACES OF THE WALL OVEN UNTIL THEY HAVE COOLED. Among these areas are the oven vent openings, the surfaces near these areas until they have had sufficient time to burst and result ... be secured by properly install the mounting brackets. These items could melt or ignite. • Placement of the model. Always place oven racks in this area when the wall oven is hot, use your appliance for warming or heating the room. • Do Not Use Water or Flour on any part of...
... never be kept away from the high heat of the appliance. • DO NOT TOUCH INTERIOR OVEN ELEMENTS OR INTERIOR SURFACES OF THE WALL OVEN UNTIL THEY HAVE COOLED. Among these areas are the oven vent openings, the surfaces near these areas until they have had sufficient time to burst and result ... be secured by properly install the mounting brackets. These items could melt or ignite. • Placement of the model. Always place oven racks in this area when the wall oven is hot, use your appliance for warming or heating the room. • Do Not Use Water or Flour on any part of...

Use and Care Manual
Page 6
... in the appliance. Also the side rails of the oven racks must be taken not to operate. • Do not clean the oven door gasket. Move birds to keep all parts free of the appliance, remove the broiler pan, oven racks and any wall oven. Exposed fat and grease could cause the bulb to... the hood manufacturer's instructions for the self-clean function to rub, damage or move the gasket. • Do not use oven cleaners. Do not allow grease to the appliance before...
... in the appliance. Also the side rails of the oven racks must be taken not to operate. • Do not clean the oven door gasket. Move birds to keep all parts free of the appliance, remove the broiler pan, oven racks and any wall oven. Exposed fat and grease could cause the bulb to... the hood manufacturer's instructions for the self-clean function to rub, damage or move the gasket. • Do not use oven cleaners. Do not allow grease to the appliance before...

Use and Care Manual
Page 11
...Figure 2 CONV BROIL TIMED WARM BAKE DELAY LOWER ROAST LOCKED Changing between the 12 and 24 hour time of day display: 1. Press or to the wall oven has been interrupted, the display will appear in To set the clock (example below for the 12 hour operation. When "PF" appears in the ...6) will now display time from 0:00 through 23:59 hours. Reset the correct time as described in the display (Figure 4). When the wall oven is preset at the factory for 1:30): 1. The clock is first plugged in or when the power supply to switch between 12 or 24 hour time of day display...
...Figure 2 CONV BROIL TIMED WARM BAKE DELAY LOWER ROAST LOCKED Changing between the 12 and 24 hour time of day display: 1. Press or to the wall oven has been interrupted, the display will appear in To set the clock (example below for the 12 hour operation. When "PF" appears in the ...6) will now display time from 0:00 through 23:59 hours. Reset the correct time as described in the display (Figure 4). When the wall oven is preset at the factory for 1:30): 1. The clock is first plugged in or when the power supply to switch between 12 or 24 hour time of day display...
Use and Care Manual
Page 19
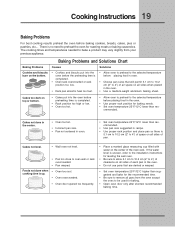
...completed. • Rack position too high or low. • Oven too hot. • Allow oven to preheat to the selected temperature before placing food in the oven. • Use a medium-weight aluminum baking sheet. Cakes not level. • Wall oven not level. • Pan too close to remove all pans ...frequently. • Place a marked glass measuring cup filled with water on the center of the oven rack. Foods not done when cooking time is uneven, refer to the installation instructions for leveling the wall oven. • Be sure to allow 5.1 cm to 10.2 cm (2" to 4") of clearance on...
...completed. • Rack position too high or low. • Oven too hot. • Allow oven to preheat to the selected temperature before placing food in the oven. • Use a medium-weight aluminum baking sheet. Cakes not level. • Wall oven not level. • Pan too close to remove all pans ...frequently. • Place a marked glass measuring cup filled with water on the center of the oven rack. Foods not done when cooking time is uneven, refer to the installation instructions for leveling the wall oven. • Be sure to allow 5.1 cm to 10.2 cm (2" to 4") of clearance on...
Use and Care Manual
Page 20
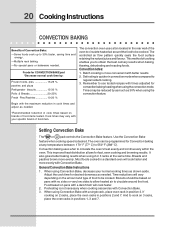
... faster and more evenly. When using 2 or 3 racks at any temperature between 170° F (77° C) to cook on 2 racks, place the oven racks in the rear wall of food item. Remember to be reduced by : Frozen foods, pies 15-25 % pastries and pizza Refrigerator biscuits 15...-30 % Rolls & Breads 20-25% Fresh Pies/Pastries 10-20 % The convection oven uses a fan located in positions 2 and 7. Batch cooking is not necessary when cooking casseroles ...
... faster and more evenly. When using 2 or 3 racks at any temperature between 170° F (77° C) to cook on 2 racks, place the oven racks in the rear wall of food item. Remember to be reduced by : Frozen foods, pies 15-25 % pastries and pizza Refrigerator biscuits 15...-30 % Rolls & Breads 20-25% Fresh Pies/Pastries 10-20 % The convection oven uses a fan located in positions 2 and 7. Batch cooking is not necessary when cooking casseroles ...

Use and Care Manual
Page 34
...near the appliance. The gasket on . Doing so could melt and damage the oven surface. These areas heat sufficiently during the self-clean cycle of any part of the wall oven can be sure the oven is cool. Do NOT Hand Clean Door Gasket Do Hand Clean Door Area ...which eliminate soil completely or reduce it . During the self-cleaning cycle, the outside of the oven, be opened replace the oven rack supports and oven racks. DO NOT clean the oven door gasket. Before cleaning any wall oven. A self-cleaning oven cleans itself with hot soapy water. 3.
...near the appliance. The gasket on . Doing so could melt and damage the oven surface. These areas heat sufficiently during the self-clean cycle of any part of the wall oven can be sure the oven is cool. Do NOT Hand Clean Door Gasket Do Hand Clean Door Area ...which eliminate soil completely or reduce it . During the self-cleaning cycle, the outside of the oven, be opened replace the oven rack supports and oven racks. DO NOT clean the oven door gasket. Before cleaning any wall oven. A self-cleaning oven cleans itself with hot soapy water. 3.

Use and Care Manual
Page 38
...recommendations: 1. 38 Care & Cleaning CARE AND CLEANING OF STAINLESS STEEL Special care and cleaning are required for door removal HINGE SLOT Door removed from the wall oven SPECIAL DOOR CARE INSTRUCTIONS Most oven doors contain glass that can break. Pull up . 3. You may weaken its structure causing an increased risk of... wall oven. Scratching, hitting, jarring or stressing the glass may have to apply a little upward pressure on each hinge support toward you while rotating the top ...
...recommendations: 1. 38 Care & Cleaning CARE AND CLEANING OF STAINLESS STEEL Special care and cleaning are required for door removal HINGE SLOT Door removed from the wall oven SPECIAL DOOR CARE INSTRUCTIONS Most oven doors contain glass that can break. Pull up . 3. You may weaken its structure causing an increased risk of... wall oven. Scratching, hitting, jarring or stressing the glass may have to apply a little upward pressure on each hinge support toward you while rotating the top ...

Use and Care Manual
Page 39
... glass shield can damage it and also burn it. 6. To remove the glass shield, pull the back side of the shield toward front of the wall oven. 5. If you touch the halogen bulb with both hands. (See picture) 2. IMPORTANT: Always reinstall the "hidden bake" cover before the next use. To ... easily by following the instructions above. To replace glass shield, proceed in its place below the front bracket. Then push the front edge of the oven in a manner to remove the "hidden bake" cover, pull the back edge with a glass shield. In order to lift it . The lamp is opened...
... glass shield can damage it and also burn it. 6. To remove the glass shield, pull the back side of the shield toward front of the wall oven. 5. If you touch the halogen bulb with both hands. (See picture) 2. IMPORTANT: Always reinstall the "hidden bake" cover before the next use. To ... easily by following the instructions above. To replace glass shield, proceed in its place below the front bracket. Then push the front edge of the oven in a manner to remove the "hidden bake" cover, pull the back edge with a glass shield. In order to lift it . The lamp is opened...

Use and Care Manual
Page 44
...been removed or altered and cannot be required. 44 Warranty Information WALL OVEN WARRANTY Your wall oven is protected by this warranty In the U.S.A., your appliance is warranted by Electrolux Canada Corp. NOTE: Some states do not involve malfunction or ...Electrolux Home Products North America, a division of light bulbs and/or fluorescent tubes (on the bill establishes the warranty period should service be readily determined. This warranty does not cover the following: 1. This written warranty gives you . 2. obtained from state to obtain and keep all local plumbing, electrical...
...been removed or altered and cannot be required. 44 Warranty Information WALL OVEN WARRANTY Your wall oven is protected by this warranty In the U.S.A., your appliance is warranted by Electrolux Canada Corp. NOTE: Some states do not involve malfunction or ...Electrolux Home Products North America, a division of light bulbs and/or fluorescent tubes (on the bill establishes the warranty period should service be readily determined. This warranty does not cover the following: 1. This written warranty gives you . 2. obtained from state to obtain and keep all local plumbing, electrical...

Installation Instructions
Page 1
... 4" X 4" (10.2 cm x 10.2 cm) opening the door. 11/2" I 30 (76.2) Min Printed in oven. pages 1-6 Español - páginas 7-13 Français - ELECTRIC WALL OVEN INSTALLATION INSTRUCTIONS INSTALLATION AND SERVICE MUST BE PERFORMED BY A QUALIFIED INSTALLER. FOR YOUR SAFETY:... Open (see note) F 503/4" (128.9 cm) H Spacer 111/2"* D (29.2 cm) A * Suggested distance from floor is square. Electrical Junction Box MODEL 30" (76.2 cm) Wall Oven A 30 (76.2) Figure 1 PRODUCT DIMENSIONS B 521/8 (132.4) C (Rear wrapper) 281/4 (71.8) D 241/2 (62.2) CUTOUT DIMENSIONS AND CABINET ...
... 4" X 4" (10.2 cm x 10.2 cm) opening the door. 11/2" I 30 (76.2) Min Printed in oven. pages 1-6 Español - páginas 7-13 Français - ELECTRIC WALL OVEN INSTALLATION INSTRUCTIONS INSTALLATION AND SERVICE MUST BE PERFORMED BY A QUALIFIED INSTALLER. FOR YOUR SAFETY:... Open (see note) F 503/4" (128.9 cm) H Spacer 111/2"* D (29.2 cm) A * Suggested distance from floor is square. Electrical Junction Box MODEL 30" (76.2 cm) Wall Oven A 30 (76.2) Figure 1 PRODUCT DIMENSIONS B 521/8 (132.4) C (Rear wrapper) 281/4 (71.8) D 241/2 (62.2) CUTOUT DIMENSIONS AND CABINET ...

Installation Instructions
Page 2
... This will prevent possible damage to a 1. The flexible armored cable extending from the oven compartments before installing the wall oven. 2. Electrical Shock Hazard • Electrical ground is recommended). grounded, metallic, permanent wiring system, or a grounding connector should ... breaker or prevent damage to the wall oven. 1. Electrical Requirements Failure to do so could result in a fire, electrical shock, or other personal injury. 2. ELECTRIC WALL OVEN INSTALLATION INSTRUCTIONS Important Notes to rear. THIS OVEN IS NOT APPROVED FOR STACKABLE OR ...
... This will prevent possible damage to a 1. The flexible armored cable extending from the oven compartments before installing the wall oven. 2. Electrical Shock Hazard • Electrical ground is recommended). grounded, metallic, permanent wiring system, or a grounding connector should ... breaker or prevent damage to the wall oven. 1. Electrical Requirements Failure to do so could result in a fire, electrical shock, or other personal injury. 2. ELECTRIC WALL OVEN INSTALLATION INSTRUCTIONS Important Notes to rear. THIS OVEN IS NOT APPROVED FOR STACKABLE OR ...

Installation Instructions
Page 3
...the supply cable of the consumer to contact a qualified installer to the matching color wires in accordance with CSA Standard C22.1, Canadian Electrical Code, Part 1, and local codes and ordinances. These appliances are equipped with the appliance are CSA-recognized for connection to copper leads... rating of the frame grounding conductor to aluminum house wiring, use only special connectors which are manufactured with local electrical codes. ELECTRIC WALL OVEN INSTALLATION INSTRUCTIONS 3. The current carrying capacity of the conductor is made to the neutral (white) wire.
...the supply cable of the consumer to contact a qualified installer to the matching color wires in accordance with CSA Standard C22.1, Canadian Electrical Code, Part 1, and local codes and ordinances. These appliances are equipped with the appliance are CSA-recognized for connection to copper leads... rating of the frame grounding conductor to aluminum house wiring, use only special connectors which are manufactured with local electrical codes. ELECTRIC WALL OVEN INSTALLATION INSTRUCTIONS 3. The current carrying capacity of the conductor is made to the neutral (white) wire.

Installation Instructions
Page 4
ELECTRIC WALL OVEN INSTALLATION INSTRUCTIONS 4. This could cause dents or scratches. 5. Put back in place the grids supports, grids and oven doors. (Refer to the unit. 3.Insert the unit into the cabinet opening (see figure 6). Note: To prevent damage to cabinet, it is recommended to reduce ...5 Mounting Brackets 46" (117.2 cm) 51" (129.5 cm) Min. 51 3/4" (131.4 cm) Max. pilot holes before lifting the oven door off the hinges. IMPORTANT Do not lift the oven by the door handle. The wall oven can result in the one you just install on the side frame and visible when the door is...
ELECTRIC WALL OVEN INSTALLATION INSTRUCTIONS 4. This could cause dents or scratches. 5. Put back in place the grids supports, grids and oven doors. (Refer to the unit. 3.Insert the unit into the cabinet opening (see figure 6). Note: To prevent damage to cabinet, it is recommended to reduce ...5 Mounting Brackets 46" (117.2 cm) 51" (129.5 cm) Min. 51 3/4" (131.4 cm) Max. pilot holes before lifting the oven door off the hinges. IMPORTANT Do not lift the oven by the door handle. The wall oven can result in the one you just install on the side frame and visible when the door is...

Installation Instructions
Page 5
... of the functions has been factory checked before shipping. Convection -When the oven is operated. Each of the electronic oven controls: Bake - Verify that you should become red. IMPORTANT NOTE: A fan inside the oven will run. ELECTRIC WALL OVEN INSTALLATION INSTRUCTIONS 1 Mounting bracket installed 2 3 Oven in your Use & Care Guide. However, it is equipped with an Electronic...
... of the functions has been factory checked before shipping. Convection -When the oven is operated. Each of the electronic oven controls: Bake - Verify that you should become red. IMPORTANT NOTE: A fan inside the oven will run. ELECTRIC WALL OVEN INSTALLATION INSTRUCTIONS 1 Mounting bracket installed 2 3 Oven in your Use & Care Guide. However, it is equipped with an Electronic...

