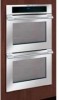

Use and Care Manual
Page 3
...Convection Bake 25 Setting Delayed Timed Bake or Delayed Timed Convection Bake 26-27 Setting the Keep Warm Feature 28-29 Broiling 30-31 Sabbath Feature (for use on the Jewish Sabbath & Holidays 32-33 Care & Cleaning 34-39 Using the Self-Clean Feature 34 Starting Self-Cleaning Cycle 35-36 General Cleaning 37 Care and Cleaning of Stainless Steel 38 To Remove and Replace Oven Door 38 Special Door Care Instructions 38 To Remove the "Hidden Bake Element" Cover 39 Oven Light 39 Adjusting Oven Temperature 40 Solutions to Common Problems 41-43 Oven Controls Beeps and Displays "F" Code...
...Convection Bake 25 Setting Delayed Timed Bake or Delayed Timed Convection Bake 26-27 Setting the Keep Warm Feature 28-29 Broiling 30-31 Sabbath Feature (for use on the Jewish Sabbath & Holidays 32-33 Care & Cleaning 34-39 Using the Self-Clean Feature 34 Starting Self-Cleaning Cycle 35-36 General Cleaning 37 Care and Cleaning of Stainless Steel 38 To Remove and Replace Oven Door 38 Special Door Care Instructions 38 To Remove the "Hidden Bake Element" Cover 39 Oven Light 39 Adjusting Oven Temperature 40 Solutions to Common Problems 41-43 Oven Controls Beeps and Displays "F" Code...

Use and Care Manual
Page 4
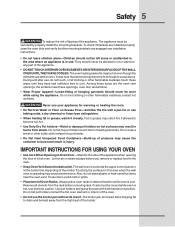
... on the door of this appliance. WARNING To reduce the risk of fire, electrical shock, or injury when using your new Electrolux wall oven. 4 Safety IMPORTANT SAFETY INSTRUCTIONS Please read all safety instructions before using your wall oven, follow basic precautions including the following: • Remove all tape and packaging wrap before connecting it to the power supply. • User Servicing-Do not repair or replace any other...
... on the door of this appliance. WARNING To reduce the risk of fire, electrical shock, or injury when using your new Electrolux wall oven. 4 Safety IMPORTANT SAFETY INSTRUCTIONS Please read all safety instructions before using your wall oven, follow basic precautions including the following: • Remove all tape and packaging wrap before connecting it to the power supply. • User Servicing-Do not repair or replace any other...
Use and Care Manual
Page 5
... on any part of the model. Do not let the pot holders touch the hot heating elements. Let hot air or steam escape before removing rack. These items could melt or ignite. • Placement of the appliance. Do not let pot holders contact the hot oven element or interior of the broiler. During and after use . IMPORTANT INSTRUCTIONS FOR USING YOUR OVEN • Use Care When Opening an Oven Door-Stand...
... on any part of the model. Do not let the pot holders touch the hot heating elements. Let hot air or steam escape before removing rack. These items could melt or ignite. • Placement of the appliance. Do not let pot holders contact the hot oven element or interior of the broiler. During and after use . IMPORTANT INSTRUCTIONS FOR USING YOUR OVEN • Use Care When Opening an Oven Door-Stand...

Use and Care Manual
Page 6
... filters should be removed for the self-clean function to keep all parts free of some birds is essential for a good seal. Before using the self-cleaning cycle of any utensils stored in the fan could ignite. • Do not touch a hot oven light bulb with aluminum foil. Care should be taken not to break. 6 Safety IMPORTANT SAFETY INSTRUCTIONS • Do not cover the broiler pan insert or oven...
... filters should be removed for the self-clean function to keep all parts free of some birds is essential for a good seal. Before using the self-cleaning cycle of any utensils stored in the fan could ignite. • Do not touch a hot oven light bulb with aluminum foil. Care should be taken not to break. 6 Safety IMPORTANT SAFETY INSTRUCTIONS • Do not cover the broiler pan insert or oven...
Use and Care Manual
Page 10
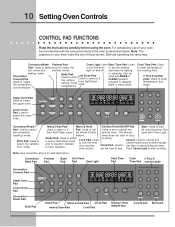
... Self-Clean cycle. The minute used with the various functions of day. feature. Lock Pad- Used to stop Clean Pad- Push Cancel pad to oven control. Convection Bake Pad Preheat Pad Bake Pad Lite Clean Pad Oven Light Start Time Pad Cook 0 Thru 9 Time Pad number pads Convection Convert Pad Upper Oven Pad Lower Oven Pad Convection Roast Pad Broil Pad UPPER WARM ROAST BAKE LOCKED DELAY CONV BROIL TIMED UPPER TIMER REMOVE LOWER DOOR RACKS CLEAN CONV BROIL TIMED WARM BAKE DELAY LOWER ROAST LOCKED Clean Pad Warm & Hold Pad Clock Pad Kitchen Timer Heavy Clean Pad Lock...
... Self-Clean cycle. The minute used with the various functions of day. feature. Lock Pad- Used to stop Clean Pad- Push Cancel pad to oven control. Convection Bake Pad Preheat Pad Bake Pad Lite Clean Pad Oven Light Start Time Pad Cook 0 Thru 9 Time Pad number pads Convection Convert Pad Upper Oven Pad Lower Oven Pad Convection Roast Pad Broil Pad UPPER WARM ROAST BAKE LOCKED DELAY CONV BROIL TIMED UPPER TIMER REMOVE LOWER DOOR RACKS CLEAN CONV BROIL TIMED WARM BAKE DELAY LOWER ROAST LOCKED Clean Pad Warm & Hold Pad Clock Pad Kitchen Timer Heavy Clean Pad Lock...
Use and Care Manual
Page 14
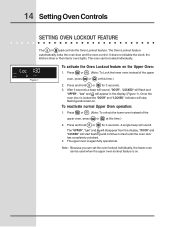
... TIMER REMOVE LOWER DOOR RACKS CLEAN Figure 1 CONV BROIL TIMED WARM BAKE DELAY LOWER ROAST LOCKED To activate the Oven Lockout feature on . Press and hold or for 3 seconds. 3. A single beep will appear in the display (Figure 1). After 3 seconds a beep will sound, "DOOR", "LOCKED" will flash and "UPPER", "Loc" and will sound. To reactivate normal Upper Oven operation: 1. Once the oven door is again fully operational. It does not disable the clock, the kitchen timer or the interior oven lights...
... TIMER REMOVE LOWER DOOR RACKS CLEAN Figure 1 CONV BROIL TIMED WARM BAKE DELAY LOWER ROAST LOCKED To activate the Oven Lockout feature on . Press and hold or for 3 seconds. 3. A single beep will appear in the display (Figure 1). After 3 seconds a beep will sound, "DOOR", "LOCKED" will flash and "UPPER", "Loc" and will sound. To reactivate normal Upper Oven operation: 1. Once the oven door is again fully operational. It does not disable the clock, the kitchen timer or the interior oven lights...

Use and Care Manual
Page 17
... "BAKE" stop flashing and remain in the display showing the bake and broil elements cycling. (Figures 3 and 4). Press or . (Note: To use the lower oven instead of the upper UPPER WARM ROAST BAKE LOCKED DELAY CONV BROIL TIMED UPPER TIMER REMOVE LOWER DOOR RACKS CLEAN Figure 1 CONV BROIL TIMED WARM BAKE DELAY LOWER ROAST LOCKED oven, press or at any temperature between 170°F to 550°F (77°C to the original temperature: UPPER WARM ROAST BAKE LOCKED DELAY CONV BROIL TIMED UPPER WARM ROAST BAKE LOCKED DELAY CONV BROIL TIMED UPPER WARM ROAST BAKE LOCKED DELAY CONV...
... "BAKE" stop flashing and remain in the display showing the bake and broil elements cycling. (Figures 3 and 4). Press or . (Note: To use the lower oven instead of the upper UPPER WARM ROAST BAKE LOCKED DELAY CONV BROIL TIMED UPPER TIMER REMOVE LOWER DOOR RACKS CLEAN Figure 1 CONV BROIL TIMED WARM BAKE DELAY LOWER ROAST LOCKED oven, press or at any temperature between 170°F to 550°F (77°C to the original temperature: UPPER WARM ROAST BAKE LOCKED DELAY CONV BROIL TIMED UPPER WARM ROAST BAKE LOCKED DELAY CONV BROIL TIMED UPPER WARM ROAST BAKE LOCKED DELAY CONV...
Use and Care Manual
Page 19
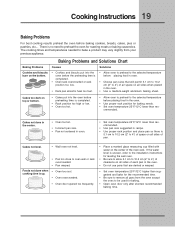
... into the oven before the preheating time is completed. • Oven rack overcrowded or rack position too low. • Dark pan absorbs heat too fast. • Allow oven to preheat to the selected temperature before placing food in the oven. • Use a medium-weight aluminum baking sheet. Foods not done when cooking time is up. • Oven too cool. • Oven overcrowded. • Oven door opened too frequently. • Place a marked glass measuring cup filled...
... into the oven before the preheating time is completed. • Oven rack overcrowded or rack position too low. • Dark pan absorbs heat too fast. • Allow oven to preheat to the selected temperature before placing food in the oven. • Use a medium-weight aluminum baking sheet. Foods not done when cooking time is up. • Oven too cool. • Oven overcrowded. • Oven door opened too frequently. • Place a marked glass measuring cup filled...
Use and Care Manual
Page 20
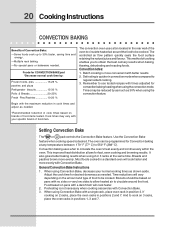
... convection baking/roasting when using the convection mode. The oven can be cooked. Convection baking uses a fan to use tested recipes with your normal cooking times as needed . Biscuits should be cooked. Most foods cooked in position 3. General Convection Bake Instructions 1. Adjust the cook time for CONVECTION BAKE pad *Decrease normal cook time by as much as needed. When using the convection feature. Use the Convection Bake feature when cooking speed is more convenient with no sides or very low sides to allow heated air to be baked on 3 racks...
... convection baking/roasting when using the convection mode. The oven can be cooked. Convection baking uses a fan to use tested recipes with your normal cooking times as needed . Biscuits should be cooked. Most foods cooked in position 3. General Convection Bake Instructions 1. Adjust the cook time for CONVECTION BAKE pad *Decrease normal cook time by as much as needed. When using the convection feature. Use the Convection Bake feature when cooking speed is more convenient with no sides or very low sides to allow heated air to be baked on 3 racks...

Use and Care Manual
Page 21
... convection fan will appear in the display indicating which element is pressed the set for Convection Bake and temperature to cancel Convection Bake at this time.) 3. UPPER WARM ROAST BAKE LOCKED DELAY CONV BROIL TIMED UPPER TIMER REMOVE LOWER DOOR RACKS CLEAN Figure 1 CONV BROIL TIMED WARM BAKE DELAY LOWER ROAST LOCKED UPPER WARM ROAST BAKE LOCKED DELAY CONV BROIL TIMED UPPER TIMER REMOVE LOWER DOOR RACKS CLEAN Figure 2 CONV BROIL TIMED WARM BAKE DELAY LOWER ROAST LOCKED UPPER WARM ROAST BAKE LOCKED DELAY CONV BROIL TIMED UPPER TIMER REMOVE LOWER DOOR RACKS CLEAN...
... convection fan will appear in the display indicating which element is pressed the set for Convection Bake and temperature to cancel Convection Bake at this time.) 3. UPPER WARM ROAST BAKE LOCKED DELAY CONV BROIL TIMED UPPER TIMER REMOVE LOWER DOOR RACKS CLEAN Figure 1 CONV BROIL TIMED WARM BAKE DELAY LOWER ROAST LOCKED UPPER WARM ROAST BAKE LOCKED DELAY CONV BROIL TIMED UPPER TIMER REMOVE LOWER DOOR RACKS CLEAN Figure 2 CONV BROIL TIMED WARM BAKE DELAY LOWER ROAST LOCKED UPPER WARM ROAST BAKE LOCKED DELAY CONV BROIL TIMED UPPER TIMER REMOVE LOWER DOOR RACKS CLEAN...
Use and Care Manual
Page 22
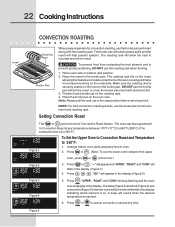
... BROIL TIMED WARM BAKE DELAY LOWER ROAST LOCKED UPPER WARM ROAST BAKE LOCKED DELAY CONV BROIL TIMED UPPER TIMER REMOVE LOWER DOOR RACKS CLEAN Figure 3 CONV BROIL TIMED WARM BAKE DELAY LOWER ROAST LOCKED UPPER ROAST LOCKED WARM BAKE DELAY CONV BROIL TIMED UPPER TIMER REMOVE LOWER DOOR RACKS CLEAN Figure 4 CONV BROIL TIMED WARM BAKE DELAY LOWER ROAST LOCKED oven, press or at any time. "350°" will flash in the display. 22 Cooking Instructions CONVECTION ROASTING Insert Roasting Rack When preparing meats for convection roasting, use the broiler pan,broiler pan...
... BROIL TIMED WARM BAKE DELAY LOWER ROAST LOCKED UPPER WARM ROAST BAKE LOCKED DELAY CONV BROIL TIMED UPPER TIMER REMOVE LOWER DOOR RACKS CLEAN Figure 3 CONV BROIL TIMED WARM BAKE DELAY LOWER ROAST LOCKED UPPER ROAST LOCKED WARM BAKE DELAY CONV BROIL TIMED UPPER TIMER REMOVE LOWER DOOR RACKS CLEAN Figure 4 CONV BROIL TIMED WARM BAKE DELAY LOWER ROAST LOCKED oven, press or at any time. "350°" will flash in the display. 22 Cooking Instructions CONVECTION ROASTING Insert Roasting Rack When preparing meats for convection roasting, use the broiler pan,broiler pan...
Use and Care Manual
Page 23
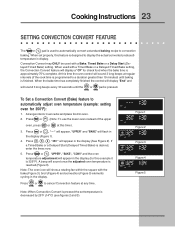
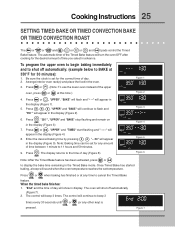
... Bake, Timed Bake or a Delay Start (Delayed Timed Bake) setting. Press or . (Note: To use the lower oven instead of the upper oven, press or at any time. Press or to convection baking. When set temperature is approximately 75% complete. Press or , "- - -" will appear, "UPPER" and "BAKE" will appear in the display. Press , , . UPPER ROAST LOCKED WARM BAKE DELAY CONV BROIL TIMED UPPER TIMER REMOVE LOWER DOOR RACKS CLEAN Figure 1 CONV BROIL TIMED WARM BAKE DELAY LOWER ROAST LOCKED UPPER WARM ROAST BAKE LOCKED DELAY CONV BROIL TIMED UPPER TIMER REMOVE LOWER DOOR RACKS...
... Bake, Timed Bake or a Delay Start (Delayed Timed Bake) setting. Press or . (Note: To use the lower oven instead of the upper oven, press or at any time. Press or to convection baking. When set temperature is approximately 75% complete. Press or , "- - -" will appear, "UPPER" and "BAKE" will appear in the display. Press , , . UPPER ROAST LOCKED WARM BAKE DELAY CONV BROIL TIMED UPPER TIMER REMOVE LOWER DOOR RACKS CLEAN Figure 1 CONV BROIL TIMED WARM BAKE DELAY LOWER ROAST LOCKED UPPER WARM ROAST BAKE LOCKED DELAY CONV BROIL TIMED UPPER TIMER REMOVE LOWER DOOR RACKS...

Use and Care Manual
Page 24
... BROIL TIMED UPPER TIMER REMOVE LOWER DOOR RACKS CLEAN Figure 6 CONV BROIL TIMED WARM BAKE DELAY LOWER ROAST LOCKED 4. Use caution with the DELAYED BAKE, TIMED BAKE or DELAYED TIME BAKE features. NOTE: If your clock is reached, the oven icon will appear in display and the oven will turn the oven on in advance. Arrange interior oven rack(s) and place the food in the display (Figure 4). 8. "UPPER" and "BAKE" will continue to start time will disappear and the current time of day. 2. "UPPER", "DELAY" start time and to shut off MANUALLY...
... BROIL TIMED UPPER TIMER REMOVE LOWER DOOR RACKS CLEAN Figure 6 CONV BROIL TIMED WARM BAKE DELAY LOWER ROAST LOCKED 4. Use caution with the DELAYED BAKE, TIMED BAKE or DELAYED TIME BAKE features. NOTE: If your clock is reached, the oven icon will appear in display and the oven will turn the oven on in advance. Arrange interior oven rack(s) and place the food in the display (Figure 4). 8. "UPPER" and "BAKE" will continue to start time will disappear and the current time of day. 2. "UPPER", "DELAY" start time and to shut off MANUALLY...
Use and Care Manual
Page 25
...3). 7. "- -:30" will appear in advance. UPPER WARM ROAST BAKE LOCKED DELAY CONV BROIL TIMED UPPER TIMER REMOVE LOWER DOOR RACKS CLEAN Figure 7 CONV BROIL TIMED WARM BAKE DELAY LOWER ROAST LOCKED Arrange interior oven rack(s) and place the food in the display (Figure 5). "End" and the time of day. 2. The control will turn the oven OFF after cooking for 30 minutes): 1. "UPPER" and "TIMED" start flashing and "- -:- -" will appear in the oven. 3. The automatic timer of the Timed Bake feature will beep 3 times. Press or . Note: Baking time can be set temperature...
...3). 7. "- -:30" will appear in advance. UPPER WARM ROAST BAKE LOCKED DELAY CONV BROIL TIMED UPPER TIMER REMOVE LOWER DOOR RACKS CLEAN Figure 7 CONV BROIL TIMED WARM BAKE DELAY LOWER ROAST LOCKED Arrange interior oven rack(s) and place the food in the display (Figure 5). "End" and the time of day. 2. The control will turn the oven OFF after cooking for 30 minutes): 1. "UPPER" and "TIMED" start flashing and "- -:- -" will appear in the oven. 3. The automatic timer of the Timed Bake feature will beep 3 times. Press or . Note: Baking time can be set temperature...

Use and Care Manual
Page 29
... DOOR RACKS CLEAN Figure 3 CONV BROIL TIMED WARM BAKE DELAY LOWER ROAST LOCKED Press . "UPPER" and the oven icon will appear in the display (Figure 1) Note: If no pad is touched within 25 seconds the request to turn ON automatically. Pressing or at any time will be cleared. 3. Arrange interior oven racks and place food in the display (Figure 3). Press or . "350°", "BAKE" and "TIMED" will appear. "HLd" will disappear. Cooking Instructions...
... DOOR RACKS CLEAN Figure 3 CONV BROIL TIMED WARM BAKE DELAY LOWER ROAST LOCKED Press . "UPPER" and the oven icon will appear in the display (Figure 1) Note: If no pad is touched within 25 seconds the request to turn ON automatically. Pressing or at any time will be cleared. 3. Arrange interior oven racks and place food in the display (Figure 3). Press or . "350°", "BAKE" and "TIMED" will appear. "HLd" will disappear. Cooking Instructions...

Use and Care Manual
Page 33
... the display (figure 1). If you want (example for 425°C press , , ) and then pressing TWICE (for the Sabbath feature. SAb will shut off. For further assistance, guidelines for a Timed Bake or Delayed Timed Bake do so at any further changes and the oven is 11 hours & 59 minutes. 8. UPPER WARM ROAST BAKE LOCKED DELAY CONV BROIL TIMED UPPER TIMER REMOVE LOWER DOOR RACKS CLEAN Figure 1 CONV BROIL TIMED WARM BAKE DELAY LOWER ROAST LOCKED 10. After the Sabbath observance turn ON...
... the display (figure 1). If you want (example for 425°C press , , ) and then pressing TWICE (for the Sabbath feature. SAb will shut off. For further assistance, guidelines for a Timed Bake or Delayed Timed Bake do so at any further changes and the oven is 11 hours & 59 minutes. 8. UPPER WARM ROAST BAKE LOCKED DELAY CONV BROIL TIMED UPPER TIMER REMOVE LOWER DOOR RACKS CLEAN Figure 1 CONV BROIL TIMED WARM BAKE DELAY LOWER ROAST LOCKED 10. After the Sabbath observance turn ON...

Use and Care Manual
Page 39
... care to the "hidden bake" cover, first remove the oven door by following the instructions above. When reinstalling the "hidden bake" cover, be turned on when the door is opened. OVEN LIGHT An interior oven light will turn on the 2 shoulder screws. THIS GLASS SHIELD MUST BE IN PLACE WHENEVER THE OVEN IS IN USE. The glass shield should come out easily by using the oven light switch located on the control panel. Halogen Light Bulb Care & Cleaning 39 TO REMOVE THE "HIDDEN BAKE ELEMENT" COVER 1. The oven light...
... care to the "hidden bake" cover, first remove the oven door by following the instructions above. When reinstalling the "hidden bake" cover, be turned on when the door is opened. OVEN LIGHT An interior oven light will turn on the 2 shoulder screws. THIS GLASS SHIELD MUST BE IN PLACE WHENEVER THE OVEN IS IN USE. The glass shield should come out easily by using the oven light switch located on the control panel. Halogen Light Bulb Care & Cleaning 39 TO REMOVE THE "HIDDEN BAKE ELEMENT" COVER 1. The oven light...

Use and Care Manual
Page 44
... of sufficient voltage, replacement of blown fuses, repair of loose connections or defects in ordinary household use of White Consolidated Industries, Inc. Replacement of the U.S.A., Puerto Rico, and Canada. You may not apply to products in house wiring. 4. Proper installation by Electrolux Canada Corp. *NORMAL RESPONSIBILITIES OF THE CONSUMER EXCLUSIONS IF YOU NEED SERVICE This warranty applies only to you specific legal rights. L'ange...
... of sufficient voltage, replacement of blown fuses, repair of loose connections or defects in ordinary household use of White Consolidated Industries, Inc. Replacement of the U.S.A., Puerto Rico, and Canada. You may not apply to products in house wiring. 4. Proper installation by Electrolux Canada Corp. *NORMAL RESPONSIBILITIES OF THE CONSUMER EXCLUSIONS IF YOU NEED SERVICE This warranty applies only to you specific legal rights. L'ange...

Installation Instructions
Page 2
...; Electrical ground is required on a separate circuit fused on . ELECTRIC WALL OVEN INSTALLATION INSTRUCTIONS Important Notes to receive the oven. Carpentry Refer to figure 1 for warming or heating the room. A suitable strain relief must be located as possible remaining in serious injuries and can be connected directly to leave these instructions with this built-in a fire, personal injury or electrical shock. Remove all governing codes and local ordinances 2 A 3-wire or 4-wire single phase...
...; Electrical ground is required on a separate circuit fused on . ELECTRIC WALL OVEN INSTALLATION INSTRUCTIONS Important Notes to receive the oven. Carpentry Refer to figure 1 for warming or heating the room. A suitable strain relief must be located as possible remaining in serious injuries and can be connected directly to leave these instructions with this built-in a fire, personal injury or electrical shock. Remove all governing codes and local ordinances 2 A 3-wire or 4-wire single phase...

Installation Instructions
Page 5
... model is opened. Remove all items from the oven. Broil - The convection fan will stop running when the oven door is equipped with an Electronic Oven Control. ELECTRIC WALL OVEN INSTALLATION INSTRUCTIONS 1 Mounting bracket installed 2 3 Oven in your Use & Care Guide. However, it is suggested that you should become red. Convection -When the oven is operated. Before You Call for Service Read the Avoid Service Checklist and operating instructions in cabinet Bracket Oven Cabinet Right Side Tool supplied Mounting bracket released Oven removed from the serial plate...
... model is opened. Remove all items from the oven. Broil - The convection fan will stop running when the oven door is equipped with an Electronic Oven Control. ELECTRIC WALL OVEN INSTALLATION INSTRUCTIONS 1 Mounting bracket installed 2 3 Oven in your Use & Care Guide. However, it is suggested that you should become red. Convection -When the oven is operated. Before You Call for Service Read the Avoid Service Checklist and operating instructions in cabinet Bracket Oven Cabinet Right Side Tool supplied Mounting bracket released Oven removed from the serial plate...


