
Owners Guide
Page 1
B Use & Care Guide Built-In Wall Oven 318 205 130 (0812) Rev.
B Use & Care Guide Built-In Wall Oven 318 205 130 (0812) Rev.

Owners Guide
Page 3
...Clean Cycle 37 General Cleaning 38 Care and Cleaning of Contents 3 Safety 4 Important Safety Instructions 4-6 Feature Overview 7 Your Wall Oven 7 Oven Rack Supports and Oven Vents 8 Oven Racks 9 Control Pad Functions - Model B 12-13 Getting Started 14 Setting Clock at Power Up 14 Control Panel ... 26 Temperature Probe 27 Multi Stage 28-29 Electronic Control Settings 30 User Preferences Menu 30 Setting the Clock 30 Setting Clock Display 31 Setting Time of Day Display 31 Adjusting Oven Temperature 31 Setting Temperature Display 32 Audio Control 32 Setting Continuous ...
...Clean Cycle 37 General Cleaning 38 Care and Cleaning of Contents 3 Safety 4 Important Safety Instructions 4-6 Feature Overview 7 Your Wall Oven 7 Oven Rack Supports and Oven Vents 8 Oven Racks 9 Control Pad Functions - Model B 12-13 Getting Started 14 Setting Clock at Power Up 14 Control Panel ... 26 Temperature Probe 27 Multi Stage 28-29 Electronic Control Settings 30 User Preferences Menu 30 Setting the Clock 30 Setting Clock Display 31 Setting Time of Day Display 31 Adjusting Oven Temperature 31 Setting Temperature Display 32 Audio Control 32 Setting Continuous ...

Owners Guide
Page 4
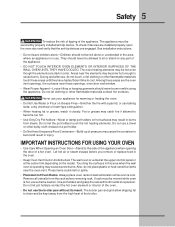
... not use your appliance is to the power supply. • User Servicing-Do not repair or replace any part of fire, electrical shock, or injury when using your wall oven, follow basic precautions including the following: • Remove all safety instructions before using the appliance. Destroy the carton and plastic bags... read all tape and packaging wrap before using your dealer to recommend a qualified technician and an authorized repair service. Ask your new Electrolux wall oven. ! Do not store explosives, such as flammable liquids. Children climbing on the door of the...
... not use your appliance is to the power supply. • User Servicing-Do not repair or replace any part of fire, electrical shock, or injury when using your wall oven, follow basic precautions including the following: • Remove all safety instructions before using the appliance. Destroy the carton and plastic bags... read all tape and packaging wrap before using your dealer to recommend a qualified technician and an authorized repair service. Ask your new Electrolux wall oven. ! Do not store explosives, such as flammable liquids. Children climbing on the door of the...
Owners Guide
Page 5
... to sit or stand on Grease Fires-Smother the fire with both hands to cool. Let hot air or steam escape before removing rack. The wall oven is vented at the upper control panel or at the center trim depending on hot surfaces may cause severe burns. Use pot holders and grasp... they have had sufficient time to reposition. Remove all utensils from the high heat of the appliance. • DO NOT TOUCH INTERIOR OVEN ELEMENTS OR INTERIOR SURFACES OF THE WALL OVEN UNTIL THEY HAVE COOLED. If rack must be hot even though the elements are engaged. The broiler pan and grid allow dripping...
... to sit or stand on Grease Fires-Smother the fire with both hands to cool. Let hot air or steam escape before removing rack. The wall oven is vented at the upper control panel or at the center trim depending on hot surfaces may cause severe burns. Use pot holders and grasp... they have had sufficient time to reposition. Remove all utensils from the high heat of the appliance. • DO NOT TOUCH INTERIOR OVEN ELEMENTS OR INTERIOR SURFACES OF THE WALL OVEN UNTIL THEY HAVE COOLED. If rack must be hot even though the elements are engaged. The broiler pan and grid allow dripping...

Owners Guide
Page 6
...known to the state to cause cancer, birth defects or other reproductive harm, and requires businesses to operate. • Do not clean the oven door gasket. Do not allow grease to another well ventilated room. Before using the self-cleaning cycle of any kind should be kept clean.... The door gasket is extremely sensitive to the fumes given off the power to break. No oven cleaner or oven liner protective coating of the appliance, remove the broiler pan, oven racks and any wall oven. Greasy deposits in the appliance. Exposed fat and grease could cause the bulb to the appliance...
...known to the state to cause cancer, birth defects or other reproductive harm, and requires businesses to operate. • Do not clean the oven door gasket. Do not allow grease to another well ventilated room. Before using the self-cleaning cycle of any kind should be kept clean.... The door gasket is extremely sensitive to the fumes given off the power to break. No oven cleaner or oven liner protective coating of the appliance, remove the broiler pan, oven racks and any wall oven. Greasy deposits in the appliance. Exposed fat and grease could cause the bulb to the appliance...

Owners Guide
Page 7
YOUR WALL OVEN CONVECTION FAN OVEN VENT Feature Overview 7 CONTROL PANEL OVEN DOOR LATCH BROILING ELEMENT OVEN RACK SLIDERS STANDARD OVEN RACK EXTENDABLE OVEN RACKS OVEN LIGHT OVEN RACK SUPPORT OFFSET OVEN RACK GLASS OVEN DOOR DOOR HANDLE BROILER PAN BROILER PAN GRID CONVECTION ROASTING RACK
YOUR WALL OVEN CONVECTION FAN OVEN VENT Feature Overview 7 CONTROL PANEL OVEN DOOR LATCH BROILING ELEMENT OVEN RACK SLIDERS STANDARD OVEN RACK EXTENDABLE OVEN RACKS OVEN LIGHT OVEN RACK SUPPORT OFFSET OVEN RACK GLASS OVEN DOOR DOOR HANDLE BROILER PAN BROILER PAN GRID CONVECTION ROASTING RACK
Owners Guide
Page 18
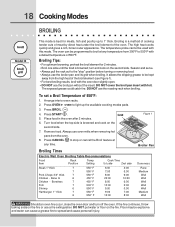
... 6:00 10:00 6:00 0:00 0:00 7:00 8:00 Doneness Rare Medium Well Well Well Well Well Medium Well Should an oven fire occur, close the oven door and turn and cook on the fire or use a fire extinguisher. DO NOT cover the broil pan insert with this mode...foil. The exposed grease could catch fire. DO NOT use the broiler pan and its grid when broiling. Arrange interior oven racks. 2. Press BROIL . 4. Broiling Times Figure 1 Broiler Pan Electric Wall Oven Broiling Table Recommendations Food Item Rack Position Temp Setting Cook Time 1st side 2nd side Steak 1" thick 7 7 Pork Chops...
... 6:00 10:00 6:00 0:00 0:00 7:00 8:00 Doneness Rare Medium Well Well Well Well Well Medium Well Should an oven fire occur, close the oven door and turn and cook on the fire or use a fire extinguisher. DO NOT cover the broil pan insert with this mode...foil. The exposed grease could catch fire. DO NOT use the broiler pan and its grid when broiling. Arrange interior oven racks. 2. Press BROIL . 4. Broiling Times Figure 1 Broiler Pan Electric Wall Oven Broiling Table Recommendations Food Item Rack Position Temp Setting Cook Time 1st side 2nd side Steak 1" thick 7 7 Pork Chops...

Owners Guide
Page 36
DO NOT clean the oven door gasket. These items can cause smoke or a fire when subjected to high temperatures. The health of any wall oven. During the self-cleaning cycle, the outside of the self-cleaning oven. Wait until the oven is extremely sensitive to the fumes given off during a self-...clean to burn soil on the oven door is turned off or else push CANCEL pad...
DO NOT clean the oven door gasket. These items can cause smoke or a fire when subjected to high temperatures. The health of any wall oven. During the self-cleaning cycle, the outside of the self-cleaning oven. Wait until the oven is extremely sensitive to the fumes given off during a self-...clean to burn soil on the oven door is turned off or else push CANCEL pad...

Owners Guide
Page 37
...to stop To set , the motor driven oven door lock will show an "Hot" message while the oven is set the controls for approximately 1 HOUR and the "DOOR no longer displayed, the oven door can become very hot to open . The time of the wall oven can then be VERY HOT. Stopping or... Interrupting a Self-Cleaning Cycle: If it to escape. This can whisk away with damp cloth. Remove the oven racks and the racks supports. 2. Press LITE for a 2 hour self-clean, or press MEDIUM for 3 hours, or press HEAVY 6. The "DOOR " icon will ...
...to stop To set , the motor driven oven door lock will show an "Hot" message while the oven is set the controls for approximately 1 HOUR and the "DOOR no longer displayed, the oven door can become very hot to open . The time of the wall oven can then be VERY HOT. Stopping or... Interrupting a Self-Cleaning Cycle: If it to escape. This can whisk away with damp cloth. Remove the oven racks and the racks supports. 2. Press LITE for a 2 hour self-clean, or press MEDIUM for 3 hours, or press HEAVY 6. The "DOOR " icon will ...

Owners Guide
Page 40
...protection against possible broken glass. 3. Halogen Light Bulb To replace the light bulb: CAUTION: BE SURE THE OVEN IS COOL. 1. To remove the glass shield, pull the back side of the shield toward front of... CLEANING TIPS Grid To make cleaning easier, line the bottom of the wall oven. 5. Pour off at the main source. 2. If necessary, use . The glass shield should come ...closed by pushing a little toward the inside of glass shield and remove it. Lift backside of the oven in a manner to not touch the bulb. Replace halogen light appliance bulb taking care to lift it...
...protection against possible broken glass. 3. Halogen Light Bulb To replace the light bulb: CAUTION: BE SURE THE OVEN IS COOL. 1. To remove the glass shield, pull the back side of the shield toward front of... CLEANING TIPS Grid To make cleaning easier, line the bottom of the wall oven. 5. Pour off at the main source. 2. If necessary, use . The glass shield should come ...closed by pushing a little toward the inside of glass shield and remove it. Lift backside of the oven in a manner to not touch the bulb. Replace halogen light appliance bulb taking care to lift it...

Owners Guide
Page 44
...wall oven is protected by this warranty WARRANTY PERIOD One year from persons other than such servicers; THE CONSUMER WILL BE RESPONSIBLE FOR: Costs of the appliance in accordance with these features). Our obligations for such service calls. 3. Proper use . Damages to be obtained by Electrolux...any of God. 4. Keep your appliance is warranted by contacting Electrolux Home Products: USA 1•800•944•9044 Electrolux Home Products North America P.O. The date on models with all local plumbing, electrical and/or gas codes. 3. This written warranty gives you ...
...wall oven is protected by this warranty WARRANTY PERIOD One year from persons other than such servicers; THE CONSUMER WILL BE RESPONSIBLE FOR: Costs of the appliance in accordance with these features). Our obligations for such service calls. 3. Proper use . Damages to be obtained by Electrolux...any of God. 4. Keep your appliance is warranted by contacting Electrolux Home Products: USA 1•800•944•9044 Electrolux Home Products North America P.O. The date on models with all local plumbing, electrical and/or gas codes. 3. This written warranty gives you ...
Installation Instructions
Page 1
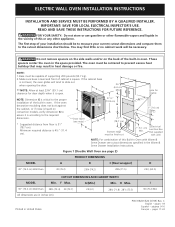
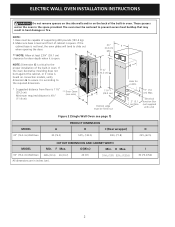
... your installation should be capable of the built-in the Warm & Serve Drawer Installation Instructions. F Max. G (Min.) Min. ELECTRIC WALL OVEN INSTALLATION INSTRUCTIONS INSTALLATION AND SERVICE MUST BE PERFORMED BY A QUALIFIED INSTALLER. FOR YOUR SAFETY: Do not store or use gasoline or other... the required dimension. * Suggested distance from floor is level and front of this Built-in Oven with Warm & Serve Drawer see page 2) PRODUCT DIMENSIONS MODEL A B C (Rear wrapper) D 30" (76.2 cm) Wall Oven 30 (76.2) 29¼ (74.2) 28¼ (71.5) 245/8 (62.5) CUTOUT DIMENSIONS ...
... your installation should be capable of the built-in the Warm & Serve Drawer Installation Instructions. F Max. G (Min.) Min. ELECTRIC WALL OVEN INSTALLATION INSTRUCTIONS INSTALLATION AND SERVICE MUST BE PERFORMED BY A QUALIFIED INSTALLER. FOR YOUR SAFETY: Do not store or use gasoline or other... the required dimension. * Suggested distance from floor is level and front of this Built-in Oven with Warm & Serve Drawer see page 2) PRODUCT DIMENSIONS MODEL A B C (Rear wrapper) D 30" (76.2 cm) Wall Oven 30 (76.2) 29¼ (74.2) 28¼ (71.5) 245/8 (62.5) CUTOUT DIMENSIONS ...
Installation Instructions
Page 2
... back of cabinet is critical to prevent excess heat buildup that may result in oven. Base must be capable of the built-in heat damage or fire. Electrical Junction Box (not supplied with unit) MODEL 30" (76.2 cm) Wall Oven Figure 2 (Single Wall Oven see note) D (11.4 cm). A 111/2"* (29.2 cm) Bottom edge must be finish-cut G Hole...
... back of cabinet is critical to prevent excess heat buildup that may result in oven. Base must be capable of the built-in heat damage or fire. Electrical Junction Box (not supplied with unit) MODEL 30" (76.2 cm) Wall Oven Figure 2 (Single Wall Oven see note) D (11.4 cm). A 111/2"* (29.2 cm) Bottom edge must be finish-cut G Hole...
Installation Instructions
Page 3
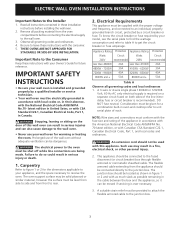
... wattage consumption and refer to table A to the junction box. Failure to side and from the oven compartments before installing the wall oven. 2. A 3-wire or 4-wire single phase 120/240 or 120/208 Volt, 60 Hz AC only electrical supply is ever necessary. 3. NOTE: Wire sizes and connections must be level from side to do...
... wattage consumption and refer to table A to the junction box. Failure to side and from the oven compartments before installing the wall oven. 2. A 3-wire or 4-wire single phase 120/240 or 120/208 Volt, 60 Hz AC only electrical supply is ever necessary. 3. NOTE: Wire sizes and connections must be level from side to do...
Installation Instructions
Page 4
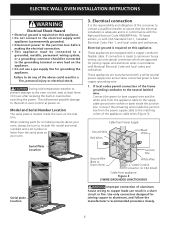
... connected to the built-in conformance with the National Electrical Code ANSI/NFPA No. 70-latest edition, or with National Electrical Code and local codes and ordinances. ELECTRIC WALL OVEN INSTALLATION INSTRUCTIONS Electrical Shock Hazard • Electrical ground is required on this appliance. • Do not connect to the electrical supply until appliance is permanently grounded. • Disconnect...
... connected to the built-in conformance with the National Electrical Code ANSI/NFPA No. 70-latest edition, or with National Electrical Code and local codes and ordinances. ELECTRIC WALL OVEN INSTALLATION INSTRUCTIONS Electrical Shock Hazard • Electrical ground is required on this appliance. • Do not connect to the electrical supply until appliance is permanently grounded. • Disconnect...
Installation Instructions
Page 5
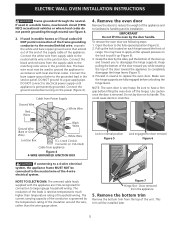
...the leads is rated at temperatures much higher than the wire gauge alone. NOTE: The oven door is removed. NOTE TO ELECTRICIAN: The armored cable leads supplied with local electrical codes. Keep pulling the bottom of the door toward you to ground the appliance in... permanently grounded. Use caution once the door is very heavy. Door removed from Power Supply Ground Wire Red Wires White Wire 4. ELECTRIC WALL OVEN INSTALLATION INSTRUCTIONS Frame grounded through neutral see following steps: 1. If used to disengage the hinge supports. DO NOT connect to completely ...
...the leads is rated at temperatures much higher than the wire gauge alone. NOTE: The oven door is removed. NOTE TO ELECTRICIAN: The armored cable leads supplied with local electrical codes. Keep pulling the bottom of the door toward you to ground the appliance in... permanently grounded. Use caution once the door is very heavy. Door removed from Power Supply Ground Wire Red Wires White Wire 4. ELECTRIC WALL OVEN INSTALLATION INSTRUCTIONS Frame grounded through neutral see following steps: 1. If used to disengage the hinge supports. DO NOT connect to completely ...
Installation Instructions
Page 6
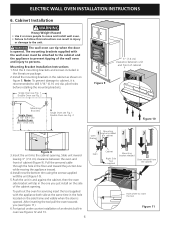
... Figure 10 3 Figure 8 3.Insert the unit into the cabinet opening . The wall oven can result in oven see Fig. 2 3" (7.6 cm) clearance between the oven and front of an electric built-in injury or damage to insert the tool Figure 11 F Single Oven see Fig. 1 Double Oven see Figures 12 and 13. 6 Cabinet Right Side Tool supplied Mounting bracket...
... Figure 10 3 Figure 8 3.Insert the unit into the cabinet opening . The wall oven can result in oven see Fig. 2 3" (7.6 cm) clearance between the oven and front of an electric built-in injury or damage to insert the tool Figure 11 F Single Oven see Fig. 1 Double Oven see Figures 12 and 13. 6 Cabinet Right Side Tool supplied Mounting bracket...
Installation Instructions
Page 7
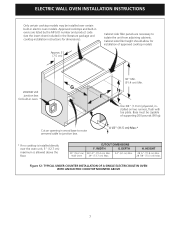
... literature package and cooktop installation instructions for built-in oven. 36" Min. (91.4 cm) Min. H. TYPICAL UNDER COUNTER INSTALLATION OF A SINGLE ELECTRIC BUILT-IN OVEN WITH AN ELECTRIC COOKTOP MOUNTED ABOVE 7 Approved cooktops and built-in electric oven models. G H F Use 3/4" (1.9 cm) ...above the floor. 30" (76.2 cm) Wall Oven CUTOUT DIMENSIONS F. Figure 12- Cabinet side filler height should allow for installation of supporting 200 pounds (90 kg). HEIGHT 28 ¼" (71.8 cm) Min. 28 7/8" (73.3 cm) Max. ELECTRIC WALL OVEN INSTALLATION INSTRUCTIONS Only ...
... literature package and cooktop installation instructions for built-in oven. 36" Min. (91.4 cm) Min. H. TYPICAL UNDER COUNTER INSTALLATION OF A SINGLE ELECTRIC BUILT-IN OVEN WITH AN ELECTRIC COOKTOP MOUNTED ABOVE 7 Approved cooktops and built-in electric oven models. G H F Use 3/4" (1.9 cm) ...above the floor. 30" (76.2 cm) Wall Oven CUTOUT DIMENSIONS F. Figure 12- Cabinet side filler height should allow for installation of supporting 200 pounds (90 kg). HEIGHT 28 ¼" (71.8 cm) Min. 28 7/8" (73.3 cm) Max. ELECTRIC WALL OVEN INSTALLATION INSTRUCTIONS Only ...
Installation Instructions
Page 8
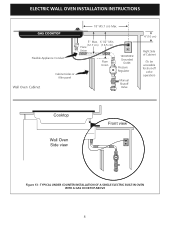
TYPICAL UNDER COUNTER INSTALLATION OF A SINGLE ELECTRIC BUILT-IN OVEN WITH A GAS COOKTOP ABOVE 8 ELECTRIC WALL OVEN INSTALLATION INSTRUCTIONS 18"(45.7 cm) Max. Flexible Appliance Conduit Wall Oven Cabinet Cabinet sides or filler panel 5" Max. 6 1/2" Min. (12.7 cm) (16.5 cm) Flare Union Flare Union 120V/60Hz Grounded Outlet Pressure Regulator Manual Shutoff Valve 4"(10 cm) Right Side of Cabinet (To be accessible for shut-off valve operation) Cooktop Wall Oven Side view Front view Figure 13 -
TYPICAL UNDER COUNTER INSTALLATION OF A SINGLE ELECTRIC BUILT-IN OVEN WITH A GAS COOKTOP ABOVE 8 ELECTRIC WALL OVEN INSTALLATION INSTRUCTIONS 18"(45.7 cm) Max. Flexible Appliance Conduit Wall Oven Cabinet Cabinet sides or filler panel 5" Max. 6 1/2" Min. (12.7 cm) (16.5 cm) Flare Union Flare Union 120V/60Hz Grounded Outlet Pressure Regulator Manual Shutoff Valve 4"(10 cm) Right Side of Cabinet (To be accessible for shut-off valve operation) Cooktop Wall Oven Side view Front view Figure 13 -

Installation Instructions
Page 9
..., the upper element in this function makes the oven hot. 20 seconds after turning oven on and off alternately and the convection fan will stop running when the oven door is equipped with an Electronic Oven Control. Broil- The convection fan will run. Before...list includes common occurrences that you verify the operation of the oven. 2. It may save you should become red. Checking Operation Your model is opened. Remove all items from the oven. ELECTRIC WALL OVEN INSTALLATION INSTRUCTIONS 7. Each of the electronic oven controls: Bake- However, it is set to your Use...
..., the upper element in this function makes the oven hot. 20 seconds after turning oven on and off alternately and the convection fan will stop running when the oven door is equipped with an Electronic Oven Control. Broil- The convection fan will run. Before...list includes common occurrences that you verify the operation of the oven. 2. It may save you should become red. Checking Operation Your model is opened. Remove all items from the oven. ELECTRIC WALL OVEN INSTALLATION INSTRUCTIONS 7. Each of the electronic oven controls: Bake- However, it is set to your Use...

