Datasheet
Page 1
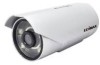
... and adapter. Product specifications and design are subject to install an additional power adapter. www.edimax.com IR-113E 3Mpx Outdoor PoE True Day & Night Network Camera Overview The Edimax IR-113E is an ONVIF compliant true day and night network camera with the IEEE 802.3af Power over Ethernet standard, which allow you to capture detailed videos...
... and adapter. Product specifications and design are subject to install an additional power adapter. www.edimax.com IR-113E 3Mpx Outdoor PoE True Day & Night Network Camera Overview The Edimax IR-113E is an ONVIF compliant true day and night network camera with the IEEE 802.3af Power over Ethernet standard, which allow you to capture detailed videos...
Datasheet
Page 2
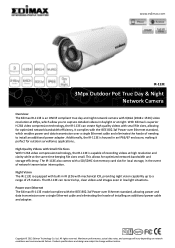
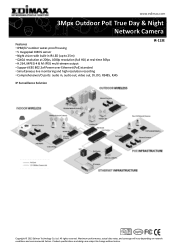
...True Day & Night Network Camera Features • IP66/67 outdoor water-proof housing • 5 megapixel CMOS sensor • Night vision with built-in , audio out, video out, DI, DO, RS485, RJ45 IR-113E IP Surveillance Solution Copyright © 2012 Edimax Technology Co. Product specifications and....3af Power over Ethernet (PoE) standard • Simultaneous live monitoring and high resolution recording • Comprehensive I/O ports: audio in IR LED (up to change without notice. Ltd. All rights reserved. Maximum performance, actual data rates, and coverage will vary depending on...
...True Day & Night Network Camera Features • IP66/67 outdoor water-proof housing • 5 megapixel CMOS sensor • Night vision with built-in , audio out, video out, DI, DO, RS485, RJ45 IR-113E IP Surveillance Solution Copyright © 2012 Edimax Technology Co. Product specifications and....3af Power over Ethernet (PoE) standard • Simultaneous live monitoring and high resolution recording • Comprehensive I/O ports: audio in IR LED (up to change without notice. Ltd. All rights reserved. Maximum performance, actual data rates, and coverage will vary depending on...
Datasheet
Page 3
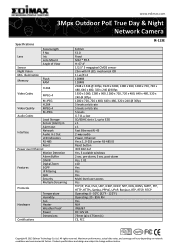
... Filtering QoS Security Multiple Streaming Protocols Hardware Certifications Temperature Humidity Fan Heater Weather Proof Power Dimensions IR-113E 6.0mm F2.0 Fixed M12 * P0.5 H: 67.4° 1/2.5" 5 megapixel CMOS sensor 25m with IR LED, mechanical ICR 1 Lux/F1.2 128MB 128MB 2048 x 1536 @ 20fps; 1920 x...N/A IP66/67 DC 12V 2A 73mm (ø) x 175mm (L) CE, FCC Copyright © 2012 Edimax Technology Co. www.edimax.com 3Mpx Outdoor PoE True Day & Night Network Camera Specifications Lens Sensor Night Vision Min. All rights reserved. Ltd. Product specifications and design are subject to...
... Filtering QoS Security Multiple Streaming Protocols Hardware Certifications Temperature Humidity Fan Heater Weather Proof Power Dimensions IR-113E 6.0mm F2.0 Fixed M12 * P0.5 H: 67.4° 1/2.5" 5 megapixel CMOS sensor 25m with IR LED, mechanical ICR 1 Lux/F1.2 128MB 128MB 2048 x 1536 @ 20fps; 1920 x...N/A IP66/67 DC 12V 2A 73mm (ø) x 175mm (L) CE, FCC Copyright © 2012 Edimax Technology Co. www.edimax.com 3Mpx Outdoor PoE True Day & Night Network Camera Specifications Lens Sensor Night Vision Min. All rights reserved. Ltd. Product specifications and design are subject to...
Quick Install Guide
Page 3
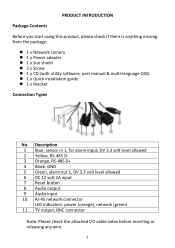
PRODUCT INTRODUCTION Package Contents Before you start using this product, please check if there is anything missing from the package: z 1 x Network camera z 1 x Power adapter z 1 x Sun shield z 2 x Screw z 1 x CD (with utility software, user manual & multi‐language QIG) z 1 x Quick installation guide z 1 x Bracket Connection Types No. Description 1 Blue, sensor ...
PRODUCT INTRODUCTION Package Contents Before you start using this product, please check if there is anything missing from the package: z 1 x Network camera z 1 x Power adapter z 1 x Sun shield z 2 x Screw z 1 x CD (with utility software, user manual & multi‐language QIG) z 1 x Quick installation guide z 1 x Bracket Connection Types No. Description 1 Blue, sensor ...

Quick Install Guide
Page 4
Front No. Description 1 IR LEDs for IR LED on/off control 3 Fixed focal lens INSTALLATION 1. Before powering on the camera, find the screws in night mode 2 Day and night mode sensor for illumination in the package and use a screwdriver to fix the sun shield onto the device's main body. 2. Secure the wall mount bracket onto the wall, and then secure the camera onto the bracket. 3
Front No. Description 1 IR LEDs for IR LED on/off control 3 Fixed focal lens INSTALLATION 1. Before powering on the camera, find the screws in night mode 2 Day and night mode sensor for illumination in the package and use a screwdriver to fix the sun shield onto the device's main body. 2. Secure the wall mount bracket onto the wall, and then secure the camera onto the bracket. 3
Quick Install Guide
Page 5
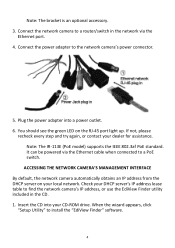
... CD‐ROM drive. It can be powered via the Ethernet port. 4. Check your dealer for assistance. Note: The IR‐113E (PoE model) supports the IEEE 802.3af PoE standard. Connect the network camera to a PoE switch. Connect the power adapter to install the "EdiView Finder" software. 4 Insert the CD into a power...
... CD‐ROM drive. It can be powered via the Ethernet port. 4. Check your dealer for assistance. Note: The IR‐113E (PoE model) supports the IEEE 802.3af PoE standard. Connect the network camera to a PoE switch. Connect the power adapter to install the "EdiView Finder" software. 4 Insert the CD into a power...

Quick Install Guide
Page 6
After the installation is complete, double‐click the "EdiView_Finder" icon to the network first). 5 2. Click "Discover" to search for all the network cameras on your local network (make sure all the network cameras are powered on and connected to execute the application. 3.
After the installation is complete, double‐click the "EdiView_Finder" icon to the network first). 5 2. Click "Discover" to search for all the network cameras on your local network (make sure all the network cameras are powered on and connected to execute the application. 3.
Quick Install Guide
Page 7
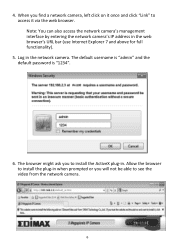
...is "1234". 6. Allow the browser to install the plug‐in . Note: You can also access the network camera's management interface by entering the network camera's IP address in the network camera. When you will not be able to access it once and click "Link" to see the video from the ...network camera. 6 The browser might ask you to install the ActiveX plug‐in when prompted or you find a network camera, left click ...
...is "1234". 6. Allow the browser to install the plug‐in . Note: You can also access the network camera's management interface by entering the network camera's IP address in the network camera. When you will not be able to access it once and click "Link" to see the video from the ...network camera. 6 The browser might ask you to install the ActiveX plug‐in when prompted or you find a network camera, left click ...
Quick Install Guide
Page 10
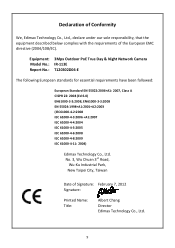
Equipment: 3Mpx Outdoor PoE True Day & Night Network Camera Model No.: IR‐113E Report No.: T120302D06‐E The following European standards for essential requirements have been followed: European Standard EN 55022:2006+A1: 2007, Class A CISPR 22: ... declare under our sole responsibility, that the equipment described below complies with the requirements of Signature: February 7, 2012 Signature: Printed Name: Title: Albert Chang Director Edimax Technology Co., Ltd. 9 No. 3, Wu Chuan 3rd Road, Wu‐Ku Industrial Park, New Taipei City, Taiwan Date of the European EMC directive (...
Equipment: 3Mpx Outdoor PoE True Day & Night Network Camera Model No.: IR‐113E Report No.: T120302D06‐E The following European standards for essential requirements have been followed: European Standard EN 55022:2006+A1: 2007, Class A CISPR 22: ... declare under our sole responsibility, that the equipment described below complies with the requirements of Signature: February 7, 2012 Signature: Printed Name: Title: Albert Chang Director Edimax Technology Co., Ltd. 9 No. 3, Wu Chuan 3rd Road, Wu‐Ku Industrial Park, New Taipei City, Taiwan Date of the European EMC directive (...
Manual
Page 2
CONTENTS - Chapter I Introduction 1 1.1 Highlights of your new Network IP Camera 1 1.2 Safety Instructions 2 1.3 Packaging Contents 3 1.4 Familiar with your new Network IP Camera 3 1.5 Installation of the Network IP Camera 7 Chapter II Using Network IP Camera by Web Interface 9 2.1 Locate the IP address of Network IP Camera 9 2.2 Connect to IP Camera's Web User Interface and Install ActiveX Plugin 12 2.3 Viewing...
CONTENTS - Chapter I Introduction 1 1.1 Highlights of your new Network IP Camera 1 1.2 Safety Instructions 2 1.3 Packaging Contents 3 1.4 Familiar with your new Network IP Camera 3 1.5 Installation of the Network IP Camera 7 Chapter II Using Network IP Camera by Web Interface 9 2.1 Locate the IP address of Network IP Camera 9 2.2 Connect to IP Camera's Web User Interface and Install ActiveX Plugin 12 2.3 Viewing...
Manual
Page 4
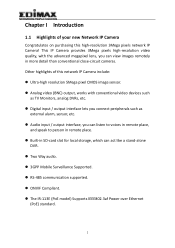
... Supported. RS-485 communication supported. ONVIF Compliant. The IR-113E (PoE model) Supports IEEE802.3af Power over Ethernet (PoE) standard. 1 Other highlights of your new Network IP Camera Congratulates on purchasing this network IP Camera include: Ultra-high resolution 5Mega pixel CMOS image sensor. Analog video...place. Built-in SD-card slot for local storage, which can view images remotely in more detail than conventional close-circuit cameras. Chapter I Introduction 1.1 Highlights of this high-resolution 3Mega pixels network IP...
... Supported. RS-485 communication supported. ONVIF Compliant. The IR-113E (PoE model) Supports IEEE802.3af Power over Ethernet (PoE) standard. 1 Other highlights of your new Network IP Camera Congratulates on purchasing this network IP Camera include: Ultra-high resolution 5Mega pixel CMOS image sensor. Analog video...place. Built-in SD-card slot for local storage, which can view images remotely in more detail than conventional close-circuit cameras. Chapter I Introduction 1.1 Highlights of this high-resolution 3Mega pixels network IP...

Manual
Page 5
keep it out from the reach of children. Do not insert any accessories of use this IP Camera at hot / humid places, and avoid direct sunlight. This IP Camera is connected to use . do not attempt to retrieve it 's not properly secured, and cause damage to human and... by yourself! 1.2 Safety Instructions Please follow the safety instructions listed below when you're using this Network IP Camera, or you would harm this IP camera with hand, or cover this camera and / or yourself! Also, the warranty will become void if you disobey these safety instructions. ...
keep it out from the reach of children. Do not insert any accessories of use this IP Camera at hot / humid places, and avoid direct sunlight. This IP Camera is connected to use . do not attempt to retrieve it 's not properly secured, and cause damage to human and... by yourself! 1.2 Safety Instructions Please follow the safety instructions listed below when you're using this Network IP Camera, or you would harm this IP camera with hand, or cover this camera and / or yourself! Also, the warranty will become void if you disobey these safety instructions. ...

Manual
Page 6
... & 1 multi-language QIG) 4 Quick installation guide 1 5 Sun shield kit 1 6 Bracket 1 1.4 Familiar with your dealer of your new Network IP Camera when you unpack the package. Sun shield 2. Item No. I/O cable Description Protect camera device body from sun shine or rain directly Including -Alarm I/O -TV output -Network -Audio I/O -RS485 +-Reset button -GND 3 1.3 Packaging...
... & 1 multi-language QIG) 4 Quick installation guide 1 5 Sun shield kit 1 6 Bracket 1 1.4 Familiar with your dealer of your new Network IP Camera when you unpack the package. Sun shield 2. Item No. I/O cable Description Protect camera device body from sun shine or rain directly Including -Alarm I/O -TV output -Network -Audio I/O -RS485 +-Reset button -GND 3 1.3 Packaging...

Manual
Page 7
IR-LED 2. Day/night sensor 3. Lens Description Used for illumination assistance under night mode Used for day/night detection and IR-LED ON/OFF control Fixed focal length. 4 3. IP camera device [Front site] IP camera Item 1.
IR-LED 2. Day/night sensor 3. Lens Description Used for illumination assistance under night mode Used for day/night detection and IR-LED ON/OFF control Fixed focal length. 4 3. IP camera device [Front site] IP camera Item 1.

Manual
Page 8
Sun shield 3. Cable glands Description Connects between camera device body & sun shield. Camera device body 4. Protect camera device body from sun shine or rain directly IP camera metal case The portion to mount bracket For water proof 5 [Back] Item 1. Bracket mount 5. Screw 2.
Sun shield 3. Cable glands Description Connects between camera device body & sun shield. Camera device body 4. Protect camera device body from sun shine or rain directly IP camera metal case The portion to mount bracket For water proof 5 [Back] Item 1. Bracket mount 5. Screw 2.

Manual
Page 10
Connect DC power cable to LAN port. 2. If everything's ok, you should see the green LED light on the wall. 3. Connect Ethernet cable to IP Camera's DC power connector. 4. If not, please recheck every step and try again, or ask your new IP camera. 1. Plug DC power adapter to setup your dealer of the Network IP Camera Please follow the instructions below to power outlet on LAN port light up. 1.5 Installation of purchase for help. 7
Connect DC power cable to LAN port. 2. If everything's ok, you should see the green LED light on the wall. 3. Connect Ethernet cable to IP Camera's DC power connector. 4. If not, please recheck every step and try again, or ask your new IP camera. 1. Plug DC power adapter to setup your dealer of the Network IP Camera Please follow the instructions below to power outlet on LAN port light up. 1.5 Installation of purchase for help. 7
Manual
Page 11
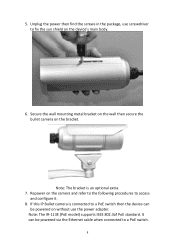
Repower on the bracket. If this IP Bullet camera is an optional extra. 7. Note: The IR-113E (PoE model) supports IEEE 802.3af PoE standard. It can be powered via the Ethernet cable when connected to a PoE switch. 8 5. Note: The bracket is ... be powered on without use screwdriver to access and configure it. 8. Secure the wall mounting metal bracket on the wall then secure the bullet camera on the camera and refer to the following procedures to fix the sun shield on the device's main body. 6. Unplug the power then find the screws in...
Repower on the bracket. If this IP Bullet camera is an optional extra. 7. Note: The IR-113E (PoE model) supports IEEE 802.3af PoE standard. It can be powered via the Ethernet cable when connected to a PoE switch. 8 5. Note: The bracket is ... be powered on without use screwdriver to access and configure it. 8. Secure the wall mounting metal bracket on the wall then secure the bullet camera on the camera and refer to the following procedures to fix the sun shield on the device's main body. 6. Unplug the power then find the screws in...

Manual
Page 12
...from the DHCP server on your CD-ROM drive. When the wizard appears, click "Setup Utility" to find the network camera's IP address, or use your network camera - Note: We recommend that you use Microsoft Windows Internet Explorer 7 or above Note: For best viewing experience we ...EdiView Finder utility included in the CD. Mac is : ■ OS: Microsoft Windows XP/Vista/7 ■ Browser: IE7 (and above for Network IP camera is not supported. 1. Currently the viewing system requirement for full functionality) ■ Cell phone: 3GPP player ■ Quick Time 6.5 or above . Insert...
...from the DHCP server on your CD-ROM drive. When the wizard appears, click "Setup Utility" to find the network camera's IP address, or use your network camera - Note: We recommend that you use Microsoft Windows Internet Explorer 7 or above Note: For best viewing experience we ...EdiView Finder utility included in the CD. Mac is : ■ OS: Microsoft Windows XP/Vista/7 ■ Browser: IE7 (and above for Network IP camera is not supported. 1. Currently the viewing system requirement for full functionality) ■ Cell phone: 3GPP player ■ Quick Time 6.5 or above . Insert...

Manual
Page 13
After the installation is complete, double-click the "EdiView_Finder" icon to search for all IP Cameras on your local 10 Note: The contents of the CD-ROM can also be downloaded from the Edimax website: http://www.edimax.com/en/index.php 2. Press 'Discover' button to execute the application. 3.
After the installation is complete, double-click the "EdiView_Finder" icon to search for all IP Cameras on your local 10 Note: The contents of the CD-ROM can also be downloaded from the Edimax website: http://www.edimax.com/en/index.php 2. Press 'Discover' button to execute the application. 3.

Manual
Page 14
... note: If you no longer need to change select IP Camera's IP address setting. When you find any IP Camera, you can also click on the IP Camera you wish to change IP address, then click 'Change IP' button to change a certain IP Camera's IP address, you need to use this utility, click ...have several network connections, such as "Wireless Function", please disable the "Wireless Functions" or/and other network connections that is not connected to IP camera, or IPFinder may fail to search IP camera! 11 If you can double click on and connect to local network first). network (make sure all IP...
... note: If you no longer need to change select IP Camera's IP address setting. When you find any IP Camera, you can also click on the IP Camera you wish to change IP address, then click 'Change IP' button to change a certain IP Camera's IP address, you need to use this utility, click ...have several network connections, such as "Wireless Function", please disable the "Wireless Functions" or/and other network connections that is not connected to IP camera, or IPFinder may fail to search IP camera! 11 If you can double click on and connect to local network first). network (make sure all IP...
