Quick Install Guide
Page 2
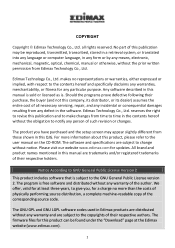
...LGPL software codes used in the contents hereof without notice. makes no more information about this manual is sold or licensed as is subject to the user manual on the CD-ROM. Edimax Technology Co., Ltd. reserves the right to revise this publication and to make changes from...repair, and any incidental or consequential damages resulting from those shown in this manual are trademarks and/or registered trademarks of their purchase, the buyer (and not this QIG. Please visit our website www.edimax.com for this publication may appear slightly different from any person of the...
...LGPL software codes used in the contents hereof without notice. makes no more information about this manual is sold or licensed as is subject to the user manual on the CD-ROM. Edimax Technology Co., Ltd. reserves the right to revise this publication and to make changes from...repair, and any incidental or consequential damages resulting from those shown in this manual are trademarks and/or registered trademarks of their purchase, the buyer (and not this QIG. Please visit our website www.edimax.com for this publication may appear slightly different from any person of the...
Quick Install Guide
Page 3
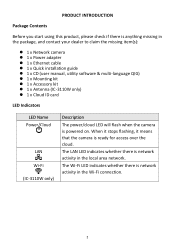
... camera 1 x Power adapter 1 x Ethernet cable 1 x Quick installation guide 1 x CD (user manual, utility software & multi-language QIG) 1 x Mounting kit 1 x Accessory kit 1 x Antenna (IC-3110W only) 1 x Cloud ID card LED Indicators LED Name Power/Cloud LAN Wi-Fi... (IC-3110W only) Description The power/cloud LED will flash when the camera is powered on. The Wi...
... camera 1 x Power adapter 1 x Ethernet cable 1 x Quick installation guide 1 x CD (user manual, utility software & multi-language QIG) 1 x Mounting kit 1 x Accessory kit 1 x Antenna (IC-3110W only) 1 x Cloud ID card LED Indicators LED Name Power/Cloud LAN Wi-Fi... (IC-3110W only) Description The power/cloud LED will flash when the camera is powered on. The Wi...
Quick Install Guide
Page 6
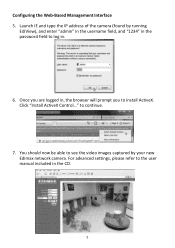
Once you are logged in, the browser will prompt you to the user manual included in . 6. For advanced settings, please refer to install ActiveX. to see the video images captured by running EdiView), and enter "admin" in the username field, and "1234" in the password field to log in the CD. 5 Click "Install ActiveX Control..." You should now be able to continue. 7. Configuring the Web-Based Management Interface 5. Launch IE and type the IP address of the camera (found by your new Edimax network camera.
Once you are logged in, the browser will prompt you to the user manual included in . 6. For advanced settings, please refer to install ActiveX. to see the video images captured by running EdiView), and enter "admin" in the username field, and "1234" in the password field to log in the CD. 5 Click "Install ActiveX Control..." You should now be able to continue. 7. Configuring the Web-Based Management Interface 5. Launch IE and type the IP address of the camera (found by your new Edimax network camera.
Manual
Page 2
... any warranty of the corresponding source code. The firmware files for at the Edimax website (www.edimax.com). 1 makes no more information about this publication may appear slightly different from those shown in this manual is sold or licensed as is. reserves the right to revise this publication... and to make changes from time to time in Edimax products are subject to change without the prior written permission from any language or computer language, in this manual are subject to the copyrights of such revision or changes. The program is ...
... any warranty of the corresponding source code. The firmware files for at the Edimax website (www.edimax.com). 1 makes no more information about this publication may appear slightly different from those shown in this manual is sold or licensed as is. reserves the right to revise this publication... and to make changes from time to time in Edimax products are subject to change without the prior written permission from any language or computer language, in this manual are subject to the copyrights of such revision or changes. The program is ...
Manual
Page 5
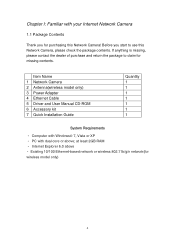
Item Name 1 Network Camera 2 Antenna(wireless model only) 3 Power Adapter 4 Ethernet Cable 5 Driver and User Manual CD-ROM 6 Accessory kit 7 Quick Installation Guide Quantity 1 1 1 1 1 1 1 System Requirements • Computer with Windows® 7, Vista or XP • PC with your Internet Network Camera 1.1 ...
Item Name 1 Network Camera 2 Antenna(wireless model only) 3 Power Adapter 4 Ethernet Cable 5 Driver and User Manual CD-ROM 6 Accessory kit 7 Quick Installation Guide Quantity 1 1 1 1 1 1 1 System Requirements • Computer with Windows® 7, Vista or XP • PC with your Internet Network Camera 1.1 ...
Manual
Page 18
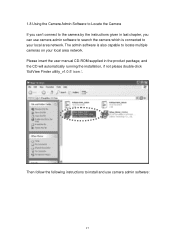
... your local area network. 1.8 Using the Camera Admin Software to Locate the Camera If you can use camera admin software: 17 Please insert the user manual CD-ROM supplied in last chapter, you can't connect to the camera by the instructions given in the product package, and the CD will automatically...
... your local area network. 1.8 Using the Camera Admin Software to Locate the Camera If you can use camera admin software: 17 Please insert the user manual CD-ROM supplied in last chapter, you can't connect to the camera by the instructions given in the product package, and the CD will automatically...
Manual
Page 24
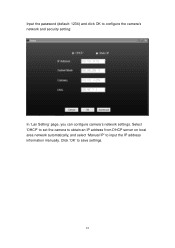
Input the password (default: 1234) and click OK to save settings. 23 Click 'OK' to configure the camera's network and security setting: In 'Lan Setting' page, you can configure camera's network settings. Select 'DHCP' to set the camera to obtain an IP address from DHCP server on local area network automatically, and select 'Manual IP' to input the IP address information manually.
Input the password (default: 1234) and click OK to save settings. 23 Click 'OK' to configure the camera's network and security setting: In 'Lan Setting' page, you can configure camera's network settings. Select 'DHCP' to set the camera to obtain an IP address from DHCP server on local area network automatically, and select 'Manual IP' to input the IP address information manually.

Manual
Page 64
... will get the date and time from dropdown menu here. You can set the date and time of the real time clock in this camera manually. Please input the date and time you to change the date and time of this Network Camera. Please input the IP address or host name... the computer you can use the time of every setting in 24-hour format. You can click 'Synchronize to PC time' to set the time manually, or use network time protocol (NTP) to use default value 'pool.ntp.org', or ask your area of NTP server here. Example: 24th August 2007...
... will get the date and time from dropdown menu here. You can set the date and time of the real time clock in this camera manually. Please input the date and time you to change the date and time of this Network Camera. Please input the IP address or host name... the computer you can use the time of every setting in 24-hour format. You can click 'Synchronize to PC time' to set the time manually, or use network time protocol (NTP) to use default value 'pool.ntp.org', or ask your area of NTP server here. Example: 24th August 2007...
Manual
Page 65
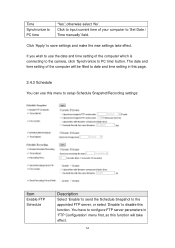
... which is connecting to the camera, click 'Synchronize to save settings and make the new settings take effect. 64 Time Synchronize to 'Set Date / Time manually' field. Click 'Apply' to PC time' button. You have to configure FTP server parameters in this page. 2.4.3 Schedule You can use the date and time...
... which is connecting to the camera, click 'Synchronize to save settings and make the new settings take effect. 64 Time Synchronize to 'Set Date / Time manually' field. Click 'Apply' to PC time' button. You have to configure FTP server parameters in this page. 2.4.3 Schedule You can use the date and time...
Manual
Page 106
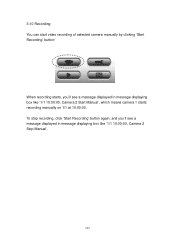
3-10 Recording You can start video recording of selected camera manually by clicking 'Start Recording' button: When recording starts, you 'll see a message displayed in message displaying box like '1/1 10:00:00, Camera 2 Start Manual', which means camera 1 starts recording manually on 1/1 at 10:00:00. To stop recording, click 'Start Recording' button again, and you 'll see a message displayed in message displaying box like '1/1 10:00:00, Camera 2 Stop Manual'. 105
3-10 Recording You can start video recording of selected camera manually by clicking 'Start Recording' button: When recording starts, you 'll see a message displayed in message displaying box like '1/1 10:00:00, Camera 2 Start Manual', which means camera 1 starts recording manually on 1/1 at 10:00:00. To stop recording, click 'Start Recording' button again, and you 'll see a message displayed in message displaying box like '1/1 10:00:00, Camera 2 Stop Manual'. 105
Manual
Page 112
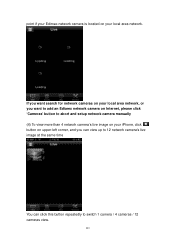
If you want search for network cameras on your local area network, or you want to add an Ediamx network camera on your local area network. point if your Edimax network camera is located on your iPhone, click button on upper-left corner, and you can view up to 12 network camera's live image at the same time You can click this button repeatedly to abort and setup network camera manually (4) To view more than 4 network camera's live image on Internet, please click 'Cameras' button to switch 1 camera / 4 cameras / 12 cameras view. 111
If you want search for network cameras on your local area network, or you want to add an Ediamx network camera on your local area network. point if your Edimax network camera is located on your iPhone, click button on upper-left corner, and you can view up to 12 network camera's live image at the same time You can click this button repeatedly to abort and setup network camera manually (4) To view more than 4 network camera's live image on Internet, please click 'Cameras' button to switch 1 camera / 4 cameras / 12 cameras view. 111
Manual
Page 113
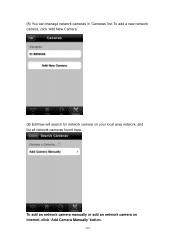
To add an network camera manually or add an network camera on your local area network, and list all network cameras found here. (5) You can manage network cameras in 'Cameras' list. To add a new network camera, click 'Add New Camera'. (6) EdiView will search for network camera on Internet, click 'Add Camera Manually' button. 112
To add an network camera manually or add an network camera on your local area network, and list all network cameras found here. (5) You can manage network cameras in 'Cameras' list. To add a new network camera, click 'Add New Camera'. (6) EdiView will search for network camera on Internet, click 'Add Camera Manually' button. 112
Manual
Page 114
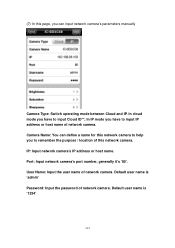
... remember the purpose / location of network camera. Default user name is 'admin' Password: Input the password of this page, you can input network camera's parameters manually Camera Type: Switch operating mode between Cloud and IP. In cloud mode you have to input IP address or host name of network camera. User...
... remember the purpose / location of network camera. Default user name is 'admin' Password: Input the password of this page, you can input network camera's parameters manually Camera Type: Switch operating mode between Cloud and IP. In cloud mode you have to input IP address or host name of network camera. User...
Manual
Page 121
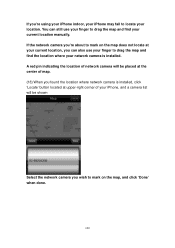
..., and a camera list will be shown Select the network camera you 're using your iPhone indoor, your iPhone may fail to locate your current location manually. A red pin indicating the location of network camera will be placed at your current location, you can also use your finger to mark on the...
..., and a camera list will be shown Select the network camera you 're using your iPhone indoor, your iPhone may fail to locate your current location manually. A red pin indicating the location of network camera will be placed at your current location, you can also use your finger to mark on the...
Manual
Page 126
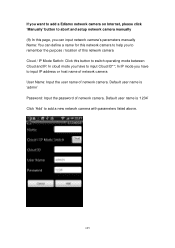
... have to input Cloud ID**; If you want to add a Ediamx network camera on Internet, please click 'Manually' button to abort and setup network camera manually (9) In this page, you can input network camera's parameters manually Name: You can define a name for this button to add a new network camera with parameters listed above...
... have to input Cloud ID**; If you want to add a Ediamx network camera on Internet, please click 'Manually' button to abort and setup network camera manually (9) In this page, you can input network camera's parameters manually Name: You can define a name for this button to add a new network camera with parameters listed above...
Manual
Page 135
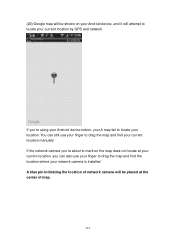
.... (22) Google map will be placed at your current location, you 're using your Android device indoor, your A may fail to locate your current location manually.
.... (22) Google map will be placed at your current location, you 're using your Android device indoor, your A may fail to locate your current location manually.