

Datasheet
Page 1
... The Edimax EW-7811UTC is set to revolutionize Wi-Fi. You can surf the internet and check your email on network conditions and environmental factors. Mac & OS X are trademarks of up to dual-band 802.11ac with 802.11n technology. Copyright © 2013 Edimax Technology Co. almost three times as fast as 802.11n. Ltd. Upgrade PCs and notebooks to change without...
... The Edimax EW-7811UTC is set to revolutionize Wi-Fi. You can surf the internet and check your email on network conditions and environmental factors. Mac & OS X are trademarks of up to dual-band 802.11ac with 802.11n technology. Copyright © 2013 Edimax Technology Co. almost three times as fast as 802.11n. Ltd. Upgrade PCs and notebooks to change without...

Datasheet
Page 2
... users' lifestyles and unlocking a new world of potential Wi-Fi applications, the low-profile miniadapter sits almost unnoticed in a snap. www.edimax.com www.edimax.com AC600 Wireless Dual-Band Mini USB Adapter EW-7811UTC Download and Stream Anywhere Use the EW-7811UTC to download and stream media from a NAS (networkattached storage) at lightning speeds. Wi-Fi Protected Setup (WPS) Button The EW-7811UTC has a one-click Wi-Fi Protected Setup (WPS) button to change...
... users' lifestyles and unlocking a new world of potential Wi-Fi applications, the low-profile miniadapter sits almost unnoticed in a snap. www.edimax.com www.edimax.com AC600 Wireless Dual-Band Mini USB Adapter EW-7811UTC Download and Stream Anywhere Use the EW-7811UTC to download and stream media from a NAS (networkattached storage) at lightning speeds. Wi-Fi Protected Setup (WPS) Button The EW-7811UTC has a one-click Wi-Fi Protected Setup (WPS) button to change...
Datasheet
Page 3
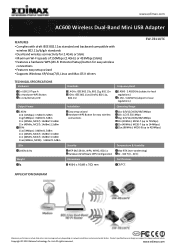
... 802.11ac standard and backward compatible with wireless 802.11a/b/g/n standards • Dual-band wireless connectivity for 2.4GHz or 5GHz • Maximum Wi-Fi speeds of 150Mbps (2.4GHz) or 433Mbps (5GHz) • Features a hardware WPS (Wi-Fi Protected Setup) button for easy wireless connections • Features easy setup wizard • Supports Windows XP/Vista/7/8, Linux and Mac OS X drivers EW-7811UTC TECHNICAL SPECIFICATIONS Hardware 1 x USB 2.0 Type A 1 x Hardware WPS Button 1 x Link/Activity LED Output Power 2.4GHz 11b (11Mbps): 17dBm±1.5dBm...
... 802.11ac standard and backward compatible with wireless 802.11a/b/g/n standards • Dual-band wireless connectivity for 2.4GHz or 5GHz • Maximum Wi-Fi speeds of 150Mbps (2.4GHz) or 433Mbps (5GHz) • Features a hardware WPS (Wi-Fi Protected Setup) button for easy wireless connections • Features easy setup wizard • Supports Windows XP/Vista/7/8, Linux and Mac OS X drivers EW-7811UTC TECHNICAL SPECIFICATIONS Hardware 1 x USB 2.0 Type A 1 x Hardware WPS Button 1 x Link/Activity LED Output Power 2.4GHz 11b (11Mbps): 17dBm±1.5dBm...

Quick Install Guide
Page 2
...Driver Installation ...18 V-2. Mac ...24 VII. Mac: Wireless Utility...28 VII-3-1. Information ...31 VII-4. I -1. Windows 8 ...23 VI-5. Mac: Connect to a Wi-Fi network 26 VII-3. WPS ...30 VII-3-5. Product Information 4 I . LED Status ...4 I -4. Safety ...5 II. Driver Installation ...12 IV-2. Driver Uninstallation...17 V. Disabling Network Adapters 22 VI-1. Windows ...25 VII-2. Link Status ...28 VII-3-2. WPS Setup...32 2 System Requirements...4 I -3. Available Network...29 VII-3-4. Driver Uninstallation...21 VI. Windows 7 ...23 VI-4. III-2. Driver...
...Driver Installation ...18 V-2. Mac ...24 VII. Mac: Wireless Utility...28 VII-3-1. Information ...31 VII-4. I -1. Windows 8 ...23 VI-5. Mac: Connect to a Wi-Fi network 26 VII-3. WPS ...30 VII-3-5. Product Information 4 I . LED Status ...4 I -4. Safety ...5 II. Driver Installation ...12 IV-2. Driver Uninstallation...17 V. Disabling Network Adapters 22 VI-1. Windows ...25 VII-2. Link Status ...28 VII-3-2. WPS Setup...32 2 System Requirements...4 I -3. Available Network...29 VII-3-4. Driver Uninstallation...21 VI. Windows 7 ...23 VI-4. III-2. Driver...
Quick Install Guide
Page 4
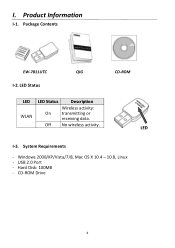
Off No wireless activity. Windows 2000/XP/Vista/7/8, Mac OS X 10.4 - 10.8, Linux - Package Contents EW-7811UTC QIG I . I -2. LED Status LED WLAN LED Status Description Wireless activity: On transmitting or receiving data. System Requirements - CD-ROM LED I -1. CD-ROM Drive 4 USB 2.0 Port - Hard Disk: 100MB - Product Information I -3.
Off No wireless activity. Windows 2000/XP/Vista/7/8, Mac OS X 10.4 - 10.8, Linux - Package Contents EW-7811UTC QIG I . I -2. LED Status LED WLAN LED Status Description Wireless activity: On transmitting or receiving data. System Requirements - CD-ROM LED I -1. CD-ROM Drive 4 USB 2.0 Port - Hard Disk: 100MB - Product Information I -3.

Quick Install Guide
Page 5
... it becomes wet for any connected cable with the following safety instructions. 1. Safety In order to ensure the safe operation of purchase for help. 7. carefully disconnect it from the wireless adapter then unplug the adapter immediately, as far as it immediately. The wireless adapter contains small parts that are no user-serviceable parts inside the wireless adapter. I-4. Please keep the wireless adapter out of reach of purchase...
... it becomes wet for any connected cable with the following safety instructions. 1. Safety In order to ensure the safe operation of purchase for help. 7. carefully disconnect it from the wireless adapter then unplug the adapter immediately, as far as it immediately. The wireless adapter contains small parts that are no user-serviceable parts inside the wireless adapter. I-4. Please keep the wireless adapter out of reach of purchase...
Quick Install Guide
Page 8
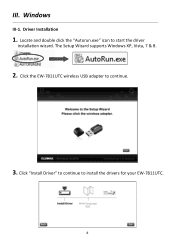
Locate and double click the "Autorun.exe" icon to continue. 3. The Setup Wizard supports Windows XP, Vista, 7 & 8. 2. Driver Installation 1. Click the EW-7811UTC wireless USB adapter to start the driver installation wizard. III. Windows III-1. Click "Install Driver" to continue to install the drivers for your EW-7811UTC. 8
Locate and double click the "Autorun.exe" icon to continue. 3. The Setup Wizard supports Windows XP, Vista, 7 & 8. 2. Driver Installation 1. Click the EW-7811UTC wireless USB adapter to start the driver installation wizard. III. Windows III-1. Click "Install Driver" to continue to install the drivers for your EW-7811UTC. 8
Quick Install Guide
Page 10
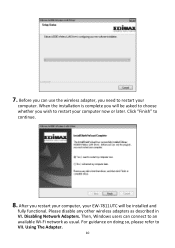
7. After you restart your computer, your EW-7811UTC will be installed and fully functional. Disabling Network Adapters. For guidance on doing so, please refer to continue. 8. Then, Windows users can use the wireless adapter, you will be asked to choose whether you wish to restart your computer. Click "Finish" to VII. When the installation is complete you need to an available Wi-Fi network as described in VI. Please disable any other wireless adapters as usual. Using The Adapter. 10 Before you can connect to restart your computer now or later.
7. After you restart your computer, your EW-7811UTC will be installed and fully functional. Disabling Network Adapters. For guidance on doing so, please refer to continue. 8. Then, Windows users can use the wireless adapter, you will be asked to choose whether you wish to restart your computer. Click "Finish" to VII. When the installation is complete you need to an available Wi-Fi network as described in VI. Please disable any other wireless adapters as usual. Using The Adapter. 10 Before you can connect to restart your computer now or later.

Quick Install Guide
Page 16
... your system has restarted) the wireless utility will open it from the "Applications" menu in your computer. 12. Go to "System Preferences Network" and a pop up window will see the notice below then you can open automatically. When the adapter is complete, you that a new interface has been detected. Click "OK" to restart your Mac. 13. Driver Installation Step 3. Click "Restart" to...
... your system has restarted) the wireless utility will open it from the "Applications" menu in your computer. 12. Go to "System Preferences Network" and a pop up window will see the notice below then you can open automatically. When the adapter is complete, you that a new interface has been detected. Click "OK" to restart your Mac. 13. Driver Installation Step 3. Click "Restart" to...

Quick Install Guide
Page 17
... version of Mac OS, click the Apple logo in VI. Open the "Wlan_11ac_USB..." Then Mac users can connect to "About This Mac". 1. folder for your version of your desktop and go to a Wi-Fi network using the included utility software. For guidance on -screen instructions. 17 IV-2. 14. Next, please disable any other wireless adapters as described in the top left corner of Mac OS X (10.4 - 10.8). 2. Disabling Network Adapters...
... version of Mac OS, click the Apple logo in VI. Open the "Wlan_11ac_USB..." Then Mac users can connect to "About This Mac". 1. folder for your version of your desktop and go to a Wi-Fi network using the included utility software. For guidance on -screen instructions. 17 IV-2. 14. Next, please disable any other wireless adapters as described in the top left corner of Mac OS X (10.4 - 10.8). 2. Disabling Network Adapters...

Quick Install Guide
Page 18
... below (where "test" is required for the administrator, and then type "y" to the Internet. 2. The process may vary according to build the driver. Ensure that your computer is necessary to your login username): cd /home/test 18 Linux The following instructions are an example of Linux setup using Ubuntu 12.04. sudo apt-get install build-essential Type the password for Linux driver installation. 1.
... below (where "test" is required for the administrator, and then type "y" to the Internet. 2. The process may vary according to build the driver. Ensure that your computer is necessary to your login username): cd /home/test 18 Linux The following instructions are an example of Linux setup using Ubuntu 12.04. sudo apt-get install build-essential Type the password for Linux driver installation. 1.

Quick Install Guide
Page 19
Check the extracted file with the command "Is": 7. Build the driver. Execute the command below to the driver folder and execute the command below: cd rtl8812AU_8821AU_linux_v4.2.0_6952.20130315 8. Execute the command below : tar vxf 2011_0427_RT3572_Linux_STA_v.2.5.0.0.DP.bz2 6. Plug the EW-7811UTC into your computer and restart Ubuntu. 19 sudo insmod os/linux/rt3572sta.ko 10. Change to load the driver. sudo make 9. Extract the driver using the command below and then input the password. 5.
Check the extracted file with the command "Is": 7. Build the driver. Execute the command below to the driver folder and execute the command below: cd rtl8812AU_8821AU_linux_v4.2.0_6952.20130315 8. Execute the command below : tar vxf 2011_0427_RT3572_Linux_STA_v.2.5.0.0.DP.bz2 6. Plug the EW-7811UTC into your computer and restart Ubuntu. 19 sudo insmod os/linux/rt3572sta.ko 10. Change to load the driver. sudo make 9. Extract the driver using the command below and then input the password. 5.
Quick Install Guide
Page 22
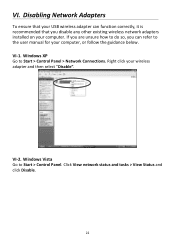
If you disable any other existing wireless network adapters installed on your computer. Click View network status and tasks > View Status and click Disable. 22 Right click your computer, or follow the guidance below. VI-1. VI-2. Windows Vista Go to Start > Control Panel > Network Connections. Disabling Network Adapters To ensure that your USB wireless adapter can refer to do so, you can function correctly, it is recommended that you are unsure how to the user manual for your wireless adapter and then select "Disable". Windows XP Go to Start > Control Panel. VI.
If you disable any other existing wireless network adapters installed on your computer. Click View network status and tasks > View Status and click Disable. 22 Right click your computer, or follow the guidance below. VI-1. VI-2. Windows Vista Go to Start > Control Panel > Network Connections. Disabling Network Adapters To ensure that your USB wireless adapter can refer to do so, you can function correctly, it is recommended that you are unsure how to the user manual for your wireless adapter and then select "Disable". Windows XP Go to Start > Control Panel. VI.

Quick Install Guide
Page 23
Click View network status and tasks > Wireless Network Connection and click Disable. Windows 8 1. Switch to File Explorer > (right click) Network > Properties > Change adapter settings. 23 Then go to desktop mode by clicking your cursor in the bottom left of the Windows 8 Start screen. VI-3. Windows 7 Go to Start > Control Panel. VI-4.
Click View network status and tasks > Wireless Network Connection and click Disable. Windows 8 1. Switch to File Explorer > (right click) Network > Properties > Change adapter settings. 23 Then go to desktop mode by clicking your cursor in the bottom left of the Windows 8 Start screen. VI-3. Windows 7 Go to Start > Control Panel. VI-4.

Quick Install Guide
Page 25
Mac users need to connect to connect using the included utility software, as usual (see VI. VII-1. Windows Below is an example of how to a Wi-Fi network using Windows Vista - the process may vary slightly for other wireless adapters (see below ) in VI-5. Using The Adapter After you will then be successfully connected to a network". 2. Disabling Network Adapters), Windows users can connect to enter it. 3. If you set a password for the SSID of Windows. 1. Mac. Click the network icon (examples below...
Mac users need to connect to connect using the included utility software, as usual (see VI. VII-1. Windows Below is an example of how to a Wi-Fi network using Windows Vista - the process may vary slightly for other wireless adapters (see below ) in VI-5. Using The Adapter After you will then be successfully connected to a network". 2. Disabling Network Adapters), Windows users can connect to enter it. 3. If you set a password for the SSID of Windows. 1. Mac. Click the network icon (examples below...

Quick Install Guide
Page 28
Link Status The "Link Status" page displays information about the current wireless connection. The "Profile" screen allows you to monitor and configure your connection. Existing profiles are listed in the "Profile List". 28 Turn Radio OFF VII-3-2. Profiles Switch off the adapter's wireless radio. Navigate the wireless utility using the menu across the top of the window. VII-3.Mac: Wireless Utility The wireless utility offers features to save different Wi-Fi connection settings as "Profiles". VII-3-1.
Link Status The "Link Status" page displays information about the current wireless connection. The "Profile" screen allows you to monitor and configure your connection. Existing profiles are listed in the "Profile List". 28 Turn Radio OFF VII-3-2. Profiles Switch off the adapter's wireless radio. Navigate the wireless utility using the menu across the top of the window. VII-3.Mac: Wireless Utility The wireless utility offers features to save different Wi-Fi connection settings as "Profiles". VII-3-1.

Quick Install Guide
Page 29
... all available Wi-Fi networks within range along with security information, and then click "OK". You can also add a new profile from the "Available Network" screen. Available Network The "Available Network" screen displays a list of information about each network. 29 Add Edit Remove Duplicate Apply Opens a new window to ) an existing profile. Save any changes. Remove an existing (selected) profile. Activate (connect to manually add a new profile. Edit an...
... all available Wi-Fi networks within range along with security information, and then click "OK". You can also add a new profile from the "Available Network" screen. Available Network The "Available Network" screen displays a list of information about each network. 29 Add Edit Remove Duplicate Apply Opens a new window to ) an existing profile. Save any changes. Remove an existing (selected) profile. Activate (connect to manually add a new profile. Edit an...

Quick Install Guide
Page 30
The WPS page displays information relating to Profile VII-3-4. All available access points along with their respective BSSID, security information and channel numbers are listed. 30 Profile). Refresh Connect Add to Wireless Protected Setup (WPS). Use a selected wireless network to a selected wireless network. Connect to create a new profile (see VII-3-2. WPS Refresh the list of available wireless networks.
The WPS page displays information relating to Profile VII-3-4. All available access points along with their respective BSSID, security information and channel numbers are listed. 30 Profile). Refresh Connect Add to Wireless Protected Setup (WPS). Use a selected wireless network to a selected wireless network. Connect to create a new profile (see VII-3-2. WPS Refresh the list of available wireless networks.

Quick Install Guide
Page 32
Press the WPS button (often the WPS/Reset button) on the underside of the EW-7811UTC for how long you can use this method to connect to activate WPS. 2. Within two minutes, press the WPS button on your router/access point to hold down its WPS. 3. Please check the instructions for your wireless router/access point for 1 - 3 seconds to activate its WPS button to a Wi-Fi network. 1. The devices will establish a connection. VII-4.WPS Setup If your wireless router/access point supports Wi-Fi Protected Setup (WPS) then you need to activate WPS. WPS Button 32
Press the WPS button (often the WPS/Reset button) on the underside of the EW-7811UTC for how long you can use this method to connect to activate WPS. 2. Within two minutes, press the WPS button on your router/access point to hold down its WPS. 3. Please check the instructions for your wireless router/access point for 1 - 3 seconds to activate its WPS button to a Wi-Fi network. 1. The devices will establish a connection. VII-4.WPS Setup If your wireless router/access point supports Wi-Fi Protected Setup (WPS) then you need to activate WPS. WPS Button 32

Quick Install Guide
Page 34
...radio technician for Use None 34 FCC Caution This device and its antenna must be determined by turning the equipment off and on a circuit different from that to comply with Part 15 of electric shock and static electricity when working with the utmost care for home and office use... radiate radio frequency energy and, if not installed and used in a residential installation. Connect the equipment into an outlet on , the user is designed with electrical equipment. Federal Communications Commission (FCC) Radiation Exposure Statement This equipment complies with the instructions, may...
...radio technician for Use None 34 FCC Caution This device and its antenna must be determined by turning the equipment off and on a circuit different from that to comply with Part 15 of electric shock and static electricity when working with the utmost care for home and office use... radiate radio frequency energy and, if not installed and used in a residential installation. Connect the equipment into an outlet on , the user is designed with electrical equipment. Federal Communications Commission (FCC) Radiation Exposure Statement This equipment complies with the instructions, may...


