
Datasheet
Page 1
...Fi Protected Setup (WPS) Button The Edimax EW-7428HCn features a convenient WPS button. All rights reserved. The latest wireless MIMO (multiple-input and multiple-output) technology is connected to either a PoE Switch or a power adapter for the power supply. Optional Power Supply The Edimax EW-7428HCn integrates a ...bridge networks between these buildings. Copyright © 2012 Edimax Technology Co. This one-press WPS button helps users set up to eliminate dead spots within the signal range. www.edimax.com EW-7428HCn N300 High Power Ceiling Mount Wireless PoE Range Extender/...
...Fi Protected Setup (WPS) Button The Edimax EW-7428HCn features a convenient WPS button. All rights reserved. The latest wireless MIMO (multiple-input and multiple-output) technology is connected to either a PoE Switch or a power adapter for the power supply. Optional Power Supply The Edimax EW-7428HCn integrates a ...bridge networks between these buildings. Copyright © 2012 Edimax Technology Co. This one-press WPS button helps users set up to eliminate dead spots within the signal range. www.edimax.com EW-7428HCn N300 High Power Ceiling Mount Wireless PoE Range Extender/...

Datasheet
Page 2
...edimax.com N300 High Power Ceiling Mount Wireless PoE Range Extender/Access Point FEATURES & TECHNICAL SPECIFICATIONS •600mW high power output for superior wireless performance* •Supports IEEE 802.3af PoE (Power over Ethernet) and alternative external power adapter •iQ Setup for automatic and smart setup...to reduce power consumption •Suitable for home, SOHO, and SMB environments •Enhanced wireless coverage up to 10,000 square meters** EW-7428HCn Hardware 1 x 10/100Mbps LAN port 1 x WPS button 1 x Power jack 2 x Internal antenna Data Rates 11b: 1/2/5.5/11Mbps 11g...
...edimax.com N300 High Power Ceiling Mount Wireless PoE Range Extender/Access Point FEATURES & TECHNICAL SPECIFICATIONS •600mW high power output for superior wireless performance* •Supports IEEE 802.3af PoE (Power over Ethernet) and alternative external power adapter •iQ Setup for automatic and smart setup...to reduce power consumption •Suitable for home, SOHO, and SMB environments •Enhanced wireless coverage up to 10,000 square meters** EW-7428HCn Hardware 1 x 10/100Mbps LAN port 1 x WPS button 1 x Power jack 2 x Internal antenna Data Rates 11b: 1/2/5.5/11Mbps 11g...

Quick Install Guide
Page 6
..., a smartphone, or a tablet computer - For now, simply click 'NEXT' without changing anything. You will then enter the iQ Setup screen, where you can connect to the user manual in the browser-based setup, should you want to activate. You will later have an opportunity to change this device. The default mode for...
..., a smartphone, or a tablet computer - For now, simply click 'NEXT' without changing anything. You will then enter the iQ Setup screen, where you can connect to the user manual in the browser-based setup, should you want to activate. You will later have an opportunity to change this device. The default mode for...

Manual
Page 2
...code. 2 Add: No. 3, Wu-Chuan 3rd Rd., Wu-Ku Industrial Park, New Taipei City, Taiwan Tel: +886-2-77396888 Email: sales@edimax.com.tw Notice According to the contents hereof and specifically disclaims any warranties, merchantability, or fitness for a charge no representations or warranties, either ... those shown in the contents hereof without any particular purpose. No part of this publication and to give you have purchased and the setup screen may be reproduced, transmitted, transcribed, stored in a retrieval system, or translated into any language or computer language, in any...
...code. 2 Add: No. 3, Wu-Chuan 3rd Rd., Wu-Ku Industrial Park, New Taipei City, Taiwan Tel: +886-2-77396888 Email: sales@edimax.com.tw Notice According to the contents hereof and specifically disclaims any warranties, merchantability, or fitness for a charge no representations or warranties, either ... those shown in the contents hereof without any particular purpose. No part of this publication and to give you have purchased and the setup screen may be reproduced, transmitted, transcribed, stored in a retrieval system, or translated into any language or computer language, in any...

Manual
Page 3
... 33 III-3-3. WPS Setting 48 III-5. MAC Filtering 58 III-6. Power Saving 66 III-6-4. Scheduling setting 67 III-7. Windows XP 76 IV-1-2. Package Contents 5 I -6. iQ Setup ...25 III-3. Security 53 III-5-2. System Utility 60 III-6-1. Configuration Tool 70 III-7-1. Firmware Upgrade 73 III-7-3. Reboot 74 IV. Safety Information 7 I -2. Connecting the Access...
... 33 III-3-3. WPS Setting 48 III-5. MAC Filtering 58 III-6. Power Saving 66 III-6-4. Scheduling setting 67 III-7. Windows XP 76 IV-1-2. Package Contents 5 I -6. iQ Setup ...25 III-3. Security 53 III-5-2. System Utility 60 III-6-1. Configuration Tool 70 III-7-1. Firmware Upgrade 73 III-7-3. Reboot 74 IV. Safety Information 7 I -2. Connecting the Access...

Manual
Page 8
... a router or PoE switch, as shown in the following is for reference after you have chosen which mode to operate your access point using iQ Setup before proceeding with wired or wireless network interface card. - To connect the access point to a Router or PoE Switch 1. Connecting the Access Point to a router...
... a router or PoE switch, as shown in the following is for reference after you have chosen which mode to operate your access point using iQ Setup before proceeding with wired or wireless network interface card. - To connect the access point to a Router or PoE Switch 1. Connecting the Access Point to a router...

Manual
Page 13
The default mode for the device is Access Point Mode. 1. For Universal Wi-Fi Extender Mode, please see section II-1. Universal Wi-Fi Extender Mode 3. Wireless Client Mode 13 You will then enter the iQ Setup screen, where you can choose which mode to activate. 8. For Access Point Mode, please see section II-2. For Wireless Client Mode, please see section II-3. Access Point Mode 2.
The default mode for the device is Access Point Mode. 1. For Universal Wi-Fi Extender Mode, please see section II-1. Universal Wi-Fi Extender Mode 3. Wireless Client Mode 13 You will then enter the iQ Setup screen, where you can choose which mode to activate. 8. For Access Point Mode, please see section II-2. For Wireless Client Mode, please see section II-3. Access Point Mode 2.

Manual
Page 14
..., and if you want to set a Wi-Fi password, select 'Enabled' from the iQ Setup list. 2. You will be prompted to broadcast a wireless Internet signal, which your desired password in the browser-based setup, should you want to . 1. You will use no password. 14 Select Access Point Mode from...you changed the username and password in this step, you keep the default settings, the device's wireless network will have the default ID of 'Edimax' and will later have an opportunity to change the login information for this in the 'Wi-Fi Network Password field'. II-1. Enter the new...
..., and if you want to set a Wi-Fi password, select 'Enabled' from the iQ Setup list. 2. You will be prompted to broadcast a wireless Internet signal, which your desired password in the browser-based setup, should you want to . 1. You will use no password. 14 Select Access Point Mode from...you changed the username and password in this step, you keep the default settings, the device's wireless network will have the default ID of 'Edimax' and will later have an opportunity to change the login information for this in the 'Wi-Fi Network Password field'. II-1. Enter the new...

Manual
Page 16
... detect again or try to move the device closer to continue. 7. You may find it via your list of an existing Wi-Fi network; iQ Setup will be unable to connect to .
... detect again or try to move the device closer to continue. 7. You may find it via your list of an existing Wi-Fi network; iQ Setup will be unable to connect to .
Manual
Page 17
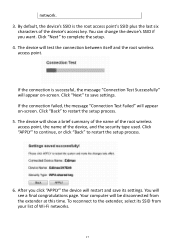
... device's SSID is successful, the message "Connection Test Successfully" will see a final congratulations page. Click "Next" to restart the setup process. 5. The device will restart and save settings. Click "Back" to complete the setup. 4. Click "APPLY" to continue, or click "Back" to the extender, select its settings. After you want. You will... device's SSID if you click "APPLY" the device will test the connection between itself and the root wireless access point. To reconnect to restart the setup process. 6.
... device's SSID is successful, the message "Connection Test Successfully" will see a final congratulations page. Click "Next" to restart the setup process. 5. The device will restart and save settings. Click "Back" to complete the setup. 4. Click "APPLY" to continue, or click "Back" to the extender, select its settings. After you want. You will... device's SSID if you click "APPLY" the device will test the connection between itself and the root wireless access point. To reconnect to restart the setup process. 6.

Manual
Page 19
... the network administrator who set up the Wi-Fi network. 3. If you do not know your Wi-Fi password, you enter the wrong password. iQ Setup will be unable to connect to the root wireless access point. 2. Select Wireless Client Mode from the list.
... the network administrator who set up the Wi-Fi network. 3. If you do not know your Wi-Fi password, you enter the wrong password. iQ Setup will be unable to connect to the root wireless access point. 2. Select Wireless Client Mode from the list.

Manual
Page 20
The device will restart and save settings. If the connection is assigned to restart the setup process. 5. Click "Next" to the appliance's Ethernet port. After you click "APPLY" the device will show a brief summary of the name of the root wireless ... -screen. If the connection failed, the message "Connection Test Failed" will see a final congratulations page. 6. You will appear on -screen. Click "Back" to restart the setup process. 4.
The device will restart and save settings. If the connection is assigned to restart the setup process. 5. Click "Next" to the appliance's Ethernet port. After you click "APPLY" the device will show a brief summary of the name of the root wireless ... -screen. If the connection failed, the message "Connection Test Failed" will see a final congratulations page. 6. You will appear on -screen. Click "Back" to restart the setup process. 4.

Manual
Page 25
... example to change the operation mode of the LAN interface III-2. This will bring you wish to the initial setup screen. 25 iQ Setup If you back to perform the initial setup process again, for this device, it cannot be modified by users) Displays the number of connected wireless client ... mask of the IP address Displays the IP address of the default gateway Displays the MAC address of the device, select iQ Setup to restart the setup process. Number Security BSSID (MAC) Associated Clients Show Active Clients IP Address Subnet Mask Default Gateway MAC address number Displays the ...
... example to change the operation mode of the LAN interface III-2. This will bring you wish to the initial setup screen. 25 iQ Setup If you back to perform the initial setup process again, for this device, it cannot be modified by users) Displays the number of connected wireless client ... mask of the IP address Displays the IP address of the default gateway Displays the MAC address of the device, select iQ Setup to restart the setup process. Number Security BSSID (MAC) Associated Clients Show Active Clients IP Address Subnet Mask Default Gateway MAC address number Displays the ...

Manual
Page 48
access point's SSIDs. You can push the Reset/WPS button on this ; WPS Setting Wi-Fi Protected Setup (WPS) is the simplest way to press a button on the wireless client. You don't have to build a connection between 1 - 4094 for you. You can input a ...
access point's SSIDs. You can push the Reset/WPS button on this ; WPS Setting Wi-Fi Protected Setup (WPS) is the simplest way to press a button on the wireless client. You don't have to build a connection between 1 - 4094 for you. You can input a ...

Manual
Page 49
... a passphrase key for this access point. If data encryption settings for WPS connection. 49 Device PIN Code This is activated, the access point will be Setup displayed here. Enable WPS Check this access point. Authentication The wireless security authentication mode Mode of this box to enable or disable WPS Wi-Fi...
... a passphrase key for this access point. If data encryption settings for WPS connection. 49 Device PIN Code This is activated, the access point will be Setup displayed here. Enable WPS Check this access point. Authentication The wireless security authentication mode Mode of this box to enable or disable WPS Wi-Fi...

Manual
Page 50
... while this access point again. 50 Click "Start PBC" to activate WPS on the wireless client within 120 seconds. Note: When using PBC-type WPS setup, you wish to connect, and click the "Start PIN" button. There are "Registrar" and "Enrollee" modes for incoming WPS requests. When "Enrollee" mode is enabled... will follow the access point's wireless settings for security reasons. The "WLAN" LED on the access point will need to start Push-Button style WPS setup.
... while this access point again. 50 Click "Start PBC" to activate WPS on the wireless client within 120 seconds. Note: When using PBC-type WPS setup, you wish to connect, and click the "Start PIN" button. There are "Registrar" and "Enrollee" modes for incoming WPS requests. When "Enrollee" mode is enabled... will follow the access point's wireless settings for security reasons. The "WLAN" LED on the access point will need to start Push-Button style WPS setup.

Manual
Page 65
... date and time of the device can be synchronized with a time server. This access point supports NTP (Network Time Protocol) for automatic time and date setup.
... date and time of the device can be synchronized with a time server. This access point supports NTP (Network Time Protocol) for automatic time and date setup.
