
Datasheet
Page 1
... adjust its Wi-Fi coverage and to the amount of power needed, this access point acts as a wireless LAN access point and repeater at the same time. Wi-Fi Protected Setup (WPS) Button The Edimax EW-7428HCn features a convenient WPS button. Optional Power Supply The Edimax EW-7428HCn integrates a PoE PD module, and also provides a power jack for the power...
... adjust its Wi-Fi coverage and to the amount of power needed, this access point acts as a wireless LAN access point and repeater at the same time. Wi-Fi Protected Setup (WPS) Button The Edimax EW-7428HCn features a convenient WPS button. Optional Power Supply The Edimax EW-7428HCn integrates a PoE PD module, and also provides a power jack for the power...

Datasheet
Page 2
www.edimax.com N300 High Power Ceiling Mount Wireless PoE Range Extender/Access Point FEATURES & TECHNICAL SPECIFICATIONS •600mW high power output for superior wireless performance* •Supports IEEE 802.3af PoE (Power over Ethernet) and alternative external ... on and off, to reduce power consumption •Suitable for home, SOHO, and SMB environments •Enhanced wireless coverage up to 10,000 square meters** EW-7428HCn Hardware 1 x 10/100Mbps LAN port 1 x WPS button 1 x Power jack 2 x Internal antenna Data Rates 11b: 1/2/5.5/11Mbps 11g: 6/9/12/24/36/48/54Mbps 11n (20MHz): MCS0...
www.edimax.com N300 High Power Ceiling Mount Wireless PoE Range Extender/Access Point FEATURES & TECHNICAL SPECIFICATIONS •600mW high power output for superior wireless performance* •Supports IEEE 802.3af PoE (Power over Ethernet) and alternative external ... on and off, to reduce power consumption •Suitable for home, SOHO, and SMB environments •Enhanced wireless coverage up to 10,000 square meters** EW-7428HCn Hardware 1 x 10/100Mbps LAN port 1 x WPS button 1 x Power jack 2 x Internal antenna Data Rates 11b: 1/2/5.5/11Mbps 11g: 6/9/12/24/36/48/54Mbps 11n (20MHz): MCS0...

Quick Install Guide
Page 2
... to claim the missing item(s): Ceiling mount range extender/access point (1 pcs) Quick installation guide (1 pcs) CD with multi-language QIG and user manual (1 pcs) Power adapter (1 pcs) Ethernet cable (1 pcs) Mounting kit (1 pcs) Access key card (1 pcs) Physical Description 3 21 4 5 6 ... networking environment. PRODUCT INTRODUCTION Thank you start using this device, please check if there is an ideal choice for purchasing the Edimax EW-7428HCn N300 High Power Ceiling Mount Wireless PoE Range Extender/Access Point!
... to claim the missing item(s): Ceiling mount range extender/access point (1 pcs) Quick installation guide (1 pcs) CD with multi-language QIG and user manual (1 pcs) Power adapter (1 pcs) Ethernet cable (1 pcs) Mounting kit (1 pcs) Access key card (1 pcs) Physical Description 3 21 4 5 6 ... networking environment. PRODUCT INTRODUCTION Thank you start using this device, please check if there is an ideal choice for purchasing the Edimax EW-7428HCn N300 High Power Ceiling Mount Wireless PoE Range Extender/Access Point!

Quick Install Guide
Page 6
... to the user manual in the browser-based setup, should you want to . 1. Access Point Mode Access Point Mode allows the device to broadcast a wireless Internet signal, which mode to change the login information for the device is Access Point Mode. Select Access Point Mode from the iQ Setup list. 2. You will later have an opportunity to activate...
... to the user manual in the browser-based setup, should you want to . 1. Access Point Mode Access Point Mode allows the device to broadcast a wireless Internet signal, which mode to change the login information for the device is Access Point Mode. Select Access Point Mode from the iQ Setup list. 2. You will later have an opportunity to activate...

Quick Install Guide
Page 7
... the 'Wi-Fi Network Password field'. Note: If you changed the username and password in this step, you will be prompted to set the device's access point settings. Note: If the device is not set a Wi-Fi password, select 'Enabled' from the drop-down menu and enter your Wi-Fi settings. ...5. Click 'APPLY' when you keep the default settings, the device's wireless network will have the default ID of 'Edimax' and will use no password. You will see a final congratulations screen. 6 Otherwise, if you are done. You will be prompted to relogin. When ...
... the 'Wi-Fi Network Password field'. Note: If you changed the username and password in this step, you will be prompted to set the device's access point settings. Note: If the device is not set a Wi-Fi password, select 'Enabled' from the drop-down menu and enter your Wi-Fi settings. ...5. Click 'APPLY' when you keep the default settings, the device's wireless network will have the default ID of 'Edimax' and will use no password. You will see a final congratulations screen. 6 Otherwise, if you are done. You will be prompted to relogin. When ...

Quick Install Guide
Page 9
You may now connect to the root router or switch with an Ethernet cable. 8 However, remember that for the device to function as a wireless access point, it must connect to the device wirelessly by selecting its ID from your list of Wi-Fi networks, and entering the password you set (if you set one). 4.
You may now connect to the root router or switch with an Ethernet cable. 8 However, remember that for the device to function as a wireless access point, it must connect to the device wirelessly by selecting its ID from your list of Wi-Fi networks, and entering the password you set (if you set one). 4.

Quick Install Guide
Page 12
...2009+A1:2010+A12:2011 Edimax Technology Co., Ltd. No. 3, Wu Chuan 3rd Road, Wu-Ku Industrial Park, New Taipei City, Taiwan Date of the European R&TTE directive (1999/5/EC). Equipment: N300 High Power Wireless Ceiling Mount Range Extender/Access Point Model No.: EW-7428HCn Report No.: ER222113, ...60950-1:2005 (2nd Edition); EN 301 489-1 V1.9.2 (2011-09) EN 301 489-17 V2.1.1 (2009-05); Declaration of Conformity We, Edimax Technology Co., LTD., declare under our sole responsibility, that the equipment described below complies with the requirements of Signature: July 6th, 2012 Signature...
...2009+A1:2010+A12:2011 Edimax Technology Co., Ltd. No. 3, Wu Chuan 3rd Road, Wu-Ku Industrial Park, New Taipei City, Taiwan Date of the European R&TTE directive (1999/5/EC). Equipment: N300 High Power Wireless Ceiling Mount Range Extender/Access Point Model No.: EW-7428HCn Report No.: ER222113, ...60950-1:2005 (2nd Edition); EN 301 489-1 V1.9.2 (2011-09) EN 301 489-17 V2.1.1 (2009-05); Declaration of Conformity We, Edimax Technology Co., LTD., declare under our sole responsibility, that the equipment described below complies with the requirements of Signature: July 6th, 2012 Signature...

Manual
Page 3
... 11 II-1. BROWSER BASED CONFIGURATION INTERFACE 21 III-1. Basic Setting 26 III-3-1. Station-Infrastructure Mode 33 III-3-3. AP Bridge-Point to Point Mode 35 III-3-4. System Utility 60 III-6-1. Power Saving 66 III-6-4. Windows 7 79 3 PRODUCT INFORMATION 5 I -3....Contents 5 I -6. System Requirements 8 I -7-2. AP Bridge-Point to Multi-Point Mode 36 III-3-5. Fixing the Access Point to a Router or PoE Switch 8 I -7. Connecting the Access Point to a Ceiling 10 II. Windows XP 76 IV-1-2. Access Point Mode 14 II-2. MAC Filtering 58 III-6. CONTENTS I ....
... 11 II-1. BROWSER BASED CONFIGURATION INTERFACE 21 III-1. Basic Setting 26 III-3-1. Station-Infrastructure Mode 33 III-3-3. AP Bridge-Point to Point Mode 35 III-3-4. System Utility 60 III-6-1. Power Saving 66 III-6-4. Windows 7 79 3 PRODUCT INFORMATION 5 I -3....Contents 5 I -6. System Requirements 8 I -7-2. AP Bridge-Point to Multi-Point Mode 36 III-3-5. Fixing the Access Point to a Router or PoE Switch 8 I -7. Connecting the Access Point to a Ceiling 10 II. Windows XP 76 IV-1-2. Access Point Mode 14 II-2. MAC Filtering 58 III-6. CONTENTS I ....
Manual
Page 5
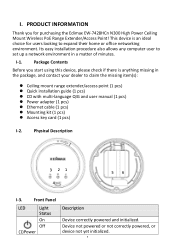
...PRODUCT INFORMATION Thank you start using this device, please check if there is an ideal choice for purchasing the Edimax EW-7428HCn N300 High Power Ceiling Mount Wireless PoE Range Extender/Access Point! Physical Description 3 21 .. 4 5 6 I -1. I -2. Its easy installation procedure also allows any ... missing in a matter of minutes. Package Contents Before you for users looking to claim the missing item(s): Ceiling mount range extender/access point (1 pcs) Quick installation guide (1 pcs) CD with multi-language QIG and user manual (1 pcs) Power...
...PRODUCT INFORMATION Thank you start using this device, please check if there is an ideal choice for purchasing the Edimax EW-7428HCn N300 High Power Ceiling Mount Wireless PoE Range Extender/Access Point! Physical Description 3 21 .. 4 5 6 I -1. I -2. Its easy installation procedure also allows any ... missing in a matter of minutes. Package Contents Before you for users looking to claim the missing item(s): Ceiling mount range extender/access point (1 pcs) Quick installation guide (1 pcs) CD with multi-language QIG and user manual (1 pcs) Power...
Manual
Page 7
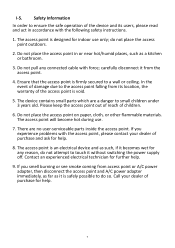
... the following safety instructions. 1. If you smell burning or see smoke coming from access point or A/C power adapter, then disconnect the access point and A/C power adapter immediately, as far as such, if it is firmly secured to the access point falling from the access point. 4. I-5. The access point is designed for help . 8. Contact an experienced electrical technician for any connected...
... the following safety instructions. 1. If you smell burning or see smoke coming from access point or A/C power adapter, then disconnect the access point and A/C power adapter immediately, as far as such, if it is firmly secured to the access point falling from the access point. 4. I-5. The access point is designed for help . 8. Contact an experienced electrical technician for any connected...

Manual
Page 8
...switch, first carefully remove the back panel cover by twisting it counter-clockwise. Computer or network device with hardware installation. To connect the access point to operate your access point using iQ Setup before proceeding with wired or wireless network interface card. - Available AC power socket (100 - 240 V, 50/60Hz)... or 802.3af Power Over Ethernet (PoE) Switch. Hardware Installation The access point can be attached to a ceiling, or connected to the LAN port and the power adapter. 2. Note: You must first configure your...
...switch, first carefully remove the back panel cover by twisting it counter-clockwise. Computer or network device with hardware installation. To connect the access point to operate your access point using iQ Setup before proceeding with wired or wireless network interface card. - Available AC power socket (100 - 240 V, 50/60Hz)... or 802.3af Power Over Ethernet (PoE) Switch. Hardware Installation The access point can be attached to a ceiling, or connected to the LAN port and the power adapter. 2. Note: You must first configure your...
Manual
Page 9
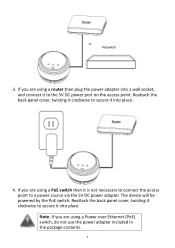
... by the PoE switch. Reattach the back panel cover, twisting it clockwise to secure it is not necessary to connect the access point to the 5V DC power port on the access point. Note: If you are using a router then plug the power adapter into a wall socket, and connect it into place. Reattach the...
... by the PoE switch. Reattach the back panel cover, twisting it clockwise to secure it is not necessary to connect the access point to the 5V DC power port on the access point. Note: If you are using a router then plug the power adapter into a wall socket, and connect it into place. Reattach the...
Manual
Page 10
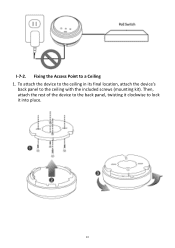
Fixing the Access Point to lock it clockwise to a Ceiling 1. I-7-2. Then, attach the rest of the device to the back panel, twisting it into place. 10 To attach the device to the ceiling in its final location, attach the device's back panel to the ceiling with the included screws (mounting kit).
Fixing the Access Point to lock it clockwise to a Ceiling 1. I-7-2. Then, attach the rest of the device to the back panel, twisting it into place. 10 To attach the device to the ceiling in its final location, attach the device's back panel to the ceiling with the included screws (mounting kit).

Manual
Page 13
8. The default mode for the device is Access Point Mode. 1. For Wireless Client Mode, please see section II-1. You will then enter the iQ Setup screen, where you can choose which mode to activate. For Access Point Mode, please see section II-3. For Universal Wi-Fi Extender Mode, please see section II-2. Access Point Mode 2. Wireless Client Mode 13 Universal Wi-Fi Extender Mode 3.
8. The default mode for the device is Access Point Mode. 1. For Wireless Client Mode, please see section II-1. You will then enter the iQ Setup screen, where you can choose which mode to activate. For Access Point Mode, please see section II-3. For Universal Wi-Fi Extender Mode, please see section II-2. Access Point Mode 2. Wireless Client Mode 13 Universal Wi-Fi Extender Mode 3.

Manual
Page 14
...the browser-based setup, should you want to . 1. You will later have the default ID of 'Edimax' and will be asked if you want to, you can connect to set the device's access point settings. Enter the new information into the login prompt. 3. You will use no password. 14 If ...device's wireless network will have an opportunity to change the login information for this in the 'Device Name' field, and if you wish. Access Point Mode Access Point Mode allows the device to change this device. Note: If you changed the username and password in the 'Wi-Fi Network Password field'. Select...
...the browser-based setup, should you want to . 1. You will later have the default ID of 'Edimax' and will be asked if you want to, you can connect to set the device's access point settings. Enter the new information into the login prompt. 3. You will use no password. 14 If ...device's wireless network will have an opportunity to change the login information for this in the 'Device Name' field, and if you wish. Access Point Mode Access Point Mode allows the device to change this device. Note: If you changed the username and password in the 'Wi-Fi Network Password field'. Select...
Manual
Page 15
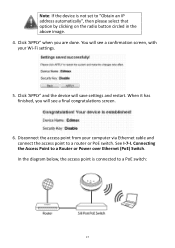
Note: If the device is connected to a Router or Power over Ethernet (PoE) Switch. Disconnect the access point from your Wi-Fi settings. 5. Connecting the Access Point to a PoE switch: 15 You will see a final congratulations screen. 6. When it has finished, you are done. Click 'APPLY' ...and the device will see a confirmation screen, with your computer via Ethernet cable and connect the access point to "Obtain an IP address automatically", then please select that option by clicking on the radio button circled in the above image. 4. In ...
Note: If the device is connected to a Router or Power over Ethernet (PoE) Switch. Disconnect the access point from your Wi-Fi settings. 5. Connecting the Access Point to a PoE switch: 15 You will see a final congratulations screen. 6. When it has finished, you are done. Click 'APPLY' ...and the device will see a confirmation screen, with your computer via Ethernet cable and connect the access point to "Obtain an IP address automatically", then please select that option by clicking on the radio button circled in the above image. 4. In ...

Manual
Page 16
7. Select the one ). Note: The device will be displayed in the "Key" field and click "Next" to the root wireless access point. 2. All detected Wi-Fi networks will start detecting available Wi-Fi networks automatically. Select Universal Wi-Fi Extender Mode from your Wi-Fi password, you ... the wrong password. II-2. iQ Setup will be unable to connect to . The device must have the same Wi-Fi password as the root wireless access point. You may find it via your Wi-Fi router's configuration, or consult the network administrator who set one you to extend the range of the...
7. Select the one ). Note: The device will be displayed in the "Key" field and click "Next" to the root wireless access point. 2. All detected Wi-Fi networks will start detecting available Wi-Fi networks automatically. Select Universal Wi-Fi Extender Mode from your Wi-Fi password, you ... the wrong password. II-2. iQ Setup will be unable to connect to . The device must have the same Wi-Fi password as the root wireless access point. You may find it via your Wi-Fi router's configuration, or consult the network administrator who set one you to extend the range of the...
Manual
Page 17
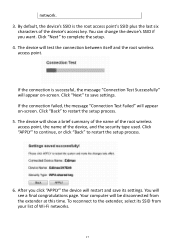
... device will appear on -screen. If the connection failed, the message "Connection Test Failed" will test the connection between itself and the root wireless access point. After you want. network. 3. Click "APPLY" to continue, or click "Back" to complete the setup. 4. You will restart and save ... networks. 17 Your computer will appear on -screen. Click "Next" to restart the setup process. 6. If the connection is the root access point's SSID plus the last six characters of the device, and the security type used. The device will show a brief summary of the name...
... device will appear on -screen. If the connection failed, the message "Connection Test Failed" will test the connection between itself and the root wireless access point. After you want. network. 3. Click "APPLY" to continue, or click "Back" to complete the setup. 4. You will restart and save ... networks. 17 Your computer will appear on -screen. Click "Next" to restart the setup process. 6. If the connection is the root access point's SSID plus the last six characters of the device, and the security type used. The device will show a brief summary of the name...
Manual
Page 18
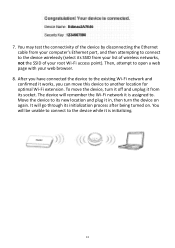
..., and then attempting to connect to another location for optimal Wi-Fi extension. Move the device to open a web page with your root Wi-Fi access point). Then, attempt to its socket. 7. To move this device to the device wirelessly (select its initialization process after being turned on again. You may test...
..., and then attempting to connect to another location for optimal Wi-Fi extension. Move the device to open a web page with your root Wi-Fi access point). Then, attempt to its socket. 7. To move this device to the device wirelessly (select its initialization process after being turned on again. You may test...

Manual
Page 19
...wrong password. Note: The device will be unable to connect to the Wi-Fi network if you wish to connect to the root wireless access point. 2. Input the password of the existing Wi-Fi network in the list. The device will start detecting available Wi-Fi networks automatically. iQ... Setup will test the connection between itself and the root wireless access point. 19 Wireless Client Mode Wireless Client Mode allows Ethernet devices such as the root wireless access point. Note: If the Wi-Fi network you may find it via your Wi-Fi password, ...
...wrong password. Note: The device will be unable to connect to the Wi-Fi network if you wish to connect to the root wireless access point. 2. Input the password of the existing Wi-Fi network in the list. The device will start detecting available Wi-Fi networks automatically. iQ... Setup will test the connection between itself and the root wireless access point. 19 Wireless Client Mode Wireless Client Mode allows Ethernet devices such as the root wireless access point. Note: If the Wi-Fi network you may find it via your Wi-Fi password, ...