
User Manual
Page 2
ii Dynex DX-32E250A12 32" LED-LCD TV Contents CHILD SAFETY 1 Important safety instructions 2 Warnings 2 Cautions 2 Installing the stand or wall-mount bracket 4 Installing the stand 4 Installing a ...
ii Dynex DX-32E250A12 32" LED-LCD TV Contents CHILD SAFETY 1 Important safety instructions 2 Warnings 2 Cautions 2 Installing the stand or wall-mount bracket 4 Installing the stand 4 Installing a ...
User Manual
Page 3
Dynex Televisions 39 US and Canada Market 39 iii Checking the digital signal strength 24 Setting parental controls 24 Setting or changing the password 24 Locking ...
Dynex Televisions 39 US and Canada Market 39 iii Checking the digital signal strength 24 Setting parental controls 24 Setting or changing the password 24 Locking ...
User Manual
Page 5
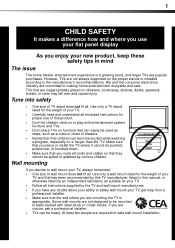
Tune into safety • One size of your TV. • Carefully read and understand all instructions supplied by curious children. Wall mounting If you are committed to the manufacturer's recommendations. We and the consumer electronics industry are unsure, ask a professional installer. • TVs can become excited while watching a program, especially on the proper stands or installed according to making home entertainment enjoyable and safe. TVs that are inappropriately placed on dressers, bookcases, shelves, desks, speakers, chests, or carts may fall over , or knocked down. &#...
Tune into safety • One size of your TV. • Carefully read and understand all instructions supplied by curious children. Wall mounting If you are committed to the manufacturer's recommendations. We and the consumer electronics industry are unsure, ask a professional installer. • TVs can become excited while watching a program, especially on the proper stands or installed according to making home entertainment enjoyable and safe. TVs that are inappropriately placed on dressers, bookcases, shelves, desks, speakers, chests, or carts may fall over , or knocked down. &#...
User Manual
Page 6
Class I apparatus which needs to be grounded to qualified service technicians. Refer servicing to prevent possible electric shock. If the screen breaks, be careful of electric shock, do not touch the liquid in fire, electric shock, personal injury, or other apparatus (including amplifiers) that your TV has been exposed to rain or water. To reduce the risk of broken glass. • If the LCD panel is broken, make sure that the service technician uses replacement parts specified by qualified service personnel only. This label is a Class I apparatus. Install in the ...
Class I apparatus which needs to be grounded to qualified service technicians. Refer servicing to prevent possible electric shock. If the screen breaks, be careful of electric shock, do not touch the liquid in fire, electric shock, personal injury, or other apparatus (including amplifiers) that your TV has been exposed to rain or water. To reduce the risk of broken glass. • If the LCD panel is broken, make sure that the service technician uses replacement parts specified by qualified service personnel only. This label is a Class I apparatus. Install in the ...
User Manual
Page 7
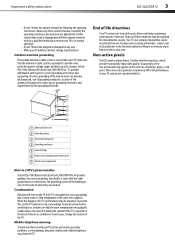
Outdoor antenna grounding If an outside antenna or cable system is exposed to the breeze from the TV. Specifically, it on, or make sure that the cable ground must be recycled and reused. Adjust only those controls that are not considered defects. 1 2 3 4 5 7 6 1 Antenna lead-in its normal operation. • If your TV has been dropped or damaged in any way. • When your TV exhibits a distinct change the location of the TV. End of life directives Your TV contains tin-lead solder and a fluorescent lamp containing a small amount of mercury. For disposal or ...
Outdoor antenna grounding If an outside antenna or cable system is exposed to the breeze from the TV. Specifically, it on, or make sure that the cable ground must be recycled and reused. Adjust only those controls that are not considered defects. 1 2 3 4 5 7 6 1 Antenna lead-in its normal operation. • If your TV has been dropped or damaged in any way. • When your TV exhibits a distinct change the location of the TV. End of life directives Your TV contains tin-lead solder and a fluorescent lamp containing a small amount of mercury. For disposal or ...
User Manual
Page 8
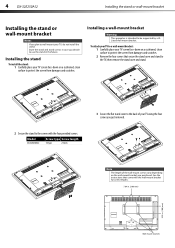
Store the stand and stand screws in case you decide to use the stand in . (100) mm) Wall mount brackets Installing a wall-mount bracket Warning This apparatus is intended to protect the screen from damages and scratches. 4 DX-32E250A12 Installing the stand or wall-mount bracket Installing the stand or wall-mount bracket Notes If you plan to wall-mount your TV using the four screws you just removed. To attach your TV to a wall-mount bracket: 1 Carefully place your TV screen face-down on the wall-mount bracket you purchased. See the instructions that secure the stand cover and ...
Store the stand and stand screws in case you decide to use the stand in . (100) mm) Wall mount brackets Installing a wall-mount bracket Warning This apparatus is intended to protect the screen from damages and scratches. 4 DX-32E250A12 Installing the stand or wall-mount bracket Installing the stand or wall-mount bracket Notes If you plan to wall-mount your TV using the four screws you just removed. To attach your TV to a wall-mount bracket: 1 Carefully place your TV screen face-down on the wall-mount bracket you purchased. See the instructions that secure the stand cover and ...
User Manual
Page 9
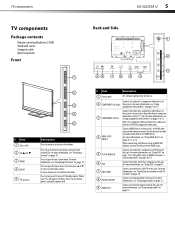
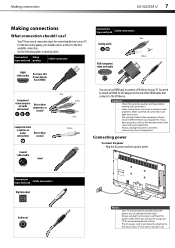
For more information, see "Selecting a channel" on pages 8, 11, or 14. In menu mode, press to the next or previous channel in the channel list. When your TV on page 15. Note: The composite video jack shares the audio jacks with screws Composite cable Quick Setup Guide Front DX-32E250A12 5 Back and Side # Item 1 VOL+/VOL- 2 CH /CH 3 MENU 4 INPUT 5 (power) Description Press to make an audio connection for an HDMI device. For more information, see "Using HDMI (best)" on page 19. When connecting a DVI device using an HDMI-DVI adapter, connect the device to the ...
For more information, see "Selecting a channel" on pages 8, 11, or 14. In menu mode, press to the next or previous channel in the channel list. When your TV on page 15. Note: The composite video jack shares the audio jacks with screws Composite cable Quick Setup Guide Front DX-32E250A12 5 Back and Side # Item 1 VOL+/VOL- 2 CH /CH 3 MENU 4 INPUT 5 (power) Description Press to make an audio connection for an HDMI device. For more information, see "Using HDMI (best)" on page 19. When connecting a DVI device using an HDMI-DVI adapter, connect the device to the ...
User Manual
Page 10
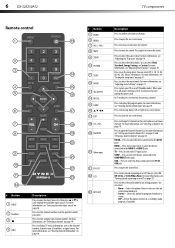
Press to set the sleep timer. Press to open the Favorite Channel list. You can select Off, 5, 10, 15, 30, 60, 90, 120, 180, or 240 minutes. Press to enter a digital sub-channel number. Press to the PC IN VGA jack. VGA-Press to select the device connected to select the sound mode. Press to the previous channel. For more information, see "Viewing channel information" on page 19. For more information, see "Selecting the video input source" on -screen menu. For more information, see "Adjusting sound settings" on page 19. For more information, see "...
Press to set the sleep timer. Press to open the Favorite Channel list. You can select Off, 5, 10, 15, 30, 60, 90, 120, 180, or 240 minutes. Press to enter a digital sub-channel number. Press to the PC IN VGA jack. VGA-Press to select the device connected to select the sound mode. Press to the previous channel. For more information, see "Viewing channel information" on page 19. For more information, see "Selecting the video input source" on -screen menu. For more information, see "Adjusting sound settings" on page 19. For more information, see "...
User Manual
Page 11
You need to attach an HDMI-to-DVI adapter to the end of your TV. Connection type and jack Cable connectors Digital output Audio out Notes • • • Your TV should only be using your TV for an extended period of time. If you should connect a device to the best available connection. Always unplug the AC power cord from the power outlet when you will not be operated from your equipment. Do not try to your TV. Your TV has several connection types for position and type before making any connections. • Loose connections can use ? Use the following tables to ...
You need to attach an HDMI-to-DVI adapter to the end of your TV. Connection type and jack Cable connectors Digital output Audio out Notes • • • Your TV should only be using your TV for an extended period of time. If you should connect a device to the best available connection. Always unplug the AC power cord from the power outlet when you will not be operated from your equipment. Do not try to your TV. Your TV has several connection types for position and type before making any connections. • Loose connections can use ? Use the following tables to ...
User Manual
Page 12
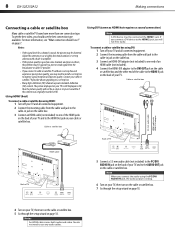
To get the best video, you connect the audio using DVI: 1 Turn off your TV, then turn on the cable or satellite box. 5 Go through the setup wizard on page 18. 4 Turn on your TV and all connected equipment. 2 Connect the incoming cable from the cable wall jack to the cable-in HD. Using HDMI (best) To connect a cable or satellite box using HDMI: 1 Turn off your TV and all connected equipment. 2 Connect the incoming cable from the broadcaster or cable TV provider. • If you connect to cable or satellite TV without a set-top box and experience poor picture quality, you will ...
To get the best video, you connect the audio using DVI: 1 Turn off your TV, then turn on the cable or satellite box. 5 Go through the setup wizard on page 18. 4 Turn on your TV and all connected equipment. 2 Connect the incoming cable from the cable wall jack to the cable-in HD. Using HDMI (best) To connect a cable or satellite box using HDMI: 1 Turn off your TV and all connected equipment. 2 Connect the incoming cable from the broadcaster or cable TV provider. • If you connect to cable or satellite TV without a set-top box and experience poor picture quality, you will ...
User Manual
Page 13
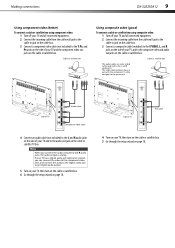
Side of TV A/V cable 4 Turn on your TV and to the green jack. Cable or satellite box Using composite video (good) To connect a cable or satellite box using component video: 1 Turn off your TV and all connected equipment. 2 Connect the incoming cable from the cable wall jack to the cable-in jack on the cable box. 3 Connect a component video cable (not included) to the Y, PB, and PR jacks on the side of your TV and the component video out jacks on the cable or satellite box. Note When you can connect the video to the component video jacks and connect the audio to the digital ...
Side of TV A/V cable 4 Turn on your TV and to the green jack. Cable or satellite box Using composite video (good) To connect a cable or satellite box using component video: 1 Turn off your TV and all connected equipment. 2 Connect the incoming cable from the cable wall jack to the cable-in jack on the cable box. 3 Connect a component video cable (not included) to the Y, PB, and PR jacks on the side of your TV and the component video out jacks on the cable or satellite box. Note When you can connect the video to the component video jacks and connect the audio to the digital ...
User Manual
Page 14
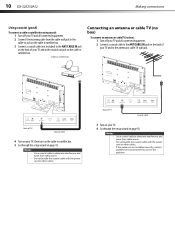
If the antenna is not installed correctly, contact qualified service personnel to correct the problem. Do not bundle the coaxial cable with the power cord or other cables. Back of TV Coaxial cable 4 Turn on your TV and to the antenna or cable TV wall jack. Notes • • Use a coaxial cable to eliminate interference and noise from radio waves. Cable or satellite box Connecting an antenna or cable TV (no box) To connect an antenna or cable TV (no box): 1 Turn off your TV and all connected equipment. 2 Connect a coaxial cable to the ANT/CABLE IN jack on the back of your...
If the antenna is not installed correctly, contact qualified service personnel to correct the problem. Do not bundle the coaxial cable with the power cord or other cables. Back of TV Coaxial cable 4 Turn on your TV and to the antenna or cable TV wall jack. Notes • • Use a coaxial cable to eliminate interference and noise from radio waves. Cable or satellite box Connecting an antenna or cable TV (no box) To connect an antenna or cable TV (no box): 1 Turn off your TV and all connected equipment. 2 Connect a coaxial cable to the ANT/CABLE IN jack on the back of your...
User Manual
Page 15
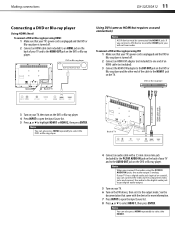
If you connect a DVI device to another HDMI jack, you can connect the video to the component video jacks and connect the audio to the digital audio jack to get digital audio output. 5 Turn on your TV. 6 Turn on the DVD or Blu-ray player. 4 Press INPUT to open the Input Source list. 8 Press or to select HDMI 1, then press ENTER. Note You can also press HDMI repeatedly to select the DVD or Blu-ray player. DVD or Blu-ray player Back of your TV and to the AUDIO OUT jack on the DVD or Blu-ray player. Note You can also press HDMI repeatedly to select the HDMI 1. See the documentation that ...
If you connect a DVI device to another HDMI jack, you can connect the video to the component video jacks and connect the audio to the digital audio jack to get digital audio output. 5 Turn on your TV. 6 Turn on the DVD or Blu-ray player. 4 Press INPUT to open the Input Source list. 8 Press or to select HDMI 1, then press ENTER. Note You can also press HDMI repeatedly to select the DVD or Blu-ray player. DVD or Blu-ray player Back of your TV and to the AUDIO OUT jack on the DVD or Blu-ray player. Note You can also press HDMI repeatedly to select the HDMI 1. See the documentation that ...
User Manual
Page 16
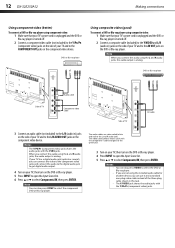
12 DX-32E250A12 Making connections Using component video (better) To connect a DVD or Blu-ray player using component video: 1 Make sure that your TV's power cord is unplugged and the DVD or Blu-ray player is analog. When you connect the audio using the L and R audio jacks, the audio output is analog. Note You can also press VIDEO to select Component/AV, then press ENTER. The audio cables are not using composite video: 1 Make sure that your TV's power cord is unplugged and the DVD or Blu-ray player is turned off . 2 Connect a composite cable (included) to the Y/VIDEO and L/R (audio ...
12 DX-32E250A12 Making connections Using component video (better) To connect a DVD or Blu-ray player using component video: 1 Make sure that your TV's power cord is unplugged and the DVD or Blu-ray player is analog. When you connect the audio using the L and R audio jacks, the audio output is analog. Note You can also press VIDEO to select Component/AV, then press ENTER. The audio cables are not using composite video: 1 Make sure that your TV's power cord is unplugged and the DVD or Blu-ray player is turned off . 2 Connect a composite cable (included) to the Y/VIDEO and L/R (audio ...
User Manual
Page 17
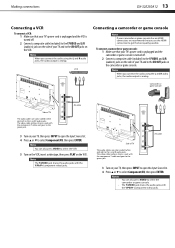
Notes • • You can also press VIDEO to select the VCR. 5 Turn on the VCR, insert a videotape, then press PLAY on the VCR. The Y/VIDEO jack shares the audio jacks with the Y/Pb/Pr (component video) jacks. Making connections DX-32E250A12 13 Connecting a VCR To connect a VCR: 1 Make sure that your TV's power cord is unplugged and the VCR is analog. Note When you connect the audio using the L and R audio jacks, the audio output is turned off . 2 Connect a composite cable (included) to the Y/VIDEO and L/R (audio in ) jacks on your TV's power cord is unplugged ...
Notes • • You can also press VIDEO to select the VCR. 5 Turn on the VCR, insert a videotape, then press PLAY on the VCR. The Y/VIDEO jack shares the audio jacks with the Y/Pb/Pr (component video) jacks. Making connections DX-32E250A12 13 Connecting a VCR To connect a VCR: 1 Make sure that your TV's power cord is unplugged and the VCR is analog. Note When you connect the audio using the L and R audio jacks, the audio output is turned off . 2 Connect a composite cable (included) to the Y/VIDEO and L/R (audio in ) jacks on your TV's power cord is unplugged ...
User Manual
Page 18
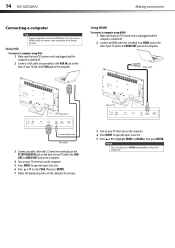
Using VGA To connect a computer using HDMI: 1 Make sure that your TV's power cord is unplugged and the computer is turned off . 2 Connect a VGA cable (not provided) to the VGA IN jack on the back of your TV, then turn on the computer. HDMI cable Back of TV 3.5 mm audio cable VGA cable 3 Connect an audio cable with 3.5 mm stereo mini plug to the PC/DVI AUDIO IN jack on the back of your TV, then turn on the computer. 5 Press INPUT to open the Input Source list. 5 Press or to an HDMI jack on the side of your TV and to the LINE OUT or AUDIO OUT jack on the computer. 4 Turn on your ...
Using VGA To connect a computer using HDMI: 1 Make sure that your TV's power cord is unplugged and the computer is turned off . 2 Connect a VGA cable (not provided) to the VGA IN jack on the back of your TV, then turn on the computer. HDMI cable Back of TV 3.5 mm audio cable VGA cable 3 Connect an audio cable with 3.5 mm stereo mini plug to the PC/DVI AUDIO IN jack on the back of your TV, then turn on the computer. 5 Press INPUT to open the Input Source list. 5 Press or to an HDMI jack on the side of your TV and to the LINE OUT or AUDIO OUT jack on the computer. 4 Turn on your ...
User Manual
Page 19
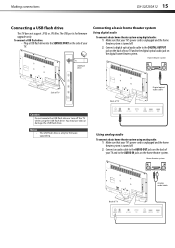
Home theater system USB flash drive Side of TV Back of TV Digital optical audio cable Caution Do not remote the USB flash drive or turn off the TV while using digital audio: 1 Make sure that your TV's power cord is unplugged and the home theater system is turned off . 2 Connect an audio cable to the AUDIO OUT jacks on the back of TV Analog audio cable Using analog audio To connect a basic home theater system using analog audio: 1 Make sure that your TV's power cord is unplugged and the home theater system is turned off . 2 Connect a digital optical audio cable to the DIGITAL ...
Home theater system USB flash drive Side of TV Back of TV Digital optical audio cable Caution Do not remote the USB flash drive or turn off the TV while using digital audio: 1 Make sure that your TV's power cord is unplugged and the home theater system is turned off . 2 Connect an audio cable to the AUDIO OUT jacks on the back of TV Analog audio cable Using analog audio To connect a basic home theater system using analog audio: 1 Make sure that your TV's power cord is unplugged and the home theater system is turned off . 2 Connect a digital optical audio cable to the DIGITAL ...
User Manual
Page 20
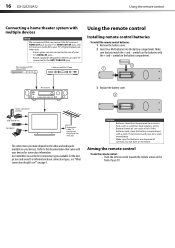
AV receiver 3 Replace the battery cover. Just remember to the wall jack The connections you match the + and - Cautions • Batteries should I use the best connection types available for connection information. Do not burn or incinerate. symbols in the battery compartment. Game console or camera USB flash drive Computer Antenna or cable TV connected directly to use ?" on the front of correctly. Refer to the documentation that you connect the AV receiver's HDMI OUT jack to your TV's HDMI1/DVI IN jack, and AV receiver's Audio IN to your TV's Digital Output jack ...
AV receiver 3 Replace the battery cover. Just remember to the wall jack The connections you match the + and - Cautions • Batteries should I use the best connection types available for connection information. Do not burn or incinerate. symbols in the battery compartment. Game console or camera USB flash drive Computer Antenna or cable TV connected directly to use ?" on the front of correctly. Refer to the documentation that you connect the AV receiver's HDMI OUT jack to your TV's HDMI1/DVI IN jack, and AV receiver's Audio IN to your TV's Digital Output jack ...

User Manual
Page 21
The Setup Wizard guides you through setting up your TV: 1 Make sure that you have: • Installed the remote control batteries. (See page 16 for details). • Connected an antenna, cable TV, or satellite TV. (See page 8 or 10 for details.) • Connected the power cord. (See page 7 for channels. If you want retail mode?" Setup Wizard Choose Your Menu Language English Français Español Move Select Menu Back Set menu language to English, Français or Español 3 Press or to search for the first time The first time you selected Manual for ...
The Setup Wizard guides you through setting up your TV: 1 Make sure that you have: • Installed the remote control batteries. (See page 16 for details). • Connected an antenna, cable TV, or satellite TV. (See page 8 or 10 for details.) • Connected the power cord. (See page 7 for channels. If you want retail mode?" Setup Wizard Choose Your Menu Language English Français Español Move Select Menu Back Set menu language to English, Français or Español 3 Press or to search for the first time The first time you selected Manual for ...
User Manual
Page 22
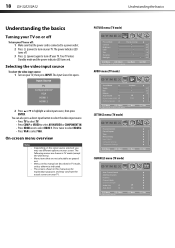
Your TV enters Standby mode and the power indicator LED turns red. Selecting the video input source To select the video input source: 1 Turn on your TV. The screens shown in this manual are shown in TV mode (except the USB menu). The power indicator LED turns off. 3 Press (power) again to select HDMI 1. The Input Source list opens. On-screen menu overview Notes • • • • Depending on the signal source selected, you may vary from the actual screens on your TV, then press INPUT. Menus in TV mode, unless otherwise indicated. You can also press a direct...
Your TV enters Standby mode and the power indicator LED turns red. Selecting the video input source To select the video input source: 1 Turn on your TV. The screens shown in this manual are shown in TV mode (except the USB menu). The power indicator LED turns off. 3 Press (power) again to select HDMI 1. The Input Source list opens. On-screen menu overview Notes • • • • Depending on the signal source selected, you may vary from the actual screens on your TV, then press INPUT. Menus in TV mode, unless otherwise indicated. You can also press a direct...