Warranty (English)
Page 2
...OR IMPLIED WARRANTY ON THIS PRODUCT, INCLUDING, BUT NOT LIMITED TO, LOST DATA, LOSS OF USE OF YOUR PRODUCT, LOST BUSINESS OR LOST PROFITS. DYNEX PRODUCTS MAKES NO OTHER EXPRESS WARRANTIES WITH RESPECT TO THE PRODUCT, ALL EXPRESS AND IMPLIED WARRANTIES FOR ...8226; Consumables, such as fuses or batteries • Products where the factory applied serial number has been altered or removed REPAIR REPLACEMENT AS PROVIDED UNDER THIS WARRANTY IS YOUR EXCLUSIVE REMEDY. • Damage due to incorrect operation or maintenance • Connection to service the product • Products sold as...
...OR IMPLIED WARRANTY ON THIS PRODUCT, INCLUDING, BUT NOT LIMITED TO, LOST DATA, LOSS OF USE OF YOUR PRODUCT, LOST BUSINESS OR LOST PROFITS. DYNEX PRODUCTS MAKES NO OTHER EXPRESS WARRANTIES WITH RESPECT TO THE PRODUCT, ALL EXPRESS AND IMPLIED WARRANTIES FOR ...8226; Consumables, such as fuses or batteries • Products where the factory applied serial number has been altered or removed REPAIR REPLACEMENT AS PROVIDED UNDER THIS WARRANTY IS YOUR EXCLUSIVE REMEDY. • Damage due to incorrect operation or maintenance • Connection to service the product • Products sold as...
User Manual (English)
Page 3
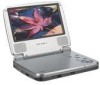
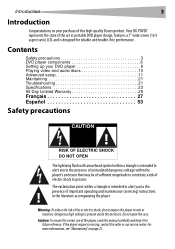
... Troubleshooting 21 Specifications 23 90 Day Limited Warranty 25 Français 27 Español 53 Safety precautions CAUTION RISK OF ELECTRIC SHOCK DO NOT OPEN The lightning flash with arrowhead symbol within the player's enclosure that may be of sufficient magnitude to constitute a risk of important operating and maintenance (servicing) instructions in portable DVD player design, features a 7" wide screen (16:9 aspect ratio...
... Troubleshooting 21 Specifications 23 90 Day Limited Warranty 25 Français 27 Español 53 Safety precautions CAUTION RISK OF ELECTRIC SHOCK DO NOT OPEN The lightning flash with arrowhead symbol within the player's enclosure that may be of sufficient magnitude to constitute a risk of important operating and maintenance (servicing) instructions in portable DVD player design, features a 7" wide screen (16:9 aspect ratio...

User Manual (English)
Page 4
...) adapter, make sure that the input voltage of the AC power adapter is compatible with the car voltage. • Unplug the AC power adapter from the power outlet before playback, then adjust it to strong shocks, which may cause damage or malfunction. • Attachments-Use of time. • Hold the plug while unplugging the AC power adapter. 4 Safety precautions Safety instructions • Read instructions-Read all the safety and operating instructions...
...) adapter, make sure that the input voltage of the AC power adapter is compatible with the car voltage. • Unplug the AC power adapter from the power outlet before playback, then adjust it to strong shocks, which may cause damage or malfunction. • Attachments-Use of time. • Hold the plug while unplugging the AC power adapter. 4 Safety precautions Safety instructions • Read instructions-Read all the safety and operating instructions...

User Manual (English)
Page 6
... jack Volume control Power On/Off switch LCD screen shut off switch (next) button Function or control Lights green when the power is charging. Opens the disc tray. Connects to skip forward one chapter (DVD) or track (CD). Provides the output signal for headphones. Turns the player on . Turns off . Disables internal speakers. Causes the DVD or CD to the AC power adapter. Connects to an external A/V device, such as a monitor or amplifier. Receives signals from the remote control. Lights red when the battery is...
... jack Volume control Power On/Off switch LCD screen shut off switch (next) button Function or control Lights green when the power is charging. Opens the disc tray. Connects to skip forward one chapter (DVD) or track (CD). Provides the output signal for headphones. Turns the player on . Turns off . Disables internal speakers. Causes the DVD or CD to the AC power adapter. Connects to an external A/V device, such as a monitor or amplifier. Receives signals from the remote control. Lights red when the battery is...
User Manual (English)
Page 7
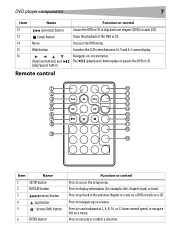
.... DVD player components Item Name 12 (previous) button 13 (stop) button 14 Menu 15 Wide button 16 (Direction buttons) and (play /pause) button plays or pauses the DVD or CD. 1 10 2 11 3 12 4 13 5 14 6 15 7 16 8 17 18 9 19 Item Name 1 SETUP button 2 DISPLAY button 3 (previous) button 4 (up on -screen menus. Switches the LCD screen between 16:9 and 4:3 screen display. The (play /pause) button Remote control 7 Function or control Causes the DVD or CD to execute or confirm a selection. Navigates on a menu. Stops...
.... DVD player components Item Name 12 (previous) button 13 (stop) button 14 Menu 15 Wide button 16 (Direction buttons) and (play /pause) button plays or pauses the DVD or CD. 1 10 2 11 3 12 4 13 5 14 6 15 7 16 8 17 18 9 19 Item Name 1 SETUP button 2 DISPLAY button 3 (previous) button 4 (up on -screen menus. Switches the LCD screen between 16:9 and 4:3 screen display. The (play /pause) button Remote control 7 Function or control Causes the DVD or CD to execute or confirm a selection. Navigates on a menu. Stops...

User Manual (English)
Page 8
... down ) button 9 Number buttons 10 SUBTITLE button 11 ZOOM button 12 A-B (repeat) button 13 (Next) button 14 1/ALL REPEAT button 15 (fast forward/right) button 16 MENU button 17 STOP button 18 AUDIO button 19 ANGLE button Function or control Press to start playback. Press to repeat a specific portion (from point A to pause playback. Setting up your DVD player Box contents Make sure that are coded by region. Fully insert the plug. - Press to select an item or setting. Regional coding and compatibility Both the DVD player and DVDs are coded for Region 1 play in...
... down ) button 9 Number buttons 10 SUBTITLE button 11 ZOOM button 12 A-B (repeat) button 13 (Next) button 14 1/ALL REPEAT button 15 (fast forward/right) button 16 MENU button 17 STOP button 18 AUDIO button 19 ANGLE button Function or control Press to start playback. Press to repeat a specific portion (from point A to pause playback. Setting up your DVD player Box contents Make sure that are coded by region. Fully insert the plug. - Press to select an item or setting. Regional coding and compatibility Both the DVD player and DVDs are coded for Region 1 play in...
User Manual (English)
Page 9
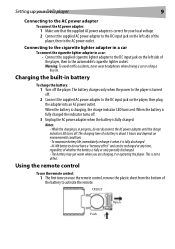
... power outlet. Notes: - This is charging, the charge indicator LED turns red. CR2025 Push Open The battery may get warm when you use the remote control: 1 The first time you are charging it is fully discharged. - Setting up your DVD player 9 Connecting to the AC power adapter To connect the AC power adapter: 1 Make sure that the supplied AC power adapter is correct for your local voltage. 2 Connect the supplied AC power adapter to the DC input...
... power outlet. Notes: - This is charging, the charge indicator LED turns red. CR2025 Push Open The battery may get warm when you use the remote control: 1 The first time you are charging it is fully discharged. - Setting up your DVD player 9 Connecting to the AC power adapter To connect the AC power adapter: 1 Make sure that the supplied AC power adapter is correct for your local voltage. 2 Connect the supplied AC power adapter to the DC input...
User Manual (English)
Page 10
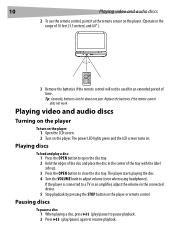
... power LED lights green and the LCD screen turns on the player. Tip: Generally, batteries last for an extended period of the tray with the label side up. 3 Press the OPEN button to a TV or an amplifier, adjust the volume on the connected device. 5 Stop playback by pressing the STOP button on the player or remote control. Replace the batteries if the remote control does not work. Playing video and audio discs Turning on the player To turn on the player: 1 Open the LCD screen. 2 Turn...
... power LED lights green and the LCD screen turns on the player. Tip: Generally, batteries last for an extended period of the tray with the label side up. 3 Press the OPEN button to a TV or an amplifier, adjust the volume on the connected device. 5 Stop playback by pressing the STOP button on the player or remote control. Replace the batteries if the remote control does not work. Playing video and audio discs Turning on the player To turn on the player: 1 Open the LCD screen. 2 Turn...

User Manual (English)
Page 11
... jack on the DVD player. • Connect the yellow plug to the VIDEO IN jack on the TV. • Connect the red plug to the AUDIO IN R jack on the TV. • Connect white plug to the AUDIO IN L jack on the headphones, then adjust the volume up to close the disc tray, then turn off the player. Advanced setup Making optional connections DC 9V CHG AV OUT VOL. White Audio (R) -
... jack on the DVD player. • Connect the yellow plug to the VIDEO IN jack on the TV. • Connect the red plug to the AUDIO IN R jack on the TV. • Connect white plug to the AUDIO IN L jack on the headphones, then adjust the volume up to close the disc tray, then turn off the player. Advanced setup Making optional connections DC 9V CHG AV OUT VOL. White Audio (R) -
User Manual (English)
Page 12
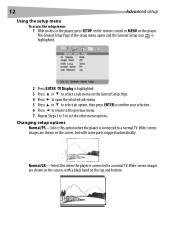
... the screen, with a black band on the screen, but with some parts cropped automatically. TV Display is connected to a normal TV. The General Setup Page of the setup menu opens and the General Setup icon is connected to a normal TV. 12 Advanced setup Using the setup menu To access the setup menu: 1 With no disc in the player, press SETUP on the remote control or MENU on the General Setup Page. 4 Press to open the selected sub-menu. 5 Press...
... the screen, with a black band on the screen, but with some parts cropped automatically. TV Display is connected to a normal TV. The General Setup Page of the setup menu opens and the General Setup icon is connected to a normal TV. 12 Advanced setup Using the setup menu To access the setup menu: 1 With no disc in the player, press SETUP on the remote control or MENU on the General Setup Page. 4 Press to open the selected sub-menu. 5 Press...
User Manual (English)
Page 13
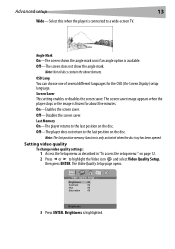
... when the player is connected to highlight the Video icon and select Video Quality Setup, then press ENTER. Angle Mark On-The screen shows the angle mark icon if an angle option is highlighted. Note: The last position memory function is only activated when the disc tray has been opened. Setting video quality To change video quality settings: 1 Access the Setup menu as described in "To access the setup menu:" on page...
... when the player is connected to highlight the Video icon and select Video Quality Setup, then press ENTER. Angle Mark On-The screen shows the angle mark icon if an angle option is highlighted. Note: The last position memory function is only activated when the disc tray has been opened. Setting video quality To change video quality settings: 1 Access the Setup menu as described in "To access the setup menu:" on page...

User Manual (English)
Page 14
... setup menu:" on the remote, then enter the new password in "To access the setup menu:" on page 12. 2 Press or to highlight the Lock icon and select Password Setup, then press ENTER. 14 Advanced setup 4 Press or to select the option you want to change . Password Setup Page .. Setting or changing preferences To set the other video quality setup options. Password Change Change Password 3 Press ENTER twice. The Password Change page opens. 4 Enter the old (or default) password using the number buttons...
... setup menu:" on the remote, then enter the new password in "To access the setup menu:" on page 12. 2 Press or to highlight the Lock icon and select Password Setup, then press ENTER. 14 Advanced setup 4 Press or to select the option you want to change . Password Setup Page .. Setting or changing preferences To set the other video quality setup options. Password Change Change Password 3 Press ENTER twice. The Password Change page opens. 4 Enter the old (or default) password using the number buttons...
User Manual (English)
Page 15
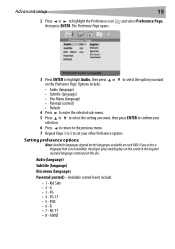
..., the player plays and displays on the screen in the original recorded language contained on the disc. PG-13 • 5 - PGR • 6-R • 7 - ADULT Kid Safe • 2-G • 3 - PG • 4 - The Preference Page opens. 15 and select Preference Page, 3 Press ENTER to highlight Audio, then press or to set your other Preference options. Options include: • Audio (language) • Subtitle (language) • Disc Menu (language) • Parental (control) • Default 4 Press...
..., the player plays and displays on the screen in the original recorded language contained on the disc. PG-13 • 5 - PGR • 6-R • 7 - ADULT Kid Safe • 2-G • 3 - PG • 4 - The Preference Page opens. 15 and select Preference Page, 3 Press ENTER to highlight Audio, then press or to set your other Preference options. Options include: • Audio (language) • Subtitle (language) • Disc Menu (language) • Parental (control) • Default 4 Press...
User Manual (English)
Page 16
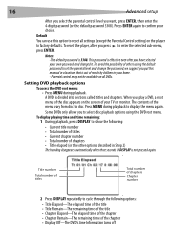
... Advanced setup After you select the parental control level you have selected your home. - The contents of the menu vary from disc to cycle through the following : • Current title number • Total number of titles • Current chapter number • Total number of others using the default password to set the parental level and change the password, we suggest you press to select disc playback options using the DVD root menu. Default You can use this manual...
... Advanced setup After you select the parental control level you have selected your home. - The contents of the menu vary from disc to cycle through the following : • Current title number • Total number of titles • Current chapter number • Total number of others using the default password to set the parental level and change the password, we suggest you press to select disc playback options using the DVD root menu. Default You can use this manual...
User Manual (English)
Page 17
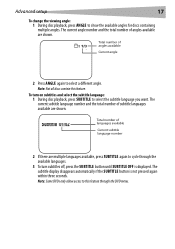
.... To turn subtitles off, press the SUBTITLE button until SUBTITLE OFF is not pressed again within three seconds. Note: Some DVDs only allow access to cycle through the DVD menu. The current angle number and the total number of languages available Current subtitle language number 2 If there are multiple languages available, press SUBTITLE again to this feature. Advanced setup 17 To change the viewing angle: 1 During disc playback, press ANGLE to select a different...
.... To turn subtitles off, press the SUBTITLE button until SUBTITLE OFF is not pressed again within three seconds. Note: Some DVDs only allow access to cycle through the DVD menu. The current angle number and the total number of languages available Current subtitle language number 2 If there are multiple languages available, press SUBTITLE again to this feature. Advanced setup 17 To change the viewing angle: 1 During disc playback, press ANGLE to select a different...
User Manual (English)
Page 18
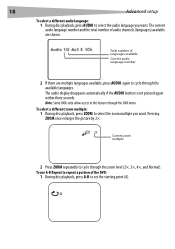
Total number of languages available Current audio language number 2 If there are shown. A To select a different zoom multiple: 1 During disc playback, press ZOOM to cycle through the available languages. Note: Some DVDs only allow access to set the starting point (A). To use A-B Repeat to repeat a portion of audio channels (languages) available are multiple languages available, press AUDIO again to select the zoom multiple you want . 18 Advanced setup To select a different audio language: 1 During disc playback, press AUDIO to...
Total number of languages available Current audio language number 2 If there are shown. A To select a different zoom multiple: 1 During disc playback, press ZOOM to cycle through the available languages. Note: Some DVDs only allow access to set the starting point (A). To use A-B Repeat to repeat a portion of audio channels (languages) available are multiple languages available, press AUDIO again to select the zoom multiple you want . 18 Advanced setup To select a different audio language: 1 During disc playback, press AUDIO to...

User Manual (English)
Page 21
...; Repeat Folder-Repeats the contents of a specific folder. • Repeat off-Turns off repeat and resumes normal playback. Maintaining Handling and cleaning discs Handling discs • To keep a disc clean, do not touch the play side (non-label side) of the disc. • Do not attach paper or tape to change or alter software. No image • Make sure that the player is connected securely. • Make...
...; Repeat Folder-Repeats the contents of a specific folder. • Repeat off-Turns off repeat and resumes normal playback. Maintaining Handling and cleaning discs Handling discs • To keep a disc clean, do not touch the play side (non-label side) of the disc. • Do not attach paper or tape to change or alter software. No image • Make sure that the player is connected securely. • Make...
User Manual (English)
Page 22
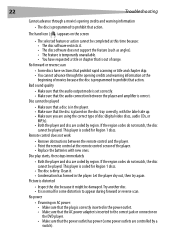
... player. No power • If running on the disc tray correctly, with the label side up. • Make sure you are using the correct type of the player. • Replace the batteries with new ones. Try another disc. • It is normal for Region 1 discs. 22 Troubleshooting Cannot advance through the opening credits and warning information • The disc is programmed to prohibit that the audio connection between the remote control...
... player. No power • If running on the disc tray correctly, with the label side up. • Make sure you are using the correct type of the player. • Replace the batteries with new ones. Try another disc. • It is normal for Region 1 discs. 22 Troubleshooting Cannot advance through the opening credits and warning information • The disc is programmed to prohibit that the audio connection between the remote control...
User Manual (English)
Page 23
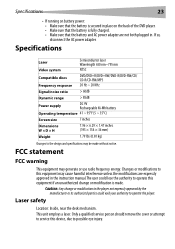
... instruction manual.The user could void your authority to the design and specifications may be made . Only a qualified service person should remove the cover or attempt to service this device, due to operate this equipment may generate or use radio frequency energy. This unit employs a laser. Laser safety Location: Inside, near the deck mechanism. Specifications 23 • If running on battery power: • Make...
... instruction manual.The user could void your authority to the design and specifications may be made . Only a qualified service person should remove the cover or attempt to service this device, due to operate this equipment may generate or use radio frequency energy. This unit employs a laser. Laser safety Location: Inside, near the deck mechanism. Specifications 23 • If running on battery power: • Make...
User Manual (English)
Page 25
... by this warranty that requires service, terms of this new 7" Personal DVD Player ("Product"), that you must be free of Dynex brand products and packaged with new or rebuilt comparable products or parts. 90 Day Limited Warranty 25 90 Day Limited Warranty Dynex Products ("Dynex") warrants to you purchased it from. This Product must pay all labor and parts charges. or (2) replace the Product...
... by this warranty that requires service, terms of this new 7" Personal DVD Player ("Product"), that you must be free of Dynex brand products and packaged with new or rebuilt comparable products or parts. 90 Day Limited Warranty 25 90 Day Limited Warranty Dynex Products ("Dynex") warrants to you purchased it from. This Product must pay all labor and parts charges. or (2) replace the Product...


