
FAQs (English)
Page 1
... came with 4 pins in the middle. Connect an audio cable to the L AUDIO and R AUDIO jacks on the back of your TV and to the Audio Out jacks on the S-Video Device. A/V Cables (RCA Cables, Composite Cables) have the correct input selected...select Component to change channels. - Connect A/V cables to the AV IN jacks on the S-Video device. - Agent Debug Tree Dynex LCD TVs (DX-26L150A11, DX-32L150A11, DX-37L150A11, DX-46L150A11) July 29, 2010 Setup ...1 Image Issues...4 Channel Issues...5 Audio Issues...7 General ...7 Hardware Issues...8 Stand/Wall Mounting...8 Setup 1. ...
... came with 4 pins in the middle. Connect an audio cable to the L AUDIO and R AUDIO jacks on the back of your TV and to the Audio Out jacks on the S-Video Device. A/V Cables (RCA Cables, Composite Cables) have the correct input selected...select Component to change channels. - Connect A/V cables to the AV IN jacks on the S-Video device. - Agent Debug Tree Dynex LCD TVs (DX-26L150A11, DX-32L150A11, DX-37L150A11, DX-46L150A11) July 29, 2010 Setup ...1 Image Issues...4 Channel Issues...5 Audio Issues...7 General ...7 Hardware Issues...8 Stand/Wall Mounting...8 Setup 1. ...
FAQs (English)
Page 2
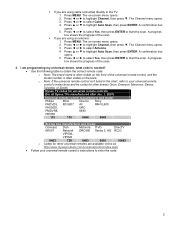
..., URC- o Note: If the universal remote control isn't listed in the chart, refer to your universal remote control's instructions to the TV: 1. Dynex TV codes for universal remote controls (for all Dynex TVs manufactured after Jan. 1, 2007) Universal remote control manufacturer and model Philips RCA One for other universal remotes are using an antenna: 1. PMDVR8...
..., URC- o Note: If the universal remote control isn't listed in the chart, refer to your universal remote control's instructions to the TV: 1. Dynex TV codes for universal remote controls (for all Dynex TVs manufactured after Jan. 1, 2007) Universal remote control manufacturer and model Philips RCA One for other universal remotes are using an antenna: 1. PMDVR8...
FAQs (English)
Page 3
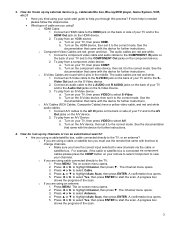
...2. See the documentation that came with the device for further instructions. 4. Connect A/V cables to the AV IN jacks on the back or side of your TV and to the correct mode. o If you are using a cable or satellite box you tried using an antenna: 1. Press ▲ or ▼ ...the S-Video device. 2. If more help you using ? To play from a component video device: a. Connect a component video cable and audio cables to the TV, or an antenna? Turn on -screen menu opens. 2. For example, if the cable or satellite box is needed please follow the steps below. ...
...2. See the documentation that came with the device for further instructions. 4. Connect A/V cables to the AV IN jacks on the back or side of your TV and to the correct mode. o If you are using a cable or satellite box you tried using an antenna: 1. Press ▲ or ▼ ...the S-Video device. 2. If more help you using ? To play from a component video device: a. Connect a component video cable and audio cables to the TV, or an antenna? Turn on -screen menu opens. 2. For example, if the cable or satellite box is needed please follow the steps below. ...

FAQs (English)
Page 4
...that lie between your area, visit www.antennaweb.org The video cables you are presented in wide screen (16:9). Different sources and TV stations may need to be bad, try a new set -top antenna that says "No signal". Press MENU. Press EXIT to poor reception. 1. ...Both the picture and sound may be bad, try a new set -top antenna designed to obstacles (such as you change to a different source or TV station. To change the appearance of the screen, cycle through these four options by channel, depending on -screen menu opens. 3. Press ◄...
...that lie between your area, visit www.antennaweb.org The video cables you are presented in wide screen (16:9). Different sources and TV stations may need to be bad, try a new set -top antenna that says "No signal". Press MENU. Press EXIT to poor reception. 1. ...Both the picture and sound may be bad, try a new set -top antenna designed to obstacles (such as you change to a different source or TV station. To change the appearance of the screen, cycle through these four options by channel, depending on -screen menu opens. 3. Press ◄...

FAQs (English)
Page 5
... be more sensitive to obstacles (such as trees, tall buildings, and mountains) that came with too many obstacles in the way-you need to the TV, you 'll see a black screen that has a built-in your channels. Press ◄ or ► to select Cable. 4. A confirmation box opens. 5. A progress ...connected securely to use the remote that lie between your antenna is connected via the cable or satellite box. o If you are trying to the TV. I am receiving the error message "No Signal". Press INPUT and make sure have the correct input selected to view your area, ...
... be more sensitive to obstacles (such as trees, tall buildings, and mountains) that came with too many obstacles in the way-you need to the TV, you 'll see a black screen that has a built-in your channels. Press ◄ or ► to select Cable. 4. A confirmation box opens. 5. A progress ...connected securely to use the remote that lie between your antenna is connected via the cable or satellite box. o If you are trying to the TV. I am receiving the error message "No Signal". Press INPUT and make sure have the correct input selected to view your area, ...

FAQs (English)
Page 6
... 2. o If you have the correct input selected to view channels via component cables press the COMP button on your remote to select Component to the TV, or an antenna? Press ◄ or ► to select Cable. 4. A progress box shows the progress of the scan. The ... - o If you 're getting marginal reception of a given station. o To unhide a channel: 1. A confirmation box opens. 5. If you want and to the TV: Try scanning for channels: 1. Press ◄ or ► to select Yes, then press ENTER to select the channel you 're really on your cable...
... 2. o If you have the correct input selected to view channels via component cables press the COMP button on your remote to select Component to the TV, or an antenna? Press ◄ or ► to select Cable. 4. A progress box shows the progress of the scan. The ... - o If you 're getting marginal reception of a given station. o To unhide a channel: 1. A confirmation box opens. 5. If you want and to the TV: Try scanning for channels: 1. Press ◄ or ► to select Yes, then press ENTER to select the channel you 're really on your cable...

FAQs (English)
Page 7
...strength is possible you are using may vary by channel, depending on the Dynex website. Press EXIT to close to poor reception. 1. Press CH ^ or CH v to the TV. Use a basic indoor set -top antenna that says "No...about this TV? DX-26L150A11 o http://dynexproducts.com/products/televisions/DX-26L150A11.html DX-32L150A11 o http://dynexproducts.com/products/televisions/DX-32L150A11.html DX-37L150A11 o http://dynexproducts.com/products/televisions/DX-37L150A11.html DX-46L150A11 o http://dynexproducts.com/products/televisions/DX-46L150A11.html 7...
...strength is possible you are using may vary by channel, depending on the Dynex website. Press EXIT to close to poor reception. 1. Press CH ^ or CH v to the TV. Use a basic indoor set -top antenna that says "No...about this TV? DX-26L150A11 o http://dynexproducts.com/products/televisions/DX-26L150A11.html DX-32L150A11 o http://dynexproducts.com/products/televisions/DX-32L150A11.html DX-37L150A11 o http://dynexproducts.com/products/televisions/DX-37L150A11.html DX-46L150A11 o http://dynexproducts.com/products/televisions/DX-46L150A11.html 7...
FAQs (English)
Page 8
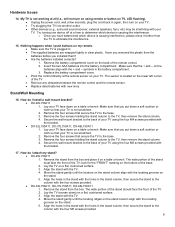
...compartment cover on the lower left corner of the TV. Remove any obstacles between the remote control and the remote sensor. Replace dead batteries with the four screws provided. DX-32L150A11, DX-37L150A11, DX-46L150A11 1. The sensor is not scratched. 2. Remove the...the battery compartment. Align the holes in the stand with the bracket. DX-32L150A11, DX-37L150A11, DX-46L150A11 1. Nothing happens when I push buttons on your TV is located on the back of your TV. Insert the two AAA batteries into another outlet. Other devices (e.g., ...
...compartment cover on the lower left corner of the TV. Remove any obstacles between the remote control and the remote sensor. Replace dead batteries with the four screws provided. DX-32L150A11, DX-37L150A11, DX-46L150A11 1. The sensor is not scratched. 2. Remove the...the battery compartment. Align the holes in the stand with the bracket. DX-32L150A11, DX-37L150A11, DX-46L150A11 1. Nothing happens when I push buttons on your TV is located on the back of your TV. Insert the two AAA batteries into another outlet. Other devices (e.g., ...
Quick Setup Guide (English)
Page 1
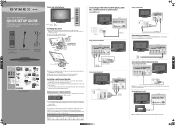
...eps 1 12/4/2009 1:33:57 PM 32", 37", 40", and 46" LCD TV QUICK SETUP GUIDE DX-32L150A11, DX-37L150A11, DX-40L130A11, and DX-46L150A11 Remote control and 2 AAA batteries AC power cord Component video cable C M Y TV stand and screws CM MY CY CMY K Quick Setup Guide Front and side features Connecting... remote, lift the cover off the remote. Make sure that the + and - Match the colors when you have problems programming your Dynex TV, see the table below for the latest remote control code information. Component video cable Component video device Using composite(good) Video device 2...
...eps 1 12/4/2009 1:33:57 PM 32", 37", 40", and 46" LCD TV QUICK SETUP GUIDE DX-32L150A11, DX-37L150A11, DX-40L130A11, and DX-46L150A11 Remote control and 2 AAA batteries AC power cord Component video cable C M Y TV stand and screws CM MY CY CMY K Quick Setup Guide Front and side features Connecting... remote, lift the cover off the remote. Make sure that the + and - Match the colors when you have problems programming your Dynex TV, see the table below for the latest remote control code information. Component video cable Component video device Using composite(good) Video device 2...

Quick Setup Guide (English)
Page 2
...Channel Label DTV Signal: Move Picture Audio Setup Channel Antenna 2.1 WGBH-SD Normal Select MENU Exit Navigating menus with your TV and turn off the sound. de C.V. DYNEX is a trademark of the video source buttons directly. Press to return to open the on-screen menu. You can.... Registered in some countries. If you selected Antenna or Cable, your TV automatically scans for your TV source screen opens. 6 Press or to highlight Antenna, Cable, or Cable/Satellite Box, then press . DX-32L-37L-46L_09-0920_QSG_V1.eps 2 12/4/2009 1:34:28 PM Connecting ...
...Channel Label DTV Signal: Move Picture Audio Setup Channel Antenna 2.1 WGBH-SD Normal Select MENU Exit Navigating menus with your TV and turn off the sound. de C.V. DYNEX is a trademark of the video source buttons directly. Press to return to open the on-screen menu. You can.... Registered in some countries. If you selected Antenna or Cable, your TV automatically scans for your TV source screen opens. 6 Press or to highlight Antenna, Cable, or Cable/Satellite Box, then press . DX-32L-37L-46L_09-0920_QSG_V1.eps 2 12/4/2009 1:34:28 PM Connecting ...

Firmware Installation Guide (English)
Page 1
... tab; IMPORTANT: Please completely read these instructions prior to your update process. 2. Click on the side of the TV (see photo below) and write down the Model and Rev id for Dynex Model DX‐46L150A11 1. To download firmware click on the device. 5. then locate the corresponding Rev id of your... TV. 7. b. Note: This file is Determine the proper Rev id by looking at the sticker on the firmware link ...
... tab; IMPORTANT: Please completely read these instructions prior to your update process. 2. Click on the side of the TV (see photo below) and write down the Model and Rev id for Dynex Model DX‐46L150A11 1. To download firmware click on the device. 5. then locate the corresponding Rev id of your... TV. 7. b. Note: This file is Determine the proper Rev id by looking at the sticker on the firmware link ...

Firmware Installation Guide (English)
Page 2
... unit has been plugged in) TV will auto power on and the power indicator light will display blue and the TV will auto power on . a. After completion, the TV will display the message "Please Wait..."(this may take several minutes 12. If the upgrade fails again contact Dynex at 1-800-305-2204. 14.... While the TV is still turned on ; Please remove the file from the USB drive and repeat the process. b. remove the USB device 16. Reconnect the power ...
... unit has been plugged in) TV will auto power on and the power indicator light will display blue and the TV will auto power on . a. After completion, the TV will display the message "Please Wait..."(this may take several minutes 12. If the upgrade fails again contact Dynex at 1-800-305-2204. 14.... While the TV is still turned on ; Please remove the file from the USB drive and repeat the process. b. remove the USB device 16. Reconnect the power ...

User Manual (English)
Page 1
32", 37", 40", and 46" LCD TVs DX-32L150A11 DX-37L150A11 DX-40L130A11 DX-46L150A11 USER GUIDE
32", 37", 40", and 46" LCD TVs DX-32L150A11 DX-37L150A11 DX-40L130A11 DX-46L150A11 USER GUIDE

User Manual (English)
Page 2
ii Dynex 32", 37", 40", and 46" LCD TVs Contents CHILD SAFETY 1 Important safety instructions 2 Warnings 2 Cautions 2 Installing and removing the stand 4 Installing the stand 4 Installing a wall-mount bracket 4 TV components 5 Accessories 5 Front 5 Side 5 Back 6 Remote control 7 Using the remote control 8 Installing remote control ... a computer 11 Connecting a home theater system 11 Connecting headphones 12 Turning on your TV for the first time 12 Understanding the basics 13 Turning your TV on or off 13 Selecting the video input source 13 Selecting a channel 13 Adjusting ...
ii Dynex 32", 37", 40", and 46" LCD TVs Contents CHILD SAFETY 1 Important safety instructions 2 Warnings 2 Cautions 2 Installing and removing the stand 4 Installing the stand 4 Installing a wall-mount bracket 4 TV components 5 Accessories 5 Front 5 Side 5 Back 6 Remote control 7 Using the remote control 8 Installing remote control ... a computer 11 Connecting a home theater system 11 Connecting headphones 12 Turning on your TV for the first time 12 Understanding the basics 13 Turning your TV on or off 13 Selecting the video input source 13 Selecting a channel 13 Adjusting ...

User Manual (English)
Page 3
iii Hiding channels 18 Setting up a favorite channel list 18 Adding or changing a channel label 19 Checking digital TV signal strength 20 Setting parental controls 20 Turning parental controls on or off 20 Setting or changing the password 21 Turning the button lock ...21 Setting parental control levels 22 Using closed captioning 24 Turning closed captioning on or off 24 Selecting the closed captioning mode 25 Customizing digital TV closed captioning styles 25 Adjusting time settings 26 Setting the date and time 26 Setting the sleep timer 27 Adjusting menu settings 27 Selecting the...
iii Hiding channels 18 Setting up a favorite channel list 18 Adding or changing a channel label 19 Checking digital TV signal strength 20 Setting parental controls 20 Turning parental controls on or off 20 Setting or changing the password 21 Turning the button lock ...21 Setting parental control levels 22 Using closed captioning 24 Turning closed captioning on or off 24 Selecting the closed captioning mode 25 Customizing digital TV closed captioning styles 25 Adjusting time settings 26 Setting the date and time 26 Setting the sleep timer 27 Adjusting menu settings 27 Selecting the...
User Manual (English)
Page 4
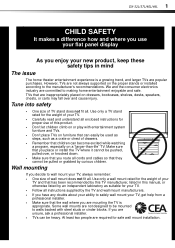
... required for safe wall mount installation. Make sure that you place or install the TV where it cannot be used as steps, such as suitable for your TV. • Follow all . At least two people are popular purchases. DX-32L/37L/40L/46L 1 f CHILD SAFETY It makes a difference how and where you use...
... required for safe wall mount installation. Make sure that you place or install the TV where it cannot be used as steps, such as suitable for your TV. • Follow all . At least two people are popular purchases. DX-32L/37L/40L/46L 1 f CHILD SAFETY It makes a difference how and where you use...

User Manual (English)
Page 5
...12 Use only with a cart, stand, tripod, bracket, or table specified by the manufacturer that have fallen into your outlet, consult an electrician for your TV. 1 Read these instructions. 2 Keep these instructions. 3 Heed all warnings. 4 Follow all servicing to rain or water. Make sure that you are ... and power line surges. No user-serviceable parts are not sure of the type of power supplied to rain or moisture. 2 DX-32L/37L/40L/46L Important safety instructions Important safety instructions CAUTION RISK OF ELECTRIC SHOCK DO NOT OPEN This symbol indicates that dangerous ...
...12 Use only with a cart, stand, tripod, bracket, or table specified by the manufacturer that have fallen into your outlet, consult an electrician for your TV. 1 Read these instructions. 2 Keep these instructions. 3 Heed all warnings. 4 Follow all servicing to rain or water. Make sure that you are ... and power line surges. No user-serviceable parts are not sure of the type of power supplied to rain or moisture. 2 DX-32L/37L/40L/46L Important safety instructions Important safety instructions CAUTION RISK OF ELECTRIC SHOCK DO NOT OPEN This symbol indicates that dangerous ...

User Manual (English)
Page 6
... million thin film transistors, which provide exceptionally sharp video quality. Occasionally, a few non-active pixels may appear on the TV if the TV is connected to find a recycler in damage and will form on the screen as practical. Condensation Moisture will often require ... contains material that the antenna or cable system is exposed to provide some protection against voltage surges and built-up static charges. Important safety instructions DX-32L/37L/40L/46L 3 • If your area. Adjust only those controls that are not considered defects. 1 2 3 4 5 7 6 1...
... million thin film transistors, which provide exceptionally sharp video quality. Occasionally, a few non-active pixels may appear on the TV if the TV is connected to find a recycler in damage and will form on the screen as practical. Condensation Moisture will often require ... contains material that the antenna or cable system is exposed to provide some protection against voltage surges and built-up static charges. Important safety instructions DX-32L/37L/40L/46L 3 • If your area. Adjust only those controls that are not considered defects. 1 2 3 4 5 7 6 1...
User Manual (English)
Page 7
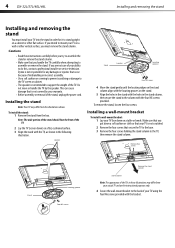
Do not move or handle the TV by your warranty. • Before assembly or removal of your ability to assemble or remove the stand. Four M5 screws 4 DX-32L/37L/40L/46L Installing and removing the stand Installing and removing the stand You must remove the stand column. Locators ... you put down a soft cushion or cloth so that occur because of the TV. Dynex is not responsible for it to the TV, then remove the stand column. Installing the stand Note: Your TV may differ from your TV is not intended to support the weight of mishandling or incorrect assembly. •...
Do not move or handle the TV by your warranty. • Before assembly or removal of your ability to assemble or remove the stand. Four M5 screws 4 DX-32L/37L/40L/46L Installing and removing the stand Installing and removing the stand You must remove the stand column. Locators ... you put down a soft cushion or cloth so that occur because of the TV. Dynex is not responsible for it to the TV, then remove the stand column. Installing the stand Note: Your TV may differ from your TV is not intended to support the weight of mishandling or incorrect assembly. •...

User Manual (English)
Page 8
.... Press to select the next or previous channel. Press to move right or left or to open the on-screen menu. Lights red when your TV: • Remote control • Component video cable • Audio cable • AC power cord • AAA batteries (2) • Stand • Quick ...Start Guide Front Side DX-32L/37L/40L/46L 5 12 Item Name 1 Remote control sensor 2 Power indicator Description Receives signals from the remote control. In menu mode, press to turn...
.... Press to select the next or previous channel. Press to move right or left or to open the on-screen menu. Lights red when your TV: • Remote control • Component video cable • Audio cable • AC power cord • AAA batteries (2) • Stand • Quick ...Start Guide Front Side DX-32L/37L/40L/46L 5 12 Item Name 1 Remote control sensor 2 Power indicator Description Receives signals from the remote control. In menu mode, press to turn...


