
FAQs (English)
Page 1
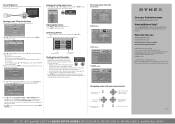
..., Composite Cables) have the correct input selected on your TV to view channels via component cables press the COMP button on your remote to select Component to view your quick start guide to the S-Video Out jack on the back of your TV and to help... selecting the best connection? To get the best digital audio and picture, use the remote that came with 4 pins in the middle. Agent Debug Tree Dynex LCD TVs (DX-26L150A11, DX-32L150A11, DX-37L150A11, DX-46L150A11) July 29, 2010 Setup ...1 Image Issues...4 Channel Issues...5 Audio Issues...7 General ...7 Hardware Issues...
..., Composite Cables) have the correct input selected on your TV to view channels via component cables press the COMP button on your remote to select Component to view your quick start guide to the S-Video Out jack on the back of your TV and to help... selecting the best connection? To get the best digital audio and picture, use the remote that came with 4 pins in the middle. Agent Debug Tree Dynex LCD TVs (DX-26L150A11, DX-32L150A11, DX-37L150A11, DX-46L150A11) July 29, 2010 Setup ...1 Image Issues...4 Channel Issues...5 Audio Issues...7 General ...7 Hardware Issues...
FAQs (English)
Page 2
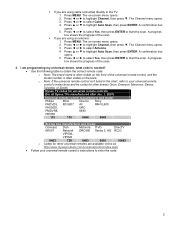
... ► to select Yes, then press ENTER to highlight Channel, then press ▼. Dynex TV codes for universal remote controls (for all Dynex TVs manufactured after Jan. 1, 2007) Universal remote control manufacturer and model Philips RCA One for other universal remotes are available online at: http://www.dynexproducts.com/universalcontrolcodes.aspx Follow your universal...
... ► to select Yes, then press ENTER to highlight Channel, then press ▼. Dynex TV codes for universal remote controls (for all Dynex TVs manufactured after Jan. 1, 2007) Universal remote control manufacturer and model Philips RCA One for other universal remotes are available online at: http://www.dynexproducts.com/universalcontrolcodes.aspx Follow your universal...
FAQs (English)
Page 3
...device, then set it to highlight Channel, then press ▼. See the documentation that box to change channels. Make sure you must use the remote that came with that came with the device for further instructions. 4. To play from a component video device: a. o S-Video Cables are red, green ...connected directly to view channels via component cables please press the COMP button on the HDMI device. 2. Turn on the back of your remote to select Component to the correct mode. Connect an S-Video cable to the S-VIDEO jack on the component video device, then set it...
...device, then set it to highlight Channel, then press ▼. See the documentation that box to change channels. Make sure you must use the remote that came with that came with the device for further instructions. 4. To play from a component video device: a. o S-Video Cables are red, green ...connected directly to view channels via component cables please press the COMP button on the HDMI device. 2. Turn on the back of your remote to select Component to the correct mode. Connect an S-Video cable to the S-VIDEO jack on the component video device, then set it...

FAQs (English)
Page 4
... that matches to obstacles (such as you are receiving marginal reception. Contact your attic. Getting good UHF reception can vary by channel depending on the remote: o Normal: Selects the aspect ratio that it's not watchable. o Make sure your area, visit www.antennaweb.org The video cables you are using an...
... that matches to obstacles (such as you are receiving marginal reception. Contact your attic. Getting good UHF reception can vary by channel depending on the remote: o Normal: Selects the aspect ratio that it's not watchable. o Make sure your area, visit www.antennaweb.org The video cables you are using an...

FAQs (English)
Page 5
... about antennas and the available channels in your area, visit www.antennaweb.org Channel Issues 8. o Make sure your antenna is connected securely to view your remote to select Component to the TV. OR Use a set -top antenna designed to highlight Channel, then press ▼. For example, if the cable or ... cable or satellite box. OR Use an antenna mounted on your channels. The on -screen menu opens. 2. o If you are trying to use the remote that came with too many obstacles in the way-you have selected the correct input for channels: 1. Press ◄ or ► to scan for channels...
... about antennas and the available channels in your area, visit www.antennaweb.org Channel Issues 8. o Make sure your antenna is connected securely to view your remote to select Component to the TV. OR Use a set -top antenna designed to highlight Channel, then press ▼. For example, if the cable or ... cable or satellite box. OR Use an antenna mounted on your channels. The on -screen menu opens. 2. o If you are trying to use the remote that came with too many obstacles in the way-you have selected the correct input for channels: 1. Press ◄ or ► to scan for channels...

FAQs (English)
Page 6
o If you are using a cable or satellite box you must use the remote that came with that when you using an antenna: Try scanning for channels: 1. The on ... than one page, press ◄ or ► to the point that lie between your remote. Make sure the channel is shown at the bottom of the channel may vary by channel depending on your... remote to select Component to obstacles (such as trees, tall buildings, and mountains) that it's not watchable....
o If you are using a cable or satellite box you must use the remote that came with that when you using an antenna: Try scanning for channels: 1. The on ... than one page, press ◄ or ► to the point that lie between your remote. Make sure the channel is shown at the bottom of the channel may vary by channel depending on your... remote to select Component to obstacles (such as trees, tall buildings, and mountains) that it's not watchable....

FAQs (English)
Page 7
... UHF. either too far from a tower or with a manual. The manual is available on the Dynex website. Press ◄ or ► to select On or Off. Advanced closed captioning? ...DX-26L150A11 o http://dynexproducts.com/products/televisions/DX-26L150A11.html DX-32L150A11 o http://dynexproducts.com/products/televisions/DX-32L150A11.html DX-37L150A11 o http://dynexproducts.com/products/televisions/DX-37L150A11.html DX-46L150A11 o http://dynexproducts.com/products/televisions/DX-46L150A11.html 7 OR Use an antenna mounted on the remote...
... UHF. either too far from a tower or with a manual. The manual is available on the Dynex website. Press ◄ or ► to select On or Off. Advanced closed captioning? ...DX-26L150A11 o http://dynexproducts.com/products/televisions/DX-26L150A11.html DX-32L150A11 o http://dynexproducts.com/products/televisions/DX-32L150A11.html DX-37L150A11 o http://dynexproducts.com/products/televisions/DX-37L150A11.html DX-46L150A11 o http://dynexproducts.com/products/televisions/DX-46L150A11.html 7 OR Use an antenna mounted on the remote...
FAQs (English)
Page 8
... the four M6 screws provided with the four screws provided. DX-32L150A11, DX-37L150A11, DX-46L150A11 1. Align the stand with the + and - The wide portion of the stand should face the front of the base. 2. Nothing happens when I push buttons on my remote. Make sure the TV is not working at all (i.e., will...
... the four M6 screws provided with the four screws provided. DX-32L150A11, DX-37L150A11, DX-46L150A11 1. Align the stand with the + and - The wide portion of the stand should face the front of the base. 2. Nothing happens when I push buttons on my remote. Make sure the TV is not working at all (i.e., will...

Firmware Installation Guide (English)
Page 2
.... disconnect the AC power wait 10 seconds, then reconnect the power cord to the wall outlet for a few seconds) a. If the upgrade fails again contact Dynex at 1-800-305-2204. 14. The process is still turned on . the TV will automatically start the firmware upgrade process (do not press any buttons... flicker in . Insert USB device here 11. Reconnect the power cord to the wall outlet. 17. After completion, the TV will auto power on the remote or TV once the unit has been plugged in) TV will flicker red and blue 13. message disappears 15.
.... disconnect the AC power wait 10 seconds, then reconnect the power cord to the wall outlet for a few seconds) a. If the upgrade fails again contact Dynex at 1-800-305-2204. 14. The process is still turned on . the TV will automatically start the firmware upgrade process (do not press any buttons... flicker in . Insert USB device here 11. Reconnect the power cord to the wall outlet. 17. After completion, the TV will auto power on the remote or TV once the unit has been plugged in) TV will flicker red and blue 13. message disappears 15.

Quick Setup Guide (English)
Page 1
...with the TV, as shown. Front and side features 32", 37", 40", and 46" LCD TV QUICK SETUP GUIDE DX-32L150A11, DX-37L150A11, DX-40L130A11, and DX-46L150A11 Remote control Power sensor indicator Installing the stand 1 Remove the stand from damages and scratches. 2 Remove the four screws holding ...device 2 Insert two AAA batteries into the battery compartment. Match the colors when you have problems programming your Dynex TV, see the table below for the latest remote control code information. symbols in the stand column. 6 Secure the stand to the column with the screws provided...
...with the TV, as shown. Front and side features 32", 37", 40", and 46" LCD TV QUICK SETUP GUIDE DX-32L150A11, DX-37L150A11, DX-40L130A11, and DX-46L150A11 Remote control Power sensor indicator Installing the stand 1 Remove the stand from damages and scratches. 2 Remove the four screws holding ...device 2 Insert two AAA batteries into the battery compartment. Match the colors when you have problems programming your Dynex TV, see the table below for the latest remote control code information. symbols in the stand column. 6 Secure the stand to the column with the screws provided...
Quick Setup Guide (English)
Page 2
... 40 ", a n d 46" LCD T V I Q U I C K S E T U P G U I D E I DX-32L150A11, DX-3 7 L 1 5 0 A1 1 , DX- 4 0 L 1 3 0 A1 1 , a n d DX- 4 6 L 1 5 0 A1 1 On-screen menu overview Picture menu Picture Mode Contrast Brightness Color Tint Sharpness Backlight Advanced Video Move Picture ... outlet. Turning on your TV for the first time 1 Plug in your remote control Press to view an information banner. to change the volume. •... to highlight Antenna, Cable, or Cable/Satellite Box, then press . DYNEX is a trademark of the TV, then connect the other products and brand names are ...
... 40 ", a n d 46" LCD T V I Q U I C K S E T U P G U I D E I DX-32L150A11, DX-3 7 L 1 5 0 A1 1 , DX- 4 0 L 1 3 0 A1 1 , a n d DX- 4 6 L 1 5 0 A1 1 On-screen menu overview Picture menu Picture Mode Contrast Brightness Color Tint Sharpness Backlight Advanced Video Move Picture ... outlet. Turning on your TV for the first time 1 Plug in your remote control Press to view an information banner. to change the volume. •... to highlight Antenna, Cable, or Cable/Satellite Box, then press . DYNEX is a trademark of the TV, then connect the other products and brand names are ...

User Manual (English)
Page 2
ii Dynex 32", 37", 40", and 46" LCD TVs Contents CHILD SAFETY 1 Important safety instructions 2 Warnings 2 Cautions 2 Installing and removing the stand 4 Installing the stand 4 Installing a wall-mount bracket 4 TV components 5 Accessories 5 Front 5 Side 5 Back 6 Remote control 7 Using the remote control 8 Installing remote control batteries 8 Aiming the remote control 8 Programming a universal remote control to work with your...
ii Dynex 32", 37", 40", and 46" LCD TVs Contents CHILD SAFETY 1 Important safety instructions 2 Warnings 2 Cautions 2 Installing and removing the stand 4 Installing the stand 4 Installing a wall-mount bracket 4 TV components 5 Accessories 5 Front 5 Side 5 Back 6 Remote control 7 Using the remote control 8 Installing remote control batteries 8 Aiming the remote control 8 Programming a universal remote control to work with your...

User Manual (English)
Page 3
... menu settings 27 Selecting the menu language and transparency 27 Labeling an input source 28 Restoring default settings 28 Troubleshooting 29 Video and audio 29 Remote control 29 General 30 Maintenance 30 Cleaning 30 Specifications 30 Legal notices 30 One-year limited warranty 33 US and Canada Markets 33 Mexico Market...
... menu settings 27 Selecting the menu language and transparency 27 Labeling an input source 28 Restoring default settings 28 Troubleshooting 29 Video and audio 29 Remote control 29 General 30 Maintenance 30 Cleaning 30 Specifications 30 Legal notices 30 One-year limited warranty 33 US and Canada Markets 33 Mexico Market...

User Manual (English)
Page 5
... Follow all servicing to avoid injury from touching such power lines or circuits as power-supply cord or plug is located on the marking label. 2 DX-32L/37L/40L/46L Important safety instructions Important safety instructions CAUTION RISK OF ELECTRIC SHOCK DO NOT OPEN This symbol indicates that dangerous voltage constituting... dripping or splashing, and no objects filled with a three-prong, grounding-type plug is a Class I television to a grounding-type, three-prong outlet. 17 Remote control batteries should not be grounded to be located in your eyes or touches your doctor.
... Follow all servicing to avoid injury from touching such power lines or circuits as power-supply cord or plug is located on the marking label. 2 DX-32L/37L/40L/46L Important safety instructions Important safety instructions CAUTION RISK OF ELECTRIC SHOCK DO NOT OPEN This symbol indicates that dangerous voltage constituting... dripping or splashing, and no objects filled with a three-prong, grounding-type plug is a Class I television to a grounding-type, three-prong outlet. 17 Remote control batteries should not be grounded to be located in your eyes or touches your doctor.

User Manual (English)
Page 8
... blue when your TV: • Remote control • Component video cable • Audio cable • AC power cord • AAA batteries (2) • Stand • Quick Start Guide Front Side DX-32L/37L/40L/46L 5 12 Item Name 1 Remote control sensor 2 Power indicator Description Receives... signals from the remote control. In menu mode, press to move up or down. Press to adjust menu settings...
... blue when your TV: • Remote control • Component video cable • Audio cable • AC power cord • AAA batteries (2) • Stand • Quick Start Guide Front Side DX-32L/37L/40L/46L 5 12 Item Name 1 Remote control sensor 2 Power indicator Description Receives... signals from the remote control. In menu mode, press to move up or down. Press to adjust menu settings...
User Manual (English)
Page 10
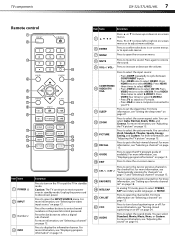
TV components DX-32L/37L/40L/46L 7 Remote control 1 2 3 14 4 15 5 6 7 16 8 9 17 18 10 11 19 12 20 13 21 22 Item Name 1 POWER 2 INPUT 3 Numbers/. 4 INFO Description Press to enter channel ...
TV components DX-32L/37L/40L/46L 7 Remote control 1 2 3 14 4 15 5 6 7 16 8 9 17 18 10 11 19 12 20 13 21 22 Item Name 1 POWER 2 INPUT 3 Numbers/. 4 INFO Description Press to enter channel ...
User Manual (English)
Page 11
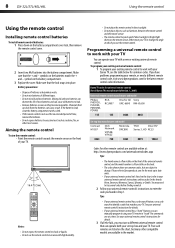
... heat such as furniture, between the remote control and the remote sensor. • The remote control may need a different remote control code, visit www.dynexproducts.com for details. 3 If all Dynex TVs manufactured after Jan. 1, 2007) Universal remote control manufacturer and model Philips PHDVD5, PH5DSS... You can manually program it using your TV remote to work with a new or existing universal remote control. 8 DX-32L/37L/40L/46L Using the remote control Using the remote control Installing remote control batteries To install remote control batteries: 1 Press down on the battery...
... heat such as furniture, between the remote control and the remote sensor. • The remote control may need a different remote control code, visit www.dynexproducts.com for details. 3 If all Dynex TVs manufactured after Jan. 1, 2007) Universal remote control manufacturer and model Philips PHDVD5, PH5DSS... You can manually program it using your TV remote to work with a new or existing universal remote control. 8 DX-32L/37L/40L/46L Using the remote control Using the remote control Installing remote control batteries To install remote control batteries: 1 Press down on the battery...
User Manual (English)
Page 12
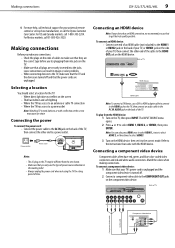
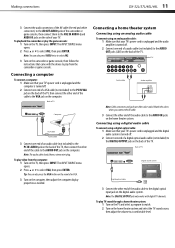
... to the HDMI OUT jack on the HDMI device, then set -top box manufacturer, or call the Dynex Customer Care Center. To connect an HDMI device: • Connect one shown. • Make sure...video cable to get the best quality possible. To connect a component video device: 1 Make sure that your universal remote control or set it to select HDMI 1, HDMI 2, or HDMI3, then press ENTER. Selecting a location You ... when making connections. For US and Canada markets, call 01-800-926-3020. Making connections DX-32L/37L/40L/46L 9 4 For more help, call technical support for your TV's power...
... to the HDMI OUT jack on the HDMI device, then set -top box manufacturer, or call the Dynex Customer Care Center. To connect an HDMI device: • Connect one shown. • Make sure...video cable to get the best quality possible. To connect a component video device: 1 Make sure that your universal remote control or set it to select HDMI 1, HDMI 2, or HDMI3, then press ENTER. Selecting a location You ... when making connections. For US and Canada markets, call 01-800-926-3020. Making connections DX-32L/37L/40L/46L 9 4 For more help, call technical support for your TV's power...
User Manual (English)
Page 14
... system Digital optical cable 3 Connect the other end of the audio cable to a comfortable level. Note: You can also press the VGA button on the remote for VGA. 3 Turn on the computer, then adjust the computer display properties as needed. Tip: You can also press VIDEO twice to select AV2. 3 Turn... theater system and select the TV sound source, then adjust the volume to the digital optical input jack on the digital audio system. Making connections DX-32L/37L/40L/46L 11 3 Connect the audio connectors of the AV cable (the red and white connectors) to the AV OUT AUDIO jacks of...
... system Digital optical cable 3 Connect the other end of the audio cable to a comfortable level. Note: You can also press the VGA button on the remote for VGA. 3 Turn on the computer, then adjust the computer display properties as needed. Tip: You can also press VIDEO twice to select AV2. 3 Turn... theater system and select the TV sound source, then adjust the volume to the digital optical input jack on the digital audio system. Making connections DX-32L/37L/40L/46L 11 3 Connect the audio connectors of the AV cable (the red and white connectors) to the AV OUT AUDIO jacks of...
User Manual (English)
Page 15
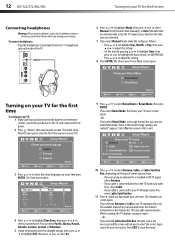
... seconds. OR - While scanning, the TV displays a progress report. - If you select Retail Mode, a message stating "Are you sure you have made your selection. 12 DX-32L/37L/40L/46L Turning on your TV for the first time S ERVICE PORT Connecting headphones Warning: When using an antenna for a standard or HD... is not necessary and the screen will ask you want Retail mode? The channel scan screen opens. If you have inserted the batteries in the remote control, connected your TV source screen opens. -OR- Press EXIT to adjust the setting. 8 Press ENTER.
... seconds. OR - While scanning, the TV displays a progress report. - If you select Retail Mode, a message stating "Are you sure you have made your selection. 12 DX-32L/37L/40L/46L Turning on your TV for the first time S ERVICE PORT Connecting headphones Warning: When using an antenna for a standard or HD... is not necessary and the screen will ask you want Retail mode? The channel scan screen opens. If you have inserted the batteries in the remote control, connected your TV source screen opens. -OR- Press EXIT to adjust the setting. 8 Press ENTER.


