
Firmware Installation Guide (English)
Page 1
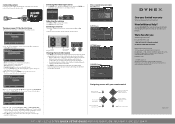
Determine the Model number of TV (see photos below do not help, call Dynex Customer Support at (800) 305‐2204 for TV Models: DX‐15L150A11, DX‐19L150A11, DX‐22L150A11, DX‐40L150A11 System requirements: a computer with an open the rubber flap (See photo below). Verify that was downloaded into the open USB port on the...
Determine the Model number of TV (see photos below do not help, call Dynex Customer Support at (800) 305‐2204 for TV Models: DX‐15L150A11, DX‐19L150A11, DX‐22L150A11, DX‐40L150A11 System requirements: a computer with an open the rubber flap (See photo below). Verify that was downloaded into the open USB port on the...
Firmware Installation Guide (English)
Page 2
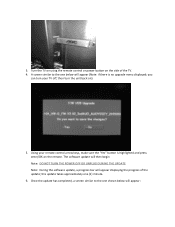
.../OK on ): 5. this update takes approximately one shown below will appear displaying the progress of the TV. 4. Turn the TV on using the remote control or power button on the side of the update; Using your TV off, then turn your remote control arrow keys, make sure the "Yes" button is no upgrade...
.../OK on ): 5. this update takes approximately one shown below will appear displaying the progress of the TV. 4. Turn the TV on using the remote control or power button on the side of the update; Using your TV off, then turn your remote control arrow keys, make sure the "Yes" button is no upgrade...
Firmware Installation Guide (English)
Page 3
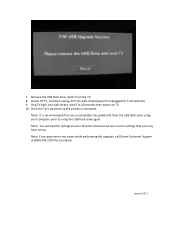
... powered up the process is recommended that you erase/delete the update file from the TV. 8. January 2011 Remove the USB flash drive (stick) from the USB flash drive using the USB flash drive again. 7. Note: It is complete. Note: If ... have set up. Note: You will need to using your computer prior to reprogram your favorite channels and any issues while performing this upgrade, call Dynex Customer Support at (800) 305‐2204 for 5‐10 seconds). 9. Plug TV back into wall socket, wait 5 to 10 seconds then power on...
... powered up the process is recommended that you erase/delete the update file from the TV. 8. January 2011 Remove the USB flash drive (stick) from the USB flash drive using the USB flash drive again. 7. Note: It is complete. Note: If ... have set up. Note: You will need to using your computer prior to reprogram your favorite channels and any issues while performing this upgrade, call Dynex Customer Support at (800) 305‐2204 for 5‐10 seconds). 9. Plug TV back into wall socket, wait 5 to 10 seconds then power on...
Quick Setup Guide (English)
Page 1
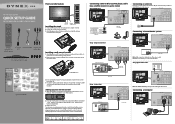
15"/19"/22" LCD TV QUICK SETUP GUIDE DX-15L150A11/DX-19L150A11 /DX-22L150A11 Front and side features Power Remote indicator control sensor Installing the stand 1 Remove the stand from damages and scratches. 2 Remove the three screws holding the TV to its stand column, then remove the stand column. ... into the stand until the locking mechanism clicks into the stando screws you connect the AV cable. Universal remote control TV codes (for all Dynex TVs manufactured after Jan. 1, 2007) Universal remote control makers and models Philips PHDVD5, PH5DSS, PMDVR8, PDVR8 RCA RCU807 ...
15"/19"/22" LCD TV QUICK SETUP GUIDE DX-15L150A11/DX-19L150A11 /DX-22L150A11 Front and side features Power Remote indicator control sensor Installing the stand 1 Remove the stand from damages and scratches. 2 Remove the three screws holding the TV to its stand column, then remove the stand column. ... into the stand until the locking mechanism clicks into the stando screws you connect the AV cable. Universal remote control TV codes (for all Dynex TVs manufactured after Jan. 1, 2007) Universal remote control makers and models Philips PHDVD5, PH5DSS, PMDVR8, PDVR8 RCA RCU807 ...
Quick Setup Guide (English)
Page 2
...buttons. Navigating menus with your set top box. 6 Press EXIT to close the menu. 15" • 19" • 22" LCD TV I QUICK SETUP GUIDE I DX-15L150A11/DX-19L150A11 /DX-22L150A11 English 09-1037 09-0xxx If you selected Cable/Satellite Box, you are done, press ENTER to move to a different... change the setting. Need additional help? This comprehensive guide includes everything from basic how-to steps to highlight a source, then press ENTER. DYNEX is a trademark of the video source buttons directly. All other end to a power outlet. If you selected Home Mode, the Choose your...
...buttons. Navigating menus with your set top box. 6 Press EXIT to close the menu. 15" • 19" • 22" LCD TV I QUICK SETUP GUIDE I DX-15L150A11/DX-19L150A11 /DX-22L150A11 English 09-1037 09-0xxx If you selected Cable/Satellite Box, you are done, press ENTER to move to a different... change the setting. Need additional help? This comprehensive guide includes everything from basic how-to steps to highlight a source, then press ENTER. DYNEX is a trademark of the video source buttons directly. All other end to a power outlet. If you selected Home Mode, the Choose your...
User Manual (English)
Page 2
ii Dynex 15", 19", and 22" LCD TVs Contents CHILD SAFETY 1 Important safety instructions 2 Warnings 2 Cautions 2 Installing and removing the stand 4 Installing the stand 4 Installing a wall-mount bracket 4 TV components 5 Accessories 5 Front 5 Back 6 Side 6 Remote control 7 Using the remote control 8 Installing remote control batteries...a computer 11 Connecting a home theater system 12 Connecting headphones 12 Turning on your TV for the first time 12 Understanding the basics 13 Turning your TV on or off 13 Selecting the video input source 13 Selecting a channel 13 Adjusting...
ii Dynex 15", 19", and 22" LCD TVs Contents CHILD SAFETY 1 Important safety instructions 2 Warnings 2 Cautions 2 Installing and removing the stand 4 Installing the stand 4 Installing a wall-mount bracket 4 TV components 5 Accessories 5 Front 5 Back 6 Side 6 Remote control 7 Using the remote control 8 Installing remote control batteries...a computer 11 Connecting a home theater system 12 Connecting headphones 12 Turning on your TV for the first time 12 Understanding the basics 13 Turning your TV on or off 13 Selecting the video input source 13 Selecting a channel 13 Adjusting...

User Manual (English)
Page 3
...parental control levels 21 Using closed captioning 24 Turning closed captioning on or off 24 Selecting the closed captioning mode 24 Customizing digital TV closed captioning styles 24 Adjusting time settings 25 Setting the clock 25 Setting the sleep timer 26 Adjusting menu settings 26 Selecting the... 27 Restoring default settings 27 Troubleshooting 28 Video and audio 28 Remote control 28 General 29 Maintenance 29 Cleaning the TV cabinet 29 Cleaning the TV screen 29 Specifications 29 Legal notices 29 One-year limited warranty 31 US and Canada Markets 31 Mexico Market 31
...parental control levels 21 Using closed captioning 24 Turning closed captioning on or off 24 Selecting the closed captioning mode 24 Customizing digital TV closed captioning styles 24 Adjusting time settings 25 Setting the clock 25 Setting the sleep timer 26 Adjusting menu settings 26 Selecting the... 27 Restoring default settings 27 Troubleshooting 28 Video and audio 28 Remote control 28 General 29 Maintenance 29 Cleaning the TV cabinet 29 Cleaning the TV screen 29 Specifications 29 Legal notices 29 One-year limited warranty 31 US and Canada Markets 31 Mexico Market 31
User Manual (English)
Page 4
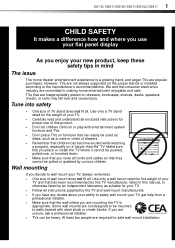
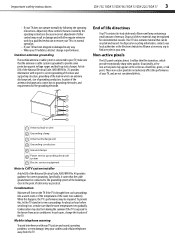
... by curious children. Some wall mounts are unsure, ask a professional installer. • TVs can easily be pushed, pulled over and cause injury. If you are not designed to making home entertainment enjoyable and safe. DX-15L150A11/DX19L150A11/DX-22L150A11 1 f CHILD SAFETY It makes a difference how and where you use of drawers... , or knocked down. • Make sure that you route all cords and cables so that the wall where you place or install the TV where it cannot be used as steps, such as a crate or chest of this manual, or otherwise listed by an independent laboratory as suitable...
... by curious children. Some wall mounts are unsure, ask a professional installer. • TVs can easily be pushed, pulled over and cause injury. If you are not designed to making home entertainment enjoyable and safe. DX-15L150A11/DX19L150A11/DX-22L150A11 1 f CHILD SAFETY It makes a difference how and where you use of drawers... , or knocked down. • Make sure that you route all cords and cables so that the wall where you place or install the TV where it cannot be used as steps, such as a crate or chest of this manual, or otherwise listed by an independent laboratory as suitable...
User Manual (English)
Page 5
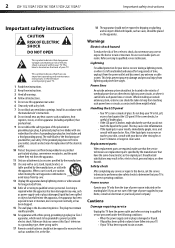
...longer in clean water. No user-serviceable parts are important operating and maintenance instructions in the literature accompanying your TV. 1 Read these instructions. 2 Keep these instructions. 3 Heed all warnings. 4 Follow all servicing to keep...DX-22L150A11 Important safety instructions Important safety instructions CAUTION RISK OF ELECTRIC SHOCK DO NOT OPEN This symbol indicates that your TV is in correct operating condition. The wide blade or the third prong are provided for replacement of overhead power lines or other hazards. Lightning For added protection for your TV...
...longer in clean water. No user-serviceable parts are important operating and maintenance instructions in the literature accompanying your TV. 1 Read these instructions. 2 Keep these instructions. 3 Heed all warnings. 4 Follow all servicing to keep...DX-22L150A11 Important safety instructions Important safety instructions CAUTION RISK OF ELECTRIC SHOCK DO NOT OPEN This symbol indicates that your TV is in correct operating condition. The wide blade or the third prong are provided for replacement of overhead power lines or other hazards. Lightning For added protection for your TV...
User Manual (English)
Page 6
..., change in damage and will form on the TV if the TV is grounded to provide some protection against voltage surges and built-up static charges. Important safety instructions DX-15L150A11/DX19L150A11/DX-22L150A11 3 • If your TV does not operate normally by a qualified technician to... restore your TV to its new surroundings for about an hour before switching it states that...
..., change in damage and will form on the TV if the TV is grounded to provide some protection against voltage surges and built-up static charges. Important safety instructions DX-15L150A11/DX19L150A11/DX-22L150A11 3 • If your TV does not operate normally by a qualified technician to... restore your TV to its new surroundings for about an hour before switching it states that...
User Manual (English)
Page 7
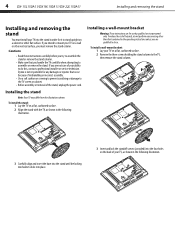
...a cabinet or other vertical surface, you must remove the stand column. 4 DX-15L150A11/DX19L150A11/DX-22L150A11 Installing and removing the stand Installing and removing the stand You must install your TV into the four holes on the back of hazards, do not perform any damages... are qualified to do this, contact a professional installer or service technician. Dynex is not responsible for any servicing other than that contained in the following illustration. Installing the stand Note: Your TV may differ from the illustrations shown. Cautions • Read these instructions carefully...
...a cabinet or other vertical surface, you must remove the stand column. 4 DX-15L150A11/DX19L150A11/DX-22L150A11 Installing and removing the stand Installing and removing the stand You must install your TV into the four holes on the back of hazards, do not perform any damages... are qualified to do this, contact a professional installer or service technician. Dynex is not responsible for any servicing other than that contained in the following illustration. Installing the stand Note: Your TV may differ from the illustrations shown. Cautions • Read these instructions carefully...
User Manual (English)
Page 8
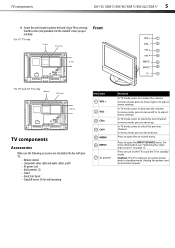
... menu mode, press to move right or to adjust menu settings. In menu mode, press to move down. TV components DX-15L150A11/DX19L150A11/DX-22L150A11 5 4 Secure the wall-mount bracket to the back of your TV: • Remote control • Component video cable and audio cable L and R • AC power cord • AAA batteries...
... menu mode, press to move right or to adjust menu settings. In menu mode, press to move down. TV components DX-15L150A11/DX19L150A11/DX-22L150A11 5 4 Secure the wall-mount bracket to the back of your TV: • Remote control • Component video cable and audio cable L and R • AC power cord • AAA batteries...

User Manual (English)
Page 9
...on page 11. For more information, see "Connecting a computer" on page 12. 3 ANT/CABLE IN jack Connect an antenna or cable TV to these jacks. Connect the audio from a standard AV device, such as a camcorder or game console, to a digital sound system. ...Connect the audio from a standard AV device, such as a camcorder or game console, to these jacks. 6 DX-15L150A11/DX19L150A11/DX-22L150A11 TV components Back Side 1 45 1 6 2 2 7 3 ANT/CABLE IN 8 3 4 10 9 Item Name Description Connect an S-Video device to this ...
...on page 11. For more information, see "Connecting a computer" on page 12. 3 ANT/CABLE IN jack Connect an antenna or cable TV to these jacks. Connect the audio from a standard AV device, such as a camcorder or game console, to a digital sound system. ...Connect the audio from a standard AV device, such as a camcorder or game console, to these jacks. 6 DX-15L150A11/DX19L150A11/DX-22L150A11 TV components Back Side 1 45 1 6 2 2 7 3 ANT/CABLE IN 8 3 4 10 9 Item Name Description Connect an S-Video device to this ...
User Manual (English)
Page 10
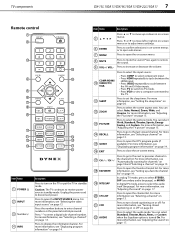
..., and Custom. Press to restore the sound. 9 VOL+ / VOL- Press to select STEREO, SAP (secondary audio language), or MONO. In analog TV mode, press to display the information banner. You can select Standard, Theater, Music, News, or Custom when the Equalizer option is turned On. For more... to turn closed captioning on or off . For moreinformation, see "Selecting the video input source" on page 14. TV components DX-15L150A11/DX19L150A11/DX-22L150A11 7 Remote control 1 2 3 14 4 15 5 6 7 16 8 9 17 18 10 11 19 12 20 13 21 22 Item Name 1 POWER 2 INPUT 3 ...
..., and Custom. Press to restore the sound. 9 VOL+ / VOL- Press to select STEREO, SAP (secondary audio language), or MONO. In analog TV mode, press to display the information banner. You can select Standard, Theater, Music, News, or Custom when the Equalizer option is turned On. For more... to turn closed captioning on or off . For moreinformation, see "Selecting the video input source" on page 14. TV components DX-15L150A11/DX19L150A11/DX-22L150A11 7 Remote control 1 2 3 14 4 15 5 6 7 16 8 9 17 18 10 11 19 12 20 13 21 22 Item Name 1 POWER 2 INPUT 3 ...
User Manual (English)
Page 11
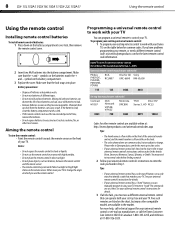
... into place. Chemicals that the lock snaps into the battery compartment. See your universal remote control's instructions for details. 3 If all Dynex TVs manufactured after Jan. 1, 2007) Universal remote control manufacturer and model Philips PHDVD5, PH5DSS, PMDVR8, PDVR8 RCA RCU807 One for All Sony...remote control. You may not work with your Dynex TV, see the table below for all else fails, you have problems programming your TV remote to change the angle at 01-800-926-3020. 8 DX-15L150A11/DX19L150A11/DX-22L150A11 Using the remote control Using the remote control...
... into place. Chemicals that the lock snaps into the battery compartment. See your universal remote control's instructions for details. 3 If all Dynex TVs manufactured after Jan. 1, 2007) Universal remote control manufacturer and model Philips PHDVD5, PH5DSS, PMDVR8, PDVR8 RCA RCU807 One for All Sony...remote control. You may not work with your Dynex TV, see the table below for all else fails, you have problems programming your TV remote to change the angle at 01-800-926-3020. 8 DX-15L150A11/DX19L150A11/DX-22L150A11 Using the remote control Using the remote control...

User Manual (English)
Page 12
... connect an audio cable to the PC/DVI AUDIO IN jack on the TV. • Make sure that all plugs are securely inserted into jacks on the back of the TV. Making connections DX-15L150A11/DX19L150A11/DX-22L150A11 9 Making connections Before you make any connections: • Check the plugs on... the ends of cables to make sure that the TV and the device are turned off . 2 Connect a component ...
... connect an audio cable to the PC/DVI AUDIO IN jack on the TV. • Make sure that all plugs are securely inserted into jacks on the back of the TV. Making connections DX-15L150A11/DX19L150A11/DX-22L150A11 9 Making connections Before you make any connections: • Check the plugs on... the ends of cables to make sure that the TV and the device are turned off . 2 Connect a component ...
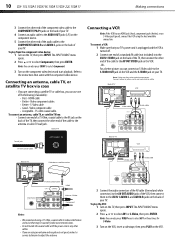
User Manual (English)
Page 13
...end of the cable to the AV IN 1 AUDIO-L and AUDIO-R jacks on the back of your TV. Video composite cable • Acceptable - 75-ohm coaxial cable. 10 DX-15L150A11/DX19L150A11/DX-22L150A11 Making connections 3 Connect the other end of the component video cable to the COMPONENT Y/Pb/Pr ...jacks on the back of your TV. 4 Connect an audio cable to the AUDIO OUT jacks (L/R) on the component device....
...end of the cable to the AV IN 1 AUDIO-L and AUDIO-R jacks on the back of your TV. Video composite cable • Acceptable - 75-ohm coaxial cable. 10 DX-15L150A11/DX19L150A11/DX-22L150A11 Making connections 3 Connect the other end of the component video cable to the COMPONENT Y/Pb/Pr ...jacks on the back of your TV. 4 Connect an audio cable to the AUDIO OUT jacks (L/R) on the component device....
User Manual (English)
Page 14
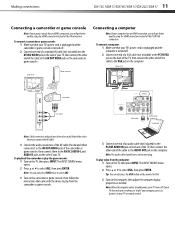
... Note: If your computer has an HDMI connection, you will get better quality using the HDMI connection instead of the AV connection. Back of TV Camcorder AV cable ANT/CABLE IN VGA cable Audio cable Computer Note: Cable connectors and jacks are often color-coded. To connect a computer: ... on the side of your TV. Note: You can also press the VGA button on the remote for VGA. 3 Turn on the computer. Tip: You can also press VIDEO twice to play from the computer: 1 Turn on the computer. Making connections DX-15L150A11/DX19L150A11/DX-22L150A11 11 Connecting a camcorder or...
... Note: If your computer has an HDMI connection, you will get better quality using the HDMI connection instead of the AV connection. Back of TV Camcorder AV cable ANT/CABLE IN VGA cable Audio cable Computer Note: Cable connectors and jacks are often color-coded. To connect a computer: ... on the side of your TV. Note: You can also press the VGA button on the remote for VGA. 3 Turn on the computer. Tip: You can also press VIDEO twice to play from the computer: 1 Turn on the computer. Making connections DX-15L150A11/DX19L150A11/DX-22L150A11 11 Connecting a camcorder or...
User Manual (English)
Page 15
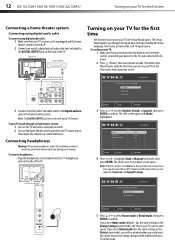
... To connect using headphones, adjust the headphone volume to avoid excessively loud volume which can adjust are set based on your TV) to confirm. 12 DX-15L150A11/DX19L150A11/DX-22L150A11 Turning on your TV for the first time The first time you turn on a time signal received from a DTV channel and the only options...
... To connect using headphones, adjust the headphone volume to avoid excessively loud volume which can adjust are set based on your TV) to confirm. 12 DX-15L150A11/DX19L150A11/DX-22L150A11 Turning on your TV for the first time The first time you turn on a time signal received from a DTV channel and the only options...
User Manual (English)
Page 16
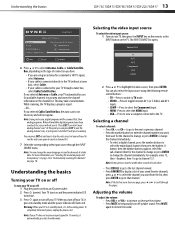
.... You can press EXIT at a later date. Press MUTE again to channel 13.1. Understanding the basics DX-15L150A11/DX19L150A11/DX-22L150A11 13 Selecting the video input source To select the video input source: 1 Turn on your TV, then press the INPUT key on the remote, or the INPUT button on page 18. The... INPUT SOURCE list opens. 6 Press or to the TV (without a tuner box), select Cable. • If your ...
.... You can press EXIT at a later date. Press MUTE again to channel 13.1. Understanding the basics DX-15L150A11/DX19L150A11/DX-22L150A11 13 Selecting the video input source To select the video input source: 1 Turn on your TV, then press the INPUT key on the remote, or the INPUT button on page 18. The... INPUT SOURCE list opens. 6 Press or to the TV (without a tuner box), select Cable. • If your ...


