
User Guide 1
Page 3
Quick Start Make sure you have all the items shown in Figure 1. (Labels included in the package may vary.) Warranty card Lithium-ion battery Quick Start Guide D1 label cassette USB cable LabelManager PnP Label Maker Figure 1 1
Quick Start Make sure you have all the items shown in Figure 1. (Labels included in the package may vary.) Warranty card Lithium-ion battery Quick Start Guide D1 label cassette USB cable LabelManager PnP Label Maker Figure 1 1
User Guide 1
Page 4
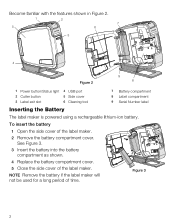
... label maker will not be used for a long period of the label maker. 2 Remove the battery compartment cover. See Figure 3. 3 Insert the battery into the battery compartment as shown. 4 Replace the battery compartment cover. 5 Close the side cover of the label maker. Figure 3 2 Become familiar with the features shown in Figure 2. 1 2 5 7 6 3 4 Figure 2 9 8 1 Power button/Status light 2 Cutter button 3 Label exit slot 4 USB port 5 Side cover 6 Cleaning tool 7 Battery compartment 8 Label compartment 9 Serial Number label Inserting the Battery The label maker is powered using...
... label maker will not be used for a long period of the label maker. 2 Remove the battery compartment cover. See Figure 3. 3 Insert the battery into the battery compartment as shown. 4 Replace the battery compartment cover. 5 Close the side cover of the label maker. Figure 3 2 Become familiar with the features shown in Figure 2. 1 2 5 7 6 3 4 Figure 2 9 8 1 Power button/Status light 2 Cutter button 3 Label exit slot 4 USB port 5 Side cover 6 Cleaning tool 7 Battery compartment 8 Label compartment 9 Serial Number label Inserting the Battery The label maker is powered using...
User Guide 1
Page 5
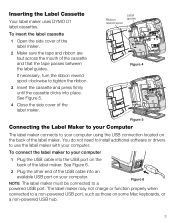
... to a Figure 6 powered USB port. Inserting the Label Cassette Your label maker uses DYMO D1 label cassettes. NOTE The label maker must be connected to a non-powered USB port, such as those on some Mac keyboards, or a non-powered USB hub. 3 Ribbon rewind spool Label guides Figure 4 Figure 5 Connecting the Label Maker to your Computer The label maker connects to use the label maker with your computer 1 Plug the USB cable into the USB port on the back of the label maker. If necessary, turn the ribbon rewind spool...
... to a Figure 6 powered USB port. Inserting the Label Cassette Your label maker uses DYMO D1 label cassettes. NOTE The label maker must be connected to a non-powered USB port, such as those on some Mac keyboards, or a non-powered USB hub. 3 Ribbon rewind spool Label guides Figure 4 Figure 5 Connecting the Label Maker to your Computer The label maker connects to use the label maker with your computer 1 Plug the USB cable into the USB port on the back of the label maker. If necessary, turn the ribbon rewind spool...

User Guide 1
Page 6
... the software for Mac OS® 1 If necessary, press the power button to start the software. no installation is required. Disconnecting the Label Maker from Your Computer To disconnect the label maker from your computer 1 (Mac Only) Drag the DYMO PnP volume to the trash. 2 Press the power button to turn on your desktop. 2 Double-click DYMO PnP to open the volume. 3 Double-click to turn off the label maker. 3 Unplug the USB cable from...
... the software for Mac OS® 1 If necessary, press the power button to start the software. no installation is required. Disconnecting the Label Maker from Your Computer To disconnect the label maker from your computer 1 (Mac Only) Drag the DYMO PnP volume to the trash. 2 Press the power button to turn on your desktop. 2 Double-click DYMO PnP to open the volume. 3 Double-click to turn off the label maker. 3 Unplug the USB cable from...
User Guide 1
Page 7
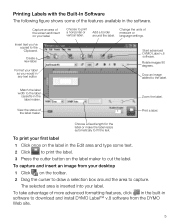
... the label. Create a new label. Choose a fixed length for the label or make the label resize automatically to print a horizontal or vertical label. Match the label width to the label cassette in software to download and install DYMO Label™ v.8 software from your label. Capture an area of the features available in any text editor. Choose to fit the text. Printing Labels with the Built-In Software The following figure shows some text. 2 Click to print the label. 3 Press the cutter button on the label maker to cut the label.
... the label. Create a new label. Choose a fixed length for the label or make the label resize automatically to print a horizontal or vertical label. Match the label width to the label cassette in software to download and install DYMO Label™ v.8 software from your label. Capture an area of the features available in any text editor. Choose to fit the text. Printing Labels with the Built-In Software The following figure shows some text. 2 Click to print the label. 3 Press the cutter button on the label maker to cut the label.

User Guide 1
Page 8
... Label maker is connected and there is a problem with the battery To charge the battery 1 Make sure the USB cable is shipped with the lithium-ion battery partially charged. The battery is displayed in the lower-left corner of the label maker. Maintaining Your Label Maker Recharging the Battery The label maker is connected to both the label maker and the computer. 2 If necessary, press the power button to turn on some Mac keyboards, or a non-powered USB...
... Label maker is connected and there is a problem with the battery To charge the battery 1 Make sure the USB cable is shipped with the lithium-ion battery partially charged. The battery is displayed in the lower-left corner of the label maker. Maintaining Your Label Maker Recharging the Battery The label maker is connected to both the label maker and the computer. 2 If necessary, press the power button to turn on some Mac keyboards, or a non-powered USB...
User Guide 1
Page 9
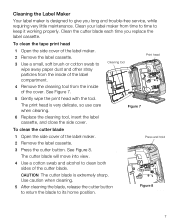
... clean the tape print head 1 Open the side cover of the label maker. 2 Remove the label cassette. 3 Use a small, soft brush or cotton swab to its home position. Figure 8 7 Figure 7 6 Replace the cleaning tool, insert the label cassette, and close the side cover. See Figure 8. Cleaning tool Print head 4 Remove the cleaning tool from the inside of the cutter blade. The print head is extremely sharp. Use caution when cleaning. 5 After cleaning the blade, release the cutter button to return the blade...
... clean the tape print head 1 Open the side cover of the label maker. 2 Remove the label cassette. 3 Use a small, soft brush or cotton swab to its home position. Figure 8 7 Figure 7 6 Replace the cleaning tool, insert the label cassette, and close the side cover. See Figure 8. Cleaning tool Print head 4 Remove the cleaning tool from the inside of the cutter blade. The print head is extremely sharp. Use caution when cleaning. 5 After cleaning the blade, release the cutter button to return the blade...
User Guide 1
Page 10
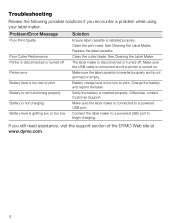
... Ensure label cassette is turned on. Replace the label cassette. Otherwise, contact Customer Support. Make sure the label maker is disconnected or turned off Printer error Battery level is too low to a powered USB port. Connect the label maker to a powered USB port to print. If you encounter a problem while using your label maker. Charge the battery and reprint the label. Clean the print head. See Cleaning the Label Maker. See Cleaning the Label Maker. Battery charge level is not jammed or empty. Clean the cutter blade. Make sure the label cassette is inserted...
... Ensure label cassette is turned on. Replace the label cassette. Otherwise, contact Customer Support. Make sure the label maker is disconnected or turned off Printer error Battery level is too low to a powered USB port. Connect the label maker to a powered USB port to print. If you encounter a problem while using your label maker. Charge the battery and reprint the label. Clean the print head. See Cleaning the Label Maker. See Cleaning the Label Maker. Battery charge level is not jammed or empty. Clean the cutter blade. Make sure the label cassette is inserted...


