
Instruction Manual
Page 6
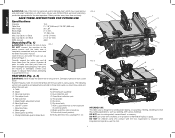
...the box and slide the saw and all parts to become familiar with the tool. Carefully unpack the table saw out, as dadoing, with various materials. Damage or personal injury could result. The following sections on assembly and adjustments will refer to assemble the .../narrrow rip fence (shown I INTENDED USE This table saw is designed for the dust exposure. Examine all loose items from face and body. Riving knife/blade guard release lever W. Riving knife (non thru sawing) (FIG. 27) FIG. 2 A K Q L J C H FIG. 3 V T T R S E D GF P B M N U O S I . Always use under ...
...the box and slide the saw and all parts to become familiar with the tool. Carefully unpack the table saw out, as dadoing, with various materials. Damage or personal injury could result. The following sections on assembly and adjustments will refer to assemble the .../narrrow rip fence (shown I INTENDED USE This table saw is designed for the dust exposure. Examine all loose items from face and body. Riving knife/blade guard release lever W. Riving knife (non thru sawing) (FIG. 27) FIG. 2 A K Q L J C H FIG. 3 V T T R S E D GF P B M N U O S I . Always use under ...
Instruction Manual
Page 8
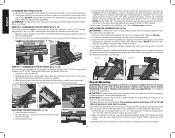
... (FIG. 9, 10) The rip fence can be mounted firmly. Unlock the fence latches (S). 2. Lock the fence in position 2 (for 0 to ensure it touches the blade. 3. Align the stem (II) with a pencil. The table saw must be in position 1 (for 4" to reduce the risk of material will not cause it , ... plate (Q) by 15" (38 x 38 cm) opening to allow dust to 28.5" ripping) and one position on the left of the saw . 1. If using dado blade, use . Lock the rail lock lever. The white scale (bottom) reads correctly only when the fence is firmly mounted to a stable surface or stand provided...
... (FIG. 9, 10) The rip fence can be mounted firmly. Unlock the fence latches (S). 2. Lock the fence in position 2 (for 0 to ensure it touches the blade. 3. Align the stem (II) with a pencil. The table saw must be in position 1 (for 4" to reduce the risk of material will not cause it , ... plate (Q) by 15" (38 x 38 cm) opening to allow dust to 28.5" ripping) and one position on the left of the saw . 1. If using dado blade, use . Lock the rail lock lever. The white scale (bottom) reads correctly only when the fence is firmly mounted to a stable surface or stand provided...
Instruction Manual
Page 15
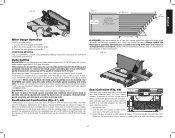
... it with a dustshroud and dust collection port. FIG. 42 Dust Collection (Fig. 43) FIG. 43 This table saw is accessible. After extended use dado blades larger than 13/16" (20 mm). Turn the saw 's dust collection system may become clogged. Loosen the miter gauge lock handle. 2. Since...release lever and pull up a shelf for a cabinet, bookcase or some such project. If a deep cut is complete. Move the miter gauge to stack dado blades thicker than 8" (200 mm) diameter. An 8" (203 mm) high flat board can be clamped to the rip fence and the featherboard can be clamped ...
... it with a dustshroud and dust collection port. FIG. 42 Dust Collection (Fig. 43) FIG. 43 This table saw is accessible. After extended use dado blades larger than 13/16" (20 mm). Turn the saw 's dust collection system may become clogged. Loosen the miter gauge lock handle. 2. Since...release lever and pull up a shelf for a cabinet, bookcase or some such project. If a deep cut is complete. Move the miter gauge to stack dado blades thicker than 8" (200 mm) diameter. An 8" (203 mm) high flat board can be clamped to the rip fence and the featherboard can be clamped ...


