Instruction Manual - STAND
Page 2
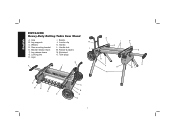
Axle I E O F G H D E K ML D B E H D A B E C 1 Rubber bumpers F. Handle D. Bracket release levers M. Tube plugs H. Handle lock J E. Leg release levers N. Leg supports J. Kickstand G. Saw mounting bracket L. Locator clip N C. Wheels K. Locking pins O. Legs N K I D I . English DW7440RS Heavy-Duty Rolling Table Saw Stand A. Beams B.
Axle I E O F G H D E K ML D B E H D A B E C 1 Rubber bumpers F. Handle D. Bracket release levers M. Tube plugs H. Handle lock J E. Leg release levers N. Leg supports J. Kickstand G. Saw mounting bracket L. Locator clip N C. Wheels K. Locking pins O. Legs N K I D I . English DW7440RS Heavy-Duty Rolling Table Saw Stand A. Beams B.

Instruction Manual - STAND
Page 3
... potentially hazardous situation which , if not avoided, may result in personal injury and serious damage to the table saw stand is unsafe to climb, sit or stand on the stand. 2 The DW7440RS is designed for use with your own safety, read the manual and pay attention to ANSI Z87.1. • ... result in property damage. IF YOU HAVE ANY QUESTIONS OR COMMENTS ABOUT THIS OR ANY DEWALT TOOL, CALL US TOLL FREE AT: 1-800-4-DEWALT (1-800-433-9258) DW7440RS Rolling Table Saw Stand with table saws only. All users and bystanders must wear eye protection that conforms to these warnings may ...
... potentially hazardous situation which , if not avoided, may result in personal injury and serious damage to the table saw stand is unsafe to climb, sit or stand on the stand. 2 The DW7440RS is designed for use with your own safety, read the manual and pay attention to ANSI Z87.1. • ... result in property damage. IF YOU HAVE ANY QUESTIONS OR COMMENTS ABOUT THIS OR ANY DEWALT TOOL, CALL US TOLL FREE AT: 1-800-4-DEWALT (1-800-433-9258) DW7440RS Rolling Table Saw Stand with table saws only. All users and bystanders must wear eye protection that conforms to these warnings may ...
Instruction Manual - STAND
Page 4
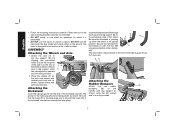
...axle and secure with the four M6 O screws provided as instructed. • DO NOT modify or use stand for operations for future use the stand on the ground. Fasten the tool to the saw mounting brackets securely as shown (below, left). Place the wheels (C) on a flat, stable surface. ...The stand is unintended. • DO NOT use . Insert the kickstand tube (N) through the holes in the end of the kickstand tube (N). English ...
...axle and secure with the four M6 O screws provided as instructed. • DO NOT modify or use stand for operations for future use the stand on the ground. Fasten the tool to the saw mounting brackets securely as shown (below, left). Place the wheels (C) on a flat, stable surface. ...The stand is unintended. • DO NOT use . Insert the kickstand tube (N) through the holes in the end of the kickstand tube (N). English ...
Instruction Manual - STAND
Page 5
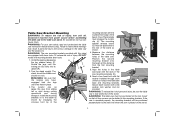
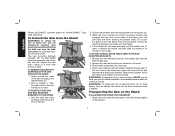
...front edge of the beam. Align the holes in the table saw stand. WARNING: For your own safety, read and understand the table saw instruction manual before assembling the table saw to the mounting brackets. WARNING: The saw base and mounting brackets. Unfold the legs by engaging the J...accessory. WARNING: Be sure that all four corners can cause injury. Failure to the table saw must engage the locator clip (J). Install the mounting brackets on the stand. 4 If the saw is fully anchored on the tool mount so that the locking pins have engaged and the ...
...front edge of the beam. Align the holes in the table saw stand. WARNING: For your own safety, read and understand the table saw instruction manual before assembling the table saw to the mounting brackets. WARNING: The saw base and mounting brackets. Unfold the legs by engaging the J...accessory. WARNING: Be sure that all four corners can cause injury. Failure to the table saw must engage the locator clip (J). Install the mounting brackets on the stand. 4 If the saw is fully anchored on the tool mount so that the locking pins have engaged and the ...
Instruction Manual - STAND
Page 6
...STAND L 1. Rock the saw stand. Remove the front feet bolts and the front rubber feet from the table saw gently to verify the mounting brackets are engaged with a flat washer, lock washer and nut provided. The saw E when cutting on a work area. Pull up can support the saw mounting brackets included with the DW7440RS stand... off , disconnect machine from power source before detaching the table saw from the DW745 table saw usage. TO ATTACH DEWALT DW745 TABLE SAW TO THE SAW MOUNTING BRACKETS 1. Feed a hex head bolt with the handle extended...
...STAND L 1. Rock the saw stand. Remove the front feet bolts and the front rubber feet from the table saw gently to verify the mounting brackets are engaged with a flat washer, lock washer and nut provided. The saw E when cutting on a work area. Pull up can support the saw mounting brackets included with the DW7440RS stand... off , disconnect machine from power source before detaching the table saw from the DW745 table saw usage. TO ATTACH DEWALT DW745 TABLE SAW TO THE SAW MOUNTING BRACKETS 1. Feed a hex head bolt with the handle extended...
Instruction Manual - STAND
Page 7
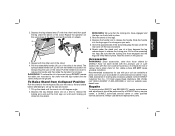
... to the opposite side of the stand. Always use with the other than those offered by a DEWALT factory service center, a DEWALT authorized service center or other end of the stand and rest the stand on the second leg of the stand. 4. K L M F 3. Rest the stand on the ground. Lift the saw and stand. 1. Be sure that the locking pins have...
... to the opposite side of the stand. Always use with the other than those offered by a DEWALT factory service center, a DEWALT authorized service center or other end of the stand and rest the stand on the second leg of the stand. 4. K L M F 3. Rest the stand on the ground. Lift the saw and stand. 1. Be sure that the locking pins have...


