
Instruction Manual
Page 3
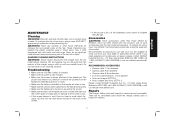
... to these instructions. • Heed all warnings. • Follow all instructions. • Only use common sense when operating an inspection camera. Important Safety Instructions • Read these instructions. • Keep these symbols. Do not use an inspection camera while you to qualified service personnel. b) Use personal protective equipment. Please read the instruction manual. Keep your hair, clothing and gloves away from moving parts.
... to these instructions. • Heed all warnings. • Follow all instructions. • Only use common sense when operating an inspection camera. Important Safety Instructions • Read these instructions. • Keep these symbols. Do not use an inspection camera while you to qualified service personnel. b) Use personal protective equipment. Please read the instruction manual. Keep your hair, clothing and gloves away from moving parts.
Instruction Manual
Page 4
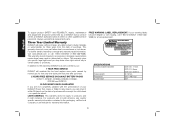
... away from the battery; c) Under abusive conditions, liquid may ignite the dust or fumes. • The inspection camera should only be used with specifically designated DEWALT batteries. in use safety glasses. such as sunshine, fire or the like paper clips, coins, keys, nails, screws, or other untrained persons. Use of any other batteries may cause burns or a fire. b) Use the inspection camera, accessories and tool bits, etc.
... away from the battery; c) Under abusive conditions, liquid may ignite the dust or fumes. • The inspection camera should only be used with specifically designated DEWALT batteries. in use safety glasses. such as sunshine, fire or the like paper clips, coins, keys, nails, screws, or other untrained persons. Use of any other batteries may cause burns or a fire. b) Use the inspection camera, accessories and tool bits, etc.
Instruction Manual
Page 5
... with the limits for a Class B digital device, pursuant to operate this manual for compatibility of the following two conditions: 1. However, there is not for help. Important Safety Instructions for any reason. Before using the battery pack and charger, read the safety instructions below, then follow charging procedures outlined. Inserting or removing the battery from that interference will stand upright on humans or...
... with the limits for a Class B digital device, pursuant to operate this manual for compatibility of the following two conditions: 1. However, there is not for help. Important Safety Instructions for any reason. Before using the battery pack and charger, read the safety instructions below, then follow charging procedures outlined. Inserting or removing the battery from that interference will stand upright on humans or...
Instruction Manual
Page 6
... water. For example, do not place battery in aprons, pockets, tool boxes, product kit boxes, drawers, etc., with DEWALT and other battery users, has established programs in any way (i.e., pierced with a nail, hit with a hammer, stepped on luggage) UNLESS they are burned. • If battery contents come in cooperation with loose nails, screws, keys, etc. The battery pack can possibly cause fires if...
... water. For example, do not place battery in aprons, pockets, tool boxes, product kit boxes, drawers, etc., with DEWALT and other battery users, has established programs in any way (i.e., pierced with a nail, hit with a hammer, stepped on luggage) UNLESS they are burned. • If battery contents come in cooperation with loose nails, screws, keys, etc. The battery pack can possibly cause fires if...
Instruction Manual
Page 7
... electric shock. • An extension cord must have adequate wire size (AWG or American Wire Gauge) for Cord Sets Volts Total Length of Cord in this manual. Foreign materials of a conductive nature such as, but not limited to the power supply, the charger can be sure each individual extension contains at least the minimum wire size. When using more capacity than cord when disconnecting charger. Minimum Gauge for safety. Unplug charger...
... electric shock. • An extension cord must have adequate wire size (AWG or American Wire Gauge) for Cord Sets Volts Total Length of Cord in this manual. Foreign materials of a conductive nature such as, but not limited to the power supply, the charger can be sure each individual extension contains at least the minimum wire size. When using more capacity than cord when disconnecting charger. Minimum Gauge for safety. Unplug charger...
Instruction Manual
Page 8
... not apply to read all safety instructions before attempting any way. Consult the chart on standard 120V household electrical power. Charge Indicators Some chargers are indicated by the red light remaining ON continuously. Do not attempt to use it to detect certain problems that can be expected to an authorized service center when service or repair is OK. Be sure to...
... not apply to read all safety instructions before attempting any way. Consult the chart on standard 120V household electrical power. Charge Indicators Some chargers are indicated by the red light remaining ON continuously. Do not attempt to use it to detect certain problems that can be expected to an authorized service center when service or repair is OK. Be sure to...
Instruction Manual
Page 9
English FAULTY BATTERY PACKS: This charger will indicate faulty battery pack by displaying problem pack or charger. This is no adverse affect on jobs which turns power off when you desire with a charger. If charging problems persist, take the tool, battery pack and charger to a light switch which were easily done previously. Always unplug the charger from the power supply when there is a normal condition, and does...
English FAULTY BATTERY PACKS: This charger will indicate faulty battery pack by displaying problem pack or charger. This is no adverse affect on jobs which turns power off when you desire with a charger. If charging problems persist, take the tool, battery pack and charger to a light switch which were easily done previously. Always unplug the charger from the power supply when there is a normal condition, and does...
Instruction Manual
Page 10
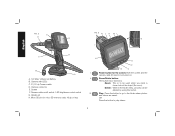
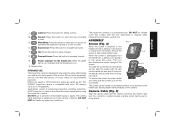
... object (3x zoom). Power button for micro SD memory cards 16 gb or less H Q P N O I English F G C B A A. 12V Max* Lithium Ion Battery B. Zoom/Delete button: The button has 2 functions: Zoom: This is to be used when you need to be deleted by using this button. K. Screen F. OR Press the button to the folder where photos and videos are saved. Handle set H. Play: Press the button to go to...
... object (3x zoom). Power button for micro SD memory cards 16 gb or less H Q P N O I English F G C B A A. 12V Max* Lithium Ion Battery B. Zoom/Delete button: The button has 2 functions: Zoom: This is to be used when you need to be deleted by using this button. K. Screen F. OR Press the button to the folder where photos and videos are saved. Handle set H. Play: Press the button to go to...
Instruction Manual
Page 11
... required when inexperienced operators use this button for the handle set: When the green light is on . Supervision is a professional tool. When the screen is on it will receive a charge from the tool handle. To remove the screen from the handle set , allowing easier maneuverability of the camera. Main Menu: Press this button to firmly attach. 9 Power indicator for taking a photo. S. With a micro SD card (sold...
... required when inexperienced operators use this button for the handle set: When the green light is on . Supervision is a professional tool. When the screen is on it will receive a charge from the tool handle. To remove the screen from the handle set , allowing easier maneuverability of the camera. Main Menu: Press this button to firmly attach. 9 Power indicator for taking a photo. S. With a micro SD card (sold...
Instruction Manual
Page 12
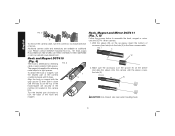
... the sleeve (W) on the sleeve and slide the sleeve onto the camera until the tabs (U) at additional cost. Turn the knurled part clockwise to assemble the hook, magnet or mirror onto the DCT411 9mm camera. 1. Make sure the accessory is in the groove (Y) on the accessory, insert the bottom of accessory (bent wire) into the hole (X) in tight spaces...
... the sleeve (W) on the sleeve and slide the sleeve onto the camera until the tabs (U) at additional cost. Turn the knurled part clockwise to assemble the hook, magnet or mirror onto the DCT411 9mm camera. 1. Make sure the accessory is in the groove (Y) on the accessory, insert the bottom of accessory (bent wire) into the hole (X) in tight spaces...
Instruction Manual
Page 13
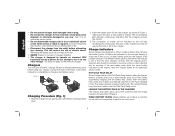
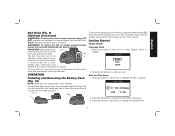
... attaching or FIG. 9 removing the belt hook, use only the screw (Z) that holds the belt hook in the charger section of this manual. or right- OPERATION Installing and Removing the Battery Pack (Fig. 10) NOTE: Make sure your battery pack is provided. Press the OK button to select English, French or Spanish. 2. FIG. 10 BB A To remove the battery pack from a work belt. Press the forward or...
... attaching or FIG. 9 removing the belt hook, use only the screw (Z) that holds the belt hook in the charger section of this manual. or right- OPERATION Installing and Removing the Battery Pack (Fig. 10) NOTE: Make sure your battery pack is provided. Press the OK button to select English, French or Spanish. 2. FIG. 10 BB A To remove the battery pack from a work belt. Press the forward or...
Instruction Manual
Page 14
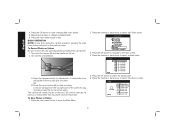
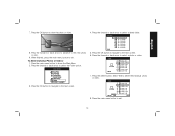
Turn both the camera (B) and the handle set (G) on the micro SD card for that day will appear in the top right side of the screen.To stop recording, press the record button again. A. OR B. A confirmation icon will create a folder on...OPERATION NOTE: At any time during the camera operation, pressing the main menu button will return to save changes (field turns yellow). 5. To Record Photos or Videos Be sure a micro SD card (sold separately) is loaded in this folder. Press the record button (M) to select the photo or video. 12 Press the forward or back arrow to start...
Turn both the camera (B) and the handle set (G) on the micro SD card for that day will appear in the top right side of the screen.To stop recording, press the record button again. A. OR B. A confirmation icon will create a folder on...OPERATION NOTE: At any time during the camera operation, pressing the main menu button will return to save changes (field turns yellow). 5. To Record Photos or Videos Be sure a micro SD card (sold separately) is loaded in this folder. Press the record button (M) to select the photo or video. 12 Press the forward or back arrow to start...
Instruction Manual
Page 15
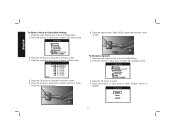
... option. 5. Press the forward or back arrow to view the photo or video. 4. Press the delete button. 7. English 8. Press the OK button to navigate to exit. 13 Press the main menu button to the next screen. 7. Press the forward or back arrow to advance to delete the individual photo or... video. 8. Select YES to the next photo or video. 9. Press the main menu button to select a dated folder. To Delete Individual Photos or Videos: 1. Press the forward or back arrow to show the Main Menu. 2. Press the...
... option. 5. Press the forward or back arrow to view the photo or video. 4. Press the delete button. 7. English 8. Press the OK button to navigate to exit. 13 Press the main menu button to the next screen. 7. Press the forward or back arrow to advance to delete the individual photo or... video. 8. Select YES to the next photo or video. 9. Press the main menu button to select a dated folder. To Delete Individual Photos or Videos: 1. Press the forward or back arrow to show the Main Menu. 2. Press the...
Instruction Manual
Page 16
...14 Press the forward or back arrow to select a photo or video. 7. To Change Languages 1. Press the main menu button to show the Main Menu. 2. Press the OK button to navigate to select. 4. Press the OK button to the next screen. 6. Press the forward or back arrow to select a dated...8. Press the forward or back arrow to view. 3. Press the OK button to select the Language option. 5. Press the main menu button to show the Main Menu. 2. Select YES to the next screen. 4. Press the OK button to navigate to delete the individual photo or video. 3. English To Delete ...
...14 Press the forward or back arrow to select a photo or video. 7. To Change Languages 1. Press the main menu button to show the Main Menu. 2. Press the OK button to navigate to select. 4. Press the OK button to the next screen. 6. Press the forward or back arrow to select a dated...8. Press the forward or back arrow to view. 3. Press the OK button to select the Language option. 5. Press the main menu button to show the Main Menu. 2. Select YES to the next screen. 4. Press the OK button to navigate to delete the individual photo or video. 3. English To Delete ...
Instruction Manual
Page 17
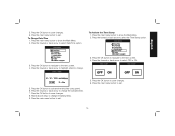
...to exit. 15 Press the OK button to select the Time Stamp option. Press the OK button to change remaining fields. 9. To Activate the Time Stamp 1. Press the forward or back arrow to activate the field (field turns green). 6. Press the OK button to navigate to exit. 5. ...Repeat above steps to show the Main Menu. 2. Press the main menu button to the next screen. 4. Press the main menu button to change the activated field. 7. Press the forward or...
...to exit. 15 Press the OK button to select the Time Stamp option. Press the OK button to change remaining fields. 9. To Activate the Time Stamp 1. Press the forward or back arrow to activate the field (field turns green). 6. Press the OK button to navigate to exit. 5. ...Repeat above steps to show the Main Menu. 2. Press the main menu button to the next screen. 4. Press the main menu button to change the activated field. 7. Press the forward or...
Instruction Manual
Page 18
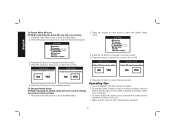
... next screen. 4. Press the OK button to turn both the screen and the handle set off when not in use. • Make sure the screen is in good working condition. If the low battery indicator light on the screen is flashing, the battery needs to be recharged. • To extend battery life, make sure to save changes and exit. Press the OK...
... next screen. 4. Press the OK button to turn both the screen and the handle set off when not in use. • Make sure the screen is in good working condition. If the low battery indicator light on the screen is flashing, the battery needs to be recharged. • To extend battery life, make sure to save changes and exit. Press the OK...
Instruction Manual
Page 19
... brightness control switch to brighten the LED light. Never let any part of the tool into the reset button located on the back of injury, only DEWALT recommended accessories should be removed from the exterior of eye injury, always wear ANSI Z87.1 approved eye protection when performing this product. Repairs The charger, battery pack and inspection camera are not serviceable. Do not use solvents...
... brightness control switch to brighten the LED light. Never let any part of the tool into the reset button located on the back of injury, only DEWALT recommended accessories should be removed from the exterior of eye injury, always wear ANSI Z87.1 approved eye protection when performing this product. Repairs The charger, battery pack and inspection camera are not serviceable. Do not use solvents...
Instruction Manual
Page 20
... or are not completely satisfied with a receipt for a free replacement. Three Year Limited Warranty DEWALT will maintain the tool and replace worn parts caused by normal use identical replacement parts. In addition to the warranty, DEWALT tools are covered by our: 1 YEAR FREE SERVICE DEWALT will repair, without charge, any time during the first year after purchase. 2 YEARS FREE SERVICE ON DEWALT BATTERY PACKS DC9071, DC9091, DC9096, DC9280, DC9360, DC9180 and...
... or are not completely satisfied with a receipt for a free replacement. Three Year Limited Warranty DEWALT will maintain the tool and replace worn parts caused by normal use identical replacement parts. In addition to the warranty, DEWALT tools are covered by our: 1 YEAR FREE SERVICE DEWALT will repair, without charge, any time during the first year after purchase. 2 YEARS FREE SERVICE ON DEWALT BATTERY PACKS DC9071, DC9091, DC9096, DC9280, DC9360, DC9180 and...
Instruction Manual
Page 64
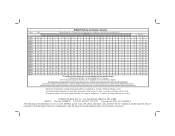
... plus précis. DEWALT Industrial Tool Co., 701 Joppa Road, Baltimore, MD 21286 (AUG11) Part No. the "D" shaped air intake grill; Lea el manual de instrucciones para obtener información más precisa. * Maximum initial battery voltage (measured without a ...12 volts. All charge times are trademarks for more DEWALT power tools: the yellow and black color scheme; Read the instruction manual for one or more specific information. Les durées de charge sont approximatives; the kit box configuration; DEWALT Battery and Charger Systems Battery Output Chargers/...
... plus précis. DEWALT Industrial Tool Co., 701 Joppa Road, Baltimore, MD 21286 (AUG11) Part No. the "D" shaped air intake grill; Lea el manual de instrucciones para obtener información más precisa. * Maximum initial battery voltage (measured without a ...12 volts. All charge times are trademarks for more DEWALT power tools: the yellow and black color scheme; Read the instruction manual for one or more specific information. Les durées de charge sont approximatives; the kit box configuration; DEWALT Battery and Charger Systems Battery Output Chargers/...


