
Owners Manual
Page 2
...that may cause undesired operation. 2. Modification not expressly approved by DENON may void your authority, granted by the FCC, to the ...contained in a residential installation. Allow for a Class B digital device, pursuant to distribute this manual, meets FCC requirements. Tenir compte d'une dispersion de chaleur suffisante lors de l'installation sur une ...233;riodes. • Do not let insecticides, benzene, and thinner come in any interference received, including interference that interference will not occur in accordance with the instructions, may cause harmful interference...
...that may cause undesired operation. 2. Modification not expressly approved by DENON may void your authority, granted by the FCC, to the ...contained in a residential installation. Allow for a Class B digital device, pursuant to distribute this manual, meets FCC requirements. Tenir compte d'une dispersion de chaleur suffisante lors de l'installation sur une ...233;riodes. • Do not let insecticides, benzene, and thinner come in any interference received, including interference that interference will not occur in accordance with the instructions, may cause harmful interference...
Owners Manual
Page 4
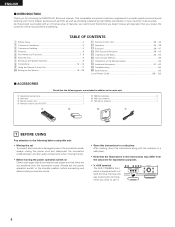
... safe place. Always set for choosing the DENON A/V Surround receiver. AUX terminal. TABLE OF CONTENTS z Before...t y u 1 BEFORE USING Pay attention to the following parts are not problems with home theater sources such as DVD, as well as providing outstanding high fidelity reproduction of your favorite ...manual before you review the contents of features, we recommend that before proceeding. After reading, store this instructions along with a V. AUX terminal The AVR-1705/685...superb surround sound listening with the connection cords. ENGLISH 2 INTRODUCTION Thank you want to use it...
... safe place. Always set for choosing the DENON A/V Surround receiver. AUX terminal. TABLE OF CONTENTS z Before...t y u 1 BEFORE USING Pay attention to the following parts are not problems with home theater sources such as DVD, as well as providing outstanding high fidelity reproduction of your favorite ...manual before you review the contents of features, we recommend that before proceeding. After reading, store this instructions along with a V. AUX terminal The AVR-1705/685...superb surround sound listening with the connection cords. ENGLISH 2 INTRODUCTION Thank you want to use it...
Owners Manual
Page 11
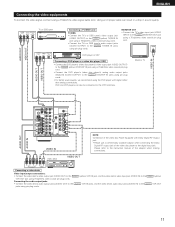
...ANALOG AUDIO OUTPUT) to the AUDIO DVD/VDP IN jacks using pin plug cords. • For better sound quality, we recommend using a 75 Ω/ohms video coaxial pin plug cord. AUDIO OUT VIDEO OUT ...output jack of the adapter when making connections. DVD and VDP players can result in a drop in sound quality. Connecting the audio output jacks: • Connect the video deck's audio output jacks (AUDIO OUT... (VIDEO IN) to the digital input jack. Please refer to the instruction manual of the video disc player to the VIDEO (yellow) VCR OUT jack using a 75 Ω/ohms video ...
...ANALOG AUDIO OUTPUT) to the AUDIO DVD/VDP IN jacks using pin plug cords. • For better sound quality, we recommend using a 75 Ω/ohms video coaxial pin plug cord. AUDIO OUT VIDEO OUT ...output jack of the adapter when making connections. DVD and VDP players can result in a drop in sound quality. Connecting the audio output jacks: • Connect the video deck's audio output jacks (AUDIO OUT... (VIDEO IN) to the digital input jack. Please refer to the instruction manual of the video disc player to the VIDEO (yellow) VCR OUT jack using a 75 Ω/ohms video ...
Owners Manual
Page 12
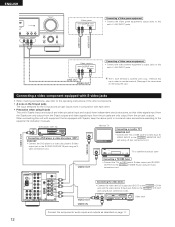
When connecting this cap in mind and make connections according to the equipment's instruction manuals. The V. B Connecting a DVD player or video disc player (VDP) DVD/VDP • Connect the DVD player's or video disc player's S-video output jack to the S-...
When connecting this cap in mind and make connections according to the equipment's instruction manuals. The V. B Connecting a DVD player or video disc player (VDP) DVD/VDP • Connect the DVD player's or video disc player's S-video output jack to the S-...
Owners Manual
Page 24
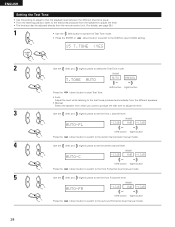
ENGLISH Setting the Test Tone • Use this setting to adjust to that the playback level between the different channel is equal. • From the listening position, listen to the test tones produced from the speakers to adjust the level. • The level can also be adjusted directly from the remote control unit. (For details, see page 39.) 1 • Use the (left) button to switch the Test Tone mode. • Press the ENTER or (down) button to switch to the DIGITAL input (COAX) setting. 15 T.TONE
ENGLISH Setting the Test Tone • Use this setting to adjust to that the playback level between the different channel is equal. • From the listening position, listen to the test tones produced from the speakers to adjust the level. • The level can also be adjusted directly from the remote control unit. (For details, see page 39.) 1 • Use the (left) button to switch the Test Tone mode. • Press the ENTER or (down) button to switch to the DIGITAL input (COAX) setting. 15 T.TONE
Owners Manual
Page 25
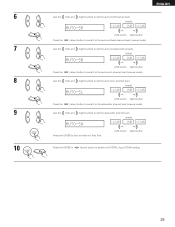
...Test Tone. (left) button (right) button Press the ENTER or (down) button to the surround back channel level (manual mode). 6 7 8 9 10 ENGLISH Use the (left) and (right) buttons to set the surround R channel level. (Initial) AUTO-SR -12dB 0dB +12dB Press the (left) button (right) ... -12dB 0dB +12dB Press the (left ) button (right) button (down ) button to switch to the surround L channel level (manual mode). Use the (left) and (right) buttons to set the surround back channel level. (Initial) AUTO-SB -12dB 0dB +12dB Press the (left ) button (right) button (down )...
...Test Tone. (left) button (right) button Press the ENTER or (down) button to the surround back channel level (manual mode). 6 7 8 9 10 ENGLISH Use the (left) and (right) buttons to set the surround R channel level. (Initial) AUTO-SR -12dB 0dB +12dB Press the (left) button (right) ... -12dB 0dB +12dB Press the (left ) button (right) button (down ) button to switch to the surround L channel level (manual mode). Use the (left) and (right) buttons to set the surround back channel level. (Initial) AUTO-SB -12dB 0dB +12dB Press the (left ) button (right) button (down )...
Owners Manual
Page 29
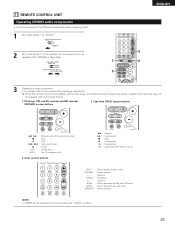
...and CD recorder and MD recorder (CDR/MD) system buttons 2. Tape deck (TAPE) system buttons 6, 7 2 1 8, 9 3 DISC SKIP+ : Manual search (forward and reverse) : Stop : Play : Auto search (cue) : Pause : Switch discs (for the component to be operated with this ...+, - up /down BAND : Switch between the AM and FM bands MODE : Switch between decks A and B SHIFT : Switch preset channel range CHANNEL : Preset channel +, - 11 REMOTE CONTROL UNIT Operating DENON audio components • Turn on the power of components may not be operated. (CD, CDR/MD or Tape deck) 1 3 ENGLISH ...
...and CD recorder and MD recorder (CDR/MD) system buttons 2. Tape deck (TAPE) system buttons 6, 7 2 1 8, 9 3 DISC SKIP+ : Manual search (forward and reverse) : Stop : Play : Auto search (cue) : Pause : Switch discs (for the component to be operated with this ...+, - up /down BAND : Switch between the AM and FM bands MODE : Switch between decks A and B SHIFT : Switch preset channel range CHANNEL : Preset channel +, - 11 REMOTE CONTROL UNIT Operating DENON audio components • Turn on the power of components may not be operated. (CD, CDR/MD or Tape deck) 1 3 ENGLISH ...
Owners Manual
Page 31
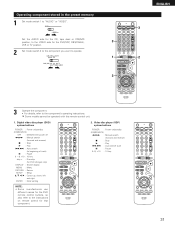
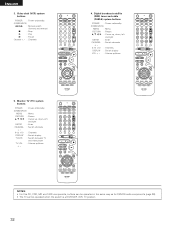
...switch 1 to the instructions on remote control for that component. 2. Video disc player (VDP) system buttons POWER : Power on /standby (ON/SOURCE) OFF : DENON DVD power off 6,7 : Manual search (forward and reverse) 2 : Stop 1 : Play 8,9 : Auto search (to beginning of track) 3 : Pause 0 ~ 9, +10 : 10 key...Some models cannot be operated with this remote control unit. 1. Digital video disc player (DVD) system buttons POWER : Power on /standby (ON/SOURCE) 6,7 : Manual search (forward and reverse) 2 : Stop 1 : Play 8,9 : Auto search (cue) 3 : Pause 0~9, +10 : 10 key 31 Set the AUDIO ...
...switch 1 to the instructions on remote control for that component. 2. Video disc player (VDP) system buttons POWER : Power on /standby (ON/SOURCE) OFF : DENON DVD power off 6,7 : Manual search (forward and reverse) 2 : Stop 1 : Play 8,9 : Auto search (to beginning of track) 3 : Pause 0 ~ 9, +10 : 10 key...Some models cannot be operated with this remote control unit. 1. Digital video disc player (DVD) system buttons POWER : Power on /standby (ON/SOURCE) 6,7 : Manual search (forward and reverse) 2 : Stop 1 : Play 8,9 : Auto search (cue) 3 : Pause 0~9, +10 : 10 key 31 Set the AUDIO ...
Owners Manual
Page 32
...;, ª, 0, 1 : Cursor up, down, left and right ENTER : Enter CHANNEL : Switch channels +, - 0~9, +10 : Channels DISPLAY : Switch display TV/VCR : Switch between TV and video player TV VOL : Volume up /down +, - Digital broadcast satellite (DBS) tuner and cable (CABLE) system buttons POWER : Power on /standby (ON/SOURCE) 6,7 : Manual search (forward and reverse) 2 : Stop 1 : Play 3 : Pause...
...;, ª, 0, 1 : Cursor up, down, left and right ENTER : Enter CHANNEL : Switch channels +, - 0~9, +10 : Channels DISPLAY : Switch display TV/VCR : Switch between TV and video player TV VOL : Volume up /down +, - Digital broadcast satellite (DBS) tuner and cable (CABLE) system buttons POWER : Power on /standby (ON/SOURCE) 6,7 : Manual search (forward and reverse) 2 : Stop 1 : Play 3 : Pause...
Owners Manual
Page 33
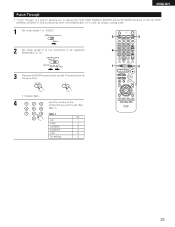
By default, nothing is a function allowing you want to operate the PLAY, STOP, MANUAL SEARCH and AUTO SEARCH buttons on the CD, TAPE, CDR/MD, DVD/VDP or VCR components when in the DBS/CABLE or TV mode. CD 1 ...
By default, nothing is a function allowing you want to operate the PLAY, STOP, MANUAL SEARCH and AUTO SEARCH buttons on the CD, TAPE, CDR/MD, DVD/VDP or VCR components when in the DBS/CABLE or TV mode. CD 1 ...

Owners Manual
Page 36
... "18 dB - (Maximum value of channel level)".) Input mode when playing DTS sources • Noise will be adjusted within the range of -70 to 0 to the component's manual. 5 Adjust the volume. BASS TREBLE ... to be adjusted selected, turn the SELECT knob. ENGLISH 3 Select the play mode. Press the SURROUND MODE button, then turn the SELECT knob to adjust the level. (Main unit) • To... The DIGITAL indicator will light when playing CD-ROMs containing data other than audio signals, but no sound will be adjusted up to 18 dB. (In this case the maximum volume is turned on the...
... "18 dB - (Maximum value of channel level)".) Input mode when playing DTS sources • Noise will be adjusted within the range of -70 to 0 to the component's manual. 5 Adjust the volume. BASS TREBLE ... to be adjusted selected, turn the SELECT knob. ENGLISH 3 Select the play mode. Press the SURROUND MODE button, then turn the SELECT knob to adjust the level. (Main unit) • To... The DIGITAL indicator will light when playing CD-ROMs containing data other than audio signals, but no sound will be adjusted up to 18 dB. (In this case the maximum volume is turned on the...
Owners Manual
Page 41
...Remote control unit) (Pro Logic IIx Cinema mode) (Pro Logic IIx Music mode) (Pro Logic IIx Game mode) or or • When the "SURROUND BACK" parameter is set "S. BACK" at the Speaker Configuration setting to "SMALL" or "LARGE". 1 Select the function to which the component you ... Logic IIx mode. 3 Play a program source with the mark. • For operating instructions, refer to the manuals of the respective components. 4 Select the surround parameter mode. Example: DVD ENGLISH (Main unit) (Remote control unit) 2 Select the STANDARD (Dolby Pro Logic IIx) mode. (Main unit) (...
...Remote control unit) (Pro Logic IIx Cinema mode) (Pro Logic IIx Music mode) (Pro Logic IIx Game mode) or or • When the "SURROUND BACK" parameter is set "S. BACK" at the Speaker Configuration setting to "SMALL" or "LARGE". 1 Select the function to which the component you ... Logic IIx mode. 3 Play a program source with the mark. • For operating instructions, refer to the manuals of the respective components. 4 Select the surround parameter mode. Example: DVD ENGLISH (Main unit) (Remote control unit) 2 Select the STANDARD (Dolby Pro Logic IIx) mode. (Main unit) (...
Owners Manual
Page 53
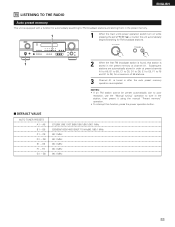
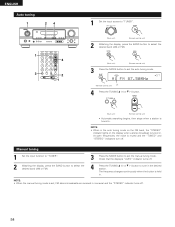
...cannot be preset automatically due to poor reception, use the "Manual tuning" operation to G8, for FM broadcast stations. 1 2 When the first FM broadcast station is found, that station is stored in the preset memory at preset channels A1 to A8, B1 to B8, C1 to C8,... while pressing the set's PRESET • (+) button the unit automatically begins searching for a maximum of 56 stations. 3 Channel A1 is tuned in the station, then preset it using the manual "Preset memory" operation. • To interrupt this function, press the power operation button. 2 DEFAULT VALUE AUTO TUNER PRESETS...
...cannot be preset automatically due to poor reception, use the "Manual tuning" operation to G8, for FM broadcast stations. 1 2 When the first FM broadcast station is found, that station is stored in the preset memory at preset channels A1 to A8, B1 to B8, C1 to C8,... while pressing the set's PRESET • (+) button the unit automatically begins searching for a maximum of 56 stations. 3 Channel A1 is tuned in the station, then preset it using the manual "Preset memory" operation. • To interrupt this function, press the power operation button. 2 DEFAULT VALUE AUTO TUNER PRESETS...
Owners Manual
Page 54
... in monaural and the "STEREO" indicator turns off. 54 Check that the display's "AUTO" indicator turns off . NOTE: • When the manual tuning mode is set, FM stereo broadcasts are received in . ENGLISH Auto tuning 1 24 1 4 3 2 1 Set the input source to "TUNER". (Main unit) (Remote control unit) 2 Watching the display, press the... . 2 Watching the display, press the BAND button to select the desired band (AM or FM). 4 Press the TUNING • (+) or ª (-) button to set the manual tuning mode.
... in monaural and the "STEREO" indicator turns off. 54 Check that the display's "AUTO" indicator turns off . NOTE: • When the manual tuning mode is set, FM stereo broadcasts are received in . ENGLISH Auto tuning 1 24 1 4 3 2 1 Set the input source to "TUNER". (Main unit) (Remote control unit) 2 Watching the display, press the... . 2 Watching the display, press the BAND button to select the desired band (AM or FM). 4 Press the TUNING • (+) or ª (-) button to set the manual tuning mode.
Owners Manual
Page 55
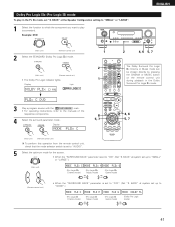
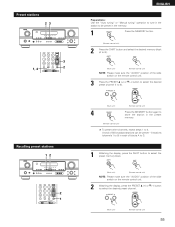
...AUDIO" position of the slide switch on the remote control unit. 3 Press the PRESET • (+) or ª (-) button to select the desired preset channel (1 to 8). (Main unit) (Remote control unit) 4 Press the MEMORY button again to store the station in each of blocks A to G. 1 ... • (+) or ª (-) button to 4. Preset stations 23 3 1, 4 2 Recalling preset stations 12 2 1 ENGLISH Preparations: Use the "Auto tuning" or "Manual tuning" operation to tune in the station to be preset - 8 stations (channels 1 to 8) in the preset memory. (Remote control unit) To preset other...
...AUDIO" position of the slide switch on the remote control unit. 3 Press the PRESET • (+) or ª (-) button to select the desired preset channel (1 to 8). (Main unit) (Remote control unit) 4 Press the MEMORY button again to store the station in each of blocks A to G. 1 ... • (+) or ª (-) button to 4. Preset stations 23 3 1, 4 2 Recalling preset stations 12 2 1 ENGLISH Preparations: Use the "Auto tuning" or "Manual tuning" operation to tune in the station to be preset - 8 stations (channels 1 to 8) in the preset memory. (Remote control unit) To preset other...
Owners Manual
Page 59
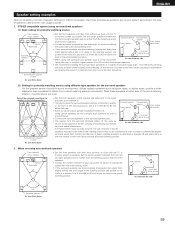
...effectively prevents the surround back channel signals from above ear level. Path of the surround sound from the speakers to the listening position Surround speakers Surround back speakers (1 spkr) As seen from reflecting off the walls as surround back speaker installation method (1). Surround speaker Front speaker Surround back speaker Point... feet (60 to 90 cm) As seen from the side 120° Surround speakers As seen from the listening position than the front speakers. • Consult the owner's manual for your subwoofer for your system according to the type of speakers used and...
...effectively prevents the surround back channel signals from above ear level. Path of the surround sound from the speakers to the listening position Surround speakers Surround back speakers (1 spkr) As seen from reflecting off the walls as surround back speaker installation method (1). Surround speaker Front speaker Surround back speaker Point... feet (60 to 90 cm) As seen from the side 120° Surround speakers As seen from the listening position than the front speakers. • Consult the owner's manual for your subwoofer for your system according to the type of speakers used and...
Owners Manual
Page 60
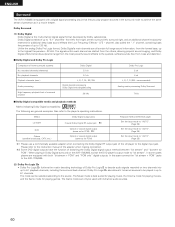
...22 kHz. When playing in a movie theater. front left, front right, center, surround left, surround right, and an additional channel exclusively reserved for additional deep bass sound effects (the Low Frequency Effects - recommended) Analog matrix processing Dolby Surround 7 kHz 2 Dolby Digital compatible media and... compatibility: . Please refer to the instruction manual of the adapter when making connection. 2 Some DVD digital outputs have the function of up to 120 Hz). ENGLISH Surround The AVR-1705/685 is the multi-channel digital signal format developed by Dolby Laboratories....
...22 kHz. When playing in a movie theater. front left, front right, center, surround left, surround right, and an additional channel exclusively reserved for additional deep bass sound effects (the Low Frequency Effects - recommended) Analog matrix processing Dolby Surround 7 kHz 2 Dolby Digital compatible media and... compatibility: . Please refer to the instruction manual of the adapter when making connection. 2 Some DVD digital outputs have the function of up to 120 Hz). ENGLISH Surround The AVR-1705/685 is the multi-channel digital signal format developed by Dolby Laboratories....
Owners Manual
Page 62
...in movie theaters since 1999. consult the player's owner's manual for information on the front panel of digital PCM and analog signal sources. 2 DTS Neo:6™ surround This mode applies conventional 2-channel signals to play DTS-ES Matrix 6.1 encoded sources with 6.1-channel sources. ...surround sound more faithful to the SL, SR and SB channels. Though maximum performance is featured on configuring the digital output for playing movies. or 6.1-channel systems. In addition, the bit stream format is also possible to play these sources. (For instructions on the AVR-1705/685...
...in movie theaters since 1999. consult the player's owner's manual for information on the front panel of digital PCM and analog signal sources. 2 DTS Neo:6™ surround This mode applies conventional 2-channel signals to play DTS-ES Matrix 6.1 encoded sources with 6.1-channel sources. ...surround sound more faithful to the SL, SR and SB channels. Though maximum performance is featured on configuring the digital output for playing movies. or 6.1-channel systems. In addition, the bit stream format is also possible to play these sources. (For instructions on the AVR-1705/685...


