Literature/Product Sheet
Page 1
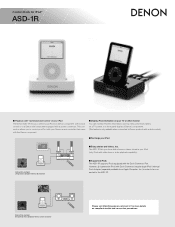
... component equipped with a system connector. Control Dock for more details on a TV screen, or a front panel display of your iPod The Denon ASD-1R lets you connect your Denon remote controller that came with the Denon component. The ASD-1R lets you show slide shows or videos stored in order to be connected to...
... component equipped with a system connector. Control Dock for more details on a TV screen, or a front panel display of your iPod The Denon ASD-1R lets you connect your Denon remote controller that came with the Denon component. The ASD-1R lets you show slide shows or videos stored in order to be connected to...
Literature/Product Sheet
Page 1
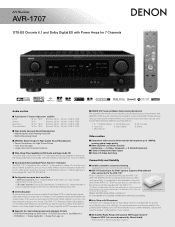
...Surround 4. Mono Movie 3. The iPod can be controlled via the remote controller supplied with the AVR-1707. *1) Supports 3rd-generation and later iPods equipped with a Dock connector. s Auto Setup with Microphone The AVR-1707 is equipped with an Auto Setup function, to achieve the most ... to the AVR-1707 iPod (*1) playback can also be enjoyed through the AVR-1707 when the ASD-1R, Denon's original Control Dock for your room. These DSP modes add spacious surround sound enhancements to a theater's front speakers being placed behind the movie screen. A/V Receiver AVR-1707 DTS-ES ...
...Surround 4. Mono Movie 3. The iPod can be controlled via the remote controller supplied with the AVR-1707. *1) Supports 3rd-generation and later iPods equipped with a Dock connector. s Auto Setup with Microphone The AVR-1707 is equipped with an Auto Setup function, to achieve the most ... to the AVR-1707 iPod (*1) playback can also be enjoyed through the AVR-1707 when the ASD-1R, Denon's original Control Dock for your room. These DSP modes add spacious surround sound enhancements to a theater's front speakers being placed behind the movie screen. A/V Receiver AVR-1707 DTS-ES ...
Literature/Product Sheet
Page 2
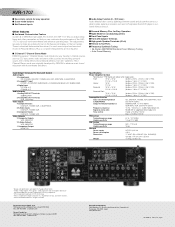
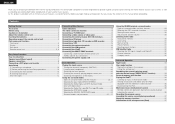
... Operation s Night Mode for not disturbing others s Front Panel Inputs s Front A/B Speaker Terminals s High-grade Speaker Terminals (All ch) s Remote In/Out Ports s Frequency Synthesis Tuning • 56-Station AM/FM/XM Random Preset Memory Tuning • Auto Preset Memory Input/Output Terminals...tape, stereo radio and stereo video sources into exciting surround sound, free of delay effects and unnatural artifacts, from all of DENON's high-grade A/V receiver, the AVR-1707 lets you can customize the performance of the AVR1707 to change without notice. *"Dolby", "Dolby Digital", "Pro Logic II...
... Operation s Night Mode for not disturbing others s Front Panel Inputs s Front A/B Speaker Terminals s High-grade Speaker Terminals (All ch) s Remote In/Out Ports s Frequency Synthesis Tuning • 56-Station AM/FM/XM Random Preset Memory Tuning • Auto Preset Memory Input/Output Terminals...tape, stereo radio and stereo video sources into exciting surround sound, free of delay effects and unnatural artifacts, from all of DENON's high-grade A/V receiver, the AVR-1707 lets you can customize the performance of the AVR1707 to change without notice. *"Dolby", "Dolby Digital", "Pro Logic II...
Owners Manual - English
Page 4
... surround sound listening with the slideshow / video function 35 Disconnecting the iPod 35 Multi zone music entertainment system 36 Remote control unit operations during multi-source playback (selecting the source 36 Recording the program source (recording the source currently ...memory functions 37 Initialization of the remote control unit 3 Part names and functions Front panel 4 Display 4 Rear panel 5 Remote control unit 5, 6 Easy Setup Procedure Easy to music in the Browse mode 34 Viewing still pictures and videos (only for choosing the DENON AVR-1707 AV Surround Receiver.
... surround sound listening with the slideshow / video function 35 Disconnecting the iPod 35 Multi zone music entertainment system 36 Remote control unit operations during multi-source playback (selecting the source 36 Recording the program source (recording the source currently ...memory functions 37 Initialization of the remote control unit 3 Part names and functions Front panel 4 Display 4 Rear panel 5 Remote control unit 5, 6 Easy Setup Procedure Easy to music in the Browse mode 34 Viewing still pictures and videos (only for choosing the DENON AVR-1707 AV Surround Receiver.
Owners Manual - English
Page 5
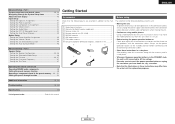
... be sure to the following parts are attached in addition to the main unit: q Operating instructions 1 w Warranty (for North America model only 1 e Service station list 1 r Remote control unit (RC-1048 1 t R6P/AA batteries 2 y AM loop antenna 1 u FM indoor antenna 1 i Setup microphone (DM-S205) (Approx. 23-5/8 ft / 6...Setup 46 Setting the Distance 46, 47 Setting the Crossover Frequency 47 Setting the Test Tone 47 Operating the remote control unit Operating DENON audio components 48 Setting the preset memory function 48 Operating a component stored in a safe place. Check once...
... be sure to the following parts are attached in addition to the main unit: q Operating instructions 1 w Warranty (for North America model only 1 e Service station list 1 r Remote control unit (RC-1048 1 t R6P/AA batteries 2 y AM loop antenna 1 u FM indoor antenna 1 i Setup microphone (DM-S205) (Approx. 23-5/8 ft / 6...Setup 46 Setting the Distance 46, 47 Setting the Crossover Frequency 47 Setting the Test Tone 47 Operating the remote control unit Operating DENON audio components 48 Setting the preset memory function 48 Operating a component stored in a safe place. Check once...

Owners Manual - English
Page 6
... in the proper direction, following products: q DENON component products w Component products other than DENON: • Set using the preset memory function ( page 48). • Point the remote control unit at the remote sensor when operating it. • The remote control unit can also be used from a distance... inside of the battery compartment and insert new batteries. • Remove the batteries from the remote if it for long periods. Note In addition to controlling the AVR-1707, the attached remote control unit (RC-1048) can be used to control the following the "" marks in the...
... in the proper direction, following products: q DENON component products w Component products other than DENON: • Set using the preset memory function ( page 48). • Point the remote control unit at the remote sensor when operating it. • The remote control unit can also be used from a distance... inside of the battery compartment and insert new batteries. • Remove the batteries from the remote if it for long periods. Note In addition to controlling the AVR-1707, the attached remote control unit (RC-1048) can be used to control the following the "" marks in the...
Owners Manual - English
Page 7
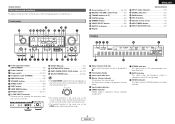
... in parentheses ( ). u STEREO indicator This lights when an FM stereo broadcast has been received. Getting Started Part names and functions For details on the remote control unit. • The control functions in the same way as the Cursor F button...) • The SELECT/ENTER knob on the main unit operates in Power Amplifier Assignment. o TUNED indicator This lights when an FM/AM broadcast has been received. 4 ENGLISH w Information display e Input signal indicators r Master volume indicator This displays the volume level. Front panel @4 @0 !8 #0 @9 @8 @7 @6 @5 @3 @2 @1 !9 !7 ...
... in parentheses ( ). u STEREO indicator This lights when an FM stereo broadcast has been received. Getting Started Part names and functions For details on the remote control unit. • The control functions in the same way as the Cursor F button...) • The SELECT/ENTER knob on the main unit operates in Power Amplifier Assignment. o TUNED indicator This lights when an FM/AM broadcast has been received. 4 ENGLISH w Information display e Input signal indicators r Master volume indicator This displays the volume level. Front panel @4 @0 !8 #0 @9 @8 @7 @6 @5 @3 @2 @1 !9 !7 ...
Owners Manual - English
Page 8
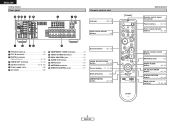
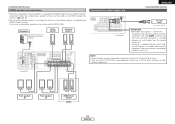
...COMPONENT VIDEO terminals 9) o VIDEO/S-VIDEO terminals 9) !0 DOCK CONTROL jack 17) !1 AUDIO IN terminals 9) !2 XM terminal 16) !3 ANTENNA terminals 16) !4 REMOTE CONTROL jacks 17) System buttons 50, 51) VIDEO SELECT/SETUP button 33, 50) Cursor buttons ···(11, 22, 50) DISPLAY button 50) DIMMER.../MENU button 20, 50) [ Front ] Getting Started Remote control signal transmitter 3) Power buttons 10, 50) Tuner system/System buttons 31, 32) Master volume control buttons 19) MUTING button 20) ...
...COMPONENT VIDEO terminals 9) o VIDEO/S-VIDEO terminals 9) !0 DOCK CONTROL jack 17) !1 AUDIO IN terminals 9) !2 XM terminal 16) !3 ANTENNA terminals 16) !4 REMOTE CONTROL jacks 17) System buttons 50, 51) VIDEO SELECT/SETUP button 33, 50) Cursor buttons ···(11, 22, 50) DISPLAY button 50) DIMMER.../MENU button 20, 50) [ Front ] Getting Started Remote control signal transmitter 3) Power buttons 10, 50) Tuner system/System buttons 31, 32) Master volume control buttons 19) MUTING button 20) ...

Owners Manual - English
Page 13
... properly if there are no obstacles. q Connecting a microphone 1 Connect the attached setup microphone to . 2 Turn on the main unit and remote control unit • Auto Setup mode is not displayed when using headphones. Be sure to turn this explanation < > : Buttons on the ...F G [ON/SOURCE] [MODE SELECTOR 1] D H F G ENGLISH Easy Setup Procedure Auto Setup w Before performing the Auto Setup procedure The AVR-1707's auto setup use the attached microphone to measure the acoustic properties in the room and automatically make the optimum settings. • To make the sound...
... properly if there are no obstacles. q Connecting a microphone 1 Connect the attached setup microphone to . 2 Turn on the main unit and remote control unit • Auto Setup mode is not displayed when using headphones. Be sure to turn this explanation < > : Buttons on the ...F G [ON/SOURCE] [MODE SELECTOR 1] D H F G ENGLISH Easy Setup Procedure Auto Setup w Before performing the Auto Setup procedure The AVR-1707's auto setup use the attached microphone to measure the acoustic properties in the room and automatically make the optimum settings. • To make the sound...
Owners Manual - English
Page 20
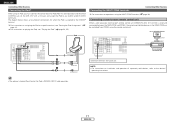
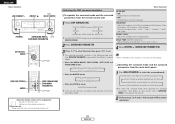
...Connecting the MULTI ZONE terminals For instructions on assigning the iPod to the DVD/VDP terminal. Connecting a room-to-room remote control unit When a sold separately room-to-room remote control unit (DENON RC-616, 617 or 618) is assigned to a specific terminal, see "Playing the iPod" ( page 34, ... connect the Control Dock for iPod (ASD-1R, sold separately) and the DOCK CONTROL jack on the AVR-1707 with a mini-jack and assign the iPod to the devices' S-VIDEO OUT operating instructions. • The optional standard Dock Control for iPod is DENON ASD-1R sold separately. 17 ENGLISH
...Connecting the MULTI ZONE terminals For instructions on assigning the iPod to the DVD/VDP terminal. Connecting a room-to-room remote control unit When a sold separately room-to-room remote control unit (DENON RC-616, 617 or 618) is assigned to a specific terminal, see "Playing the iPod" ( page 34, ... connect the Control Dock for iPod (ASD-1R, sold separately) and the DOCK CONTROL jack on the AVR-1707 with a mini-jack and assign the iPod to the devices' S-VIDEO OUT operating instructions. • The optional standard Dock Control for iPod is DENON ASD-1R sold separately. 17 ENGLISH
Owners Manual - English
Page 21
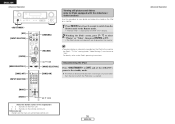
NOTE: • Insert the plugs securely. Incomplete connections will result in amplifier. No power is supplied from the remote control unit. Never connect equipment whose total power consumption exceeds 120 W (1A.). Never use the AC OUTLETS for hair driers, monitors or other electrical appliances. (L) (R) >< ...
NOTE: • Insert the plugs securely. Incomplete connections will result in amplifier. No power is supplied from the remote control unit. Never connect equipment whose total power consumption exceeds 120 W (1A.). Never use the AC OUTLETS for hair driers, monitors or other electrical appliances. (L) (R) >< ...
Owners Manual - English
Page 22
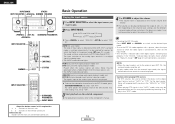
... level in this explanation < > : Buttons on the main unit [ ] : Buttons on the remote control unit Button name only : Buttons on the selected component. For some players the playback level of input signal is detected and the AVR-1707's surround mode is set . • In play in the "ANALOG" or "PCM" mode. ...set to the various input terminals are correct. IN mode: Press INPUT MODE or to switch to "ON". 3 Start playback on the main unit and remote control unit 19 ENGLISH NOTE: • When the input mode is set to the desired input mode. • To use the EXT. Cautions when...
... level in this explanation < > : Buttons on the main unit [ ] : Buttons on the remote control unit Button name only : Buttons on the selected component. For some players the playback level of input signal is detected and the AVR-1707's surround mode is set . • In play in the "ANALOG" or "PCM" mode. ...set to the various input terminals are correct. IN mode: Press INPUT MODE or to switch to "ON". 3 Start playback on the main unit and remote control unit 19 ENGLISH NOTE: • When the input mode is set to the desired input mode. • To use the EXT. Cautions when...

Owners Manual - English
Page 24
...explanation < > : Buttons on the main unit [ ] : Buttons on the remote control unit Button name only : Buttons on the main unit and remote control unit Basic Operation Selecting the play mode (DIRECT/STEREO) The AVR-1707 is equipped with an asterisk (*) cannot be used when the surround back speaker ... of the low frequencies in function of the speaker configuration, select the DIRECT mode to adjust the tone and achieve the desired sound. DENON Original Surround Modes ( page 28, 29) • Select these for playing 6.1- DIRECT STEREO ¢ STEREO mode Use this surround mode...
...explanation < > : Buttons on the main unit [ ] : Buttons on the remote control unit Button name only : Buttons on the main unit and remote control unit Basic Operation Selecting the play mode (DIRECT/STEREO) The AVR-1707 is equipped with an asterisk (*) cannot be used when the surround back speaker ... of the low frequencies in function of the speaker configuration, select the DIRECT mode to adjust the tone and achieve the desired sound. DENON Original Surround Modes ( page 28, 29) • Select these for playing 6.1- DIRECT STEREO ¢ STEREO mode Use this surround mode...
Owners Manual - English
Page 26
... compatible with conventional Dolby Pro Logic sources. Because of this explanation < > : Buttons on the main unit [ ] : Buttons on the remote control unit Button name only : Buttons on the main unit and remote control unit Selecting the Dolby Pro Logic IIx (Pro Logic II) mode It is possible to set. ENGLISH Basic Operation...
... compatible with conventional Dolby Pro Logic sources. Because of this explanation < > : Buttons on the main unit [ ] : Buttons on the remote control unit Button name only : Buttons on the main unit and remote control unit Selecting the Dolby Pro Logic IIx (Pro Logic II) mode It is possible to set. ENGLISH Basic Operation...
Owners Manual - English
Page 32
...F G About the button names in this explanation < > : Buttons on the main unit [ ] : Buttons on the remote control unit Button name only : Buttons on the main unit and remote control unit Selecting the DSP surround simulation ¢ To operate the surround mode and the surround parameters from the main...• Select "DEFAULT Y/N" and press F to reset all the settings. ¢ Operating the surround mode and the surround parameters from the remote control unit 1 Press [DSP SIMULATION]. 5CH/7CH STEREO MONO MOVIE VIRTUAL ROCK ARENA MATRIX VIDEO GAME JAZZ CLUB The 5CH/7CH STEREO mode can...
...F G About the button names in this explanation < > : Buttons on the main unit [ ] : Buttons on the remote control unit Button name only : Buttons on the main unit and remote control unit Selecting the DSP surround simulation ¢ To operate the surround mode and the surround parameters from the main...• Select "DEFAULT Y/N" and press F to reset all the settings. ¢ Operating the surround mode and the surround parameters from the remote control unit 1 Press [DSP SIMULATION]. 5CH/7CH STEREO MONO MOVIE VIRTUAL ROCK ARENA MATRIX VIDEO GAME JAZZ CLUB The 5CH/7CH STEREO mode can...
Owners Manual - English
Page 33
..., 90.1 / 90.1 MHz 90.1 MHz 90.1 MHz 90.1 MHz 90.1 MHz 90.1 MHz 30 ENGLISH When the first FM broadcast station is found, that the remote control unit is completed. 1 ROOM SIZE MED 2 TONE DEF. ON 3 TONE DEF.
..., 90.1 / 90.1 MHz 90.1 MHz 90.1 MHz 90.1 MHz 90.1 MHz 90.1 MHz 30 ENGLISH When the first FM broadcast station is found, that the remote control unit is completed. 1 ROOM SIZE MED 2 TONE DEF. ON 3 TONE DEF.
Owners Manual - English
Page 34
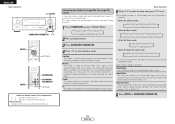
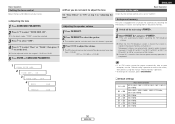
...again. • Store the station in this explanation < > : Buttons on the main unit [ ] : Buttons on the remote control unit Button name only : Buttons on the main unit and remote control unit Auto tuning Preset memory Basic Operation 1 1 Use to select "TUNER" or press [TUNER]. The frequency changes continuously ...select the memory block. 2 Press CHANNEL to select the desired preset channel. • When the manual tuning mode is set, FM stereo broadcasts are received in the memory. 2 Press BAND to select "AM", "FM" or "XM". When listening to the XM Satellite Radio ( page 32). 3...
...again. • Store the station in this explanation < > : Buttons on the main unit [ ] : Buttons on the remote control unit Button name only : Buttons on the main unit and remote control unit Auto tuning Preset memory Basic Operation 1 1 Use to select "TUNER" or press [TUNER]. The frequency changes continuously ...select the memory block. 2 Press CHANNEL to select the desired preset channel. • When the manual tuning mode is set, FM stereo broadcasts are received in the memory. 2 Press BAND to select "AM", "FM" or "XM". When listening to the XM Satellite Radio ( page 32). 3...
Owners Manual - English
Page 36
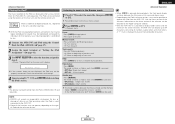
... each surround mode. 2 Press until the desired image appears on the main unit and remote control unit Advanced Operation Night mode The night mode can not be set when playing Dolby Digital sources. User mode function The AVR-1707 is displayed. 33 ENGLISH ENGLISH INPUT SELECTOR VIDEO SELECT STATUS INPUT SELECTOR ENTER VIDEO...
... each surround mode. 2 Press until the desired image appears on the main unit and remote control unit Advanced Operation Night mode The night mode can not be set when playing Dolby Digital sources. User mode function The AVR-1707 is displayed. 33 ENGLISH ENGLISH INPUT SELECTOR VIDEO SELECT STATUS INPUT SELECTOR ENTER VIDEO...
Owners Manual - English
Page 37
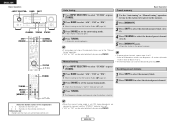
...and other countries. 1 Press [D H] to 64 characters, consisting of previous track • H: Move to operate the iPod from the AVR-1707. Remote iPod If the screens above are not displayed, the iPod may not operate, depending on the type of data on the main unit's ... Repeat play : Press [MEMORY]. The iPod can be properly connected. iPod is DENON ASD-1R sold separately). Press again to the AVR-1707. • Some of the software can be used connected to resume. NOTE: • DENON will accept no responsibility whatsoever for iPod is a trademark of the software.
...and other countries. 1 Press [D H] to 64 characters, consisting of previous track • H: Move to operate the iPod from the AVR-1707. Remote iPod If the screens above are not displayed, the iPod may not operate, depending on the type of data on the main unit's ... Repeat play : Press [MEMORY]. The iPod can be properly connected. iPod is DENON ASD-1R sold separately). Press again to the AVR-1707. • Some of the software can be used connected to resume. NOTE: • DENON will accept no responsibility whatsoever for iPod is a trademark of the software.
Owners Manual - English
Page 38
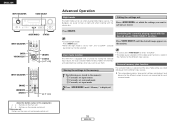
... can be set the AVR-1707's power to the standby mode. ENGLISH Advanced Operation [OFF] [INPUT SELECTOR] [ENTER] [MODE SELECTOR 1] [ZONE2 OFF] [INPUT SELECTOR] [CHANNEL] Viewing still pictures and videos (only for at least 2 seconds to switch from the Browse mode to the Remote mode. • "Remote iPod" is assigned.... [D H F G] [MODE SELECTOR 2] [ZONE2 ON] Disconnecting the iPod Press or [OFF] and set to which the iPod input is displayed on the AVR-1707's display. 2 Watching the iPod's screen, press [D H] to select "Photos" or "Video", then press [ENTER] or [G]. • The iPod's ...
... can be set the AVR-1707's power to the standby mode. ENGLISH Advanced Operation [OFF] [INPUT SELECTOR] [ENTER] [MODE SELECTOR 1] [ZONE2 OFF] [INPUT SELECTOR] [CHANNEL] Viewing still pictures and videos (only for at least 2 seconds to switch from the Browse mode to the Remote mode. • "Remote iPod" is assigned.... [D H F G] [MODE SELECTOR 2] [ZONE2 ON] Disconnecting the iPod Press or [OFF] and set to which the iPod input is displayed on the AVR-1707's display. 2 Watching the iPod's screen, press [D H] to select "Photos" or "Video", then press [ENTER] or [G]. • The iPod's ...


