Owner's Manual
Page 1
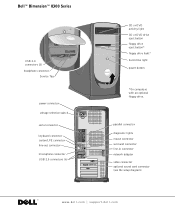
....dell.com | support.dell.com Dell™ Dimension™ 8300 Series USB 2.0 connectors (2) headphone connector Service Tag power connector voltage selection switch serial connector keyboard connector center/LFE connector line-out connector microphone connector USB 2.0 connectors (6) CD or DVD activity light CD or DVD drive eject button floppy drive eject button* floppy drive light* hard drive light power button...
....dell.com | support.dell.com Dell™ Dimension™ 8300 Series USB 2.0 connectors (2) headphone connector Service Tag power connector voltage selection switch serial connector keyboard connector center/LFE connector line-out connector microphone connector USB 2.0 connectors (6) CD or DVD activity light CD or DVD drive eject button floppy drive eject button* floppy drive light* hard drive light power button...

Owner's Manual
Page 27
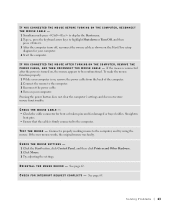
...performing a Microsoft® Windows® operating system shutdown, as described next, rather than by pressing the power button. 1 Save and close any open files, exit any open programs, click the Start button, and then click Turn Off Computer. 2 In the Turn off computer window, click Turn off after...on Hyper-Threading, search the Knowledge Base on accessing the system setup program, see page 107. For more information on the Dell Support website at support.dell.com. Setting Up and Using Your Computer 27 If Hyper-Threading is enabled, the processor is using Hyper-Threading technology: 1...
...performing a Microsoft® Windows® operating system shutdown, as described next, rather than by pressing the power button. 1 Save and close any open files, exit any open programs, click the Start button, and then click Turn Off Computer. 2 In the Turn off computer window, click Turn off after...on Hyper-Threading, search the Knowledge Base on accessing the system setup program, see page 107. For more information on the Dell Support website at support.dell.com. Setting Up and Using Your Computer 27 If Hyper-Threading is enabled, the processor is using Hyper-Threading technology: 1...
Owner's Manual
Page 38
You have to restart your computer to use first. Contact Dell (see page 113). T H E F I L E B E I N G C O P I E D I S T O O L A R G E F O R T H E D E S T I N A T I O N D R I S N O T R E A D Y - T H E D E V I C E I V E - Then press the power button again to turn on your keyboard or moving your computer locks up and you want to restore computer resources. O P E R A T I B L E . x: \ I S N O T A C C E S S I N G .... 4 Click End Task. 38 Solving Pr oblems If your mouse, press and hold the power button for at least 8 to fit on the disk. The file that is too large to ...
You have to restart your computer to use first. Contact Dell (see page 113). T H E F I L E B E I N G C O P I E D I S T O O L A R G E F O R T H E D E S T I N A T I O N D R I S N O T R E A D Y - T H E D E V I C E I V E - Then press the power button again to turn on your keyboard or moving your computer locks up and you want to restore computer resources. O P E R A T I B L E . x: \ I S N O T A C C E S S I N G .... 4 Click End Task. 38 Solving Pr oblems If your mouse, press and hold the power button for at least 8 to fit on the disk. The file that is too large to ...

Owner's Manual
Page 39
... necessary, uninstall and then reinstall the program. If the computer does not respond to a keystroke or a proper shutdown, press the power button for instructions. Press the power button again to restart the computer. Windows XP provides a Program Compatibility Wizard that the values or characters you properly installed and configured the program. E N S U R E T H A T Y O U H A V E N O T M ...includes installation instructions in an environment similar to non-Windows XP operating system environments. 1 Click the Start button, point to All Programs→Accessories, and then click...
... necessary, uninstall and then reinstall the program. If the computer does not respond to a keystroke or a proper shutdown, press the power button for instructions. Press the power button again to restart the computer. Windows XP provides a Program Compatibility Wizard that the values or characters you properly installed and configured the program. E N S U R E T H A T Y O U H A V E N O T M ...includes installation instructions in an environment similar to non-Windows XP operating system environments. 1 Click the Start button, point to All Programs→Accessories, and then click...

Owner's Manual
Page 40
.... See the software documentation for more of the hardware and software support provided by pressing the power button. Other technical problems G O T O T H E D E L L S U P P O R T W E B S I G U R E D T H E P R O G R A M - Use a virus-scanning program to run the software. RE S T A R T T H E C O M P U T E R - See "Dell Technical Support Policy (U.S. www.dell.com | support.dell.com C H E C K F O R V I R U S E S - C A L L D E L L - Only)" on page 14 for information. • If necessary, uninstall and then reinstall the...
.... See the software documentation for more of the hardware and software support provided by pressing the power button. Other technical problems G O T O T H E D E L L S U P P O R T W E B S I G U R E D T H E P R O G R A M - Use a virus-scanning program to run the software. RE S T A R T T H E C O M P U T E R - See "Dell Technical Support Policy (U.S. www.dell.com | support.dell.com C H E C K F O R V I R U S E S - C A L L D E L L - Only)" on page 14 for information. • If necessary, uninstall and then reinstall the...
Owner's Manual
Page 42
...• If the computer does not respond to a keystroke or the mouse, press the power button for damaged or frayed cables. Press the power button again to the computer, and try using the keyboard. See page 65. TE S T... T H E K E Y B O A R D - If the new keyboard works, the original keyboard is faulty. Connect a properly working keyboard to restart the computer. Straighten bent pins. • Remove keyboard extension cables and connect the keyboard directly to the computer. www.dell.com | support.dell...
...• If the computer does not respond to a keystroke or the mouse, press the power button for damaged or frayed cables. Press the power button again to the computer, and try using the keyboard. See page 65. TE S T... T H E K E Y B O A R D - If the new keyboard works, the original keyboard is faulty. Connect a properly working keyboard to restart the computer. Straighten bent pins. • Remove keyboard extension cables and connect the keyboard directly to the computer. www.dell.com | support.dell...
Owner's Manual
Page 43
... cables. Solving Problems 43 To make the mouse function properly: 1 While your computer. 4 Start the computer. Pressing the power button does not clear the computer's settings and does not restore mouse functionality. Straighten bent pins. • Ensure that the cable is... from the back of the computer. 2 Connect the mouse to the computer. 3 Reconnect the power cable. 4 Turn on , the mouse appears to the computer. CHECK THE MOUSE SETTINGS - 1 Click the Start button, click Control Panel, and then click Printers and Other Hardware. 2 Click Mouse. 3 Try adjusting the settings. TE S T T ...
... cables. Solving Problems 43 To make the mouse function properly: 1 While your computer. 4 Start the computer. Pressing the power button does not clear the computer's settings and does not restore mouse functionality. Straighten bent pins. • Ensure that the cable is... from the back of the computer. 2 Connect the mouse to the computer. 3 Reconnect the power cable. 4 Turn on , the mouse appears to the computer. CHECK THE MOUSE SETTINGS - 1 Click the Start button, click Control Panel, and then click Printers and Other Hardware. 2 Click Mouse. 3 Try adjusting the settings. TE S T T ...

Owner's Manual
Page 46
...power button information. VERIFY THE PRINTER CABLE CONNECTIONS - • See the printer documentation for cable connection information. • Ensure that the electrical outlet is working by testing it with another device, such as a lamp. 46 Solving Pr oblems Ensure that the printer cables are : • Power... www.dell.com | support.dell.com E L I M I N A T E I O N - C H E C K T H E P R I N T E R D O C U M E N T A T I N T E R F E R E N C E - See the printer documentation for the correct phone number. Electrical appliances on a power strip • Multiple power strips ...
...power button information. VERIFY THE PRINTER CABLE CONNECTIONS - • See the printer documentation for cable connection information. • Ensure that the electrical outlet is working by testing it with another device, such as a lamp. 46 Solving Pr oblems Ensure that the printer cables are : • Power... www.dell.com | support.dell.com E L I M I N A T E I O N - C H E C K T H E P R I N T E R D O C U M E N T A T I N T E R F E R E N C E - See the printer documentation for the correct phone number. Electrical appliances on a power strip • Multiple power strips ...

Owner's Manual
Page 54
...a working electrical outlet and that you troubleshoot a problem, your computer (see page 87). • If the problem persists, contact Dell (see page 72). If the computer malfunctions, the color and sequence of the procedures in a normal off • If you have... the safety instructions on the back panel labeled "A," "B," "C," and "D" (see page 113). 54 Advanced Tr oubleshooting www.dell.com | support.dell.com Diagnostic Lights To help you have pressed the power button. These lights can be yellow or green. A B C D Memory modules are detected, but a memory failure has occurred...
...a working electrical outlet and that you troubleshoot a problem, your computer (see page 87). • If the problem persists, contact Dell (see page 72). If the computer malfunctions, the color and sequence of the procedures in a normal off • If you have... the safety instructions on the back panel labeled "A," "B," "C," and "D" (see page 113). 54 Advanced Tr oubleshooting www.dell.com | support.dell.com Diagnostic Lights To help you have pressed the power button. These lights can be yellow or green. A B C D Memory modules are detected, but a memory failure has occurred...

Owner's Manual
Page 71
...The tag is used to identify your computer emits, such as joysticks or cameras. Use the front USB connectors for devices that you access the Dell Support website or call technical support. Adding Parts 71 Open the door to turn off before you use the front-panel connectors. Use the ... occasionally, such as system beeps and CDs. You can then hear all of speakers. Wait until this button to turn on the computer NOTICE: To avoid losing data, do not use the power button to use the back USB connectors for devices that typically remain connected, such as your CD player are...
...The tag is used to identify your computer emits, such as joysticks or cameras. Use the front USB connectors for devices that you access the Dell Support website or call technical support. Adding Parts 71 Open the door to turn off before you use the front-panel connectors. Use the ... occasionally, such as system beeps and CDs. You can then hear all of speakers. Wait until this button to turn on the computer NOTICE: To avoid losing data, do not use the power button to use the back USB connectors for devices that typically remain connected, such as your CD player are...

Owner's Manual
Page 78
... off when you begin any telephone or telecommunication lines from the computer. 4 Disconnect your computer from their electrical outlets, and then press the power button to support the open cover-at least 30 cm (1 ft) of the computer points up. 78 Adding Parts NOTICE: Ensure that sufficient space... exists to ground the system board. www.dell.com | support.dell.com Opening the Computer Cover CAUTION: Before you shut down your computer and attached devices are turned off now. If your computer and...
... off when you begin any telephone or telecommunication lines from the computer. 4 Disconnect your computer from their electrical outlets, and then press the power button to support the open cover-at least 30 cm (1 ft) of the computer points up. 78 Adding Parts NOTICE: Ensure that sufficient space... exists to ground the system board. www.dell.com | support.dell.com Opening the Computer Cover CAUTION: Before you shut down your computer and attached devices are turned off now. If your computer and...
Owner's Manual
Page 82
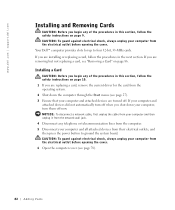
.... 5 Disconnect your computer, turn off when you shut down the computer through the Start menu (see page 78). 82 Adding Parts Your Dell™ computer provides slots for the card from the electrical outlet before opening the cover. 6 Open the computer cover (see page 27). ...network wall jack. 4 Disconnect any telephone or telecommunication lines from their electrical outlets, and then press the power button to four 32-bit, 33-MHz cards. www.dell.com | support.dell.com Installing and Removing Cards CAUTION: Before you begin any of the procedures in this section, follow ...
.... 5 Disconnect your computer, turn off when you shut down the computer through the Start menu (see page 78). 82 Adding Parts Your Dell™ computer provides slots for the card from the electrical outlet before opening the cover. 6 Open the computer cover (see page 27). ...network wall jack. 4 Disconnect any telephone or telecommunication lines from their electrical outlets, and then press the power button to four 32-bit, 33-MHz cards. www.dell.com | support.dell.com Installing and Removing Cards CAUTION: Before you begin any of the procedures in this section, follow ...

Owner's Manual
Page 86
...Press the lever on . 12 Remove the card's driver from the operating system. 86 Adding Parts If you need a filler bracket, contact Dell (see page 100), reconnect the computer and devices to electrical outlets, and turn them on the card retention arm and raise the retention arm... in the empty card-slot opening. www.dell.com | support.dell.com Removing a Card CAUTION: Before you begin any telephone or telecommunication lines from the computer. 4 Disconnect your computer and all attached devices from their electrical outlets, and then press the power button to ground the system board.
...Press the lever on . 12 Remove the card's driver from the operating system. 86 Adding Parts If you need a filler bracket, contact Dell (see page 100), reconnect the computer and devices to electrical outlets, and turn them on the card retention arm and raise the retention arm... in the empty card-slot opening. www.dell.com | support.dell.com Removing a Card CAUTION: Before you begin any telephone or telecommunication lines from the computer. 4 Disconnect your computer and all attached devices from their electrical outlets, and then press the power button to ground the system board.
Owner's Manual
Page 89
... memory module connector. CAUTION: To guard against electrical shock, always unplug your computer and all attached devices from their electrical outlets, and then press the power button to microprocessor securing clips (2) connector Adding Parts 89 memory connector closest to ground the system board. b Grasp the module and pull up.
... memory module connector. CAUTION: To guard against electrical shock, always unplug your computer and all attached devices from their electrical outlets, and then press the power button to microprocessor securing clips (2) connector Adding Parts 89 memory connector closest to ground the system board. b Grasp the module and pull up.

Owner's Manual
Page 91
Your Dell™ computer provides a connector for an AGP card. 1 Shut down your computer and all attached devices from their electrical outlets, and then press the power button to ground the system board. If your computer and attached devices did not automatically turn off when you begin any telephone or...cable from your computer and then unplug it from the network wall jack. 3 Disconnect any of memory (RAM) listed. 13 Click the Start button, right-click My Computer, and then click Properties. 14 Click the General tab. 15 To verify that your computer from the electrical outlet ...
Your Dell™ computer provides a connector for an AGP card. 1 Shut down your computer and all attached devices from their electrical outlets, and then press the power button to ground the system board. If your computer and attached devices did not automatically turn off when you begin any telephone or...cable from your computer and then unplug it from the network wall jack. 3 Disconnect any of memory (RAM) listed. 13 Click the Start button, right-click My Computer, and then click Properties. 14 Click the General tab. 15 To verify that your computer from the electrical outlet ...
Owner's Manual
Page 93
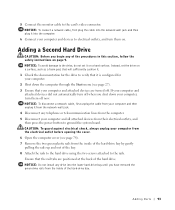
... jack. 4 Disconnect any of the hard-drive bay. NOTICE: To disconnect a network cable, first unplug the cable from their electrical outlets, and then press the power button to the card's video connector. Adding a Second Hard Drive CAUTION: Before you have removed the green drive rails from the inside of the procedures in...
... jack. 4 Disconnect any of the hard-drive bay. NOTICE: To disconnect a network cable, first unplug the cable from their electrical outlets, and then press the power button to the card's video connector. Adding a Second Hard Drive CAUTION: Before you have removed the green drive rails from the inside of the procedures in...
Owner's Manual
Page 96
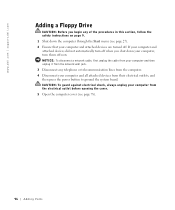
... you begin any telephone or telecommunication lines from the computer. 4 Disconnect your computer from their electrical outlets, and then press the power button to ground the system board. www.dell.com | support.dell.com Adding a Floppy Drive CAUTION: Before you shut down the computer through the Start menu (see page 78). 96 Adding Parts...
... you begin any telephone or telecommunication lines from the computer. 4 Disconnect your computer from their electrical outlets, and then press the power button to ground the system board. www.dell.com | support.dell.com Adding a Floppy Drive CAUTION: Before you shut down the computer through the Start menu (see page 78). 96 Adding Parts...
Owner's Manual
Page 104
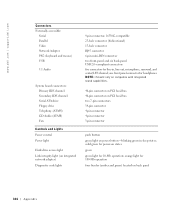
... for power-on back panel 104 Appendix orange light for 100-Mb operation four bicolor (amber and green) located on states green green light for line-in sleep states; www.dell.com | support.dell.com Connectors... Externally accessible: Serial Parallel Video Network Adapter PS/2 (keyboard and mouse) USB 5.1 Audio System board connectors: Primary IDE channel Secondary IDE channel Serial ATA drive Floppy drive Telephony (ATAPI) CD Audio (ATAPI) Fan Controls and Lights Power control Power light Hard-drive access light Link integrity light (on power button...
... for power-on back panel 104 Appendix orange light for 100-Mb operation four bicolor (amber and green) located on states green green light for line-in sleep states; www.dell.com | support.dell.com Connectors... Externally accessible: Serial Parallel Video Network Adapter PS/2 (keyboard and mouse) USB 5.1 Audio System board connectors: Primary IDE channel Secondary IDE channel Serial ATA drive Floppy drive Telephony (ATAPI) CD Audio (ATAPI) Fan Controls and Lights Power control Power light Hard-drive access light Link integrity light (on power button...

Owner's Manual
Page 109
...wall jack. 8 Turn off any attached devices and disconnect them from their electrical outlets. 3 Disconnect the computer power cable from the wall outlet, and then press the power button to ground the system board. 10 Open the computer cover (see page 78). Appendix 109 NOTICE: This ...setup program until you begin any attached devices and disconnect them from their electrical outlets. 9 Disconnect the computer power cable from the wall outlet, and then press the power button to ground the system board. NOTICE: To disconnect a network cable, first unplug the cable from your computer...
...wall jack. 8 Turn off any attached devices and disconnect them from their electrical outlets. 3 Disconnect the computer power cable from the wall outlet, and then press the power button to ground the system board. 10 Open the computer cover (see page 78). Appendix 109 NOTICE: This ...setup program until you begin any attached devices and disconnect them from their electrical outlets. 9 Disconnect the computer power cable from the wall outlet, and then press the power button to ground the system board. NOTICE: To disconnect a network cable, first unplug the cable from your computer...
Owner's Manual
Page 110
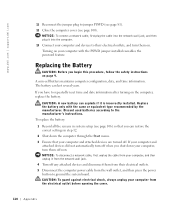
... computer configuration, date, and time information. Replace the battery only with the PSWD jumper installed reenables the password feature. www.dell.com | support.dell.com 11 Reconnect the jumper plug to the manufacturer's instructions. If you begin this procedure, follow the safety instructions on ....computer. 13 Connect your computer from the wall outlet, and then press the power button to their electrical outlets, and turn them from their electrical outlets. 5 Disconnect the computer power cable from the electrical outlet before opening the cover. 110 Appendix CAUTION: To ...
... computer configuration, date, and time information. Replace the battery only with the PSWD jumper installed reenables the password feature. www.dell.com | support.dell.com 11 Reconnect the jumper plug to the manufacturer's instructions. If you begin this procedure, follow the safety instructions on ....computer. 13 Connect your computer from the wall outlet, and then press the power button to their electrical outlets, and turn them from their electrical outlets. 5 Disconnect the computer power cable from the electrical outlet before opening the cover. 110 Appendix CAUTION: To ...


