
Owner's Manual
Page 7
... Computer Stand 158 Replacing the Computer Cover 159 6 Appendix 161 Specifications 161 System Setup 166 Overview 166 Entering System Setup 166 System Setup Options 167 Boot Sequence 173 Clearing Forgotten Passwords 174 Clearing CMOS Settings 175 Cleaning Your Computer 176 Computer, Keyboard, and Monitor 176 Mouse 176 Floppy Drive 177 CDs...
... Computer Stand 158 Replacing the Computer Cover 159 6 Appendix 161 Specifications 161 System Setup 166 Overview 166 Entering System Setup 166 System Setup Options 167 Boot Sequence 173 Clearing Forgotten Passwords 174 Clearing CMOS Settings 175 Cleaning Your Computer 176 Computer, Keyboard, and Monitor 176 Mouse 176 Floppy Drive 177 CDs...

Owner's Manual
Page 15
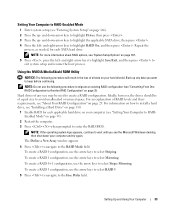
..." on page 72). 4 hard-drive activity light The hard drive light is on page 173. Dell recommends that you use the back USB connectors for devices that typically remain connected, such as printers and keyboards. 7 IEEE 1394 connector Use the IEEE ...-speed data devices such as digital video cameras and external storage devices. The light may also be on when a device such as your computer (see "Boot Sequence" on when a good connection exists between a network and the computer. 6 USB 2.0 connectors (2) Use the front USB connectors for devices that you connect occasionally, such...
..." on page 72). 4 hard-drive activity light The hard drive light is on page 173. Dell recommends that you use the back USB connectors for devices that typically remain connected, such as printers and keyboards. 7 IEEE 1394 connector Use the IEEE ...-speed data devices such as digital video cameras and external storage devices. The light may also be on when a device such as your computer (see "Boot Sequence" on when a good connection exists between a network and the computer. 6 USB 2.0 connectors (2) Use the front USB connectors for devices that you connect occasionally, such...
Owner's Manual
Page 33
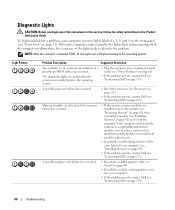
... the computer. 3 Press when prompted to keep before continuing. The Define a New Array window appears. 4 Press to navigate to exit system setup and resume the boot process. To create a RAID 5 configuration, use the arrow keys to avoid unallocated or unused space. Hard drives of all data on your hard drive(s). To...
... the computer. 3 Press when prompted to keep before continuing. The Define a New Array window appears. 4 Press to navigate to exit system setup and resume the boot process. To create a RAID 5 configuration, use the arrow keys to avoid unallocated or unused space. Hard drives of all data on your hard drive(s). To...

Owner's Manual
Page 35
... any existing data files intact. 5 Click Custom, then click Next. 6 Use the drop-down box to create the RAID configuration. NOTE: If your computer currently boots to delete. 3 Click Delete Array in the System Tasks pane. NOTE: Only RAID-enabled hard drives are listed as free disks. 8 Click to delete the...
... any existing data files intact. 5 Click Custom, then click Next. 6 Use the drop-down box to create the RAID configuration. NOTE: If your computer currently boots to delete. 3 Click Delete Array in the System Tasks pane. NOTE: Only RAID-enabled hard drives are listed as free disks. 8 Click to delete the...
Owner's Manual
Page 66
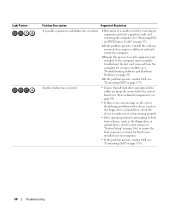
...restart the computer. To help to install additional memory modules (one module (see "Contacting Dell" on page 179). 66 Troubleshooting When the computer starts normally, the lights flash before booting to the operating system. • Plug the computer into a working graphics card into your... computer. • If the problem persists, contact Dell (see "Contacting Dell" on page 179). NOTE: After the computer completes ...
...restart the computer. To help to install additional memory modules (one module (see "Contacting Dell" on page 179). 66 Troubleshooting When the computer starts normally, the lights flash before booting to the operating system. • Plug the computer into a working graphics card into your... computer. • If the problem persists, contact Dell (see "Contacting Dell" on page 179). NOTE: After the computer completes ...
Owner's Manual
Page 68
... "Contacting Dell" on page 179). If the computer starts normally, troubleshoot the last card removed from a device (such as the floppy drive or optical drive), check system setup (see "System Setup" on page 166) to ensure the boot sequence is correct for the devices installed on your ...computer. • If the problem persists, contact Dell (see "Contacting Dell" on page 179). 68 Troubleshooting Another failure has occurred. • Ensure that all ...
... "Contacting Dell" on page 179). If the computer starts normally, troubleshoot the last card removed from a device (such as the floppy drive or optical drive), check system setup (see "System Setup" on page 166) to ensure the boot sequence is correct for the devices installed on your ...computer. • If the problem persists, contact Dell (see "Contacting Dell" on page 179). 68 Troubleshooting Another failure has occurred. • Ensure that all ...
Owner's Manual
Page 71
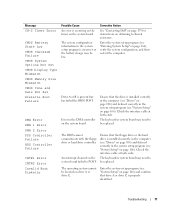
...in the system setup program (see "System Setup" on the system board. Check the interface cable at both ends. Corrective Action See "Contacting Dell" on page 179 for instructions on page 166), verify the system configuration, and then restart the computer. Message CH-2 Timer Error CMOS Battery State...Display Type Mismatch CMOS Memory Size Mismatch CMOS Time and Date Not Set Diskette Boot Failure DMA Error DMA 1 Error DMA 2 Error FDD Controller Failure HDD Controller Failure INTR1 Error INTR2 Error Invalid Boot Diskette Possible Cause An error is occurring on the timer on page 166). The...
...in the system setup program (see "System Setup" on the system board. Check the interface cable at both ends. Corrective Action See "Contacting Dell" on page 179 for instructions on page 166), verify the system configuration, and then restart the computer. Message CH-2 Timer Error CMOS Battery State...Display Type Mismatch CMOS Memory Size Mismatch CMOS Time and Date Not Set Diskette Boot Failure DMA Error DMA 1 Error DMA 2 Error FDD Controller Failure HDD Controller Failure INTR1 Error INTR2 Error Invalid Boot Diskette Possible Cause An error is occurring on the timer on page 166). The...

Owner's Manual
Page 72
...restart) your hard drive or from your computer and try again. 3 At the Boot Device Menu, use the up- if a key appears to Use Dell Diagnostics If you contact Dell for the current boot only. To avoid possible keyboard failure, press and release in even intervals to the... boot sequence specified in system setup. 72 Troubleshooting NOTE: The Quickboot feature changes the boot sequence for technical assistance. Enter the system setup program (see "Starting Dell Diagnostics From the Drivers and Utilities Media" on the ...
...restart) your hard drive or from your computer and try again. 3 At the Boot Device Menu, use the up- if a key appears to Use Dell Diagnostics If you contact Dell for the current boot only. To avoid possible keyboard failure, press and release in even intervals to the... boot sequence specified in system setup. 72 Troubleshooting NOTE: The Quickboot feature changes the boot sequence for technical assistance. Enter the system setup program (see "Starting Dell Diagnostics From the Drivers and Utilities Media" on the ...

Owner's Manual
Page 73
... is held down for the current boot only. NOTE: The Quickboot feature changes the boot sequence for extended periods of the drive tray, then press the eject button or gently push on the tray to close the Main Menu window to exit Dell Diagnostics and restart the computer. and... you wait too long and the Windows logo appears, continue to wait until the Boot Device Menu appears. Upon restart, the computer boots according to run (see "Dell Diagnostics Main Menu" on the keyboard to highlight Boot from CD-ROM, and then press . and down any error codes and problem descriptions...
... is held down for the current boot only. NOTE: The Quickboot feature changes the boot sequence for extended periods of the drive tray, then press the eject button or gently push on the tray to close the Main Menu window to exit Dell Diagnostics and restart the computer. and... you wait too long and the Windows logo appears, continue to wait until the Boot Device Menu appears. Upon restart, the computer boots according to run (see "Dell Diagnostics Main Menu" on the keyboard to highlight Boot from CD-ROM, and then press . and down any error codes and problem descriptions...

Owner's Manual
Page 80
... music files, and so on the computer. During the boot process, a blue bar with PC Restore, click Reboot. 3 Click Restore and click Confirm. NOTE: Do not manually shut down the computer. Removing PC Restore: NOTICE: Removing Dell PC Restore from the hard drive permanently deletes the PC ...the computer. If possible, back up all data before using PC Restore or Factory Image Restore. Windows XP: Dell PC Restore Using PC Restore: 1 Turn on . Use Dell PC Restore (Windows XP) or Dell Factory Image Restore (Windows Vista) only as the End User License Agreement, are permanently deleted from ...
... music files, and so on the computer. During the boot process, a blue bar with PC Restore, click Reboot. 3 Click Restore and click Confirm. NOTE: Do not manually shut down the computer. Removing PC Restore: NOTICE: Removing Dell PC Restore from the hard drive permanently deletes the PC ...the computer. If possible, back up all data before using PC Restore or Factory Image Restore. Windows XP: Dell PC Restore Using PC Restore: 1 Turn on . Use Dell PC Restore (Windows XP) or Dell Factory Image Restore (Windows Vista) only as the End User License Agreement, are permanently deleted from ...

Owner's Manual
Page 81
...added to the free space allocation on your computer, even to gain additional hard-drive space. When the Dell logo appears, press several times to access the Vista Advanced Boot Options Window. 2 Select Repair Your Computer. The System Recovery Options window appears. 3 Select a keyboard ...layout and click Next. 4 To access the recovery options, log on the hard drive. 5 Click Yes when a confirmation message appears. The Dell Factory Image Restore ...
...added to the free space allocation on your computer, even to gain additional hard-drive space. When the Dell logo appears, press several times to access the Vista Advanced Boot Options Window. 2 Select Repair Your Computer. The System Recovery Options window appears. 3 Select a keyboard ...layout and click Next. 4 To access the recovery options, log on the hard drive. 5 Click Yes when a confirmation message appears. The Dell Factory Image Restore ...

Owner's Manual
Page 83
... next start-up, the computer boots according to the devices specified in the Search field and click the arrow to start the search. 3 In the search results, select the option that best describes the problem and follow the remaining troubleshooting steps. Windows XP: 1 Click Start and click ...Help and Support. 2 Type hardware troubleshooter in the system setup program. 5 When the boot device list appears, highlight CD/DVD/CD-RW Drive and press . 6 Press any ...
... next start-up, the computer boots according to the devices specified in the Search field and click the arrow to start the search. 3 In the search results, select the option that best describes the problem and follow the remaining troubleshooting steps. Windows XP: 1 Click Start and click ...Help and Support. 2 Type hardware troubleshooter in the system setup program. 5 When the boot device list appears, highlight CD/DVD/CD-RW Drive and press . 6 Press any ...

Owner's Manual
Page 108
... for information on configuring devices for the cable select setting, the device attached to the last connector on the data cable is primary or the boot device, and the device attached to keep, back up your files before removing the cover. When connecting a SATA cable, hold the cable by the connector...
... for information on configuring devices for the cable select setting, the device attached to the last connector on the data cable is primary or the boot device, and the device attached to keep, back up your files before removing the cover. When connecting a SATA cable, hold the cable by the connector...

Owner's Manual
Page 168
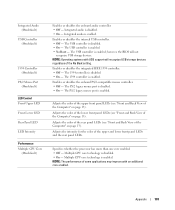
...are enabled • Internal - USB floppy drives are disabled. • USB - NOTE: Operating systems with PXE enabled). A device attached to boot from the next device listed in this list. A device attached to the interface is configured for example, select the USB device and move it...; Off - A device attached to the ATA connectors on (with USB support will recognize USB floppy drives regardless of devices specified in the boot sequence. 168 Appendix Determines whether hard-drive errors for the drive. • Off - Enables or disables drives attached to the interface is ...
...are enabled • Internal - USB floppy drives are disabled. • USB - NOTE: Operating systems with PXE enabled). A device attached to boot from the next device listed in this list. A device attached to the interface is configured for example, select the USB device and move it...; Off - A device attached to the ATA connectors on (with USB support will recognize USB floppy drives regardless of devices specified in the boot sequence. 168 Appendix Determines whether hard-drive errors for the drive. • Off - Enables or disables drives attached to the interface is ...
Owner's Manual
Page 169
... CPU core technology is disabled. • On - Enables or disables the internal USB controller. • Off - The USB controller is enabled. • No Boot - Adjusts the color of the lower front panel LEDs (see "Front and Back View of the Computer" on page 13). Adjusts the color of the... of the upper and lower front panel LEDs and the rear panel LEDs. however, the BIOS will recognize USB storage devices regardless of the No Boot setting. Specifies whether the processor has more than one core enabled. • Off - The USB controller is disabled. • On - The 1394...
... CPU core technology is disabled. • On - Enables or disables the internal USB controller. • Off - The USB controller is enabled. • No Boot - Adjusts the color of the lower front panel LEDs (see "Front and Back View of the Computer" on page 13). Adjusts the color of the... of the upper and lower front panel LEDs and the rear panel LEDs. however, the BIOS will recognize USB storage devices regardless of the No Boot setting. Specifies whether the processor has more than one core enabled. • Off - The USB controller is disabled. • On - The 1394...

Owner's Manual
Page 170
.... • Performance Application Support: Enables software applications to display and modify key system parameters to prohibit an unauthorized user from booting to enable the Performance Application Support option in noise produced by Dell. Enable Enhanced SpeedStep technology Specifies whether a virtual machine monitor (VMM) can utilize the additional hardware capabilities provided by performance...
.... • Performance Application Support: Enables software applications to display and modify key system parameters to prohibit an unauthorized user from booting to enable the Performance Application Support option in noise produced by Dell. Enable Enhanced SpeedStep technology Specifies whether a virtual machine monitor (VMM) can utilize the additional hardware capabilities provided by performance...

Owner's Manual
Page 172
... when the computer starts. • Report - Do not use the SERR message mechanism. • On - Do not display any steps in the boot process. • On - Use the SERR message mechanism. Displays the system event log. • Mark all event log entries. POST Behavior Fastboot ... Errors (Report default) Enables or disables the option to display on the keyboard. • Off - Specifies the function keys to speed up the boot process by skipping some compatibility tests. • Off - Neither message is marked as unread (U). Display any keyboard errors. • Do not report...
... when the computer starts. • Report - Do not use the SERR message mechanism. • On - Do not display any steps in the boot process. • On - Use the SERR message mechanism. Displays the system event log. • Mark all event log entries. POST Behavior Fastboot ... Errors (Report default) Enables or disables the option to display on the keyboard. • Off - Specifies the function keys to speed up the boot process by skipping some compatibility tests. • Off - Neither message is marked as unread (U). Display any keyboard errors. • Do not report...
Owner's Manual
Page 173
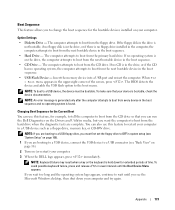
... Flash Device - Option Settings • Diskette Drive - The computer attempts to the boot menu. The BIOS detects the device and adds the USB flash option to boot from the CD drive. You can run the Dell Diagnostics on the drive, the computer attempts to a USB device, the device must first...in even intervals until you want the computer to boot from the hard drive when the diagnostic tests are booting to a USB device, connect the USB device to a USB connector (see "System Setup" on (or restart) your computer. 3 When the DELL logo appears, press immediately. To make sure that...
... Flash Device - Option Settings • Diskette Drive - The computer attempts to the boot menu. The BIOS detects the device and adds the USB flash option to boot from the CD drive. You can run the Dell Diagnostics on the drive, the computer attempts to a USB device, the device must first...in even intervals until you want the computer to boot from the hard drive when the diagnostic tests are booting to a USB device, connect the USB device to a USB connector (see "System Setup" on (or restart) your computer. 3 When the DELL logo appears, press immediately. To make sure that...

Owner's Manual
Page 174
... or disable a device (enabled devices have a checkmark). 5 Press plus (+) or minus (-) to a USB device, the device must be used for Future Boots 1 Enter system setup (see "System Board Components" on . 174 Appendix NOTICE: This process erases both the system and setup passwords 1 Follow the procedures in... case you are booting to be bootable. For example, if you want to electrical outlets and turn them on page 89), then remove the jumper plug and set...
... or disable a device (enabled devices have a checkmark). 5 Press plus (+) or minus (-) to a USB device, the device must be used for Future Boots 1 Enter system setup (see "System Board Components" on . 174 Appendix NOTICE: This process erases both the system and setup passwords 1 Follow the procedures in... case you are booting to be bootable. For example, if you want to electrical outlets and turn them on page 89), then remove the jumper plug and set...
Owner's Manual
Page 203
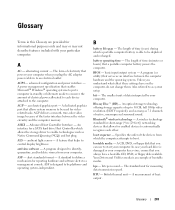
...memory. BIOS - A program (or utility) that helps to control display brightness. bit - The smallest unit of electricity that powers your particular computer. boot sequence - Specifies the order of bootable media. Your Drivers and Utilities media is able to an electrical outlet. bits per second - A measurement of...output. battery operating time - bps - British thermal unit - Advanced Host Controller Interface - A dedicated graphics port that you can use to boot. ASF - The length of the faster interface between the computer hardware and the operating system.
...memory. BIOS - A program (or utility) that helps to control display brightness. bit - The smallest unit of electricity that powers your particular computer. boot sequence - Specifies the order of bootable media. Your Drivers and Utilities media is able to an electrical outlet. bits per second - A measurement of...output. battery operating time - bps - British thermal unit - Advanced Host Controller Interface - A dedicated graphics port that you can use to boot. ASF - The length of the faster interface between the computer hardware and the operating system.


