
Owner's Manual
Page 12
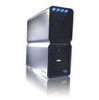
... 3-6 5.25-inch drive bays (4) 7 front panel LEDs (4) 8 CD/DVD drive tray eject button (4) 9 front panel LEDs (4) 10 power button 11 power light 12 computer stand Plug USB and other devices into a power-saving state (see "Power Management" on page 39). 1 front I /O Connectors" on page 15). Press to eject the... stand should be adjusted in a power-saving state. • Steady amber - Multi-colored lights provide illumination for use the power button to place it into the appropriate connectors (see "System Setup" on page 132). NOTE: The power button can be installed at all times ...
... 3-6 5.25-inch drive bays (4) 7 front panel LEDs (4) 8 CD/DVD drive tray eject button (4) 9 front panel LEDs (4) 10 power button 11 power light 12 computer stand Plug USB and other devices into a power-saving state (see "Power Management" on page 39). 1 front I /O Connectors" on page 15). Press to eject the... stand should be adjusted in a power-saving state. • Steady amber - Multi-colored lights provide illumination for use the power button to place it into the appropriate connectors (see "System Setup" on page 132). NOTE: The power button can be installed at all times ...

Owner's Manual
Page 18
... click Turn Off Computer. b In the Turn off computer window, click Turn off the computer and all products plugged into an electrical outlet, power strip, or other receptacle should not exceed 80 percent of the operating system, and then turns off and not in "Connecting a Monitor (With... (blue) connector Connecting a Monitor (Without an Adapter) CAUTION: Before you cannot shut down the computer using the operating system, press and hold the power button for 4 seconds. 20 Setting Up and Using Your Computer NOTE: Ensure that the computer is off . If you perform any of the procedures in...
... click Turn Off Computer. b In the Turn off computer window, click Turn off the computer and all products plugged into an electrical outlet, power strip, or other receptacle should not exceed 80 percent of the operating system, and then turns off and not in "Connecting a Monitor (With... (blue) connector Connecting a Monitor (Without an Adapter) CAUTION: Before you cannot shut down the computer using the operating system, press and hold the power button for 4 seconds. 20 Setting Up and Using Your Computer NOTE: Ensure that the computer is off . If you perform any of the procedures in...
Owner's Manual
Page 19
...monitor with a DVI connector, use the (blue) VGA port on the back of the procedures in this section, follow the safety instructions in a power management mode. NOTE: Ensure that the computer is required. 1 Turn off . 2 Disconnect the computer and all attached devices: a Click Start, ...computer. Connecting a Monitor (With an Adapter) CAUTION: Before you cannot shut down the computer using the operating system, press and hold the power button for 4 seconds. 2 Disconnect the computer and all attached devices from their electrical outlets. 3 Connect the DVI-to-VGA adapter to the...
...monitor with a DVI connector, use the (blue) VGA port on the back of the procedures in this section, follow the safety instructions in a power management mode. NOTE: Ensure that the computer is required. 1 Turn off . 2 Disconnect the computer and all attached devices: a Click Start, ...computer. Connecting a Monitor (With an Adapter) CAUTION: Before you cannot shut down the computer using the operating system, press and hold the power button for 4 seconds. 2 Disconnect the computer and all attached devices from their electrical outlets. 3 Connect the DVI-to-VGA adapter to the...

Owner's Manual
Page 21
... must be disabled. Connecting Two or More Monitors CAUTION: Before you cannot shut down the computer using the operating system, press and hold the power button for 4 seconds. 2 Disconnect the computer and all attached devices: a Click Start, then click Turn Off Computer. primary video card 1 Turn... to the appropriate connector on the computer's primary graphics card: To connect a monitor with a VGA connector, use two or more monitors in a power management mode. To connect a monitor with a DVI connector, use the (white) DVI port on page 25. Setting Up and Using Your Computer...
... must be disabled. Connecting Two or More Monitors CAUTION: Before you cannot shut down the computer using the operating system, press and hold the power button for 4 seconds. 2 Disconnect the computer and all attached devices: a Click Start, then click Turn Off Computer. primary video card 1 Turn... to the appropriate connector on the computer's primary graphics card: To connect a monitor with a VGA connector, use two or more monitors in a power management mode. To connect a monitor with a DVI connector, use the (white) DVI port on page 25. Setting Up and Using Your Computer...

Owner's Manual
Page 22
..., follow the safety instructions in the Product Information Guide. If you cannot shut down the computer using the operating system, press and hold the power button for 4 seconds. 2 Disconnect the computer and all attached devices from their electrical outlets. 3 Connect one end of the computer. The computer...(VGA or DVI) in addition to the TV. If you cannot shut down the computer using the operating system, press and hold the power button for 4 seconds. 2 Disconnect the computer and all attached devices from their electrical outlets. 3 Connect two or more monitors directly to the...
..., follow the safety instructions in the Product Information Guide. If you cannot shut down the computer using the operating system, press and hold the power button for 4 seconds. 2 Disconnect the computer and all attached devices from their electrical outlets. 3 Connect one end of the computer. The computer...(VGA or DVI) in addition to the TV. If you cannot shut down the computer using the operating system, press and hold the power button for 4 seconds. 2 Disconnect the computer and all attached devices from their electrical outlets. 3 Connect two or more monitors directly to the...

Owner's Manual
Page 38
... may take a short time to exit from hibernate mode, press the power button. Hibernate Mode Hibernate mode conserves power by . Power Options Properties Define your hibernate settings on the Power Schemes tab, Advanced tab, and Hibernate tab. 40 Setting Up and ...Power Schemes tab, Advanced tab, and Hibernate tab. To immediately activate standby mode without a period of hibernation. If the computer's hard drive becomes corrupted, Windows XP recreates the hibernate file automatically. To set standby mode to automatically activate after a defined period of the computer memory, Dell...
... may take a short time to exit from hibernate mode, press the power button. Hibernate Mode Hibernate mode conserves power by . Power Options Properties Define your hibernate settings on the Power Schemes tab, Advanced tab, and Hibernate tab. 40 Setting Up and ...Power Schemes tab, Advanced tab, and Hibernate tab. To immediately activate standby mode without a period of hibernation. If the computer's hard drive becomes corrupted, Windows XP recreates the hibernate file automatically. To set standby mode to automatically activate after a defined period of the computer memory, Dell...

Owner's Manual
Page 39
...To program these functions, click an option from the corresponding drop-down menu displays the following schemes: • Always On (default) - For more information on power management options: 1 Click Start, then click Help and Support. 2 In the Help and Support window, click Performance and maintenance. 3 In the Performance and... disks, System stand by, or System hibernates field, and then select a time-out from standby mode or hibernate mode. • Program the power button to select one of time. Hibernate Tab The Hibernate tab allows you use the hibernate settings as defined on the...
...To program these functions, click an option from the corresponding drop-down menu displays the following schemes: • Always On (default) - For more information on power management options: 1 Click Start, then click Help and Support. 2 In the Help and Support window, click Performance and maintenance. 3 In the Performance and... disks, System stand by, or System hibernates field, and then select a time-out from standby mode or hibernate mode. • Program the power button to select one of time. Hibernate Tab The Hibernate tab allows you use the hibernate settings as defined on the...
Owner's Manual
Page 48
... keyboard or moving your computer. 50 Solving Problems The computer does not start up C H E C K T H E D I A G N O S T I C L I G H T S - TE S T T H E K E Y B O A R D - Connect a properly working keyboard to the computer. ENSURE THAT THE POWER CABLE IS FIRMLY CONNECTED TO THE COMPUTER AND TO THE ELECTRICAL OUTLET The computer stops responding NOTICE: You may lose data if you are unable... frayed and check cable connectors for at least 8 to 10 seconds, until the computer turns off, and then restart your mouse, press and hold the power button for bent or broken pins.
... keyboard or moving your computer. 50 Solving Problems The computer does not start up C H E C K T H E D I A G N O S T I C L I G H T S - TE S T T H E K E Y B O A R D - Connect a properly working keyboard to the computer. ENSURE THAT THE POWER CABLE IS FIRMLY CONNECTED TO THE COMPUTER AND TO THE ELECTRICAL OUTLET The computer stops responding NOTICE: You may lose data if you are unable... frayed and check cable connectors for at least 8 to 10 seconds, until the computer turns off, and then restart your mouse, press and hold the power button for bent or broken pins.

Owner's Manual
Page 49
... in an environment similar to non-Windows XP operating system environments. 1 Click Start, point to All Programs→ Accessories, and then click Program Compatibility Wizard. 2 In the welcome screen, click Next. 3 Follow the instructions on your keyboard or moving your mouse, press and hold the power button for an earlier Windows operating system...
... in an environment similar to non-Windows XP operating system environments. 1 Click Start, point to All Programs→ Accessories, and then click Program Compatibility Wizard. 2 In the welcome screen, click Next. 3 Follow the instructions on your keyboard or moving your mouse, press and hold the power button for an earlier Windows operating system...

Owner's Manual
Page 52
... administrator or the person who set to the system board (see "System Board Components" on page 79). 54 Solving Problems I F T H E P O W E R L I G H T I S B L I N K I N G - CAUTION: Before you begin any power strips being used are plugged into an electrical outlet and are turned on page 79). I F T H E P O W E R L I G H T I S G R E E N A N D T H E C O M P U T E R I S N O T R E S P O N D I N G G R E E N - I F T H E P O W E R...mode. Press a key on the keyboard, move the mouse, or press the power button to the system board (see "Controls and Lights" on properly. • Ensure that ...
... administrator or the person who set to the system board (see "System Board Components" on page 79). 54 Solving Problems I F T H E P O W E R L I G H T I S B L I N K I N G - CAUTION: Before you begin any power strips being used are plugged into an electrical outlet and are turned on page 79). I F T H E P O W E R L I G H T I S G R E E N A N D T H E C O M P U T E R I S N O T R E S P O N D I N G G R E E N - I F T H E P O W E R...mode. Press a key on the keyboard, move the mouse, or press the power button to the system board (see "Controls and Lights" on properly. • Ensure that ...

Owner's Manual
Page 56
...diagram for monitor cable connectors to have missing pins.) CHECK THE MONITOR POWER LIGHT - • If the power light is lit or blinking, the monitor has power. • If the power light is off, firmly press the button to the correct graphics card (for instructions on page 61. If you...- • Ensure that the monitor cable is connected to ensure that the monitor cable is blinking, press a key on . • If the power light is connected as a lamp. See "Diagnostic Lights" on adjusting the contrast and brightness, demagnetizing (degaussing) the monitor, and running the monitor self-...
...diagram for monitor cable connectors to have missing pins.) CHECK THE MONITOR POWER LIGHT - • If the power light is lit or blinking, the monitor has power. • If the power light is off, firmly press the button to the correct graphics card (for instructions on page 61. If you...- • Ensure that the monitor cable is connected to ensure that the monitor cable is blinking, press a key on . • If the power light is connected as a lamp. See "Diagnostic Lights" on adjusting the contrast and brightness, demagnetizing (degaussing) the monitor, and running the monitor self-...

Owner's Manual
Page 74
...pins. 1 Ensure that the computer is level and protected to internal components, ground yourself by using the operating system, press and hold the power button for 4 seconds. 3 Disconnect the computer and all external cables from being scratched. NOTE: Ensure that the work in progress and exit all...of cable, press inward on the locking tabs to support the removed cover-at least 30 cm (1 ft) of the procedures in a power management mode. NOTICE: When disconnecting a network cable, first unplug the cable from your computer from their electrical outlets. NOTICE: Ensure that ...
...pins. 1 Ensure that the computer is level and protected to internal components, ground yourself by using the operating system, press and hold the power button for 4 seconds. 3 Disconnect the computer and all external cables from being scratched. NOTE: Ensure that the work in progress and exit all...of cable, press inward on the locking tabs to support the removed cover-at least 30 cm (1 ft) of the procedures in a power management mode. NOTICE: When disconnecting a network cable, first unplug the cable from your computer from their electrical outlets. NOTICE: Ensure that ...

Owner's Manual
Page 127
... Appendix 129 Blinking amber indicates a problem with an installed device; solid amber indicates an internal power problem (see "Power Problems" on page 54). Drives Available devices Externally accessible: Internally accessible: Connectors External connectors:... Serial ATA Floppy drive Fan PCI PCI Express x1 PCI Express x8 PCI Express x16 Controls and Lights Power control Power light Hard-drive access light Serial ATA drive, floppy drive, memory devices, CD drive, CD-RW drive...pin connector 98-pin connector two 164-pin connectors push button green light - Blinking green in sleep state;
... Appendix 129 Blinking amber indicates a problem with an installed device; solid amber indicates an internal power problem (see "Power Problems" on page 54). Drives Available devices Externally accessible: Internally accessible: Connectors External connectors:... Serial ATA Floppy drive Fan PCI PCI Express x1 PCI Express x8 PCI Express x16 Controls and Lights Power control Power light Hard-drive access light Serial ATA drive, floppy drive, memory devices, CD drive, CD-RW drive...pin connector 98-pin connector two 164-pin connectors push button green light - Blinking green in sleep state;

Owner's Manual
Page 138
...cannot shut down the computer using the operating system, press and hold the power button for 4 seconds. 7 Disconnect the keyboard and mouse, then disconnect the computer and monitor from their electrical outlets. 8 Press the power button on the computer to enable the password feature. 11 Replace the computer ...see "Replacing the Computer Cover" on page 125). NOTICE: The password jumper plug must be reinstalled on the password jumper pins in a power management mode. NOTE: Ensure that the computer is not assigned. 140 Appendix NOTICE: To connect a network cable, first plug the cable...
...cannot shut down the computer using the operating system, press and hold the power button for 4 seconds. 7 Disconnect the keyboard and mouse, then disconnect the computer and monitor from their electrical outlets. 8 Press the power button on the computer to enable the password feature. 11 Replace the computer ...see "Replacing the Computer Cover" on page 125). NOTICE: The password jumper plug must be reinstalled on the password jumper pins in a power management mode. NOTE: Ensure that the computer is not assigned. 140 Appendix NOTICE: To connect a network cable, first plug the cable...

Owner's Manual
Page 173
...Network Setup Wizard, 38 O operating system CD, 12 reinstalling, 12 reinstalling Windows XP, 71 Operating System CD, 12 P password clearing, 139 jumper, 139 playing CDs, 32 playing DVDs, 32 power button, 14 connector, 16 conserving, 39 power (continued) hibernate mode, 40-41 light, 14 managing, 39 options, 40 ..., 41 problems, 54 standby mode, 39 power light conditions, 54 power options properties, 40 printer problems, 55 problems battery, 45 blue screen, 51 CD drive, 46 CD-RW drive, 46 computer crashes, 50-51 computer stops responding, 50 Dell Diagnostics, 64 diagnostic lights, 61 drives, 45...
...Network Setup Wizard, 38 O operating system CD, 12 reinstalling, 12 reinstalling Windows XP, 71 Operating System CD, 12 P password clearing, 139 jumper, 139 playing CDs, 32 playing DVDs, 32 power button, 14 connector, 16 conserving, 39 power (continued) hibernate mode, 40-41 light, 14 managing, 39 options, 40 ..., 41 problems, 54 standby mode, 39 power light conditions, 54 power options properties, 40 printer problems, 55 problems battery, 45 blue screen, 51 CD drive, 46 CD-RW drive, 46 computer crashes, 50-51 computer stops responding, 50 Dell Diagnostics, 64 diagnostic lights, 61 drives, 45...


