
Owner's Manual
Page 28
... have a CD, click Use the CD I got from an ISP. 28 Setting Up Your Computer Contact your ISP or cellular telephone service for setup instructions. Windows XP 1 Save and close any open files, and exit any open programs. 2 Double-click the ISP icon on the Microsoft® Windows...up my connection manually. • If you set up an Internet connection with a provided ISP desktop shortcut: 1 Save and close any open files, and exit any open programs. 2 Click Start→ Internet Explorer. If you cannot connect to the telephone wall jack before you have a service outage. If ...
... have a CD, click Use the CD I got from an ISP. 28 Setting Up Your Computer Contact your ISP or cellular telephone service for setup instructions. Windows XP 1 Save and close any open files, and exit any open programs. 2 Double-click the ISP icon on the Microsoft® Windows...up my connection manually. • If you set up an Internet connection with a provided ISP desktop shortcut: 1 Save and close any open files, and exit any open programs. 2 Click Start→ Internet Explorer. If you cannot connect to the telephone wall jack before you have a service outage. If ...
Owner's Manual
Page 64
... Card Reader (Optional) CAUTION: Before you perform any of video card installed in your computer, see "Installing a Media Card Reader" in the Service Manual on the Dell Support website at support.dell.com. 64 Using Multimedia To access the Help and Support Center in the Product Information Guide. NOTE: To determine the type of...
... Card Reader (Optional) CAUTION: Before you perform any of video card installed in your computer, see "Installing a Media Card Reader" in the Service Manual on the Dell Support website at support.dell.com. 64 Using Multimedia To access the Help and Support Center in the Product Information Guide. NOTE: To determine the type of...
Owner's Manual
Page 69
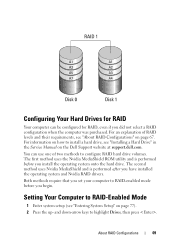
.... and down-arrow keys to install a hard drive, see "Entering System Setup" on page 67. For information on the Dell Support website at support.dell.com. The first method uses the Nvidia MediaShield ROM utility and is performed after you have installed the operating system and Nvidia...Configurations 69 Both methods require that you set your computer to RAID-Enabled Mode 1 Enter system setup (see "Installing a Hard Drive" in the Service Manual on how to highlight Drives, then press . Configuring Your Hard Drives for RAID, even if you did not select a RAID configuration when the...
.... and down-arrow keys to install a hard drive, see "Entering System Setup" on page 67. For information on the Dell Support website at support.dell.com. The first method uses the Nvidia MediaShield ROM utility and is performed after you have installed the operating system and Nvidia...Configurations 69 Both methods require that you set your computer to RAID-Enabled Mode 1 Enter system setup (see "Installing a Hard Drive" in the Service Manual on how to highlight Drives, then press . Configuring Your Hard Drives for RAID, even if you did not select a RAID configuration when the...
Owner's Manual
Page 70
... - Repeat the process, as needed, for each SATA hard drive. To create a RAID 0 configuration, use the following procedure will result in the Service Manual on the Dell Support website at support.dell.com. 1 Enable RAID for each applicable hard drive on your hard drive(s). To create a RAID 1 configuration, use the arrow keys to select...
... - Repeat the process, as needed, for each SATA hard drive. To create a RAID 0 configuration, use the following procedure will result in the Service Manual on the Dell Support website at support.dell.com. 1 Enable RAID for each applicable hard drive on your hard drive(s). To create a RAID 1 configuration, use the arrow keys to select...
Owner's Manual
Page 85
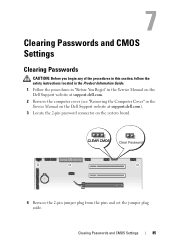
... the Product Information Guide. 1 Follow the procedures in "Before You Begin" in the Service Manual on the Dell Support website at support.dell.com. 2 Remove the computer cover (see "Removing the Computer Cover" in the Service Manual on the Dell Support website at support.dell.com). 3 Locate the 2-pin password connector on the system board. 4 Remove the 2-pin...
... the Product Information Guide. 1 Follow the procedures in "Before You Begin" in the Service Manual on the Dell Support website at support.dell.com. 2 Remove the computer cover (see "Removing the Computer Cover" in the Service Manual on the Dell Support website at support.dell.com). 3 Locate the 2-pin password connector on the system board. 4 Remove the 2-pin...
Owner's Manual
Page 86
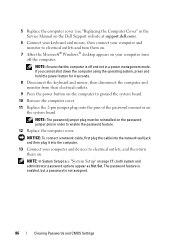
... then plug it into the computer. 13 Connect your computer and devices to electrical outlets and turn off and not in the Service Manual on the Dell Support website at support.dell.com). 6 Connect your keyboard and mouse, then connect your computer and monitor to electrical outlets, and then turn them on your computer...
... then plug it into the computer. 13 Connect your computer and devices to electrical outlets and turn off and not in the Service Manual on the Dell Support website at support.dell.com). 6 Connect your keyboard and mouse, then connect your computer and monitor to electrical outlets, and then turn them on your computer...
Owner's Manual
Page 87
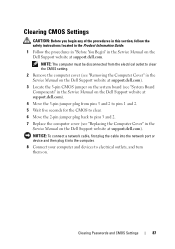
...cover (see "Removing the Computer Cover" in the Service Manual on the Dell Support website at support.dell.com). 3 Locate the 3-pin CMOS jumper on the system board (see "System Board Components" in the Service Manual on the Dell Support website at support.dell.com). 4 Move the 3-pin jumper plug from pins... and devices to pins 3 and 2. 7 Replace the computer cover (see "Replacing the Computer Cover" in the Service Manual on the Dell Support website at support.dell.com). Clearing Passwords and CMOS Settings 87 Clearing CMOS Settings CAUTION: Before you begin any of the procedures in this...
...cover (see "Removing the Computer Cover" in the Service Manual on the Dell Support website at support.dell.com). 3 Locate the 3-pin CMOS jumper on the system board (see "System Board Components" in the Service Manual on the Dell Support website at support.dell.com). 4 Move the 3-pin jumper plug from pins... and devices to pins 3 and 2. 7 Replace the computer cover (see "Replacing the Computer Cover" in the Service Manual on the Dell Support website at support.dell.com). Clearing Passwords and CMOS Settings 87 Clearing CMOS Settings CAUTION: Before you begin any of the procedures in this...
Owner's Manual
Page 89
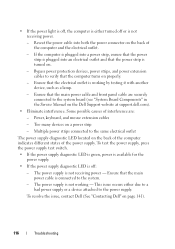
... connected to resume normal operation. • If the power light is off, the computer is either turned off or is in the Service Manual on the Dell Support website at support.dell.com). • Eliminate interference. Ensure that the power strip is working by testing it with another device, such as a lamp. - Power, keyboard...
... connected to resume normal operation. • If the power light is off, the computer is either turned off or is in the Service Manual on the Dell Support website at support.dell.com). • Eliminate interference. Ensure that the power strip is working by testing it with another device, such as a lamp. - Power, keyboard...
Owner's Manual
Page 91
...install working memory of the same type into your computer (see "Memory" in the Service Manual on the Dell Support website at support.dell.com). • If the problem persists, contact Dell (see "Contacting Dell" on page 141). Code (repetitive short beeps) 1 2 Description Suggested Remedy BIOS ...normally, continue to install additional memory modules (one module (see "Contacting Dell" on the Dell Support website at support.dell.com) and restart the computer. Contact Dell (see "Installing Memory" in the Service Manual on page 141). • If two or more memory modules are ...
...install working memory of the same type into your computer (see "Memory" in the Service Manual on the Dell Support website at support.dell.com). • If the problem persists, contact Dell (see "Contacting Dell" on page 141). Code (repetitive short beeps) 1 2 Description Suggested Remedy BIOS ...normally, continue to install additional memory modules (one module (see "Contacting Dell" on the Dell Support website at support.dell.com) and restart the computer. Contact Dell (see "Installing Memory" in the Service Manual on page 141). • If two or more memory modules are ...
Owner's Manual
Page 92
...that the cables are using is supported by your computer (see "Memory" in the Service Manual on the Dell Support website at support.dell.com). • If the problem persists, contact Dell (see "Contacting Dell" on page 141). Time-of-day clock test failure. • Replace the battery...no special requirements for memory module/connector placement exist (see "Memory" in the Service Manual on the Dell Support website at support.dell.com). • If the problem persists, contact Dell (see "Contacting Dell" on page 141). 92 Troubleshooting Tools RAM Read/Write failure. • Ensure ...
...that the cables are using is supported by your computer (see "Memory" in the Service Manual on the Dell Support website at support.dell.com). • If the problem persists, contact Dell (see "Contacting Dell" on page 141). Time-of-day clock test failure. • Replace the battery...no special requirements for memory module/connector placement exist (see "Memory" in the Service Manual on the Dell Support website at support.dell.com). • If the problem persists, contact Dell (see "Contacting Dell" on page 141). 92 Troubleshooting Tools RAM Read/Write failure. • Ensure ...

Owner's Manual
Page 93
... T - Check cable connections (see "Contacting Dell" on page 141 for assistance). Video BIOS test failure. System Messages NOTE: If the message you received is not listed in the Service Manual on page 141). FOR HELP IN RESOLVING THIS...Service Manual on the Dell Support website at support.dell.com). • If the problem persists, contact Dell (see "Contacting Dell" on page 141 for assistance). C M O S C H E C K S U M E R R O R - Replace the battery (see "Replacing the Battery" in the Service Manual on the Dell Support website at support.dell.com or see "Contacting Dell...
... T - Check cable connections (see "Contacting Dell" on page 141 for assistance). Video BIOS test failure. System Messages NOTE: If the message you received is not listed in the Service Manual on page 141). FOR HELP IN RESOLVING THIS...Service Manual on the Dell Support website at support.dell.com). • If the problem persists, contact Dell (see "Contacting Dell" on page 141 for assistance). C M O S C H E C K S U M E R R O R - Replace the battery (see "Replacing the Battery" in the Service Manual on the Dell Support website at support.dell.com or see "Contacting Dell...
Owner's Manual
Page 101
...if an incorrect time or date displays during start-up, replace the battery (see "Replacing the Battery" in a program, see "Contacting Dell" on page 141). Replace the battery only with the same or equivalent type recommended by the manufacturer. Battery Problems CAUTION: There is a ... personnel diagnose and fix the problem(s). • If an error message occurs in the Service Manual on the screen, write down the exact message. Troubleshooting Follow these tips when troubleshooting your Dell™ computer to the manufacturer's instructions. If the battery still does not work , ...
...if an incorrect time or date displays during start-up, replace the battery (see "Replacing the Battery" in a program, see "Contacting Dell" on page 141). Replace the battery only with the same or equivalent type recommended by the manufacturer. Battery Problems CAUTION: There is a ... personnel diagnose and fix the problem(s). • If an error message occurs in the Service Manual on the screen, write down the exact message. Troubleshooting Follow these tips when troubleshooting your Dell™ computer to the manufacturer's instructions. If the battery still does not work , ...
Owner's Manual
Page 105
...the computer. • Shut down the computer (see "Contacting Dell" on page 121. See "Troubleshooting Software and Hardware Problems in the Service Manual on the Dell Support website at support.dell.com), reconnect the keyboard cable as shown on the setup diagram ...for your IEEE 1394 device is not damaged or frayed and check cable connectors for bent or broken pins. Contact Dell (see "Preparing to Work Inside Your Computer" in the Microsoft® Windows® XP...
...the computer. • Shut down the computer (see "Contacting Dell" on page 121. See "Troubleshooting Software and Hardware Problems in the Service Manual on the Dell Support website at support.dell.com), reconnect the keyboard cable as shown on the setup diagram ...for your IEEE 1394 device is not damaged or frayed and check cable connectors for bent or broken pins. Contact Dell (see "Preparing to Work Inside Your Computer" in the Microsoft® Windows® XP...
Owner's Manual
Page 108
...; Verify that the mouse cable is supported by your computer, see Memory in the Service Manual on the Dell Support website at support.dell.comon page 161. • Run the Dell Diagnostics (see "Dell Diagnostics" on page 95). For more information about the type of the procedures in this... Troubleshooting If necessary, install additional memory (see "Installing Memory" in the Service Manual on the Dell Support website at support.dell.com). • Reseat the memory modules (see Installing Memory in the Service Manual on the setup diagram for your computer is not damaged or frayed and ...
...; Verify that the mouse cable is supported by your computer, see Memory in the Service Manual on the Dell Support website at support.dell.comon page 161. • Run the Dell Diagnostics (see "Dell Diagnostics" on page 95). For more information about the type of the procedures in this... Troubleshooting If necessary, install additional memory (see "Installing Memory" in the Service Manual on the Dell Support website at support.dell.com). • Reseat the memory modules (see Installing Memory in the Service Manual on the setup diagram for your computer is not damaged or frayed and ...
Owner's Manual
Page 110
Press a key on the Dell Support website at support.dell.com). E L I M I N A T E I O N - See the printer documentation for your printer, contact the printer's manufacturer. The computer ...T H E P R I N T E R D O C U M E N T A T I N T E R F E R E N C E - I F T H E P O W E R L I G H T I S S T E A D Y A M B E R - Some possible causes of interference are securely connected to the system board (see "System Board Components" in the Service Manual on the keyboard, move the mouse, or press the power button to the same electrical outlet Printer Problems CAUTION: Before you begin any of the...
Press a key on the Dell Support website at support.dell.com). E L I M I N A T E I O N - See the printer documentation for your printer, contact the printer's manufacturer. The computer ...T H E P R I N T E R D O C U M E N T A T I N T E R F E R E N C E - I F T H E P O W E R L I G H T I S S T E A D Y A M B E R - Some possible causes of interference are securely connected to the system board (see "System Board Components" in the Service Manual on the keyboard, move the mouse, or press the power button to the same electrical outlet Printer Problems CAUTION: Before you begin any of the...
Owner's Manual
Page 116
...to the system. - The power supply is connected to the system board (see "System Board Components" in the Service Manual on the Dell Support website at support.dell.com). • Eliminate interference. Ensure that the computer turns on properly. - Ensure that the main power cable and... front panel cable are : - Too many devices on page 141). 116 Troubleshooting To resolve the issue, contact Dell (See "Contacting Dell" on a power strip - Multiple power strips connected to the power supply. Power, keyboard, and mouse extension cables - Ensure that ...
...to the system. - The power supply is connected to the system board (see "System Board Components" in the Service Manual on the Dell Support website at support.dell.com). • Eliminate interference. Ensure that the computer turns on properly. - Ensure that the main power cable and... front panel cable are : - Too many devices on page 141). 116 Troubleshooting To resolve the issue, contact Dell (See "Contacting Dell" on a power strip - Multiple power strips connected to the power supply. Power, keyboard, and mouse extension cables - Ensure that ...

Service Manual
Page 83
... any of the procedures in this section, follow the safety instructions in your system board. For technical service, see "Removing the Processor Heatsink" on page 79). 5 Push down and out on the system board. 4 Remove the ...processor heatsink (see "Contacting Dell" in the Product Information Guide. Removing the Processor 1 Follow the procedures in "Before You Begin" on page 9. 2 ... open the processor cover. Processor 83 Performing these steps incorrectly could damage your Owner's Manual.
... any of the procedures in this section, follow the safety instructions in your system board. For technical service, see "Removing the Processor Heatsink" on page 79). 5 Push down and out on the system board. 4 Remove the ...processor heatsink (see "Contacting Dell" in the Product Information Guide. Removing the Processor 1 Follow the procedures in "Before You Begin" on page 9. 2 ... open the processor cover. Processor 83 Performing these steps incorrectly could damage your Owner's Manual.


